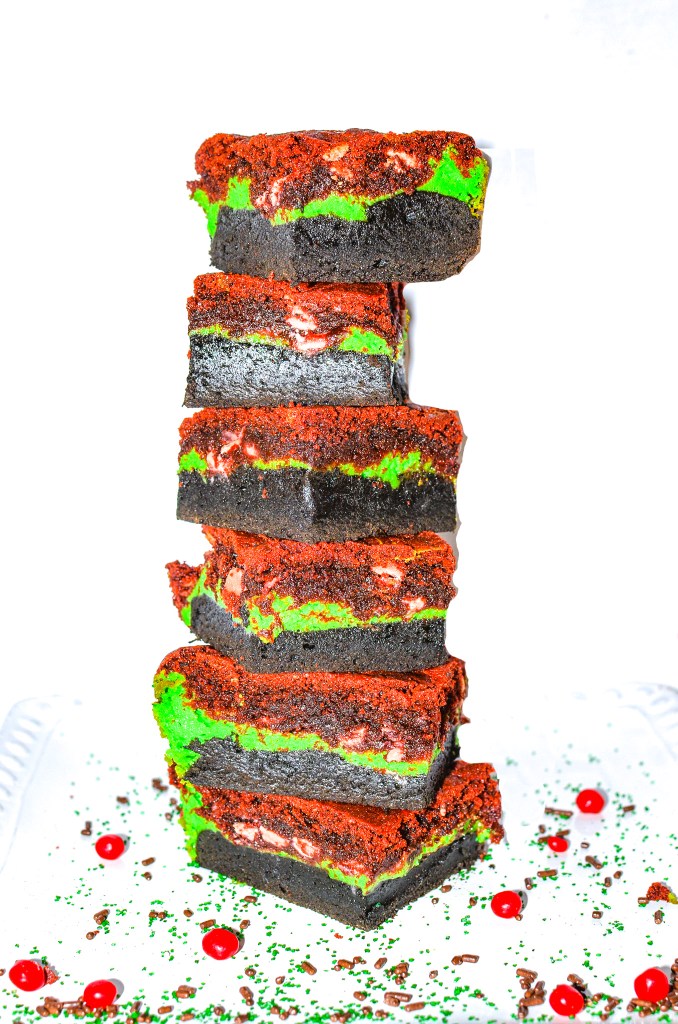
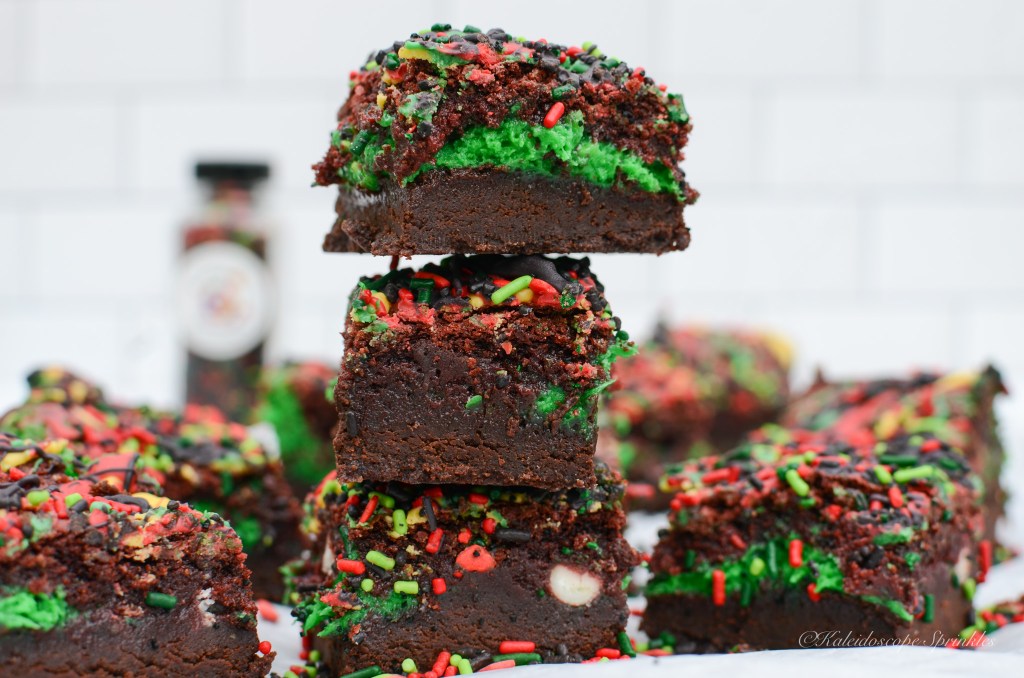
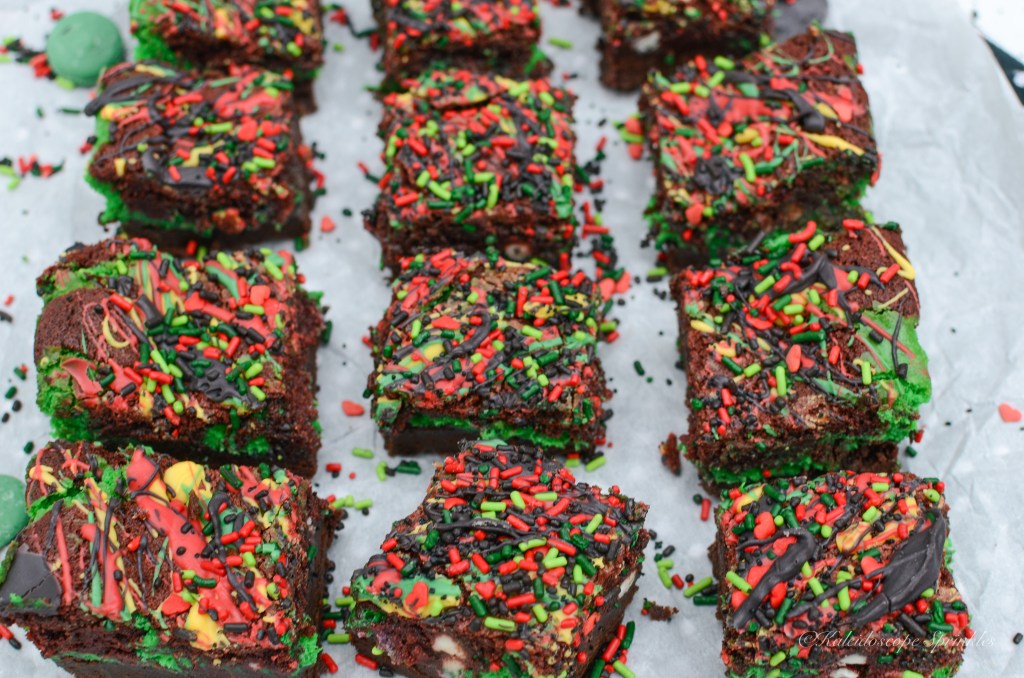
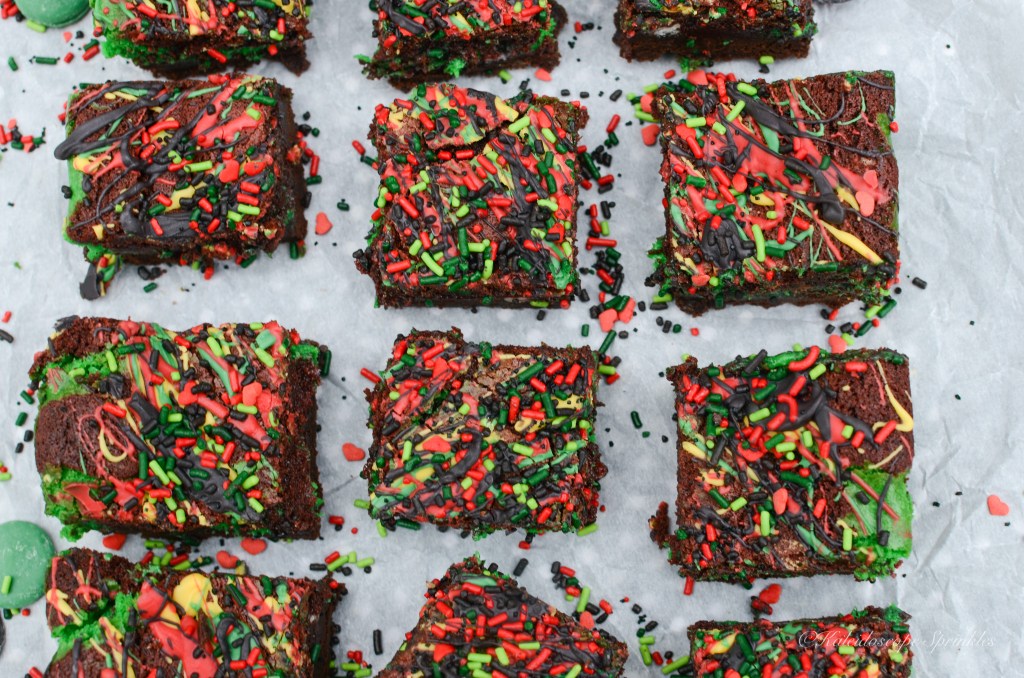
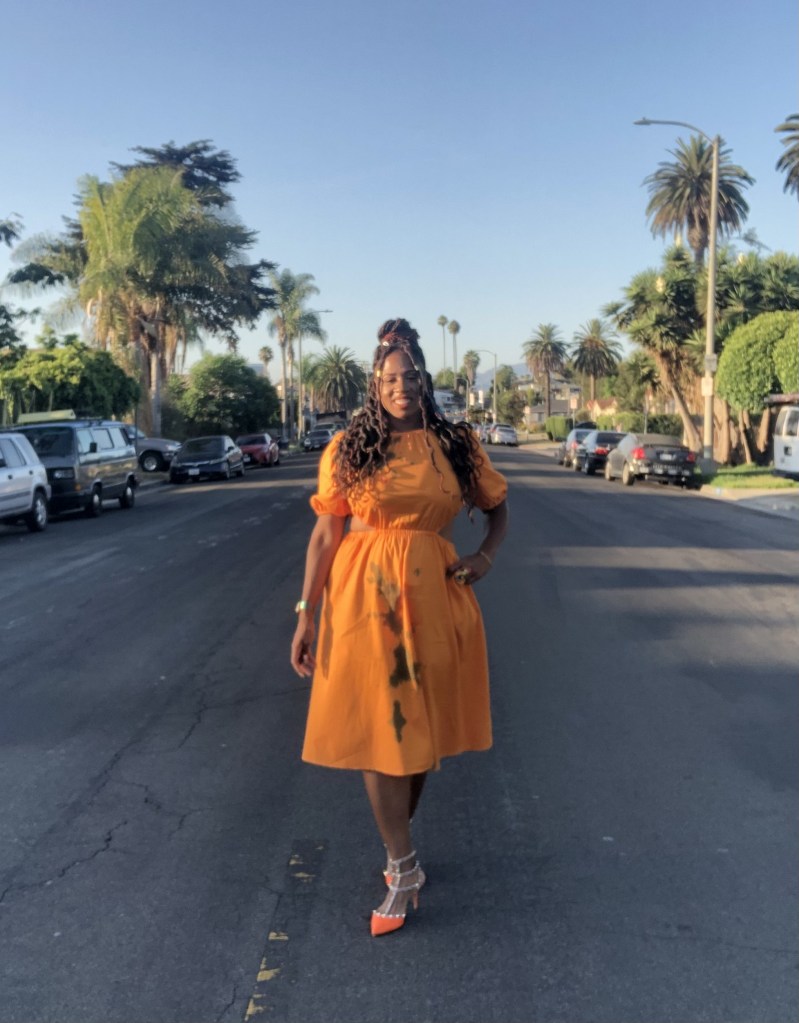
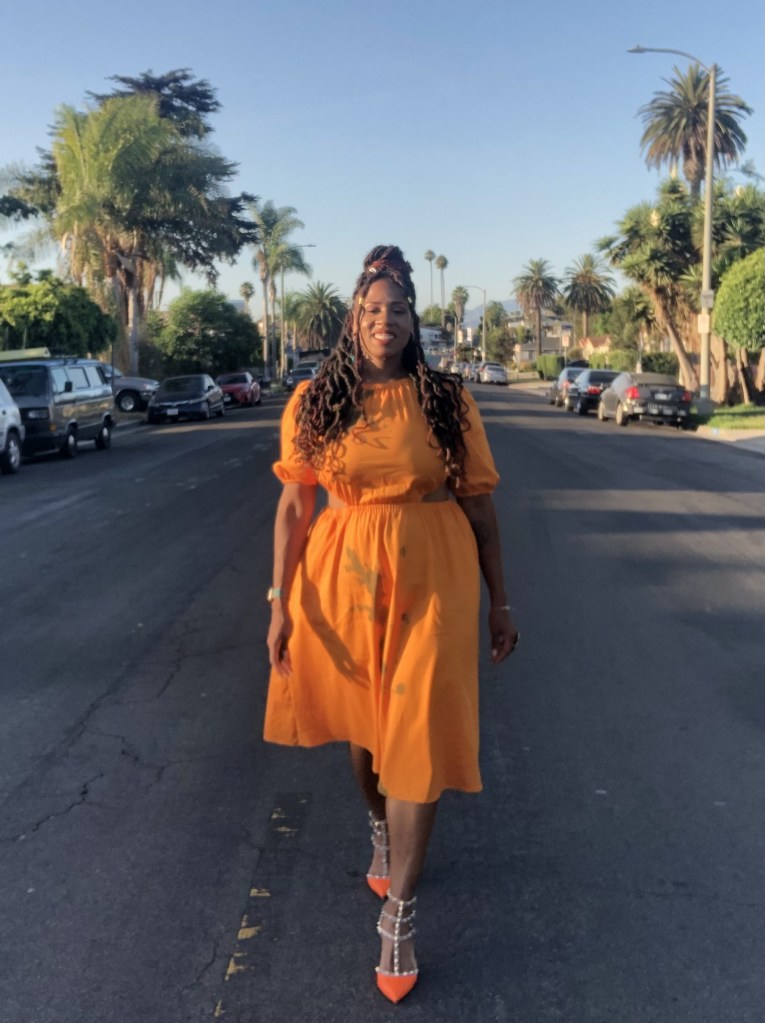
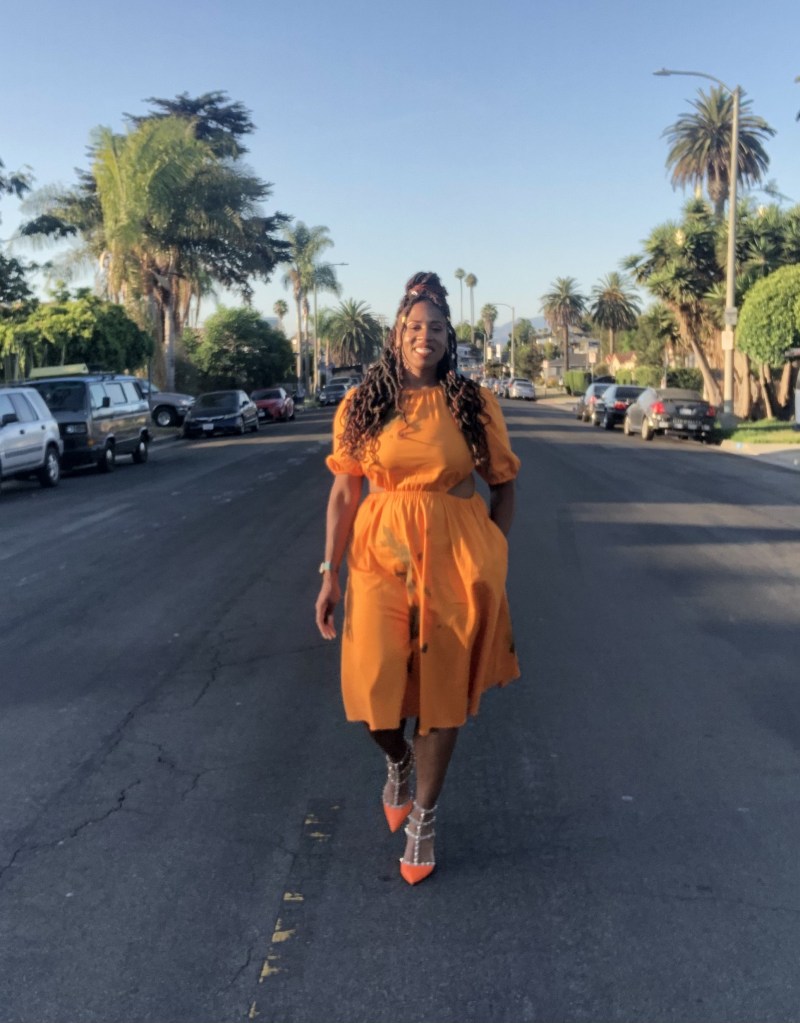
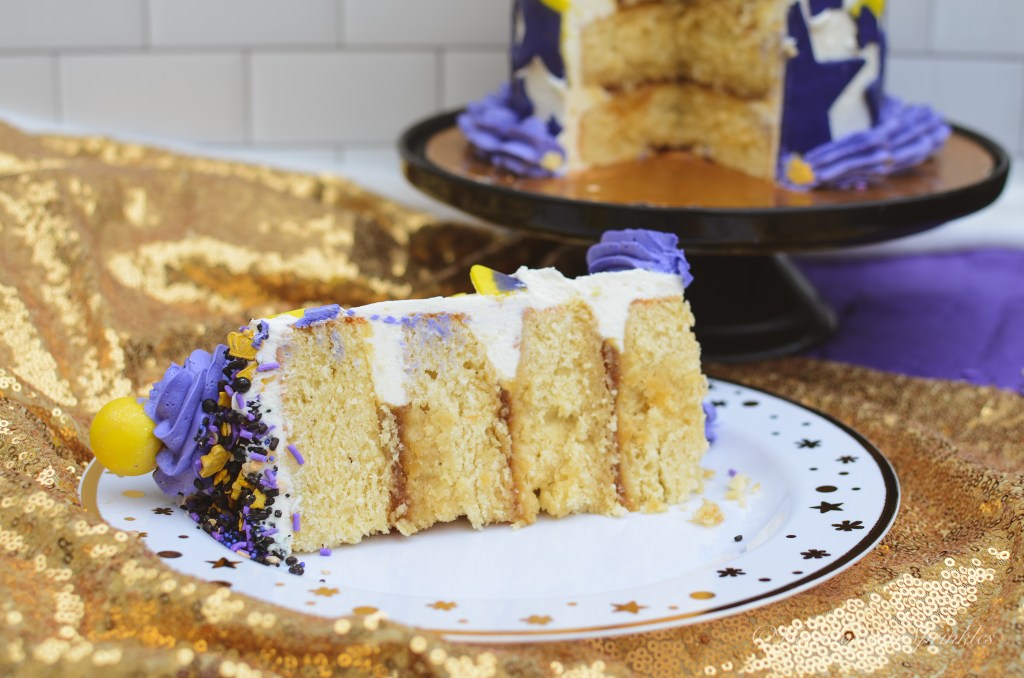
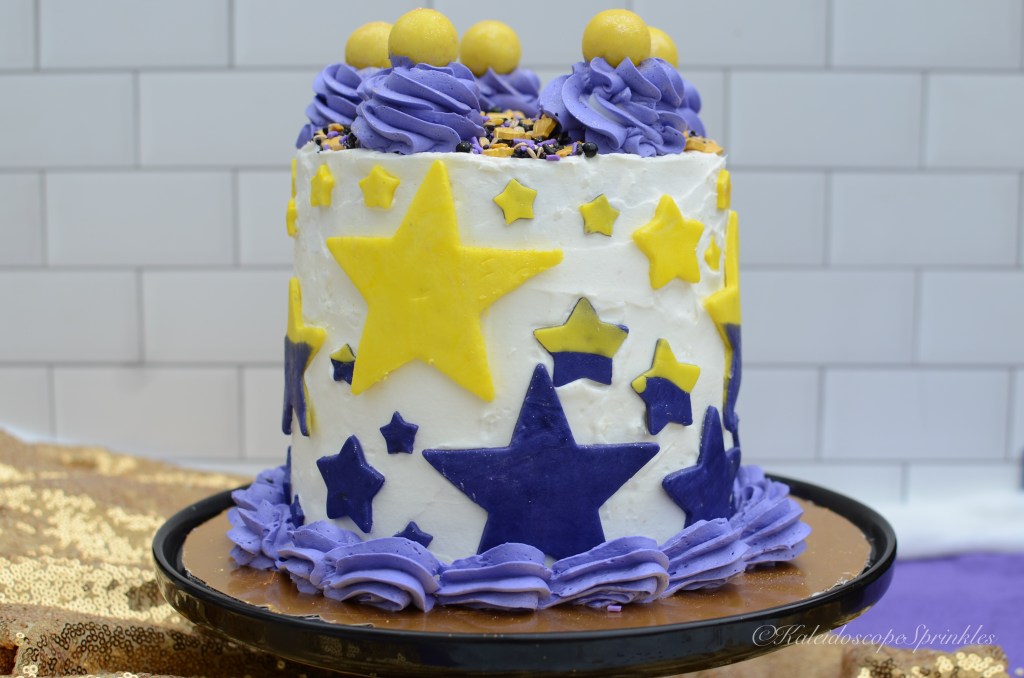
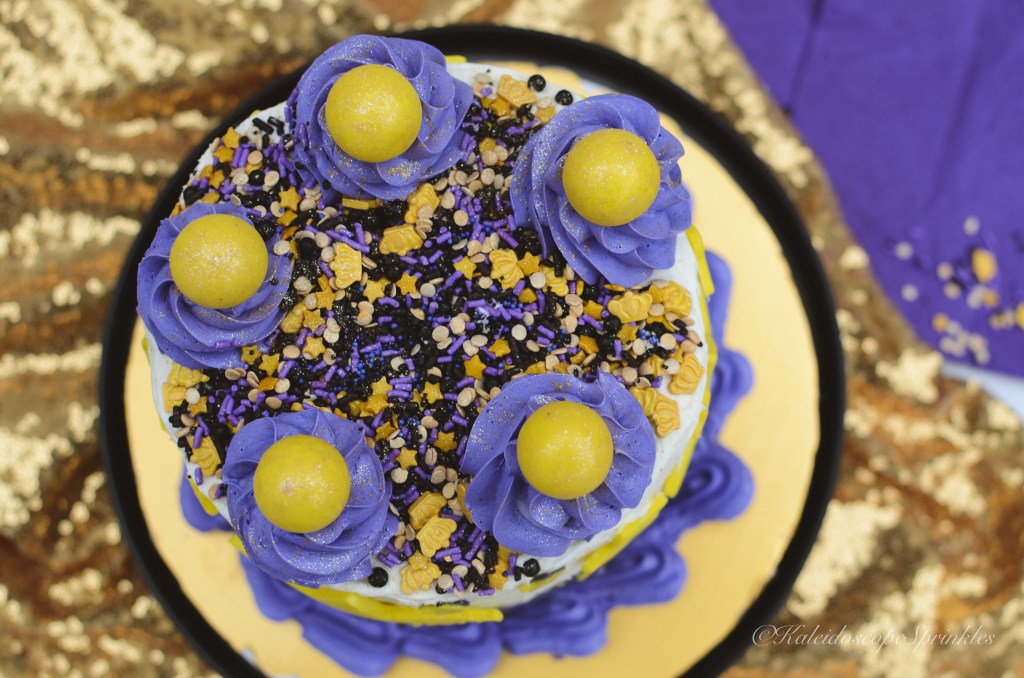
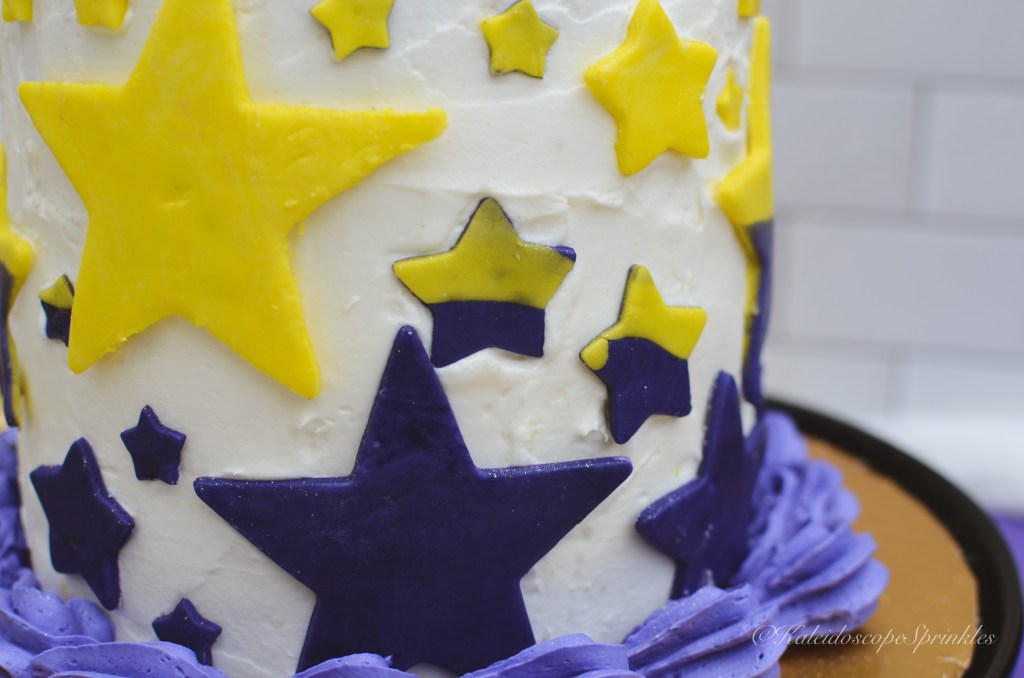
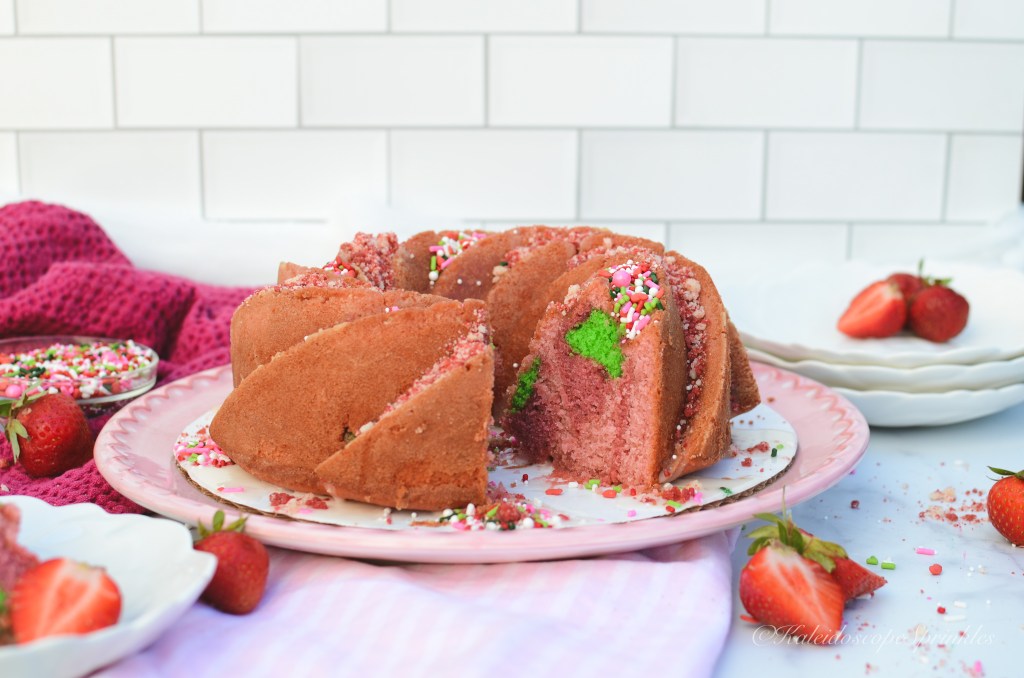
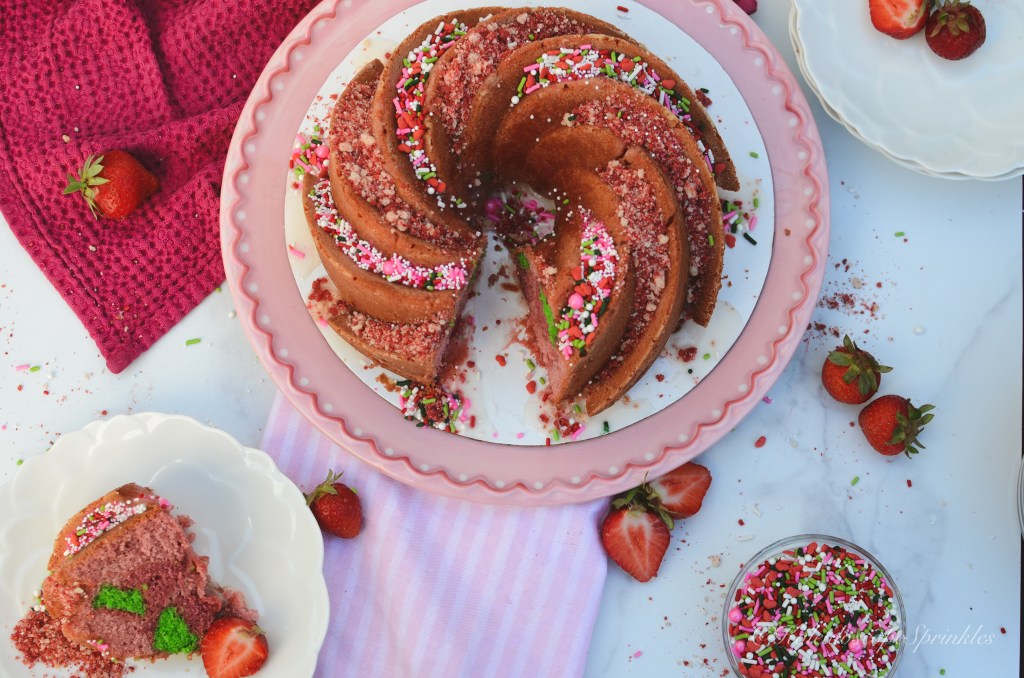
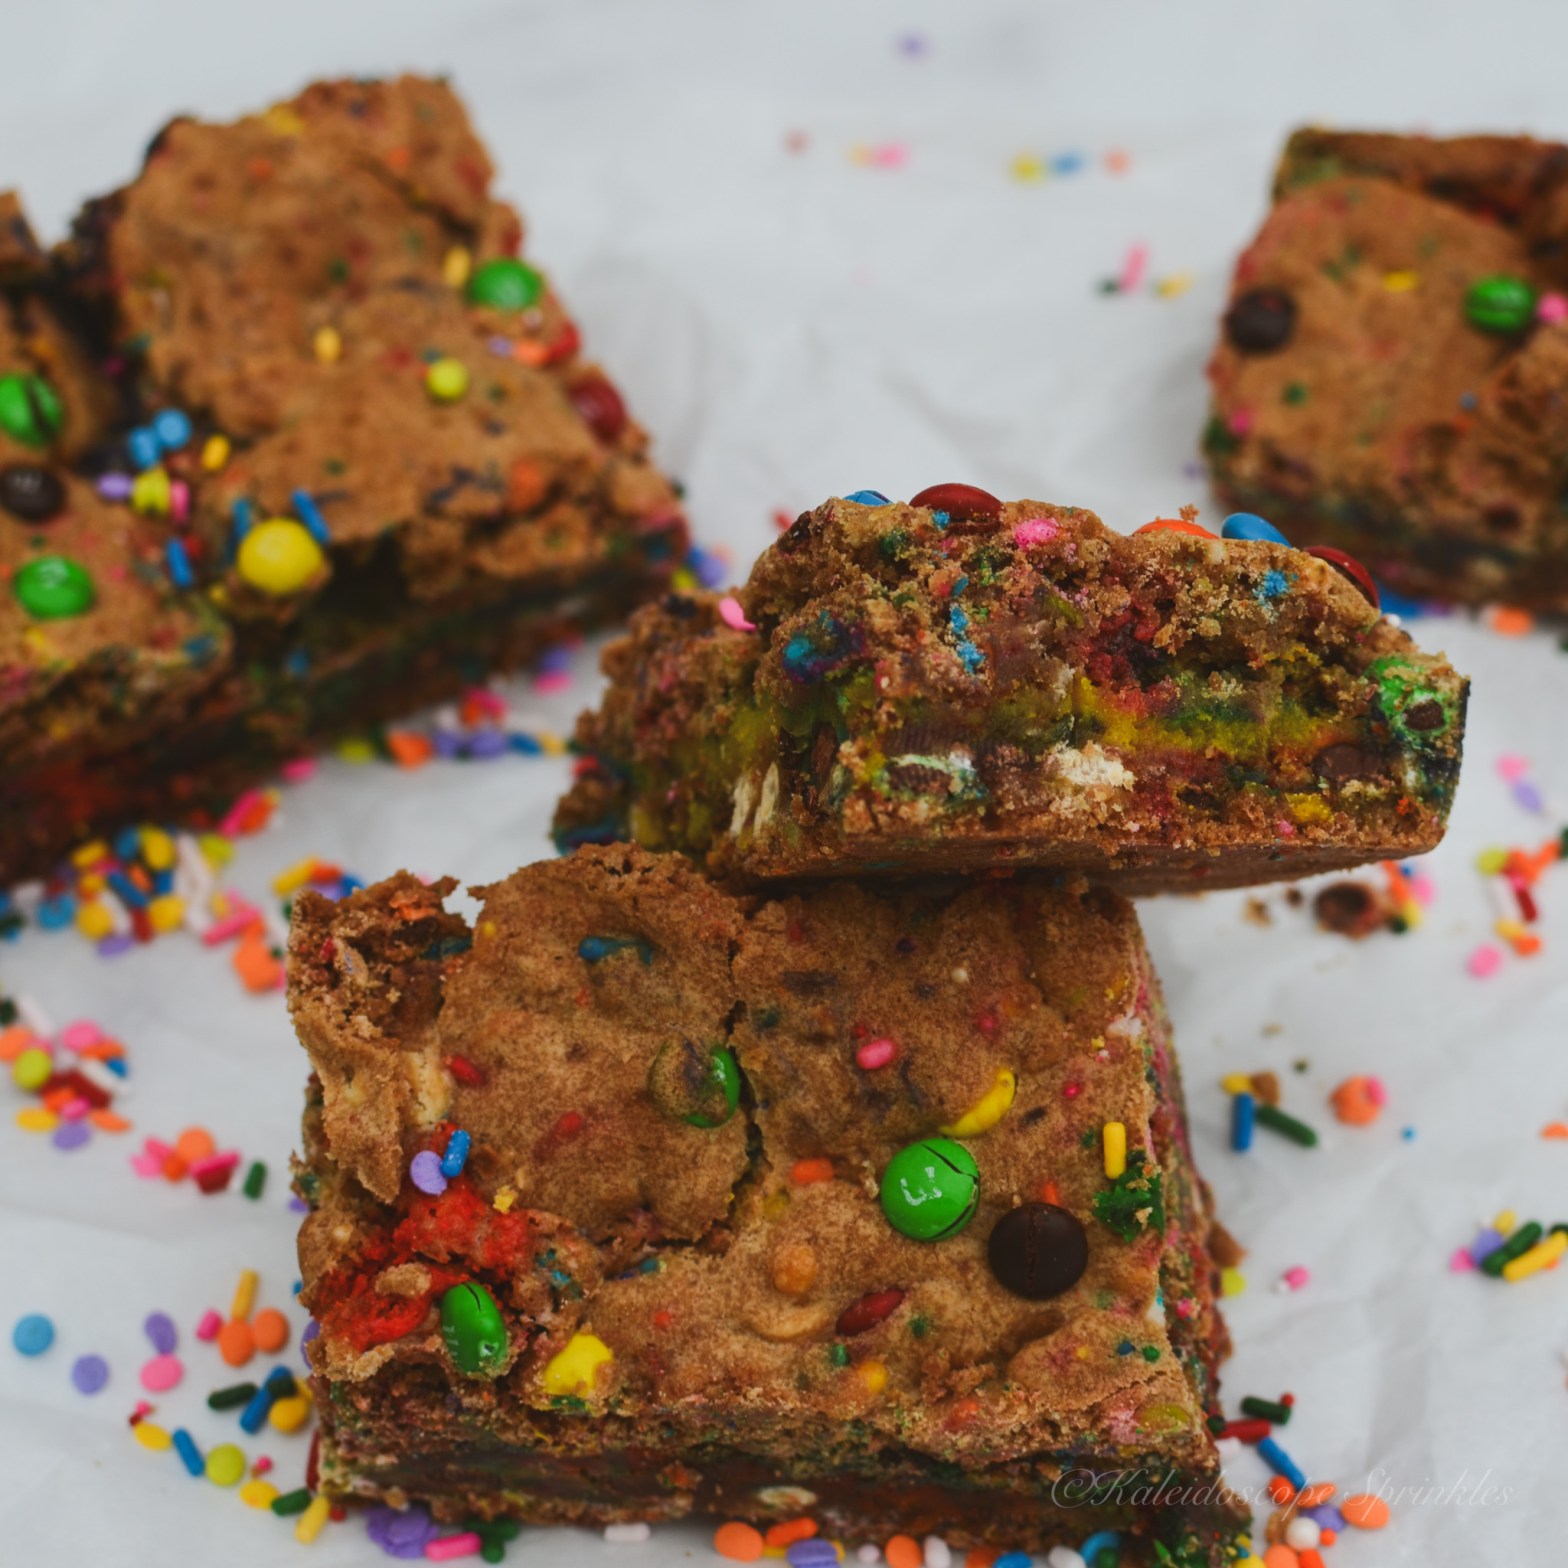
Happy Earth Day 2024! I have been celebrating and honoring this earth since I was a child. Growing up in California meant learning about conservation and planet protection early on. I remember planting baby trees one year when I was six or seven. Another year I recall attending a beach clean up. Recycling was understood as an important initiative when I still barely tying my shoes.
I admittingly, have been an advocate for Mother Earth, since the old years of the 1980s. When I was child I remember growing up with Captain Planet and the campaign, “Recycle, Reduce, Reuse.” I recall watching the news and hearing about a hole burning in the ozone. In my adolescence, I didn’t fully understand the extent of the importance of saving this planet. I did at that time understand that making a small difference could lead to a great impact.
Every Earth Day I try to not only continue the fight for our planet, but I try and encourage others to do the same. Earth Day is about being conscious about the awareness of climate change and doing your part to improve that. I try and make small changes daily to reduce my overall carbon footprint. This year is one step closer to a cleaner and more delicious future.
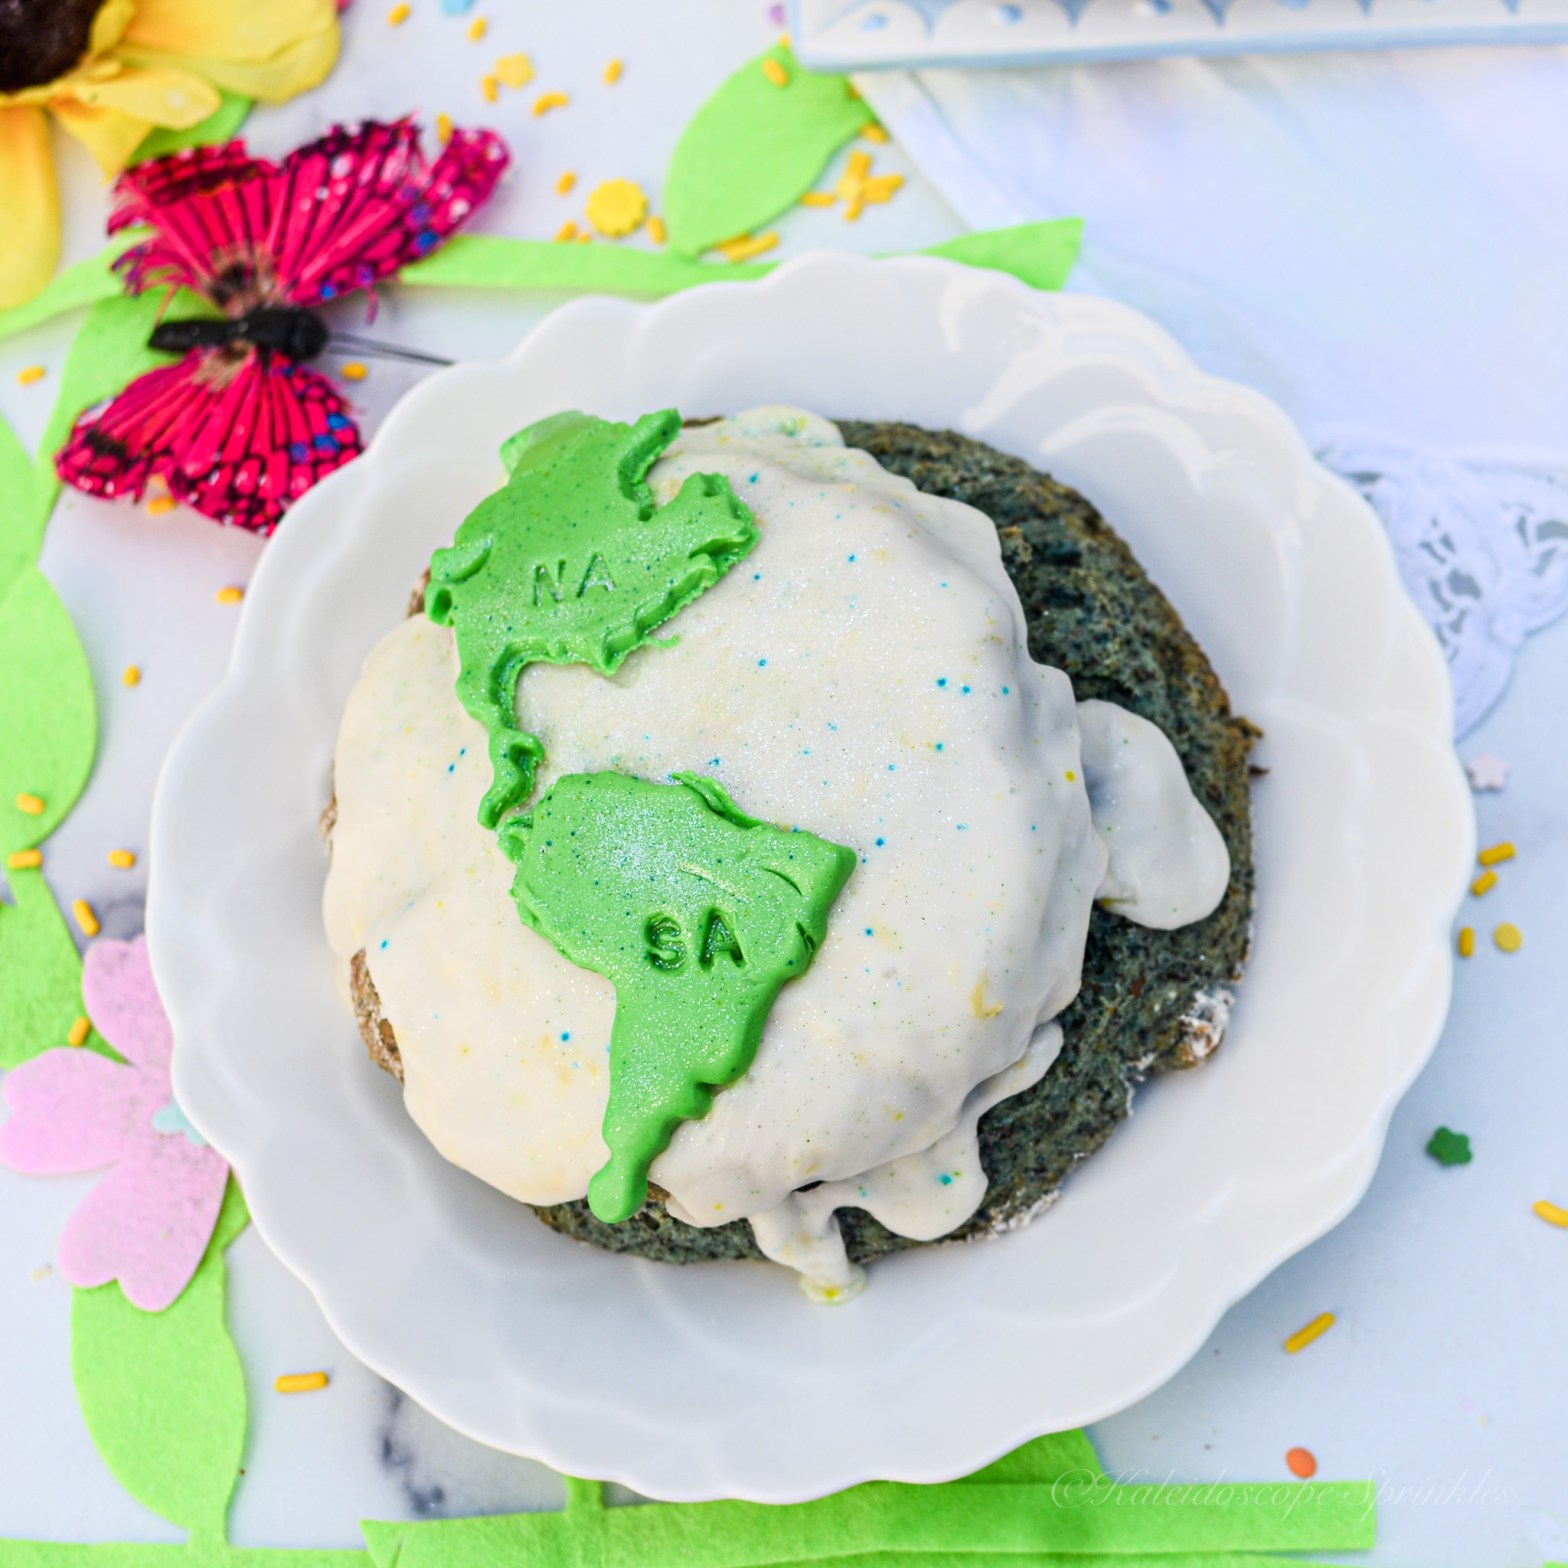
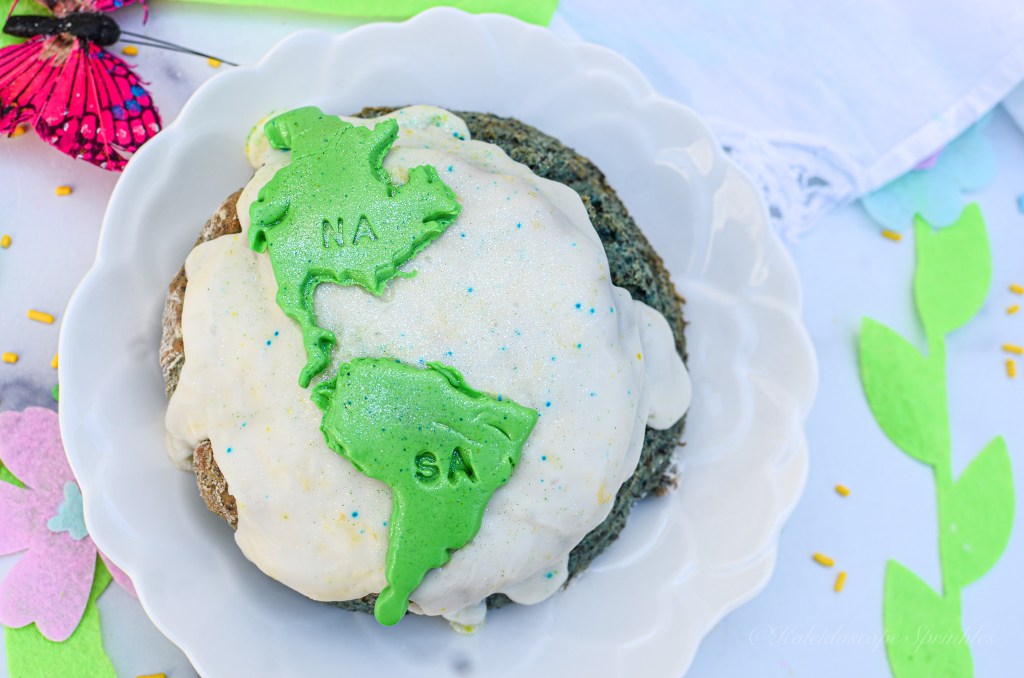
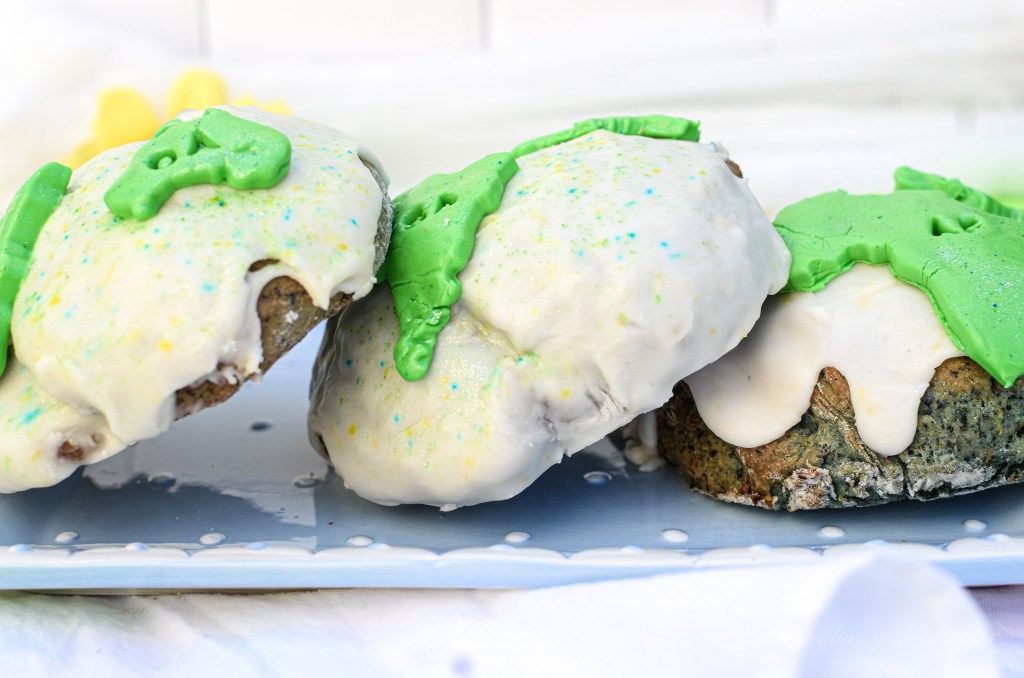
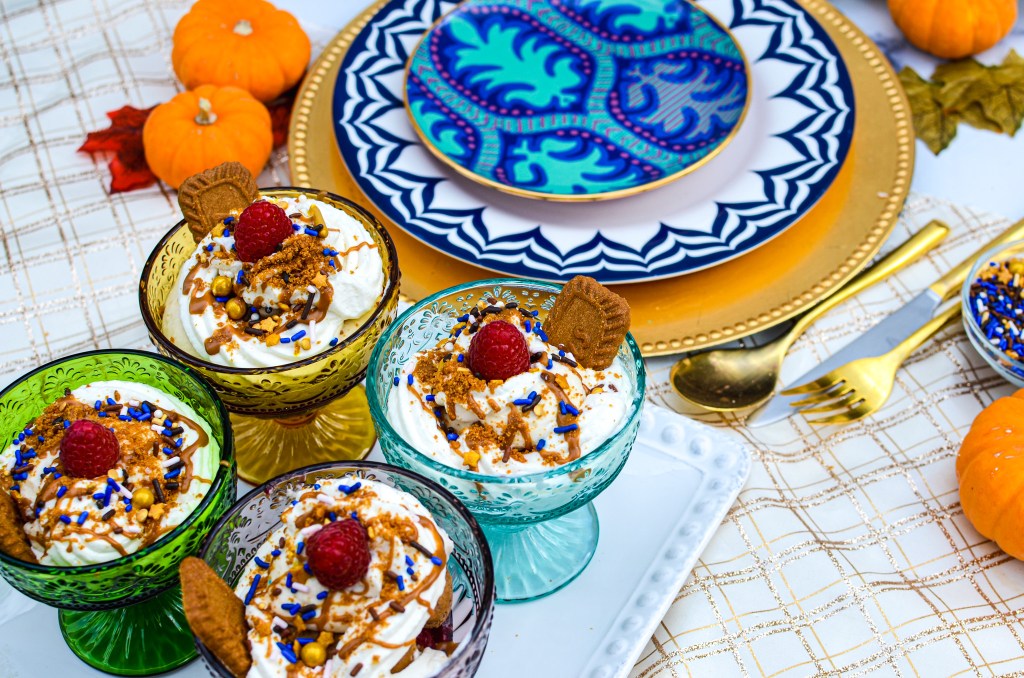
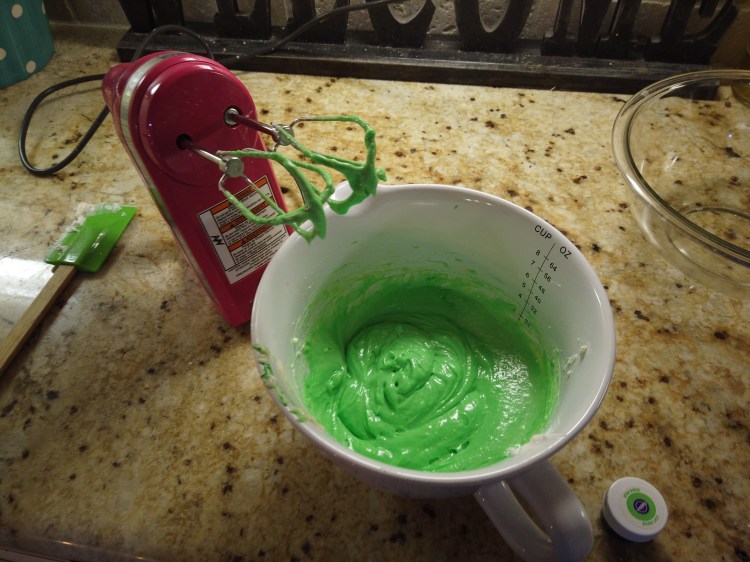
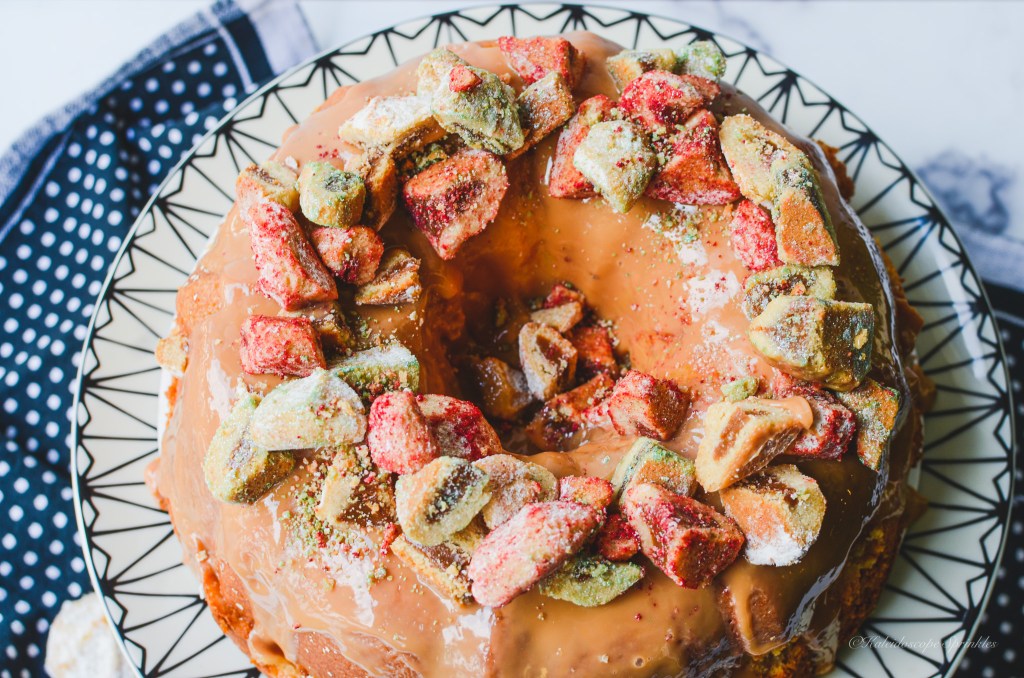
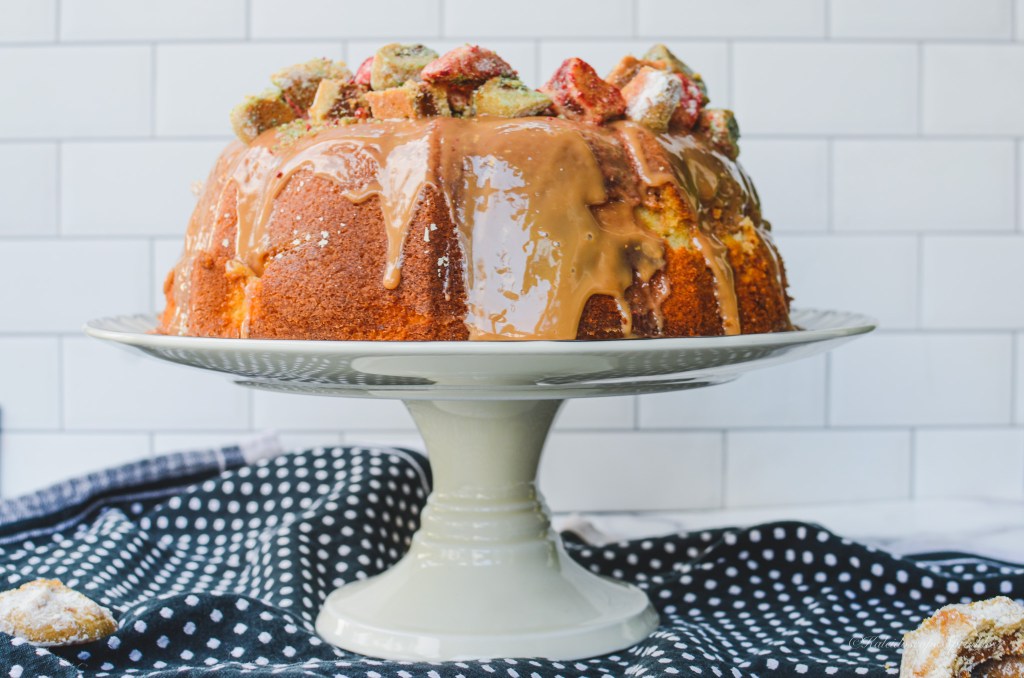
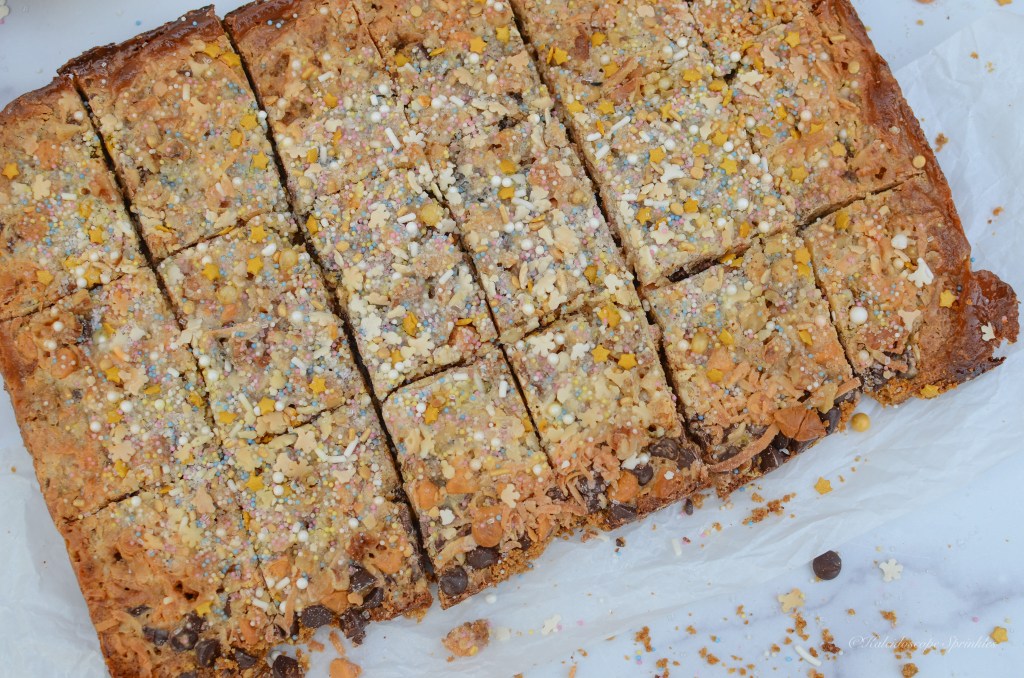
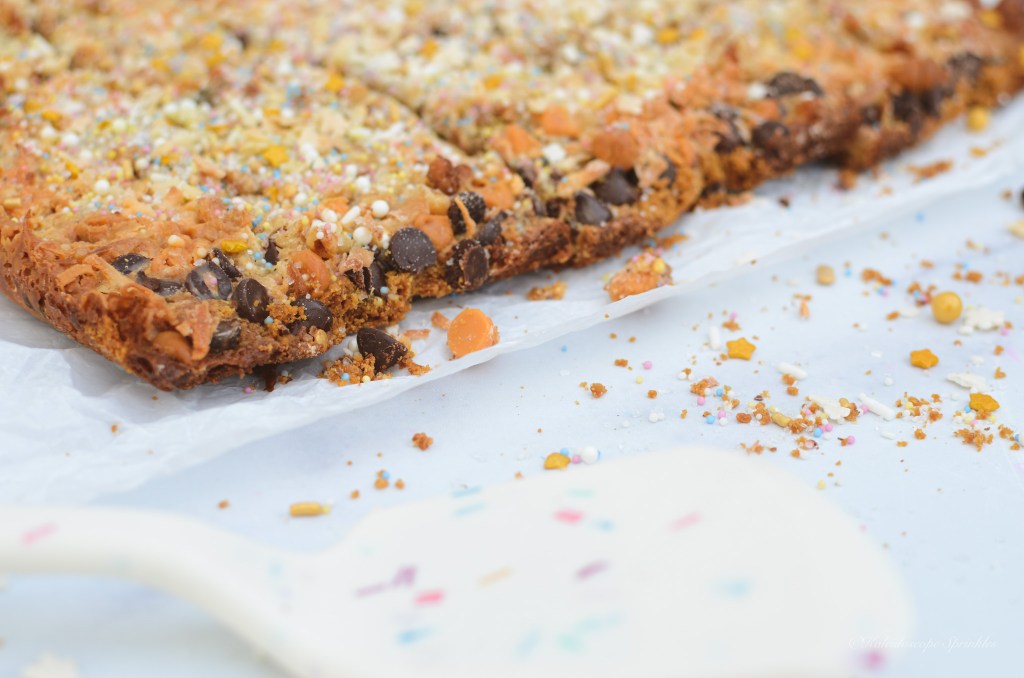
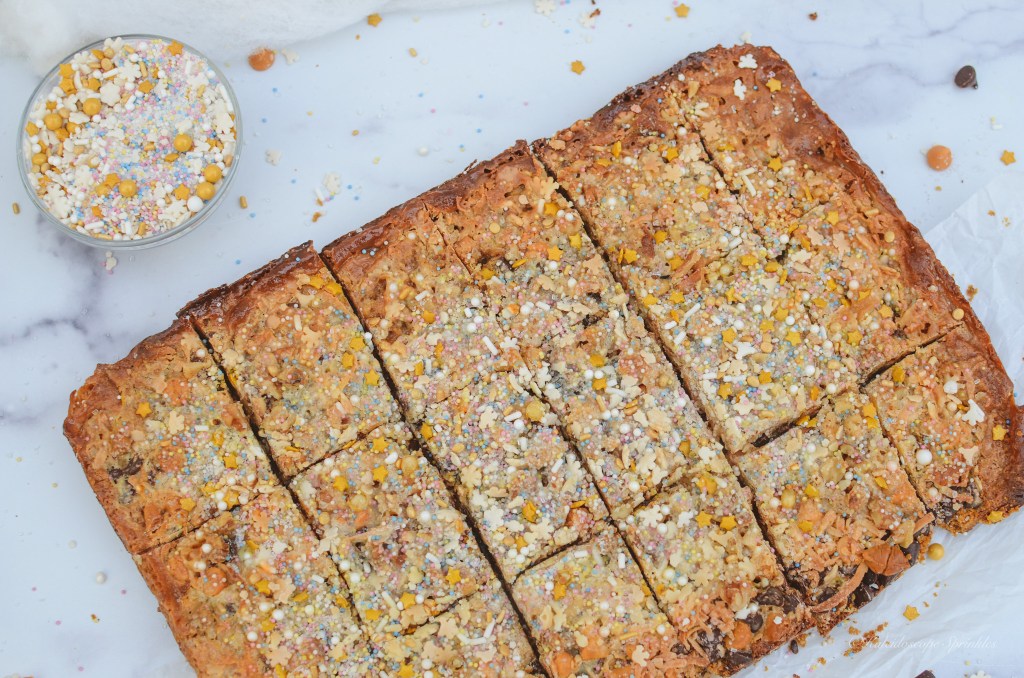
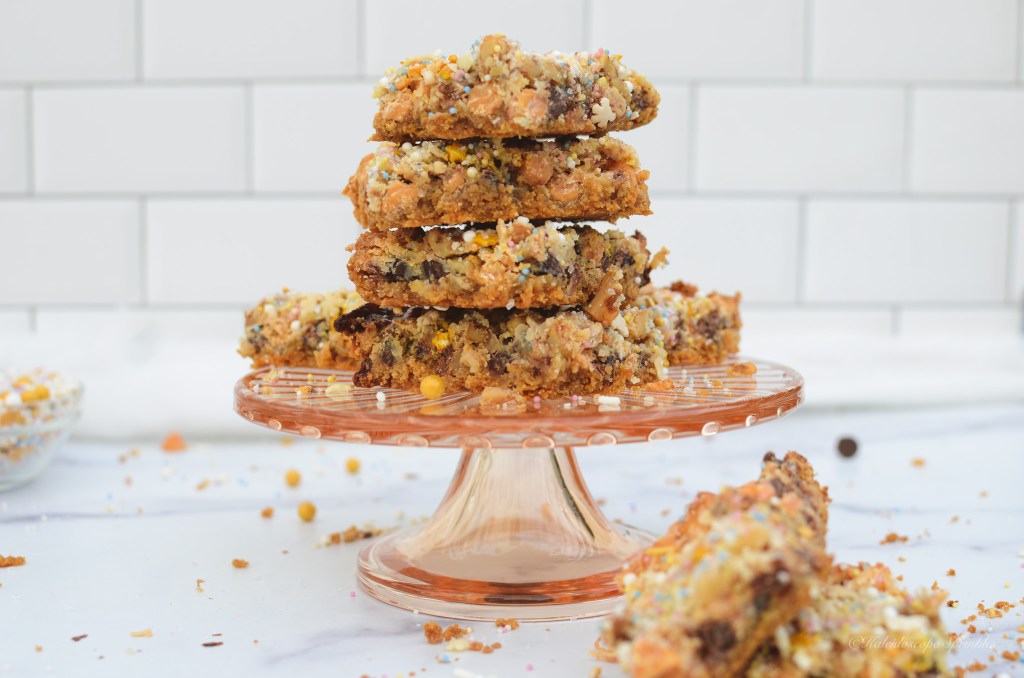
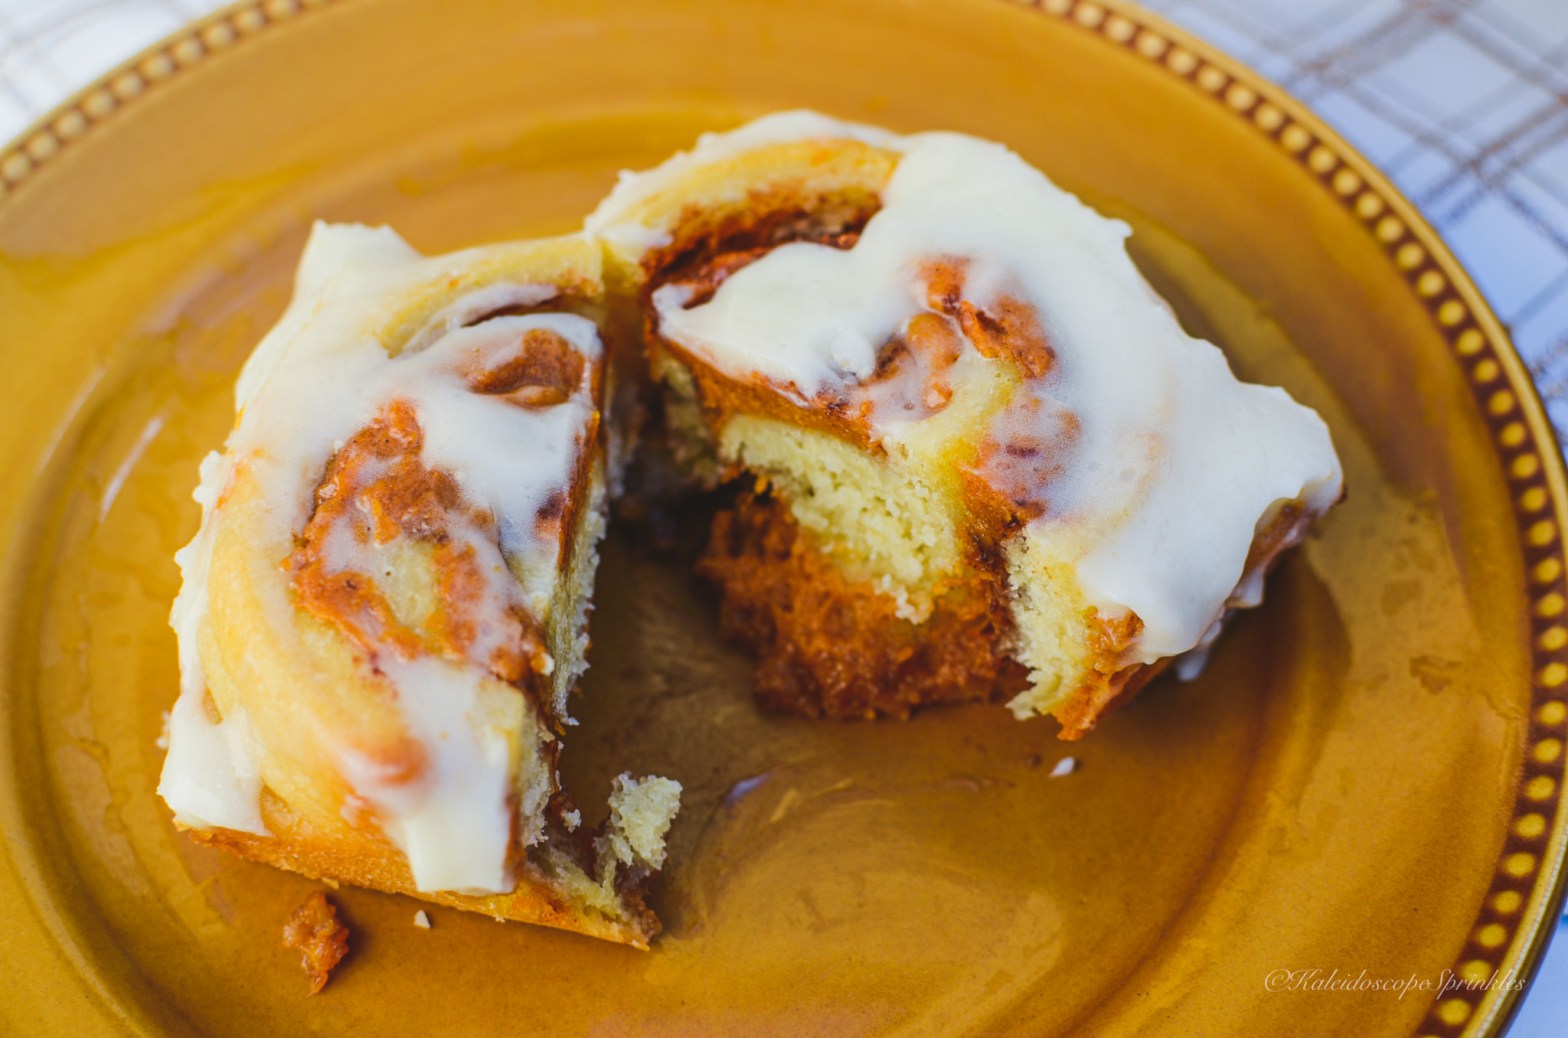
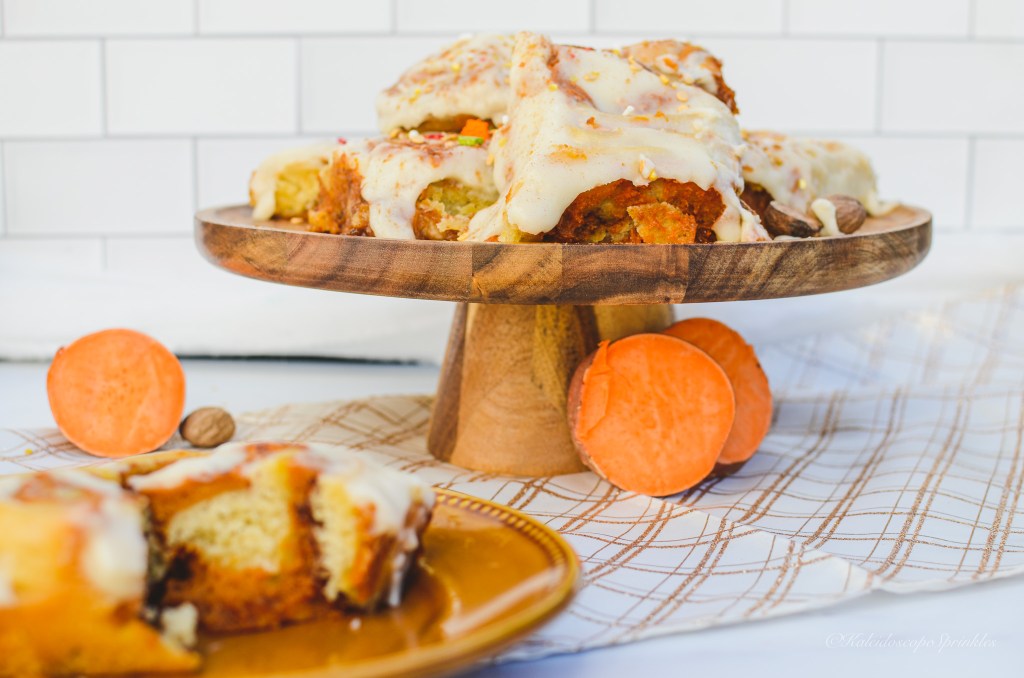
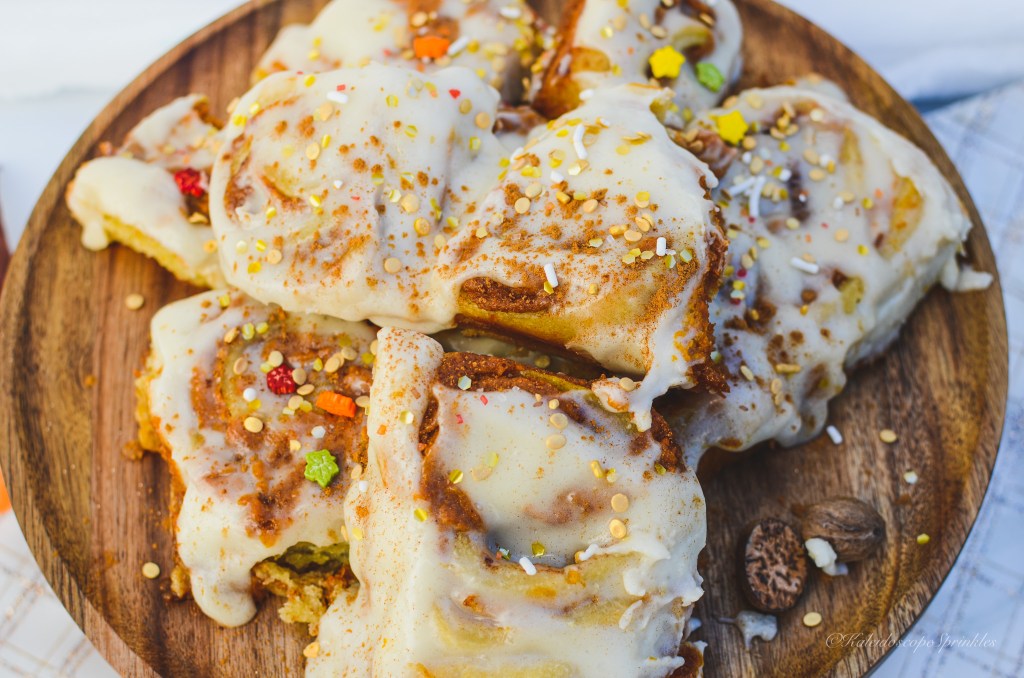
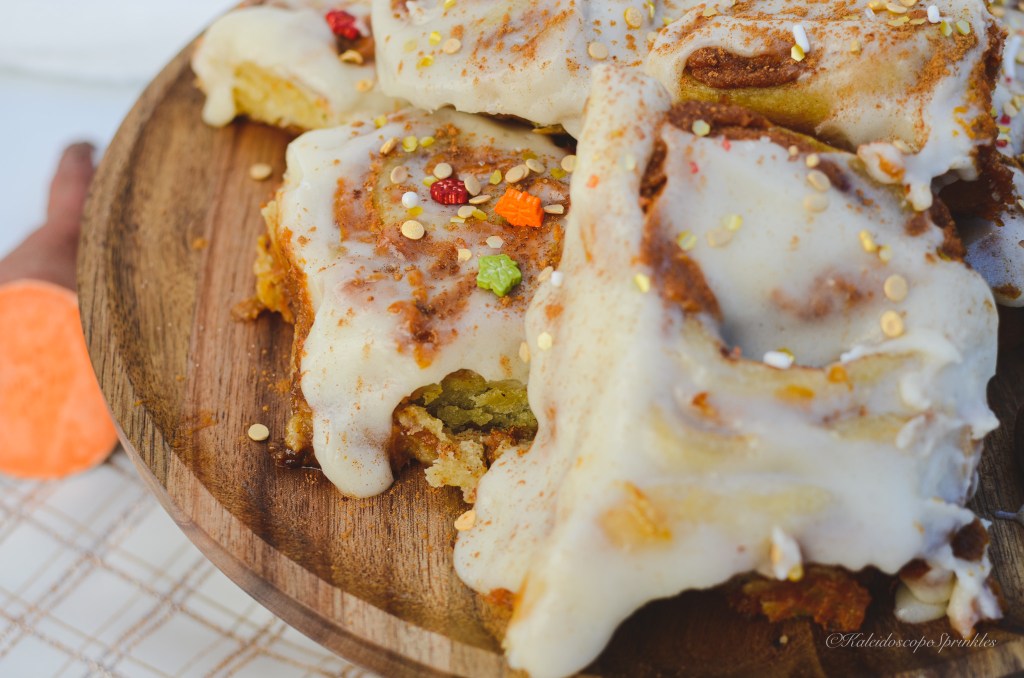
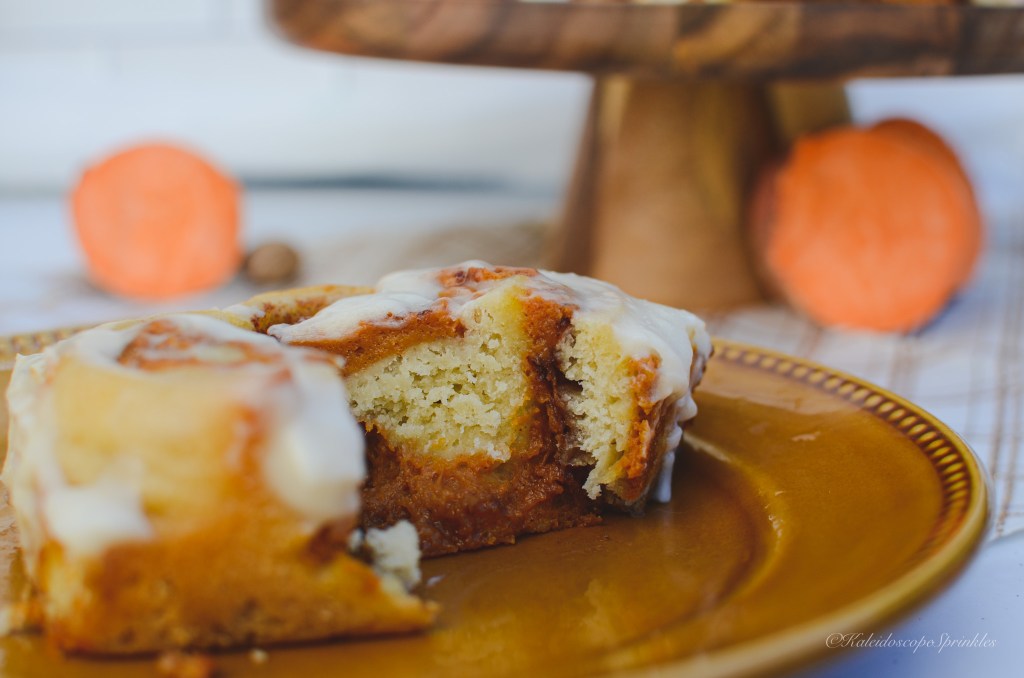
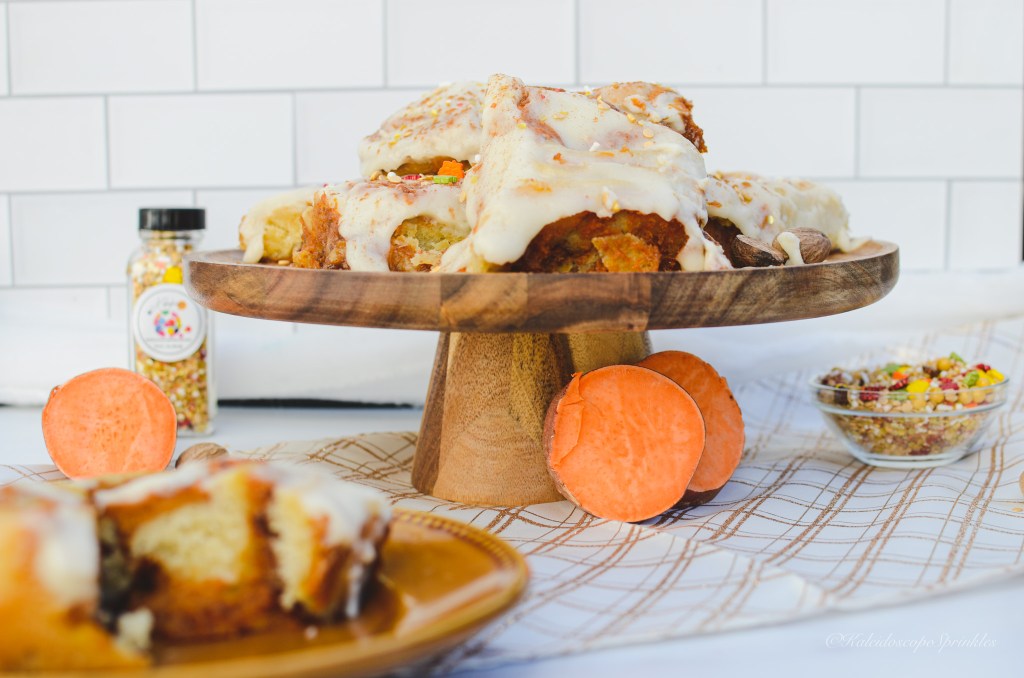
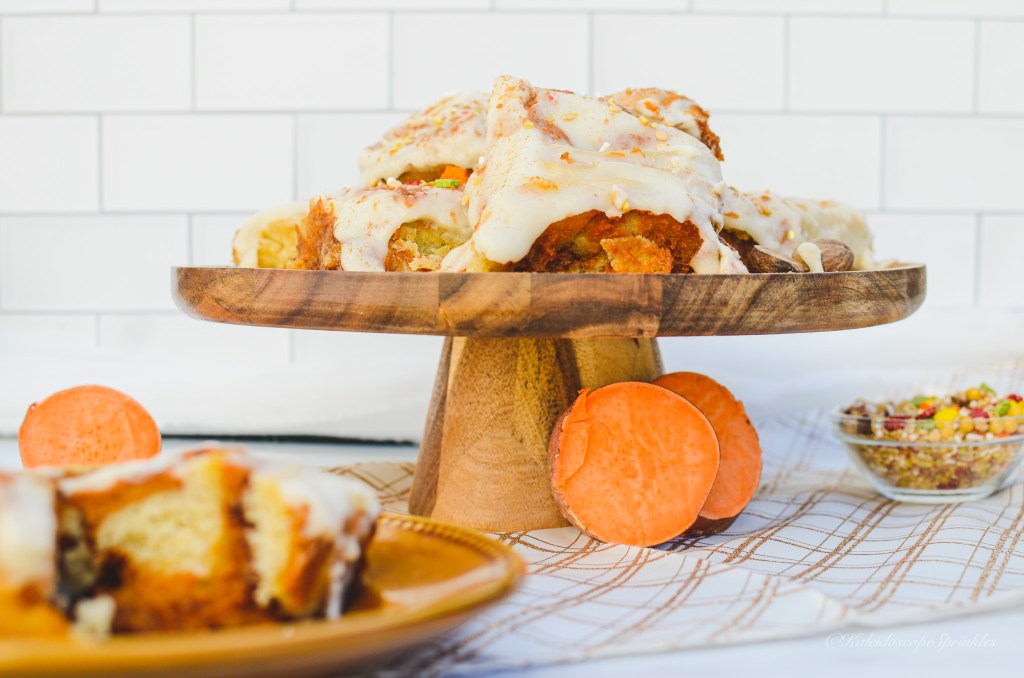
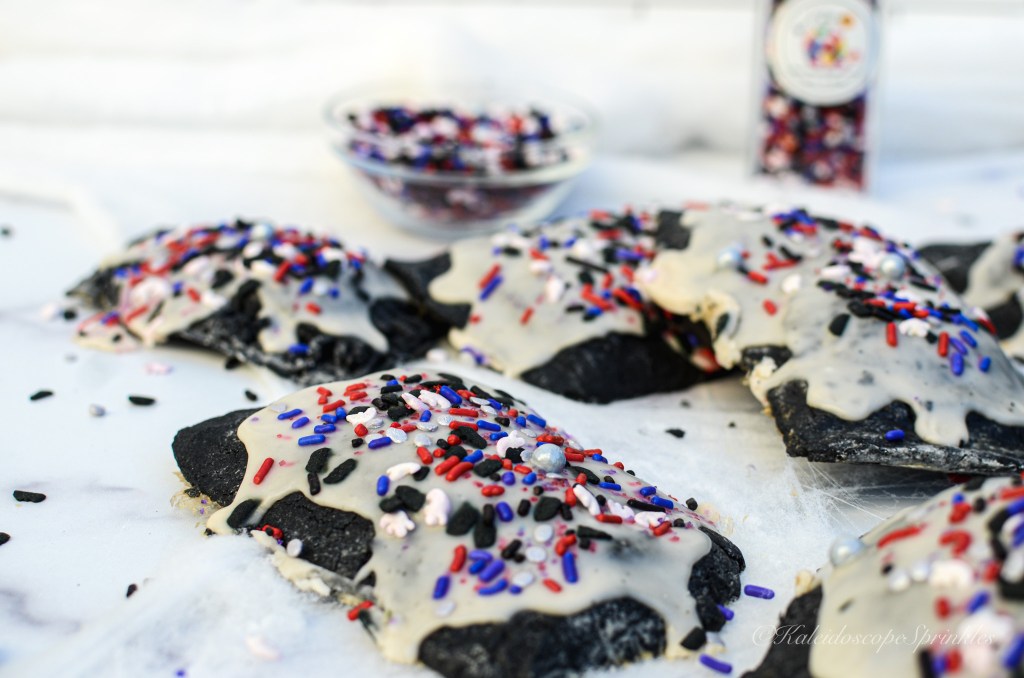
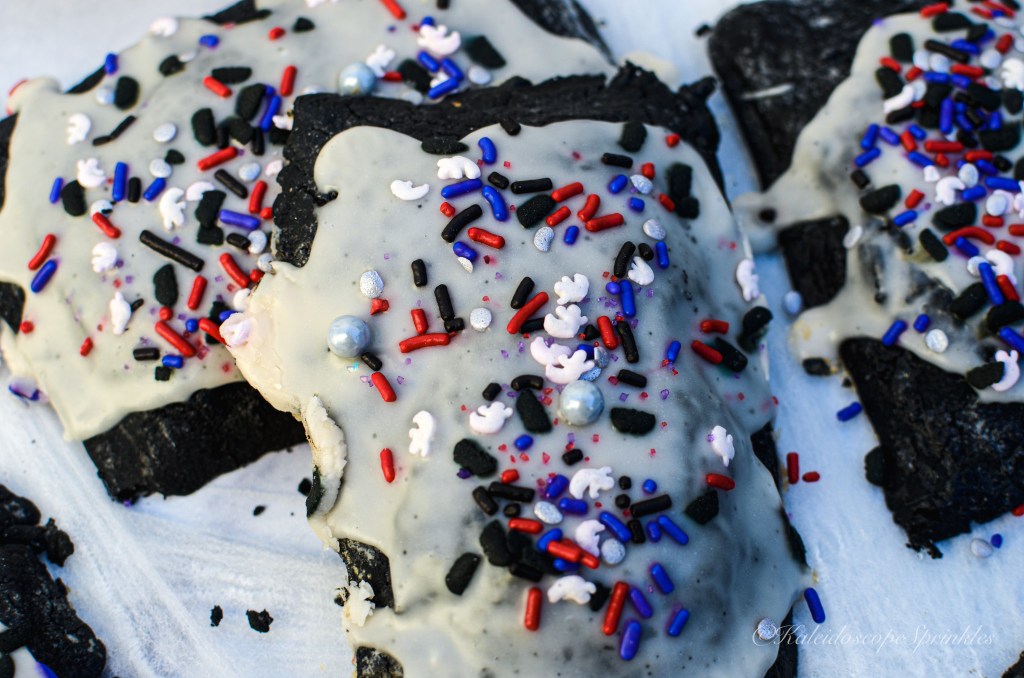
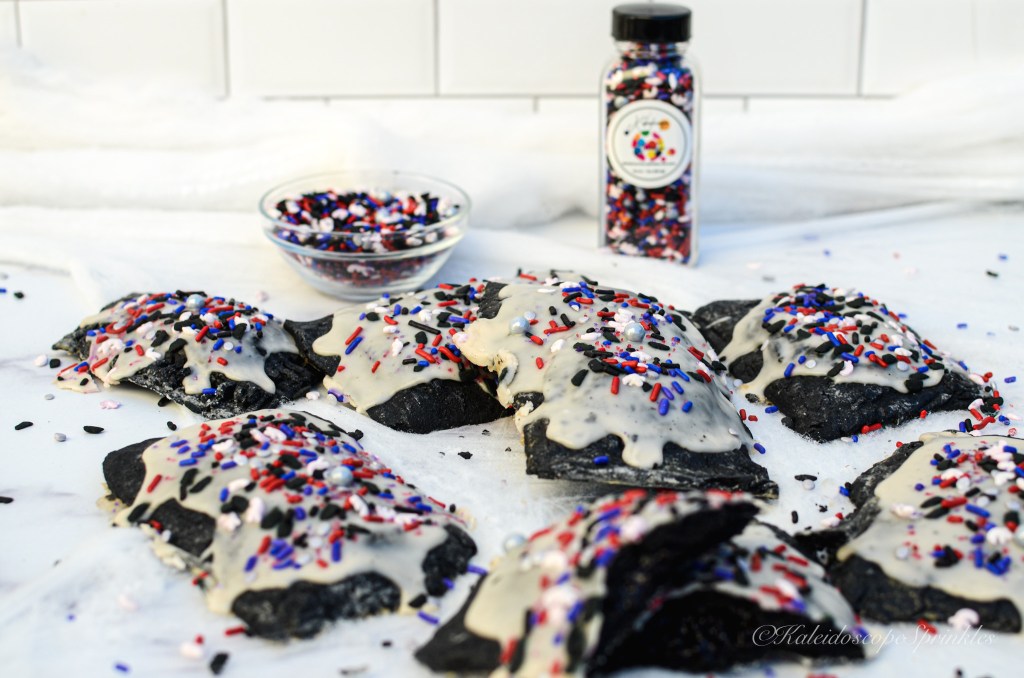
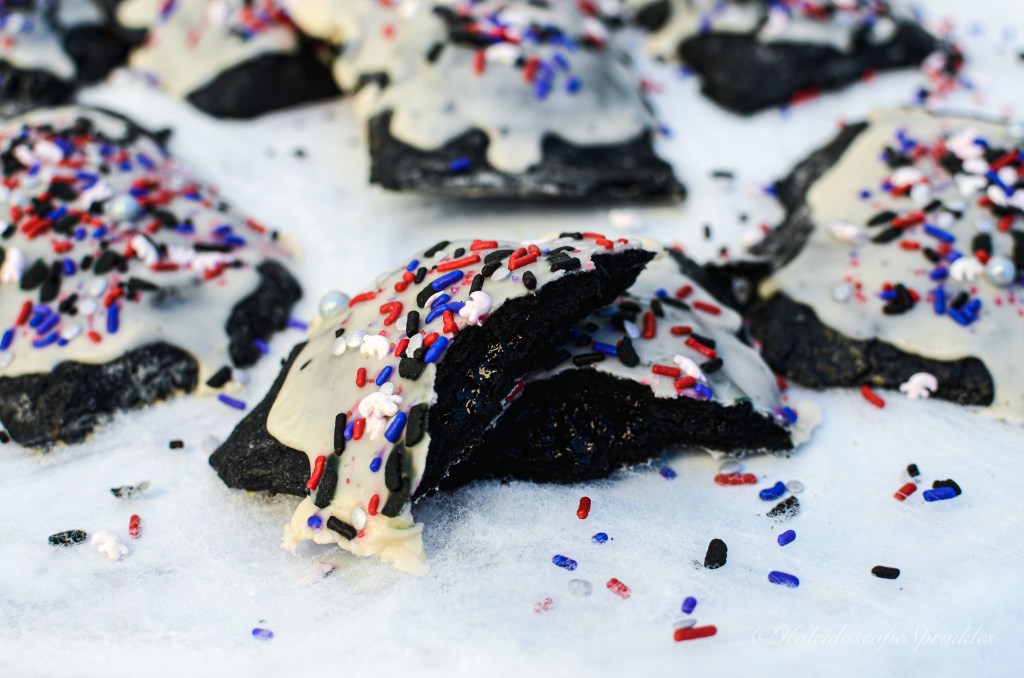
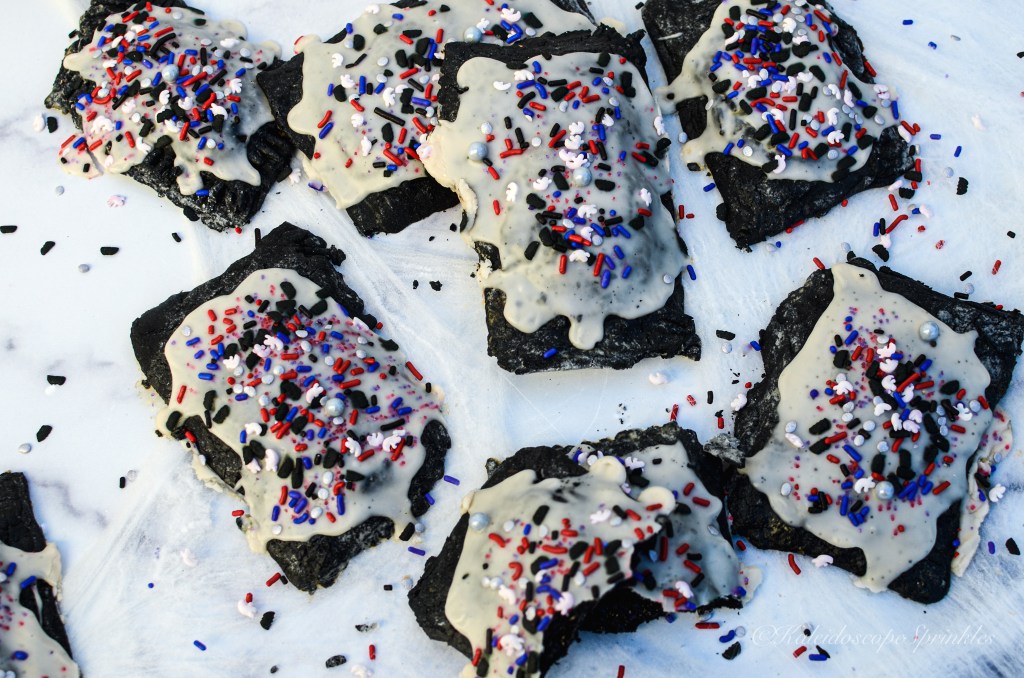
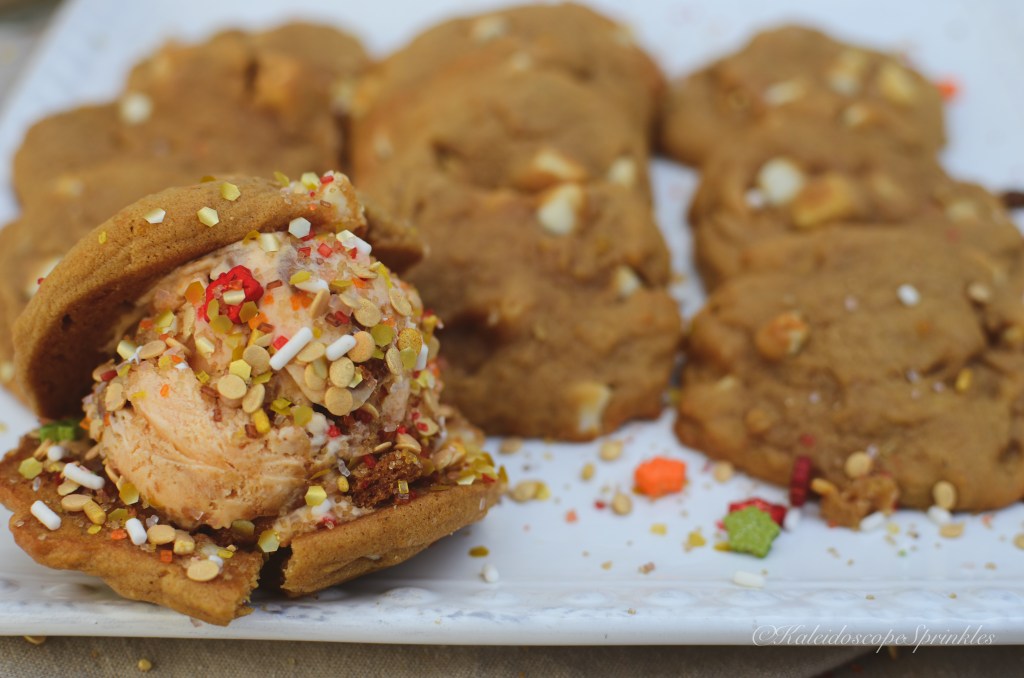
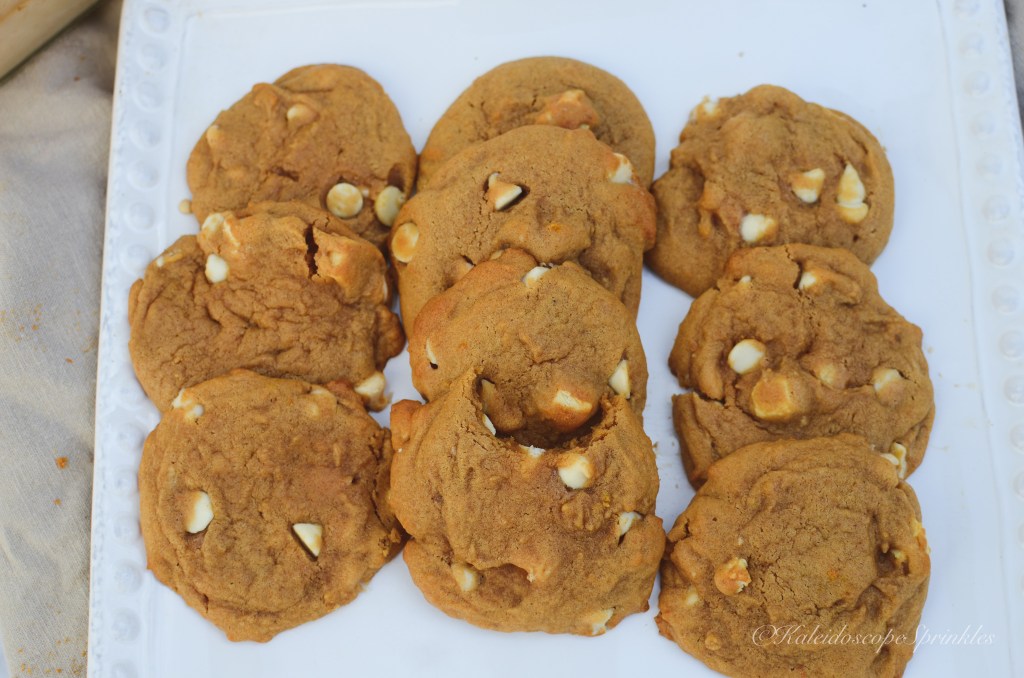
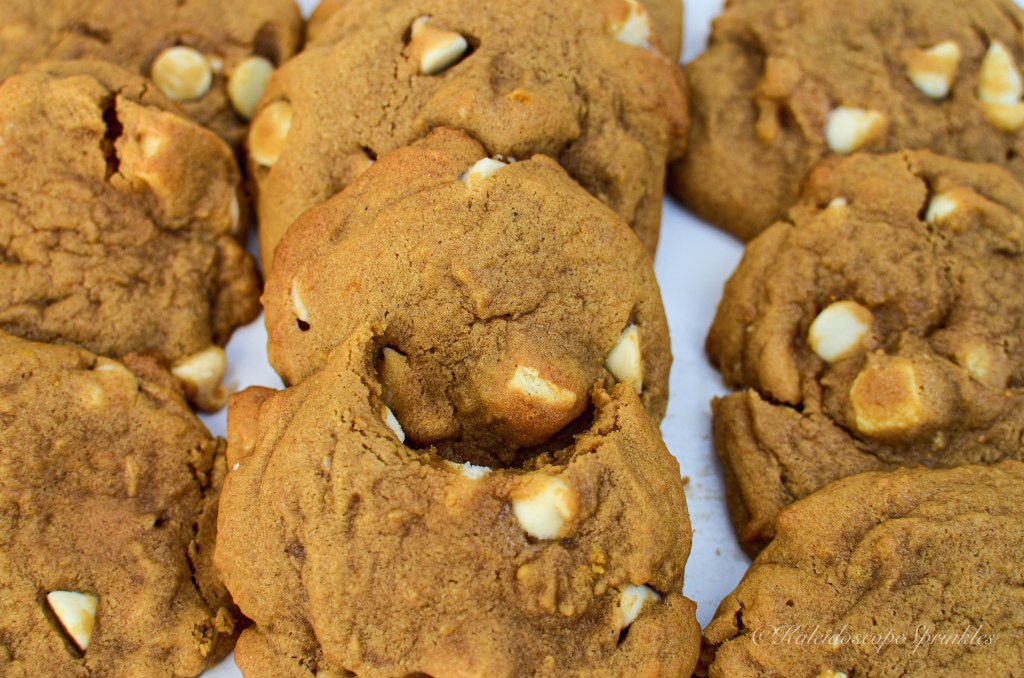
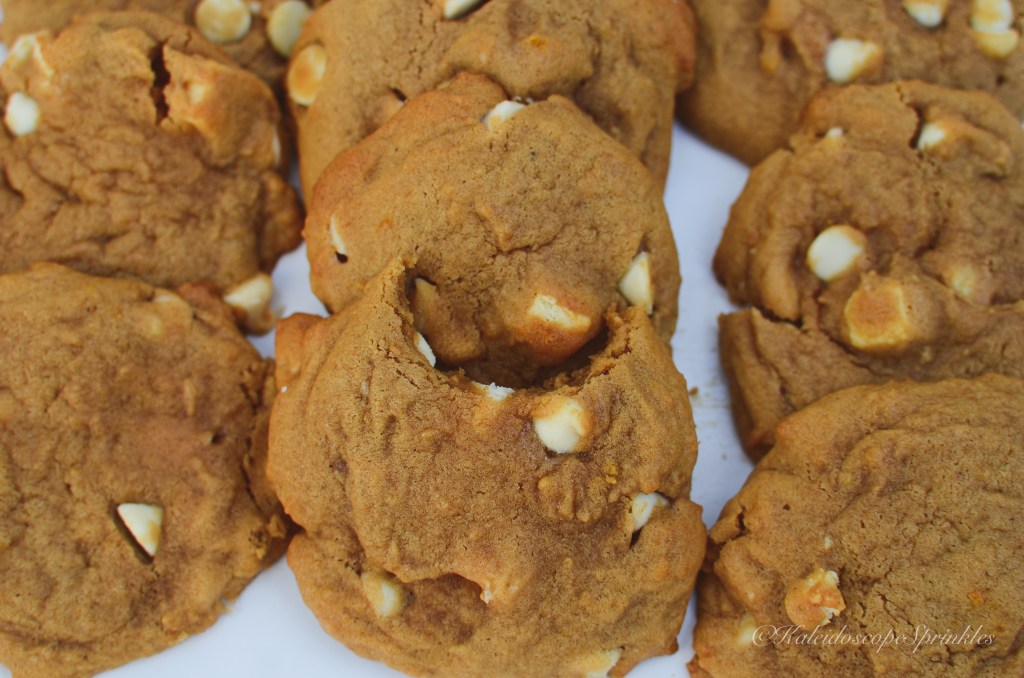
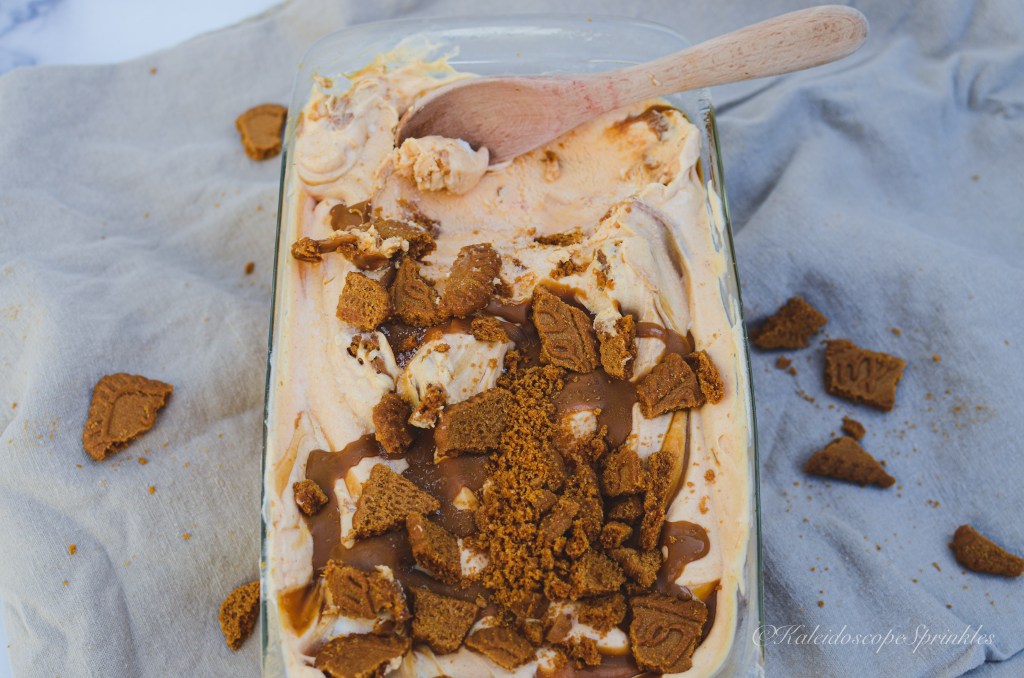
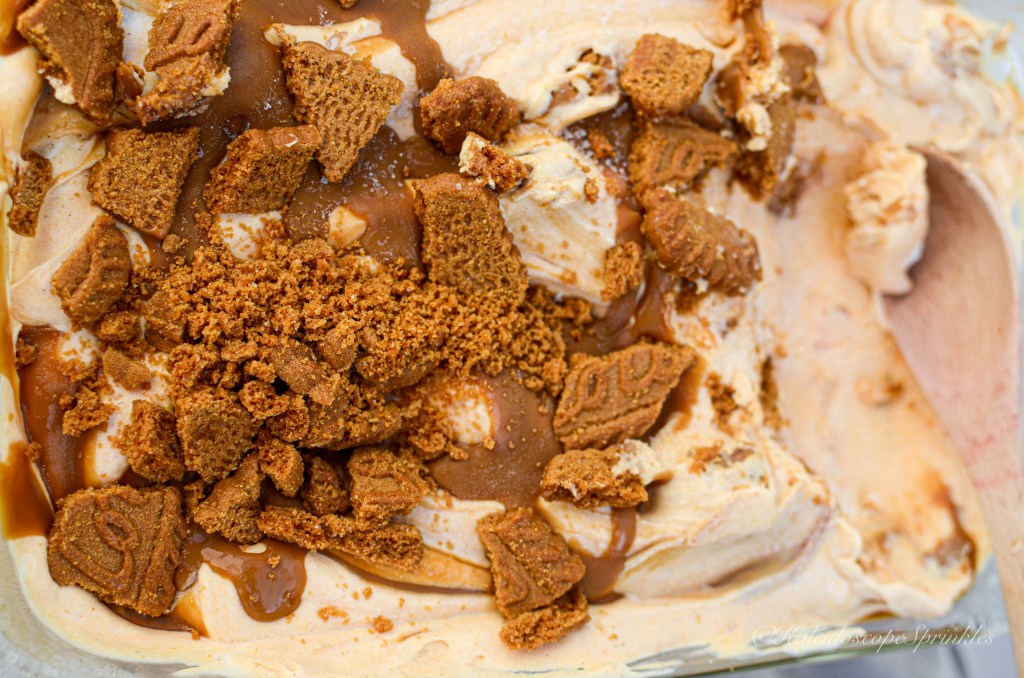
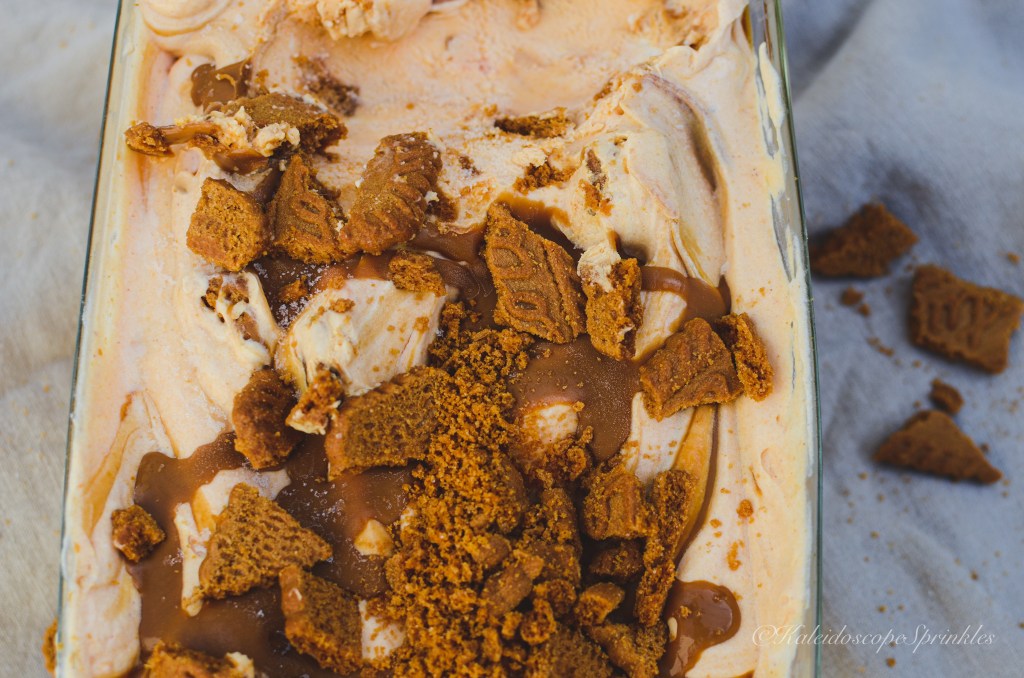
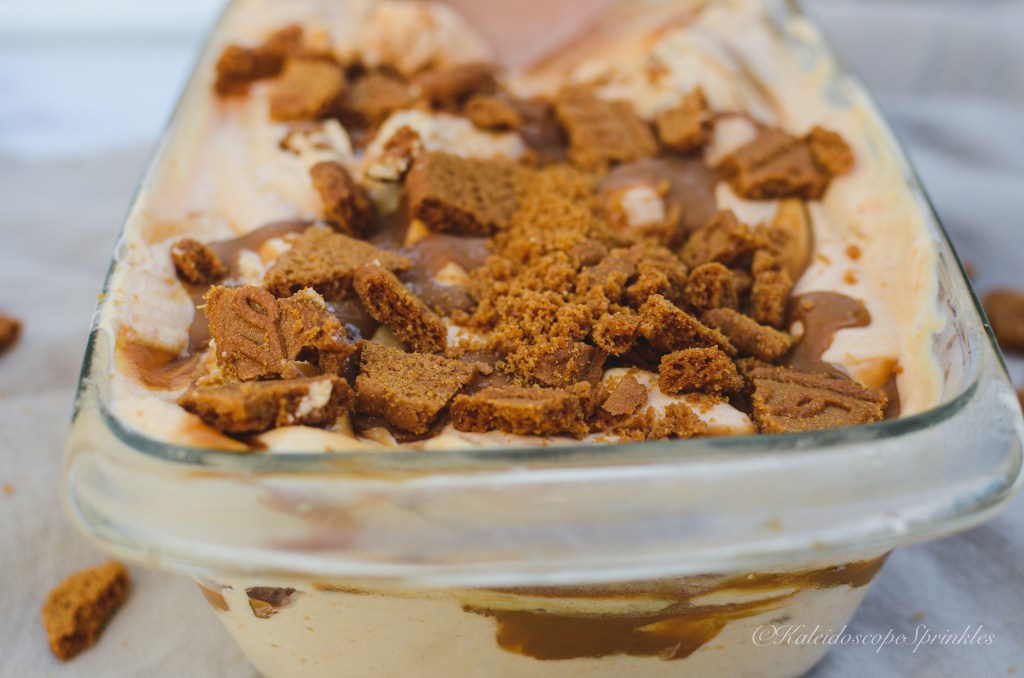
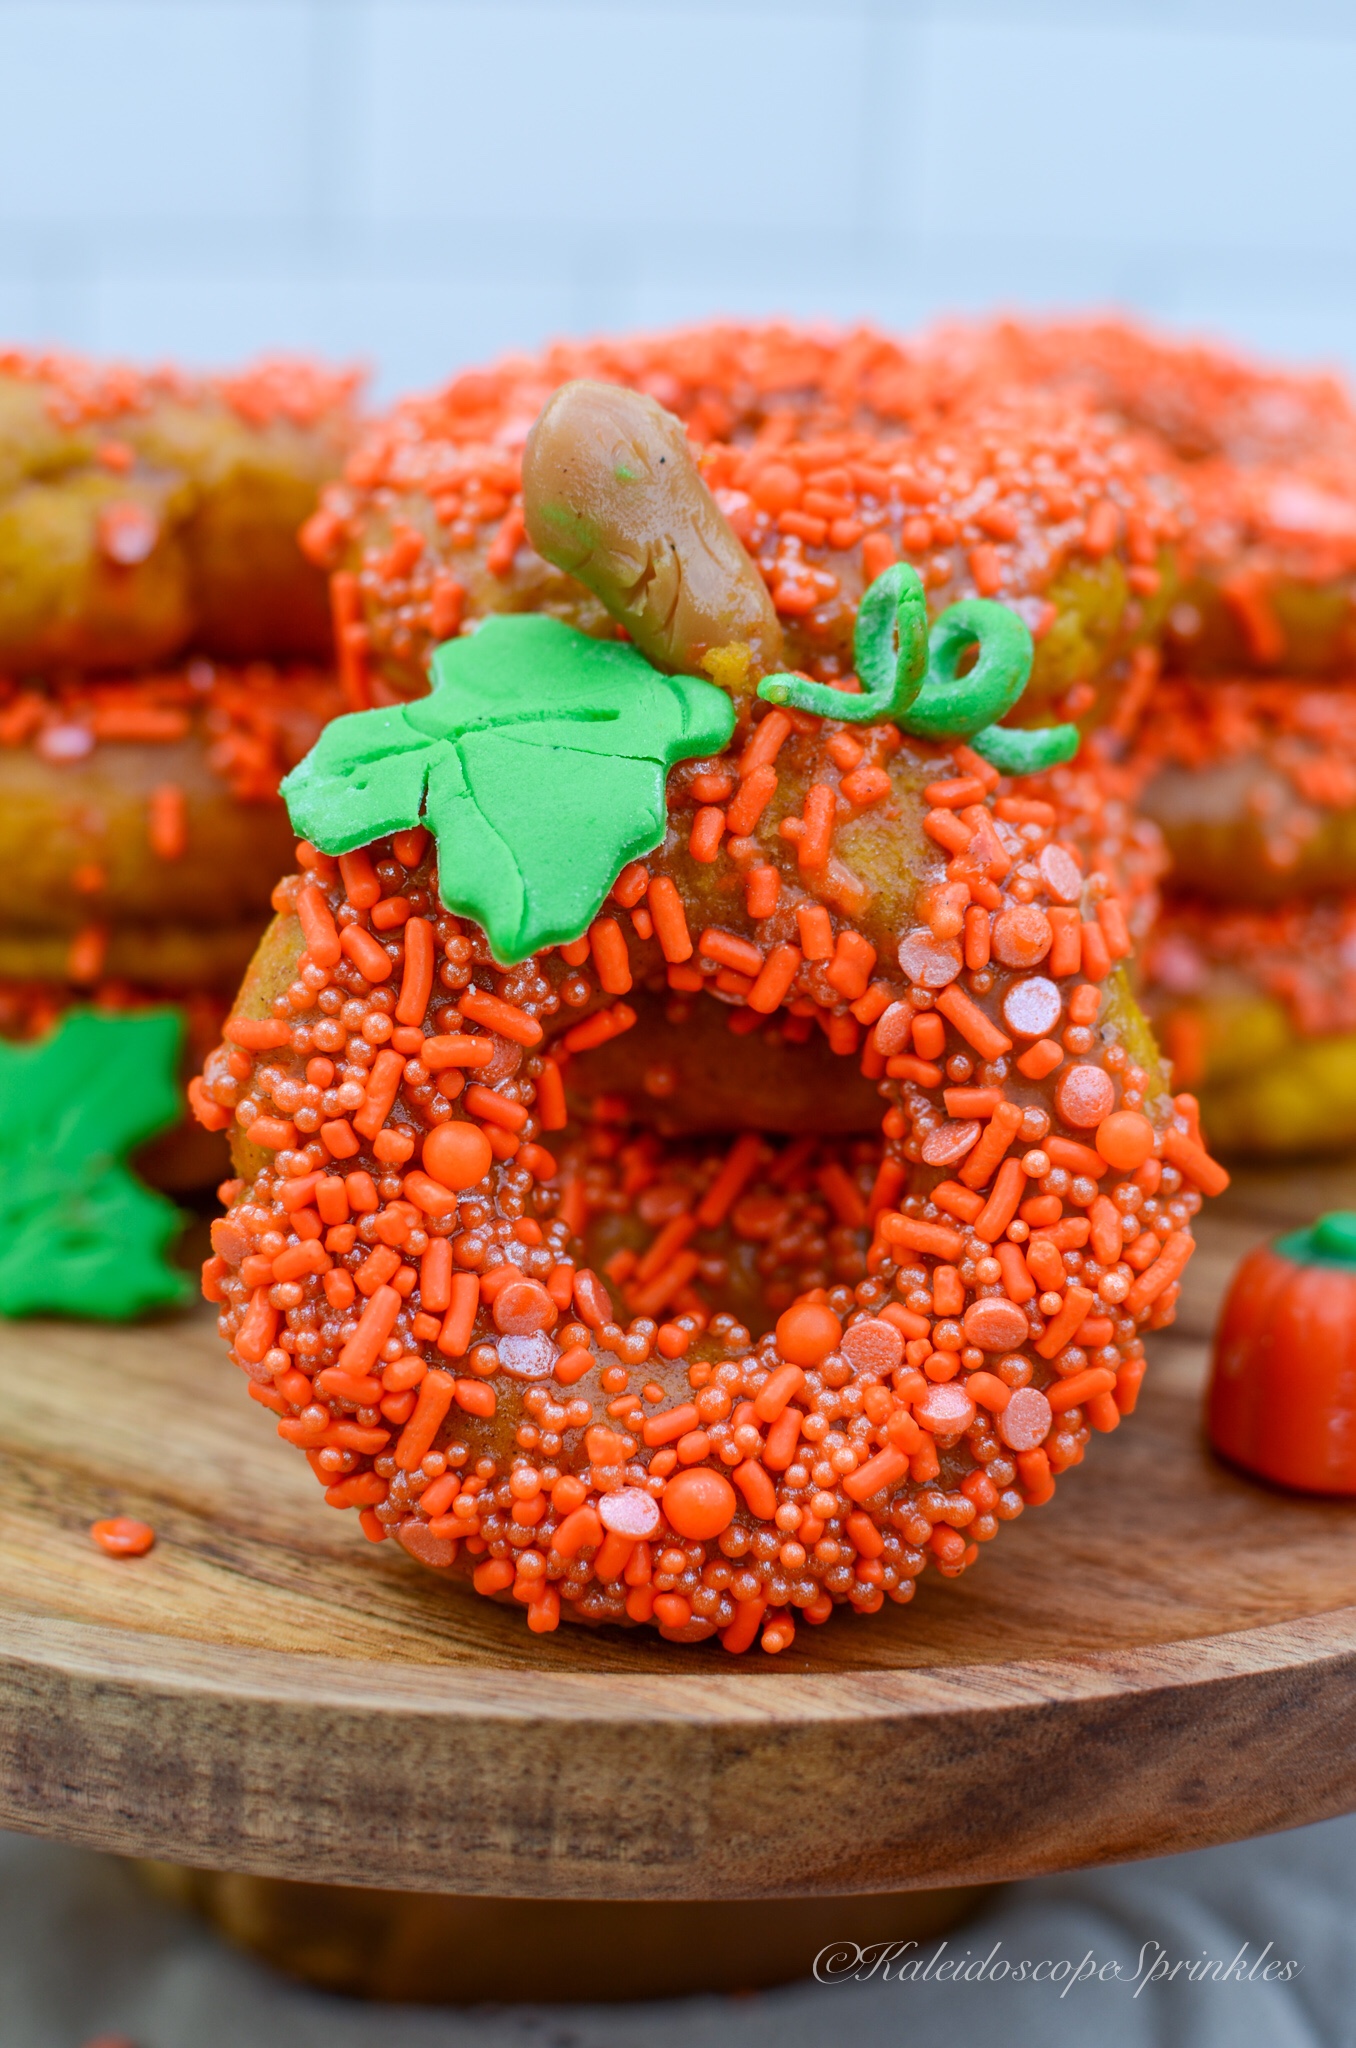
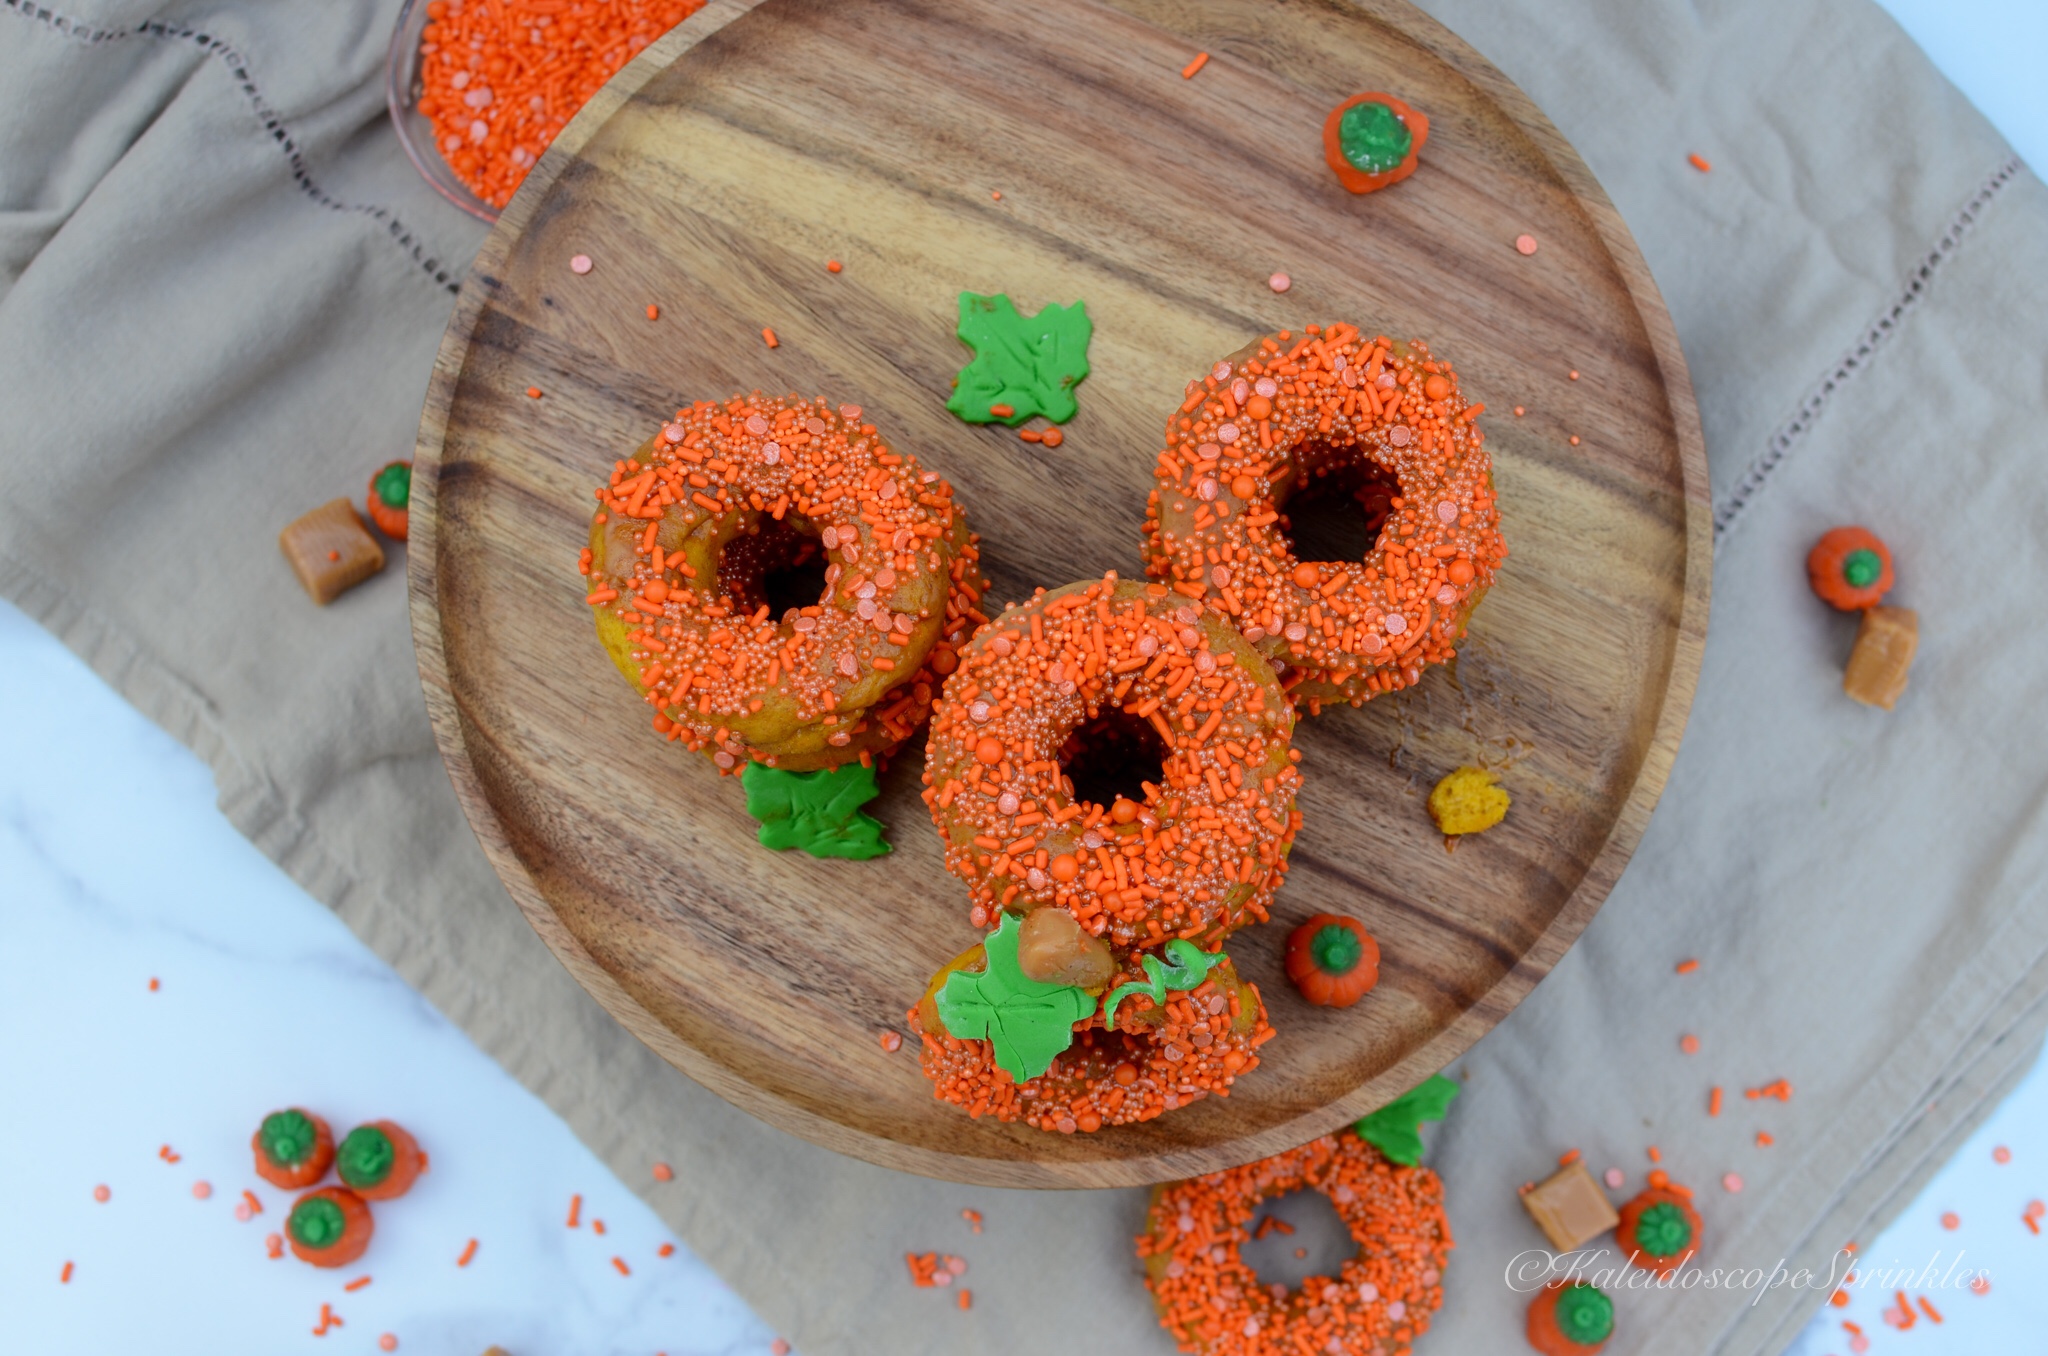
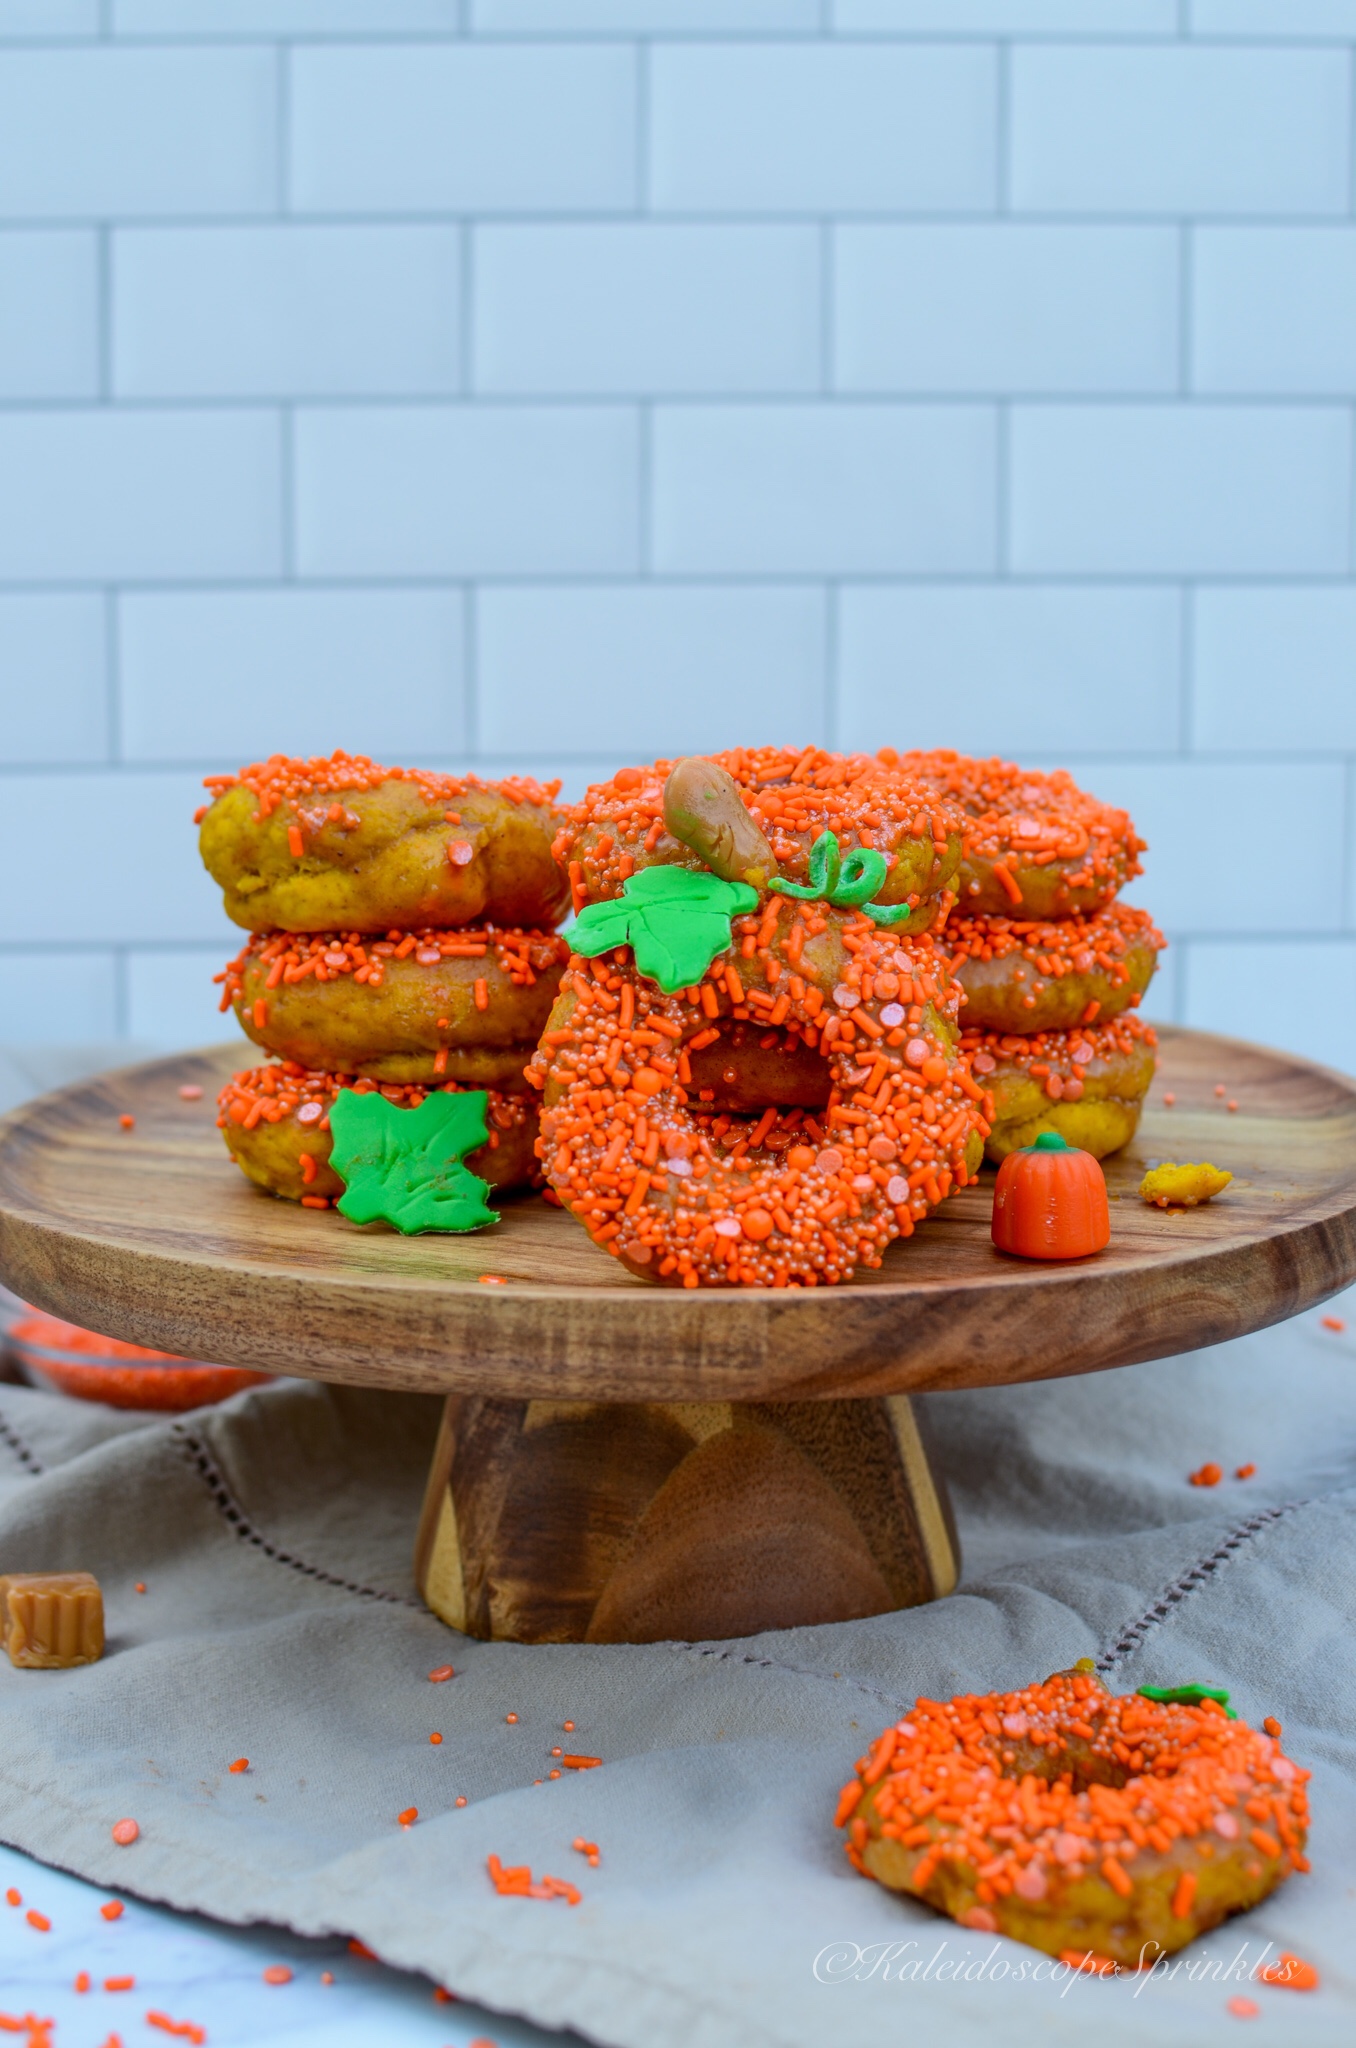
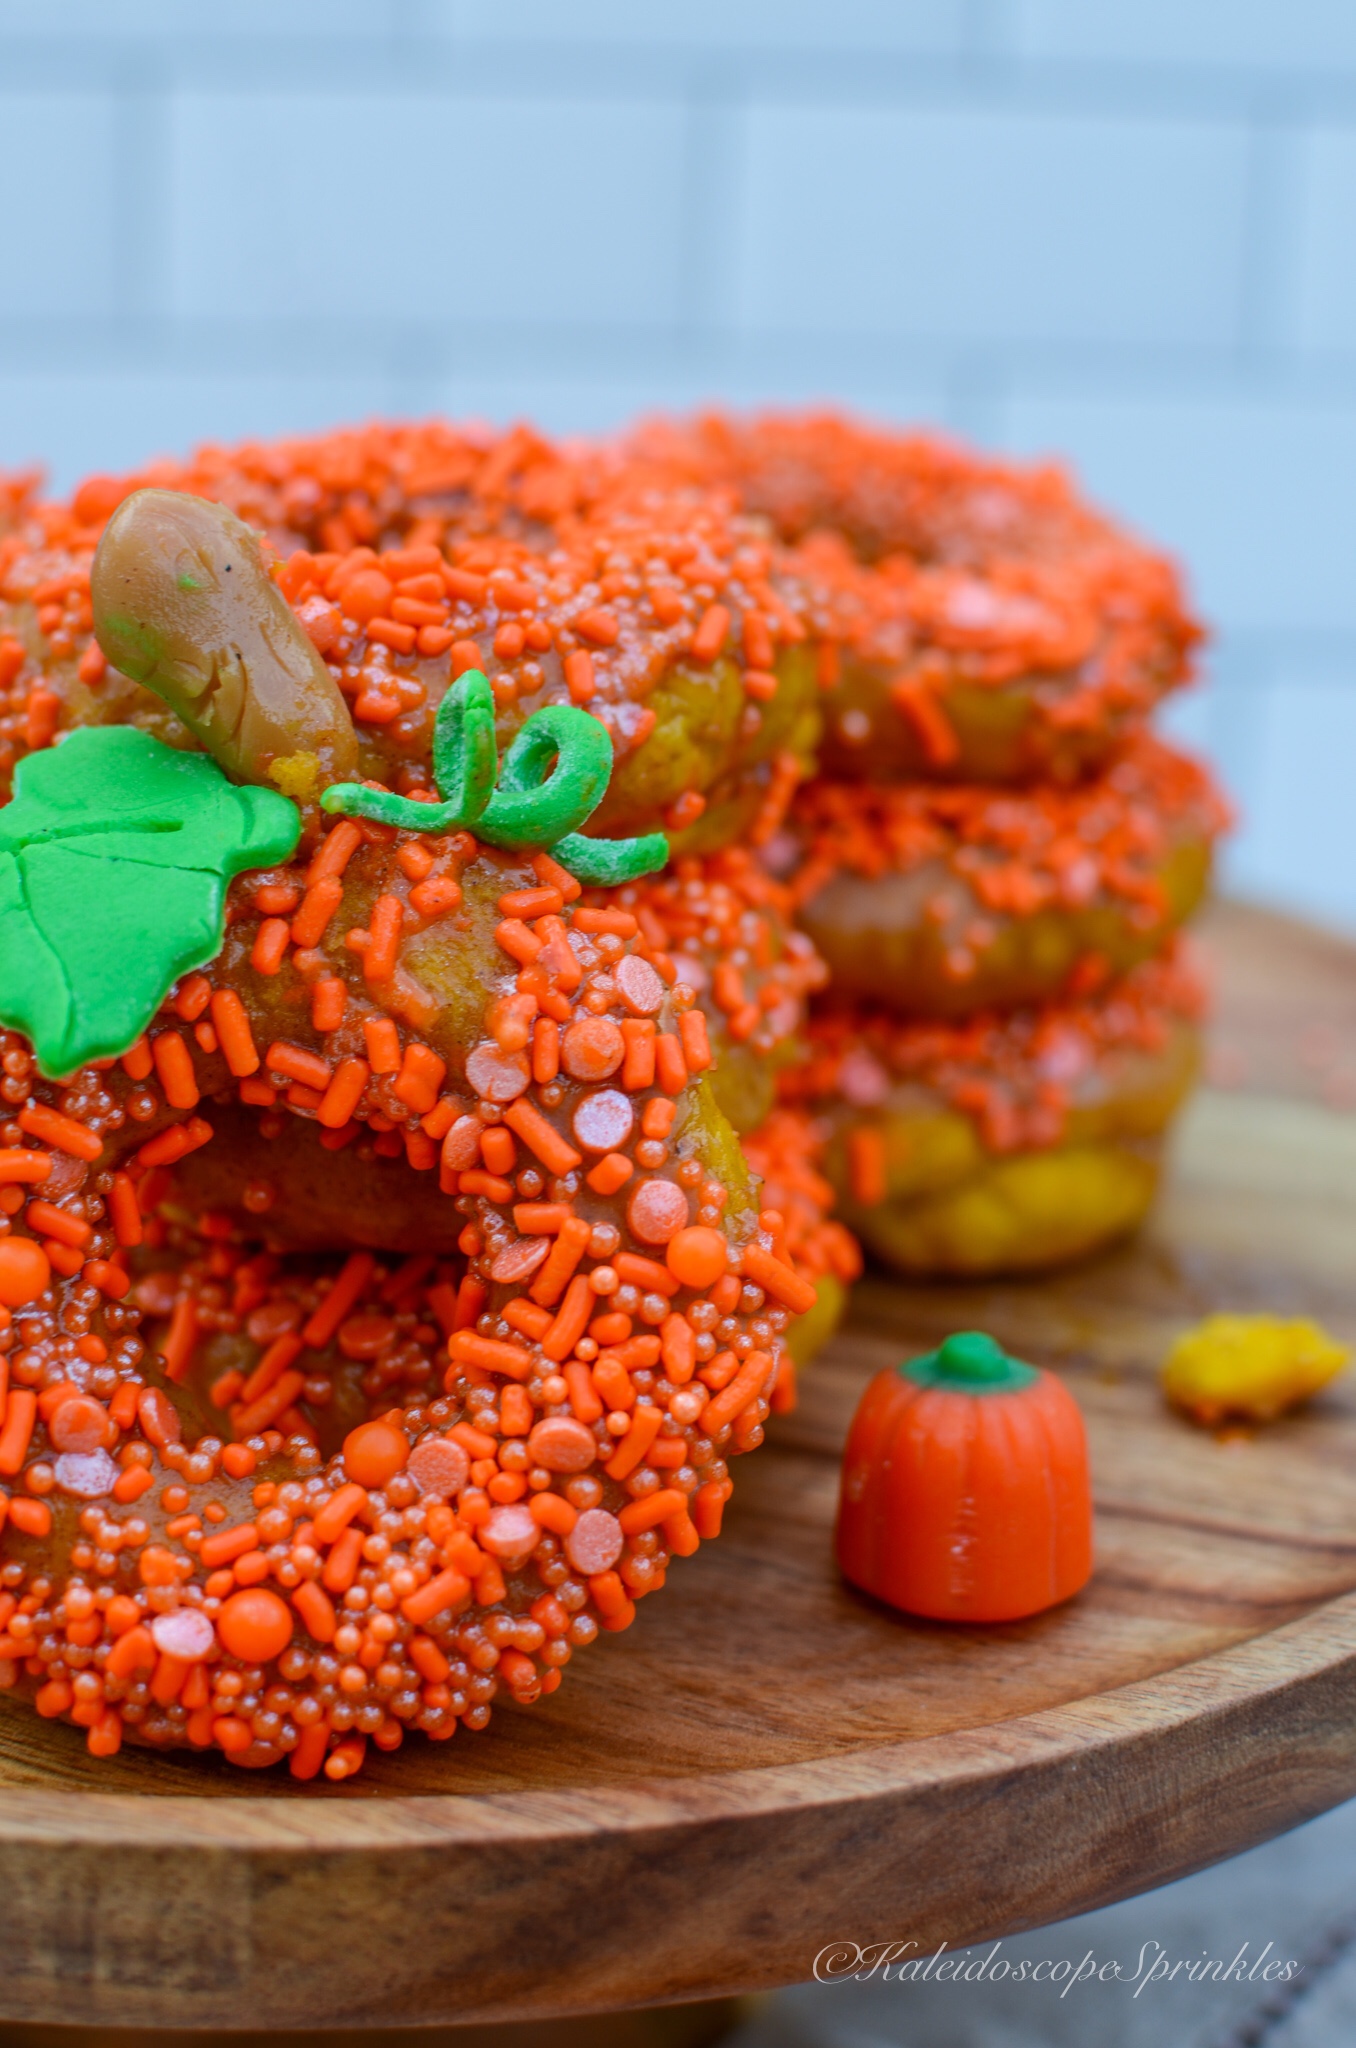
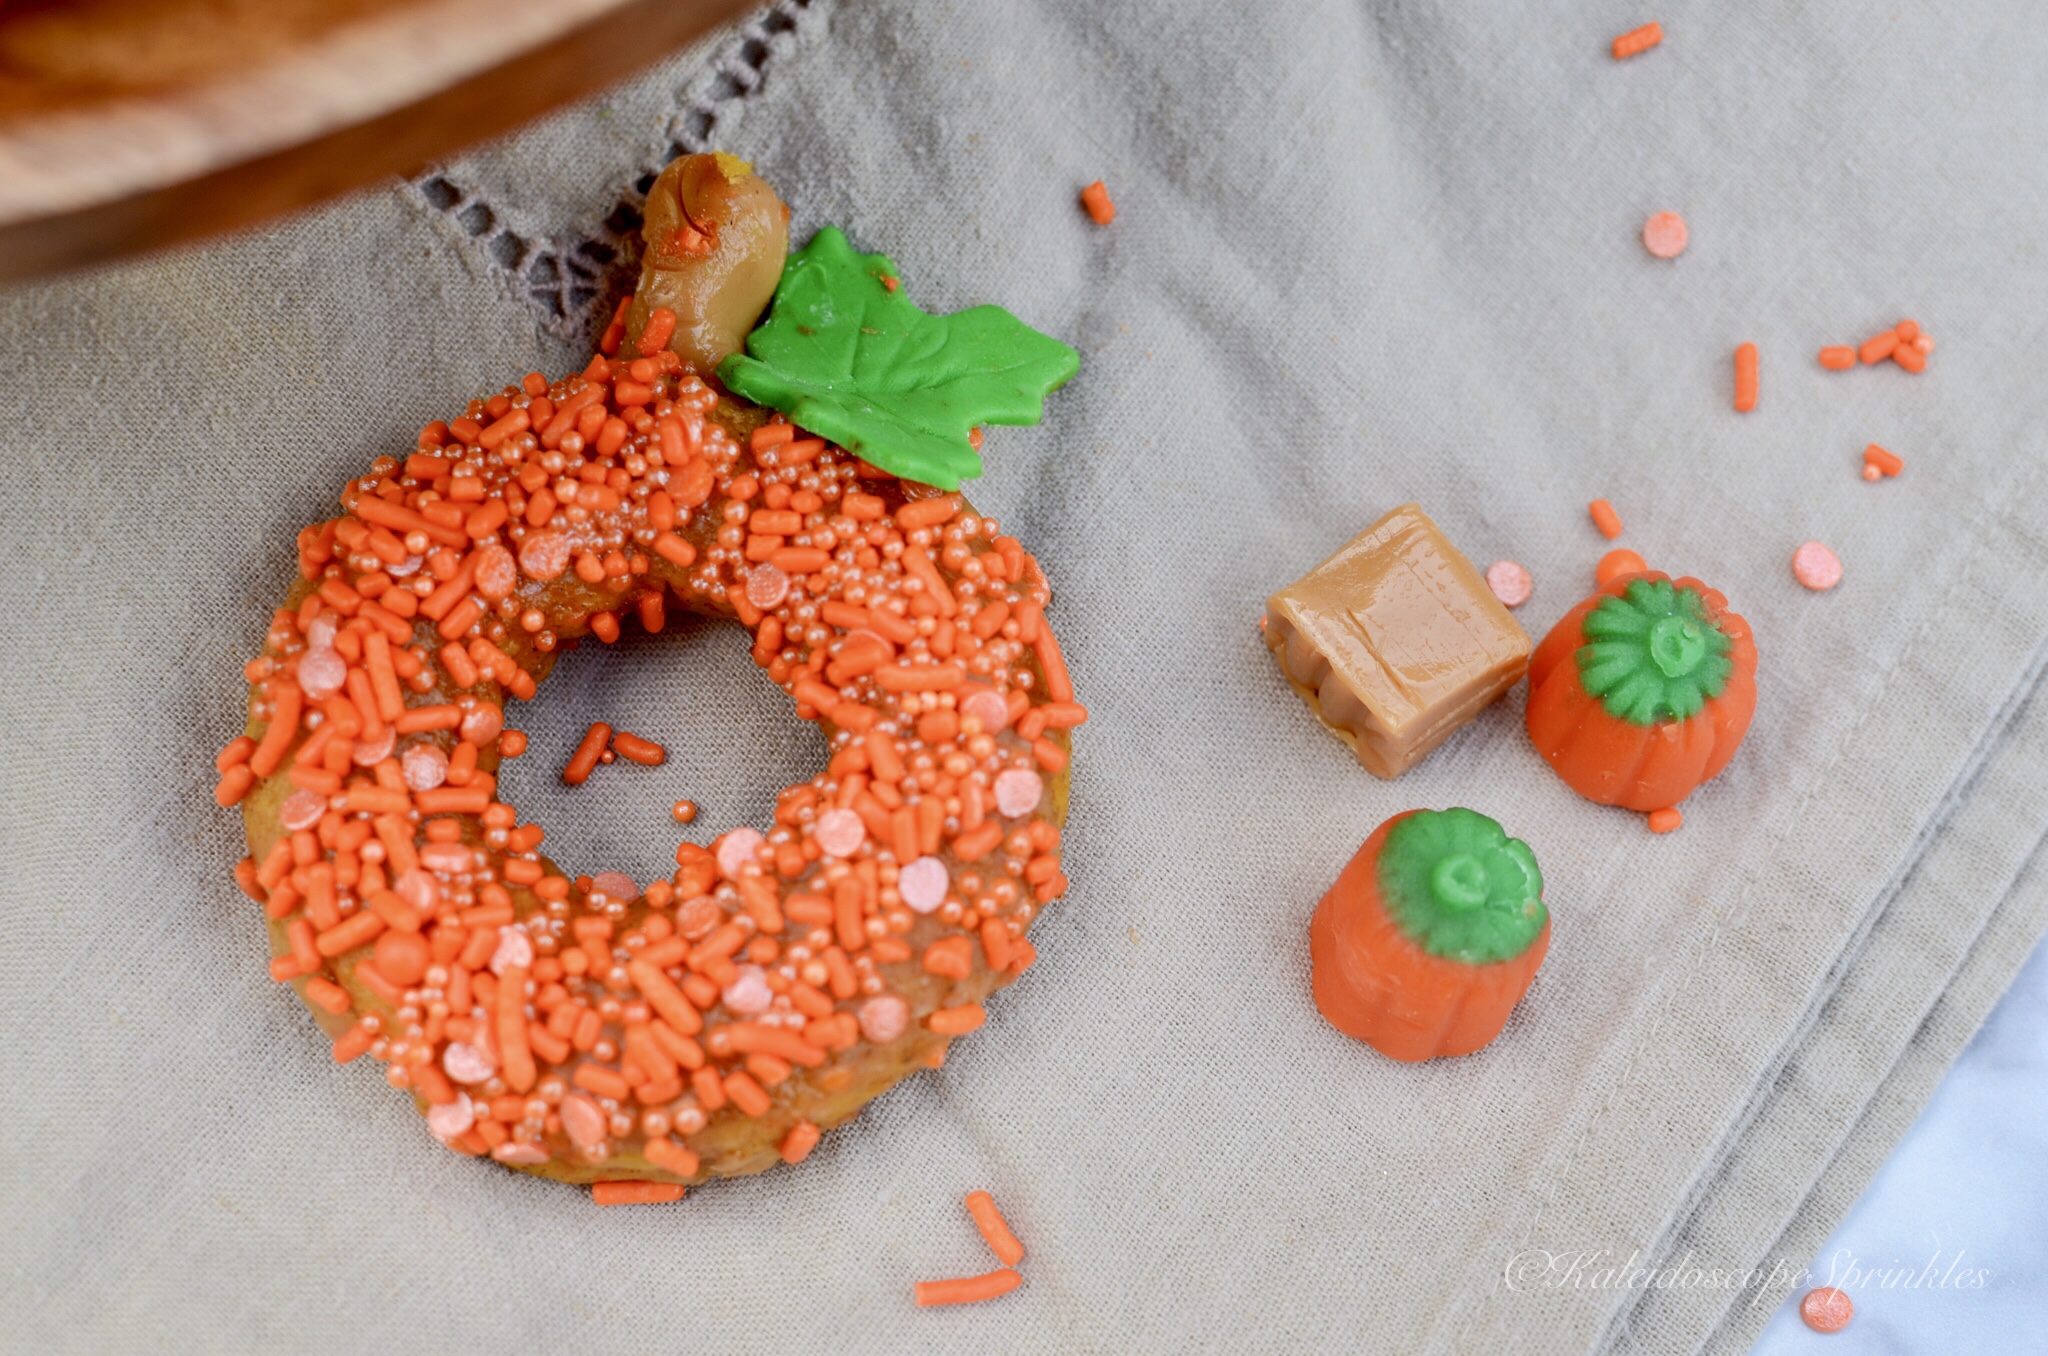
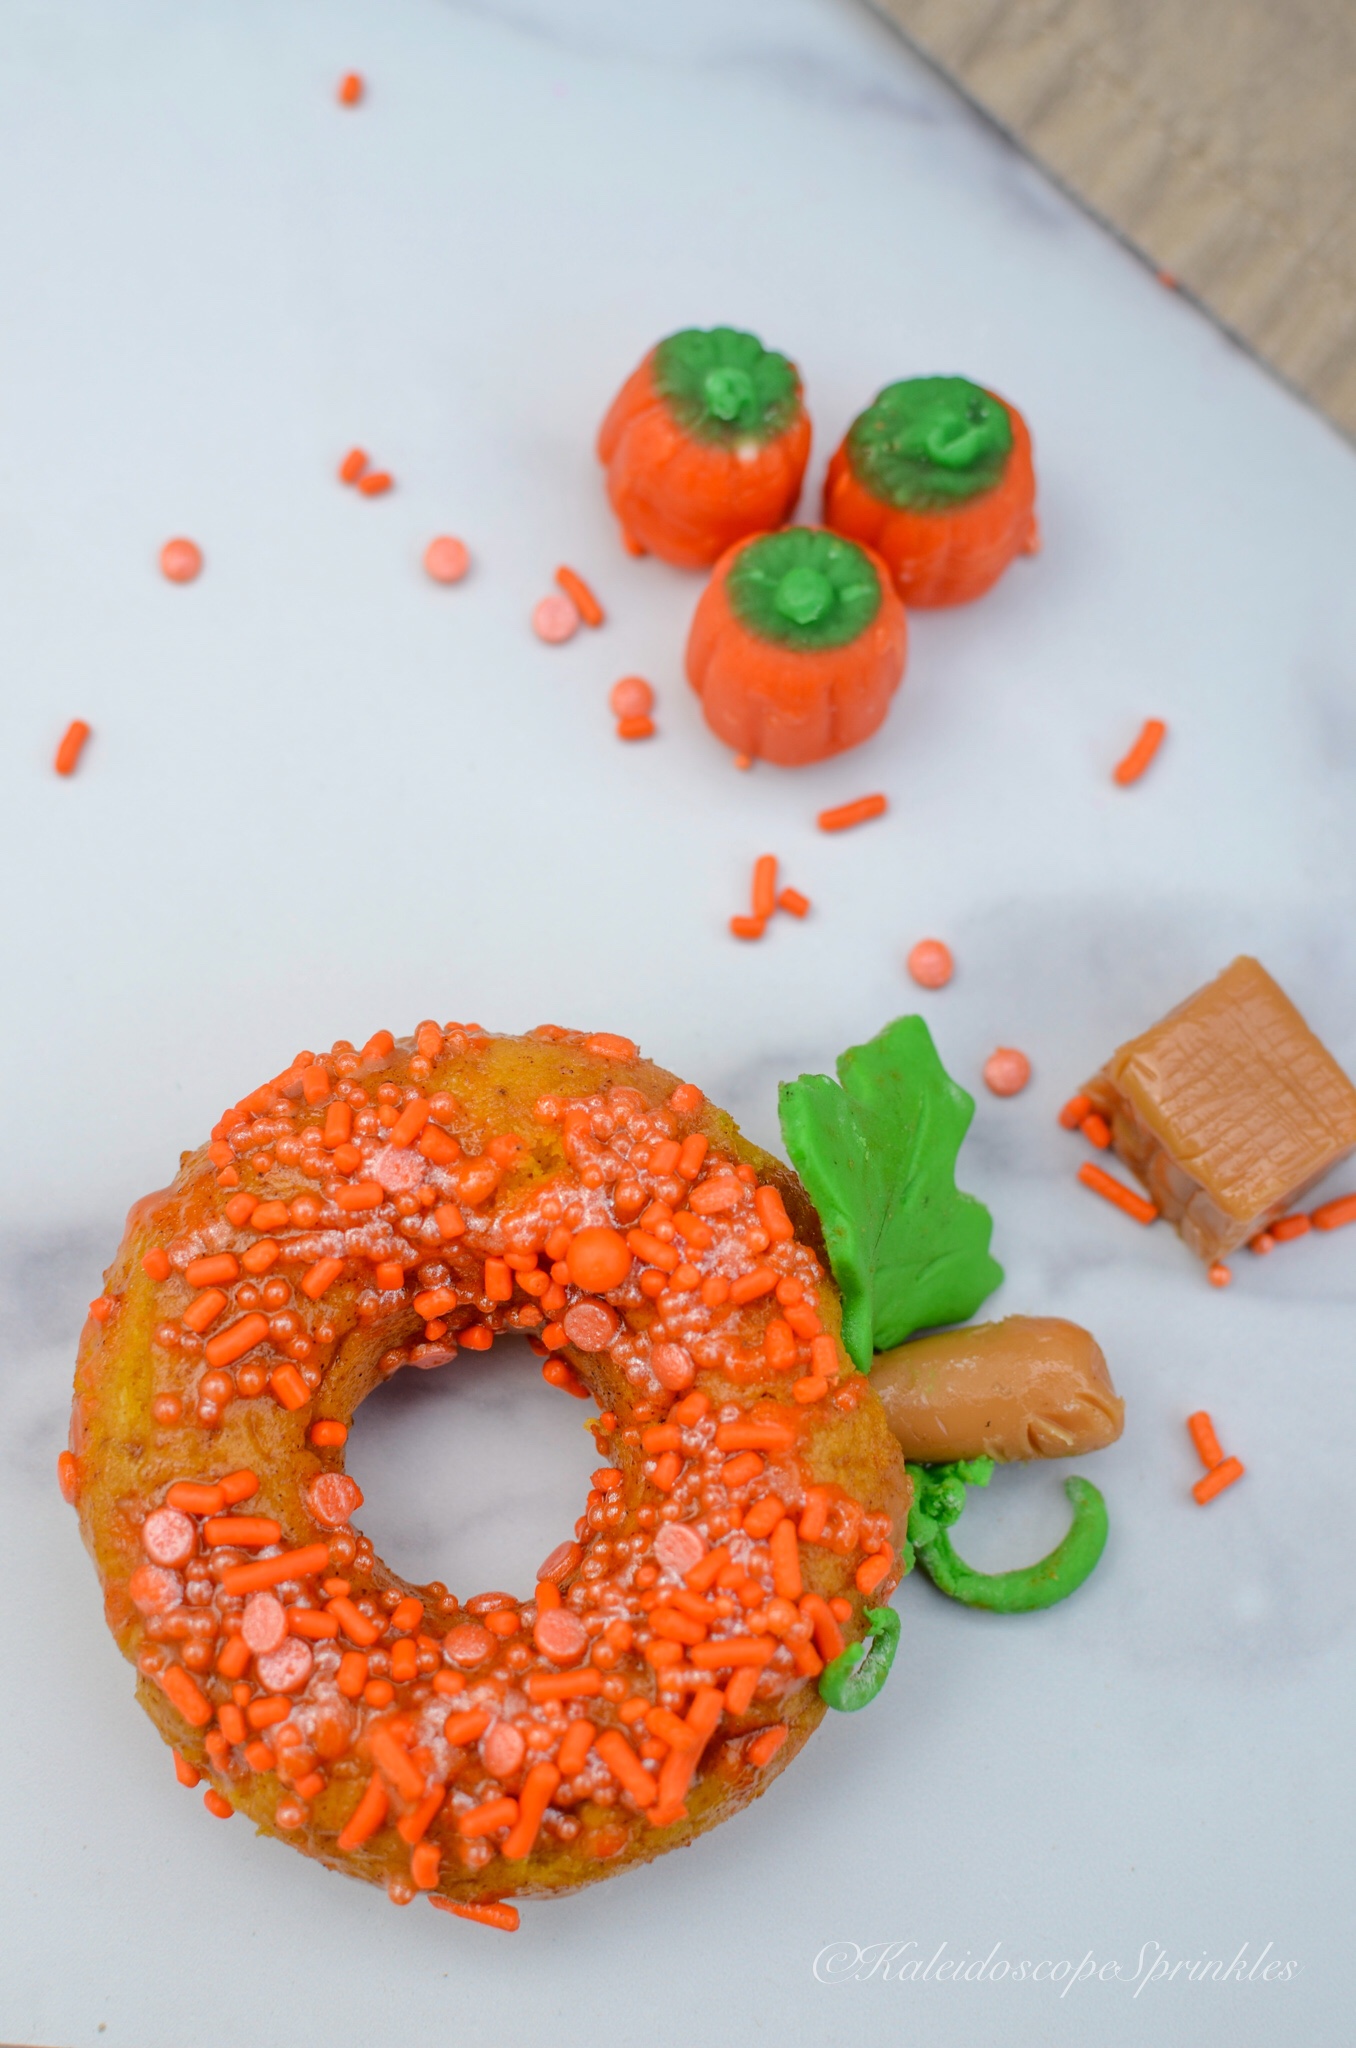
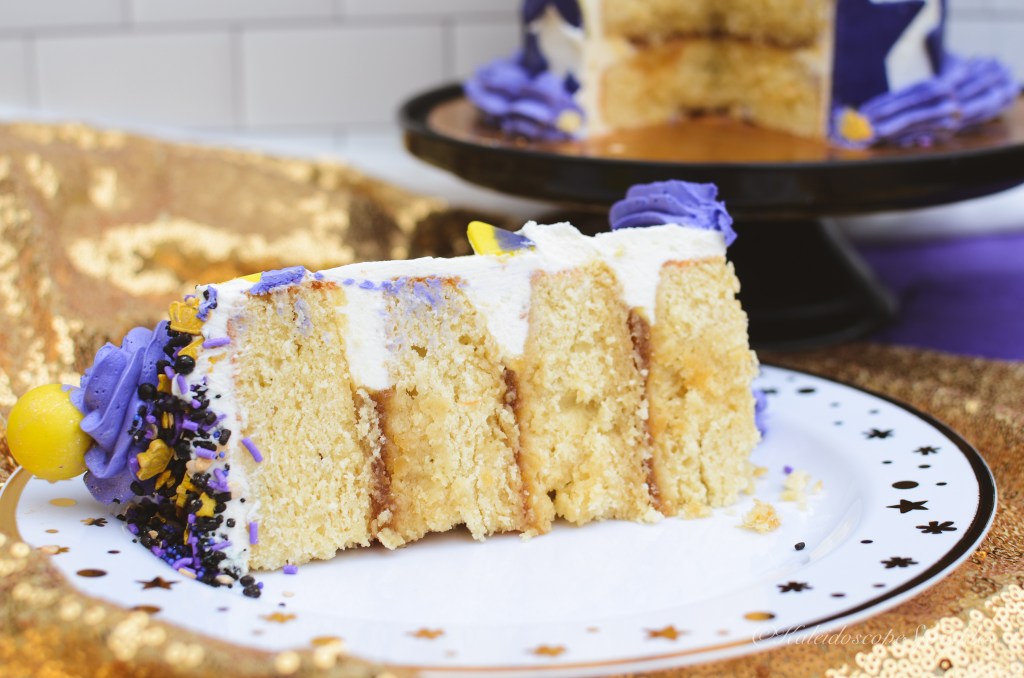
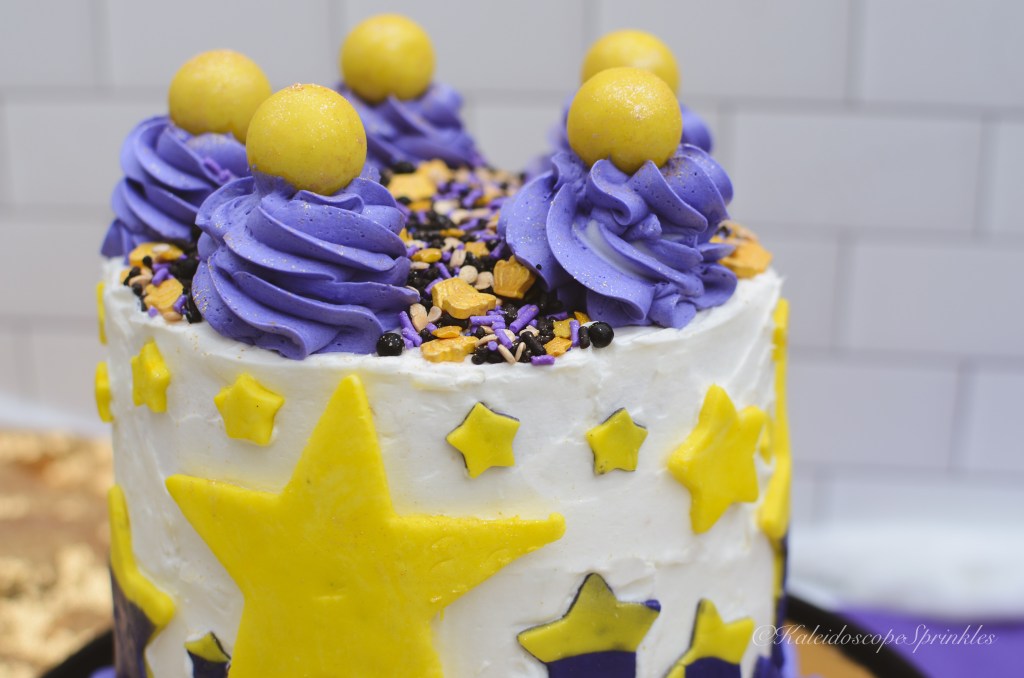
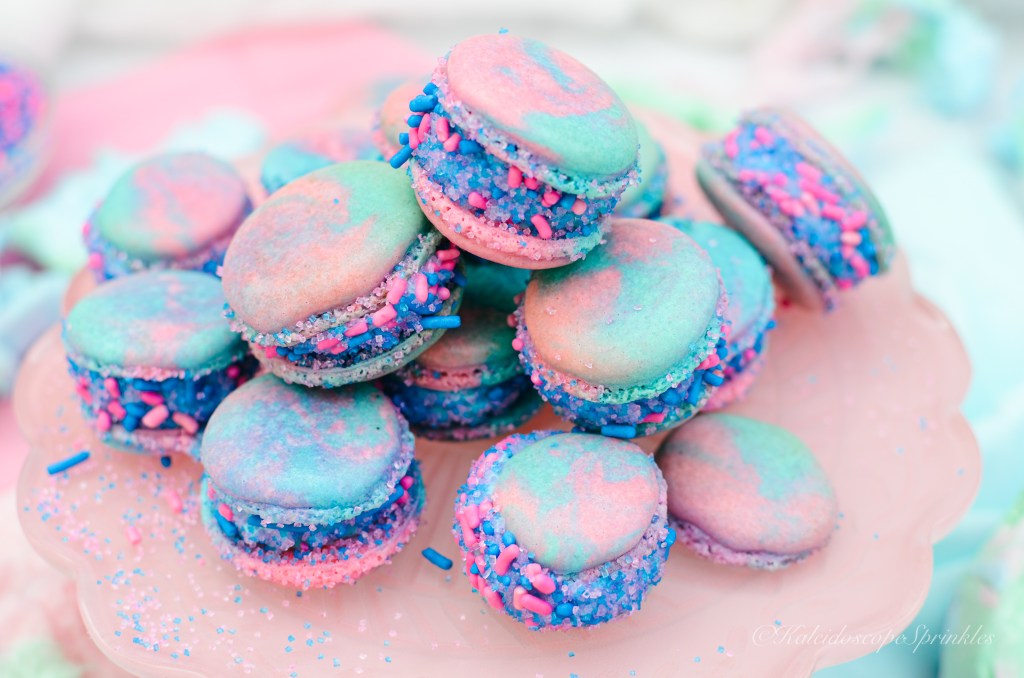
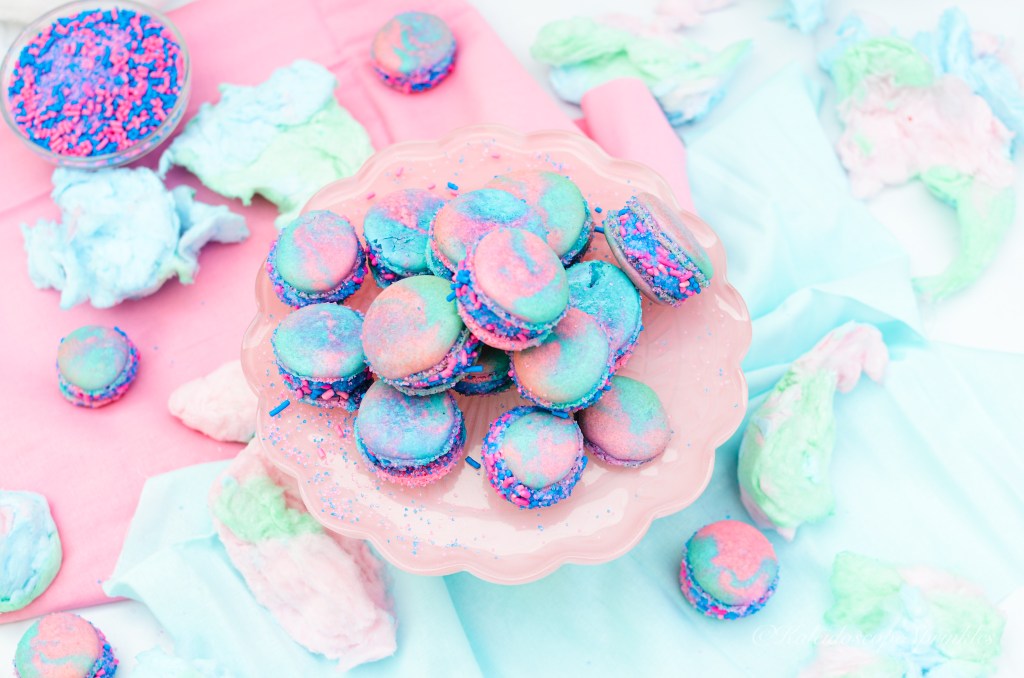
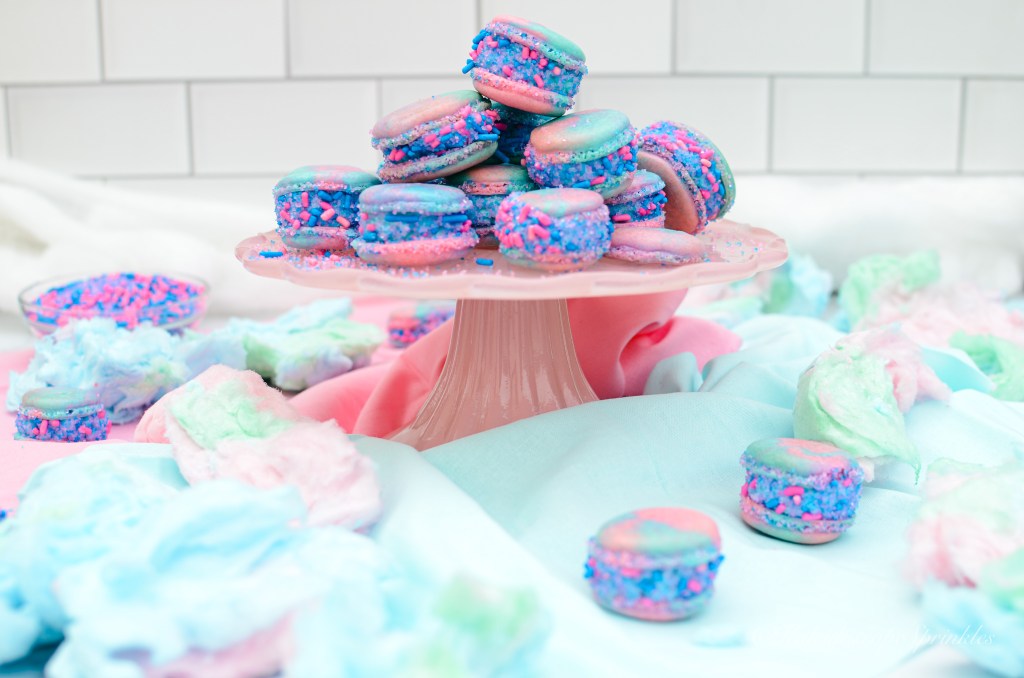
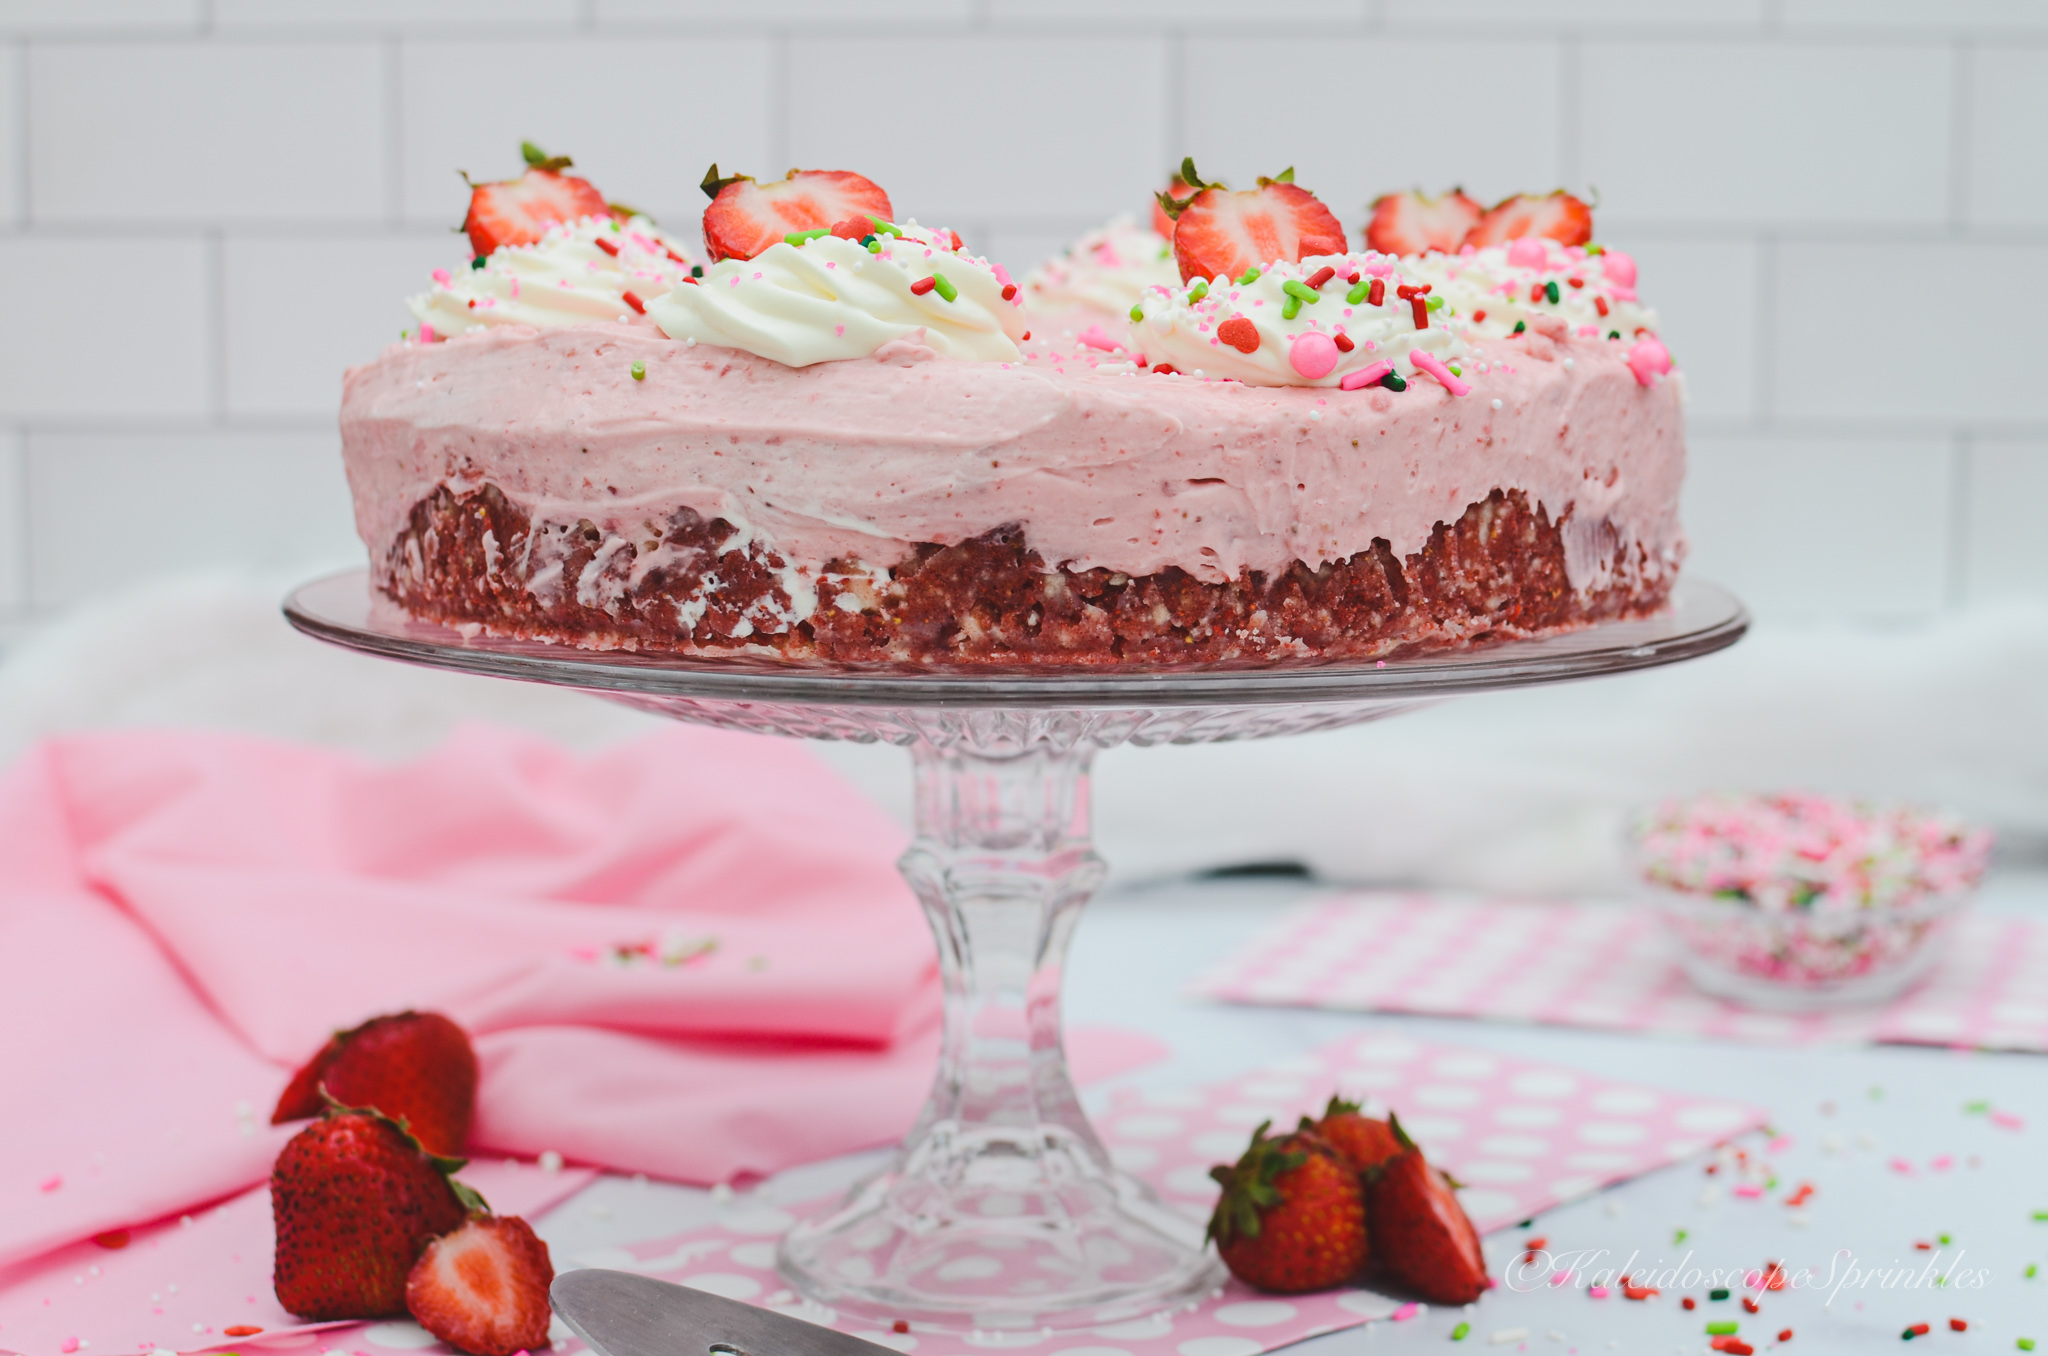
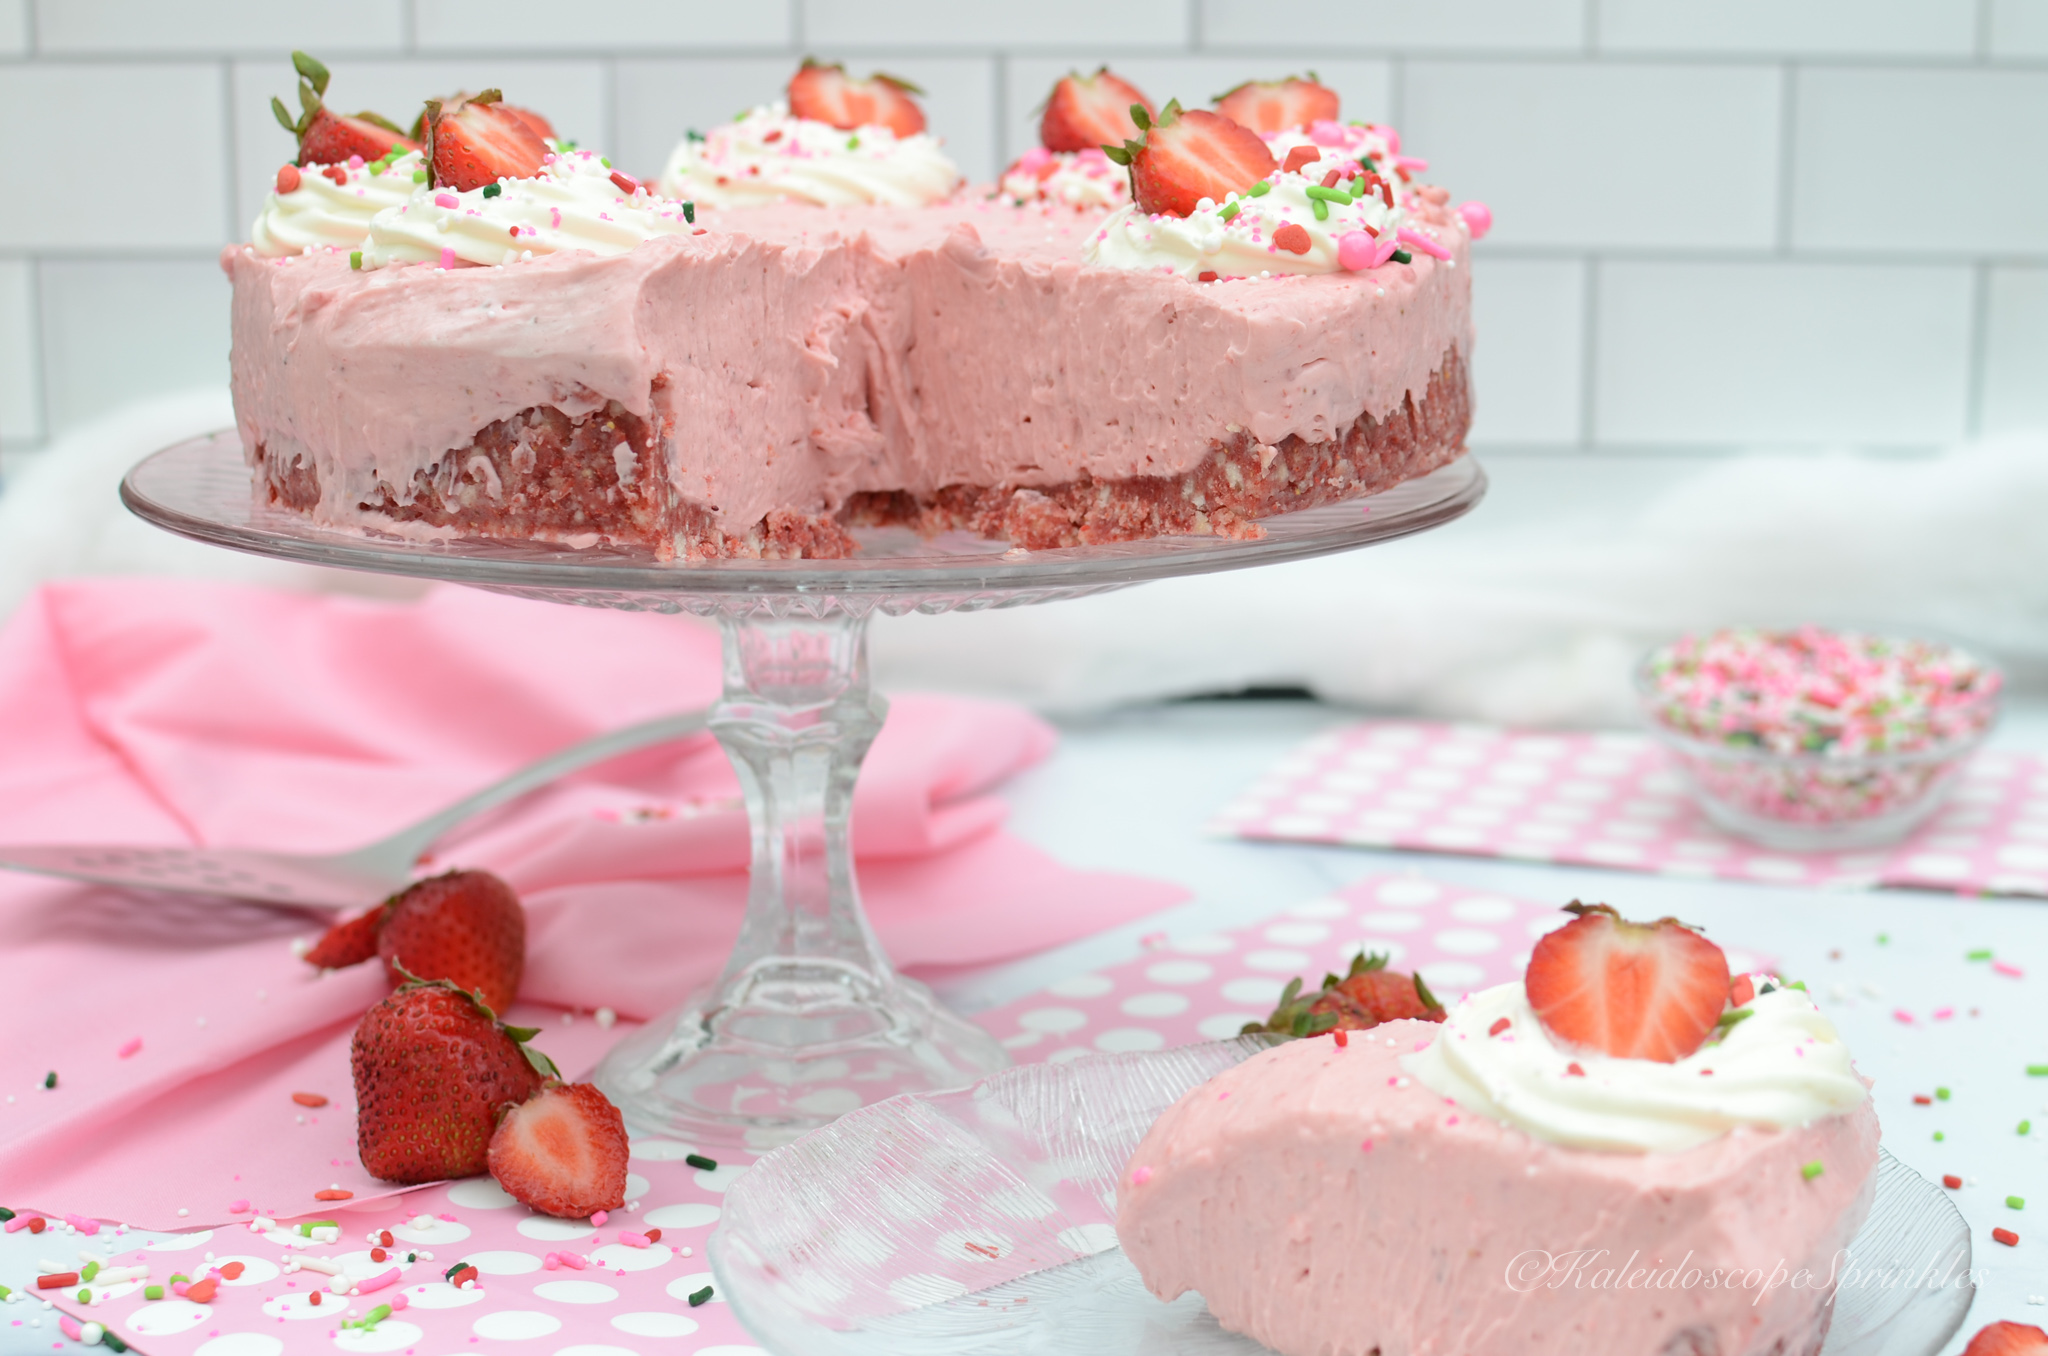
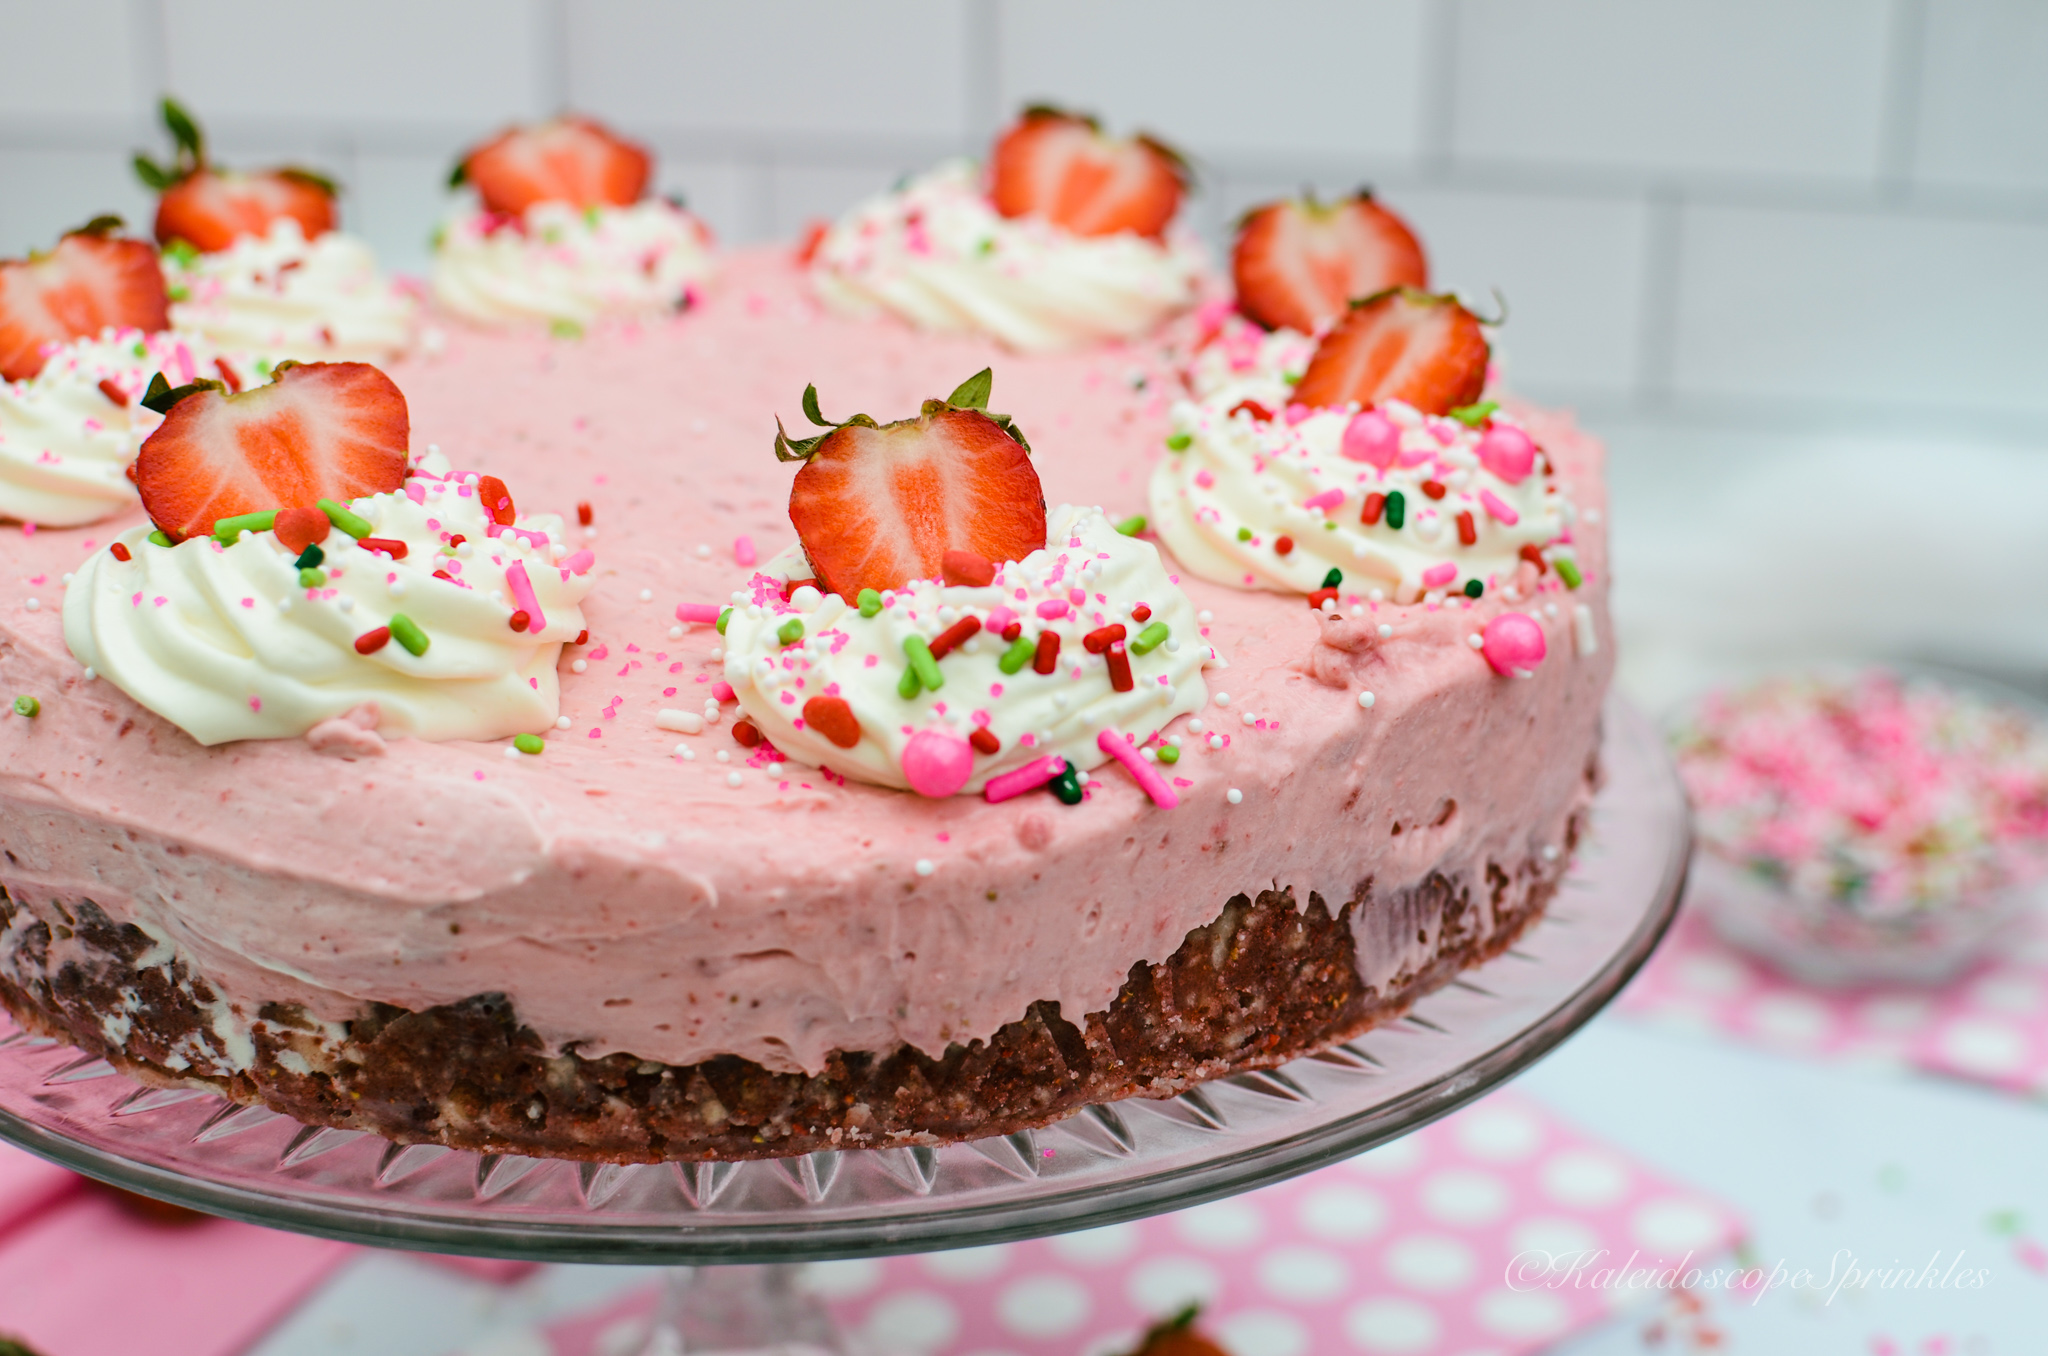
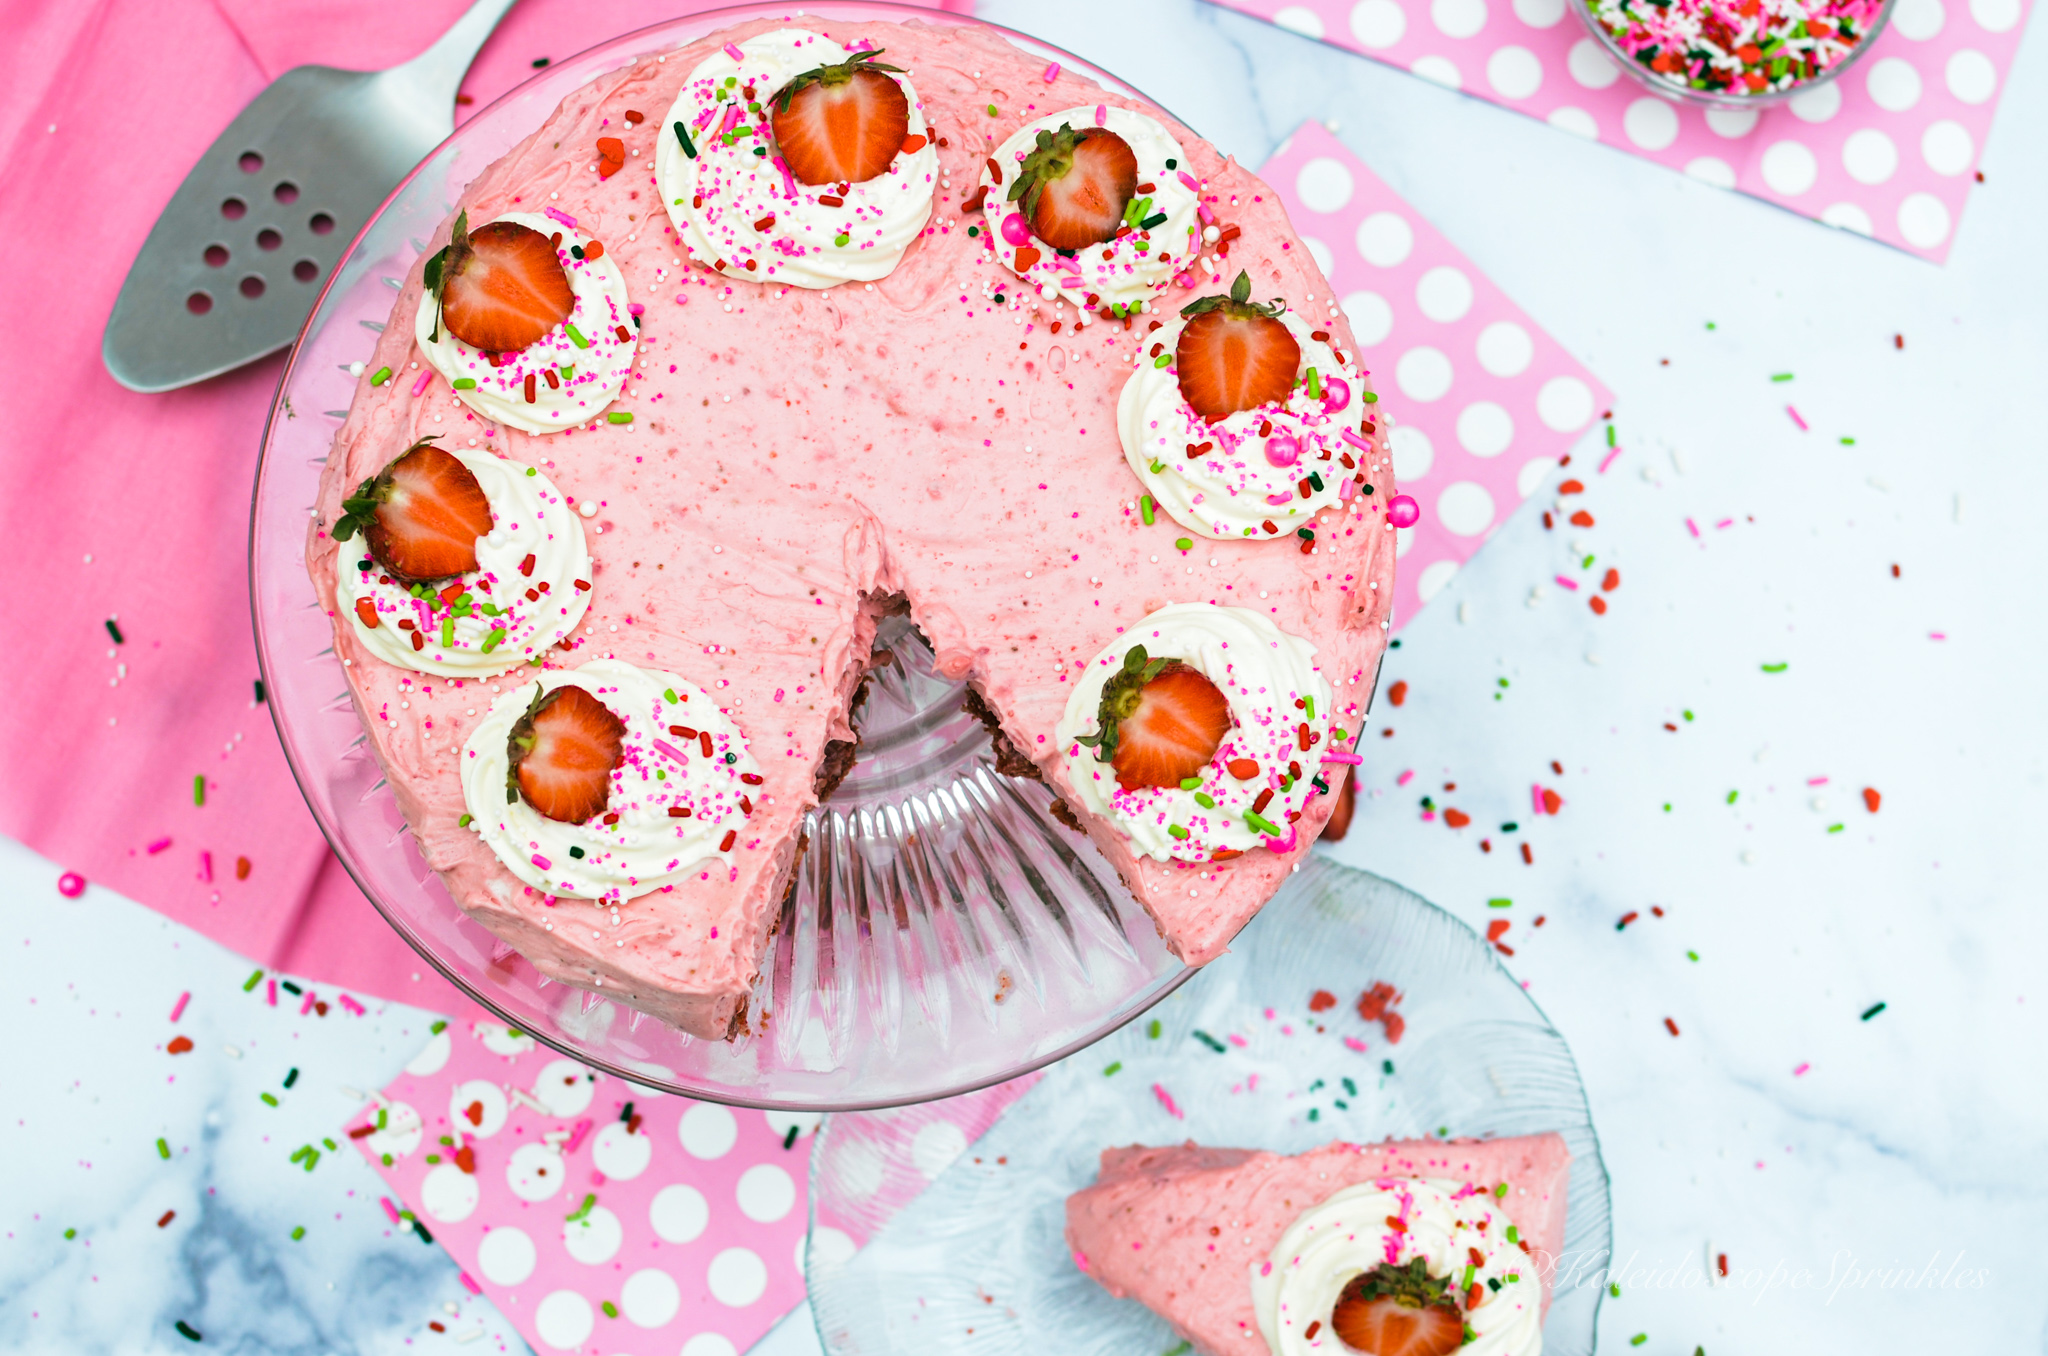
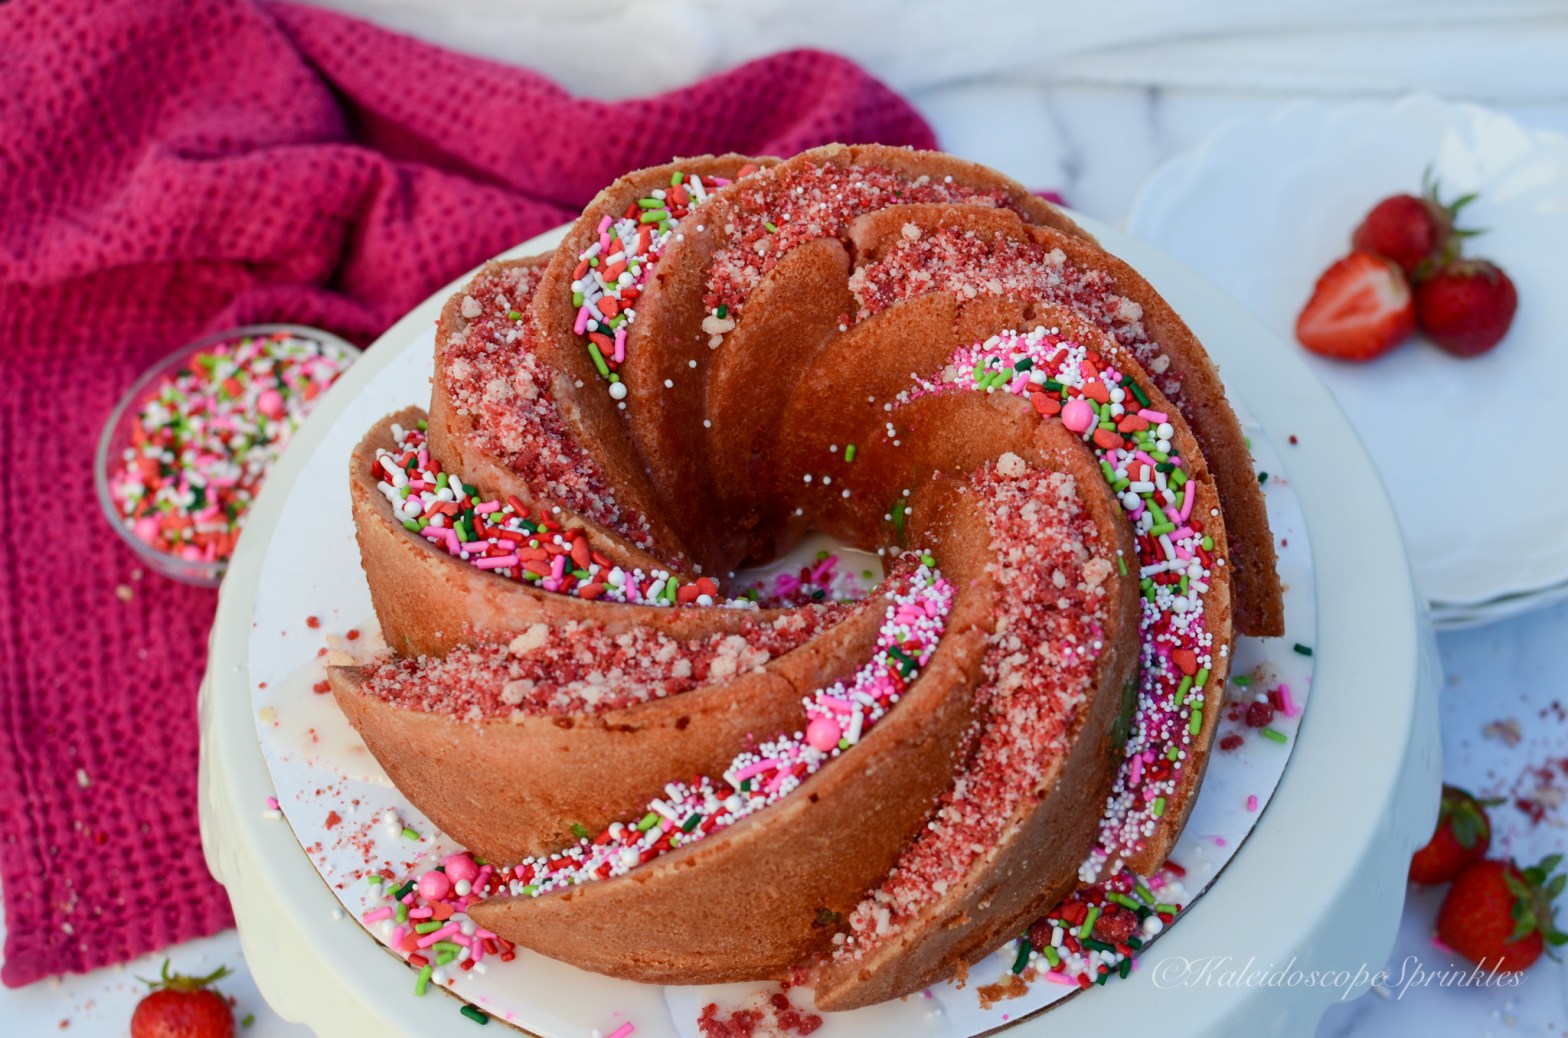
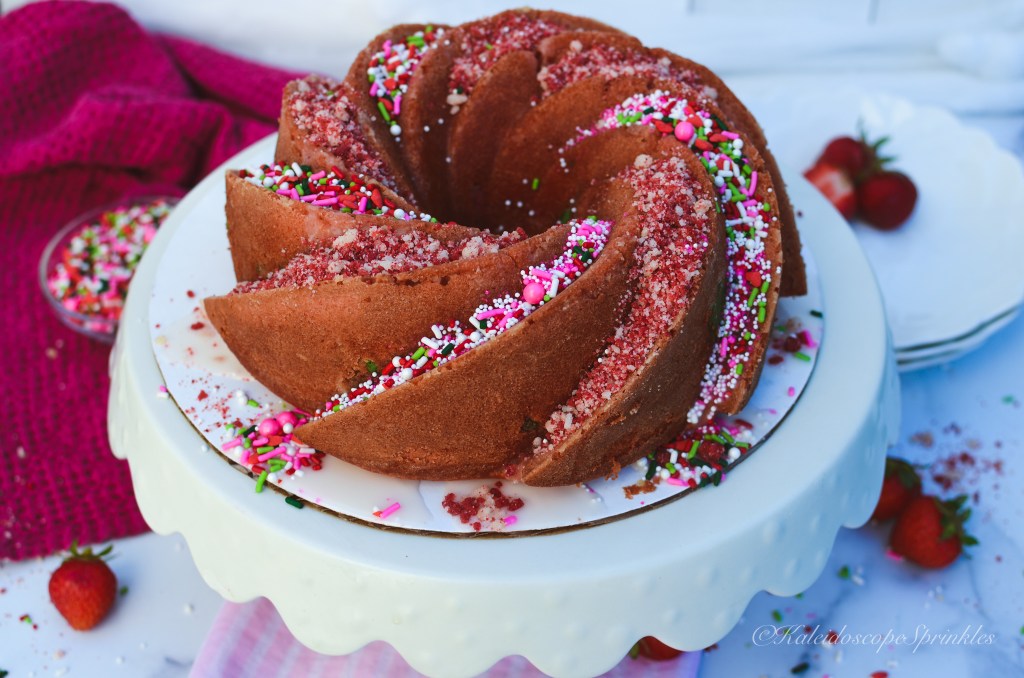
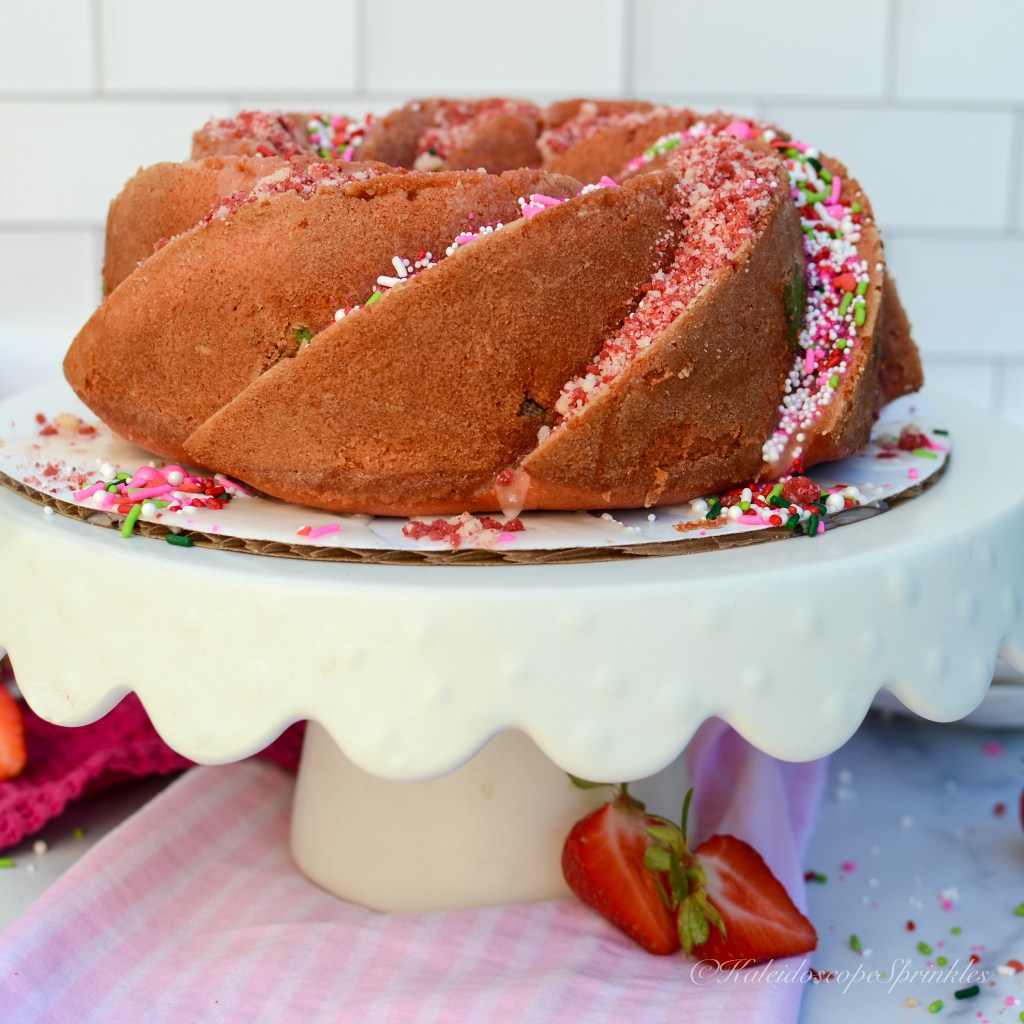
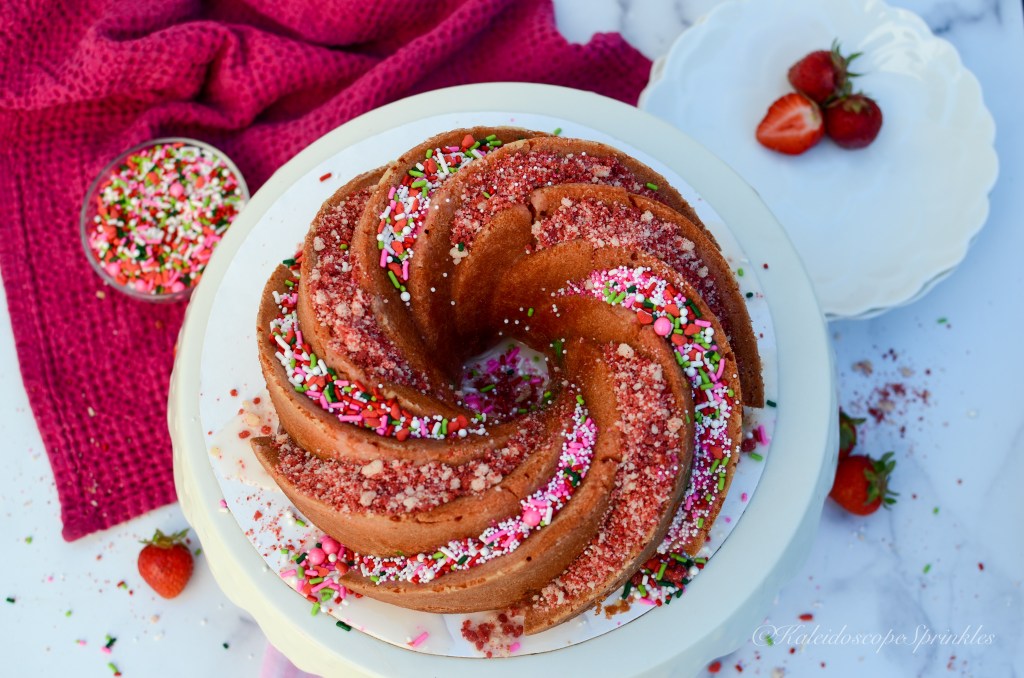
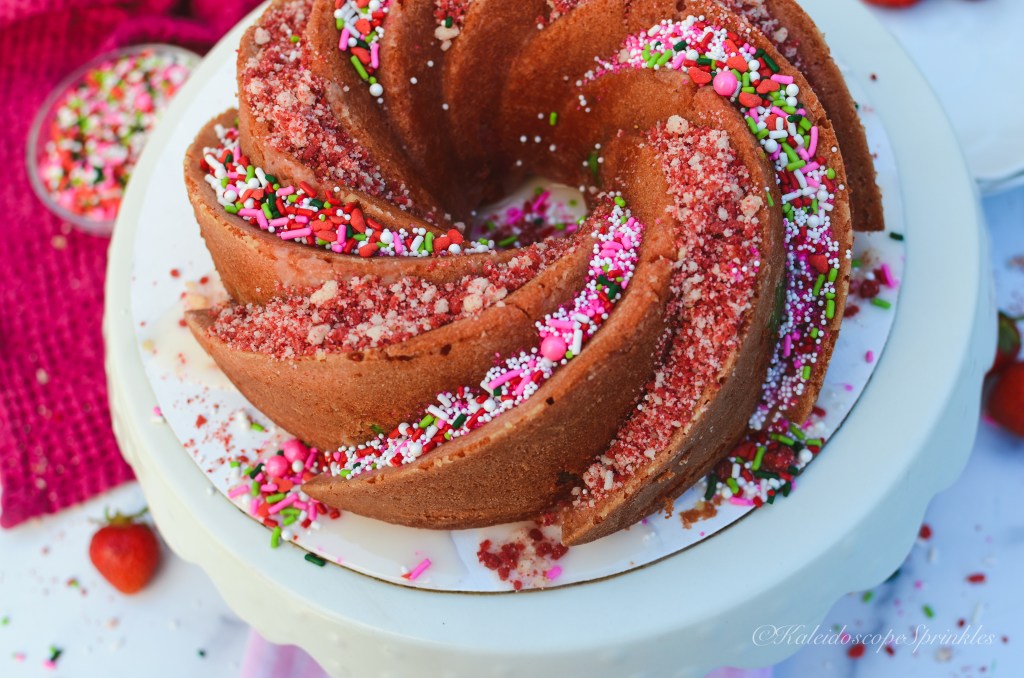
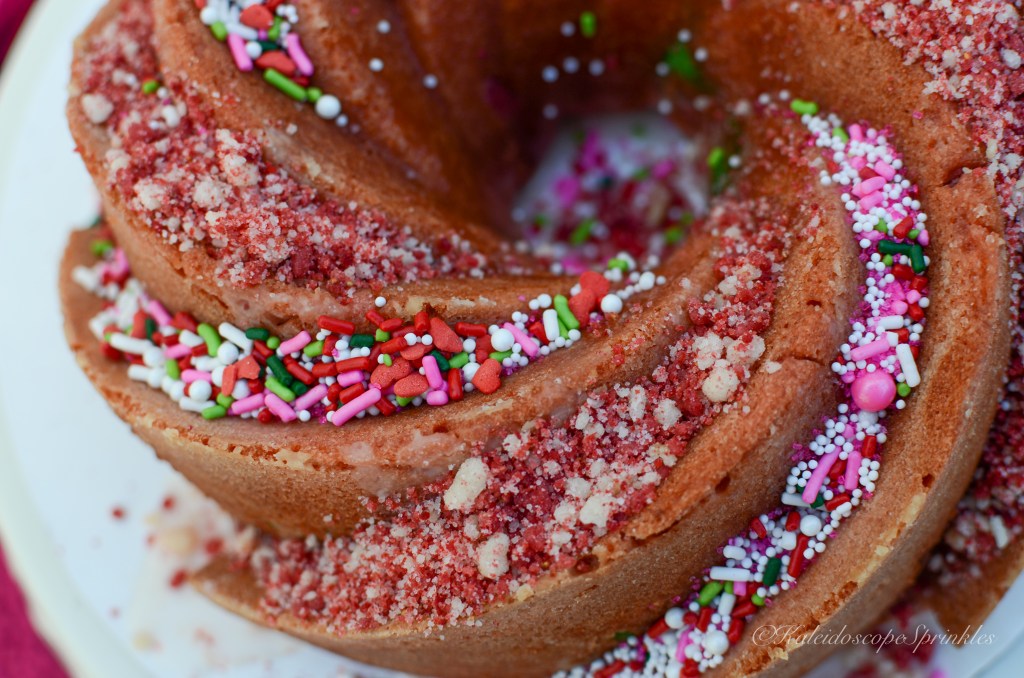
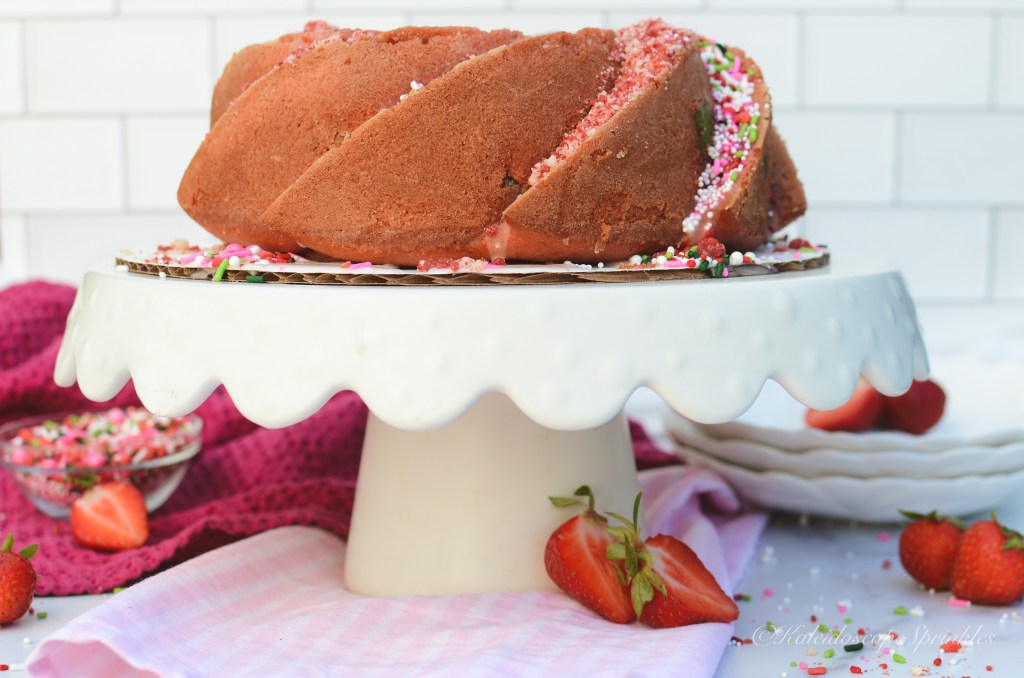
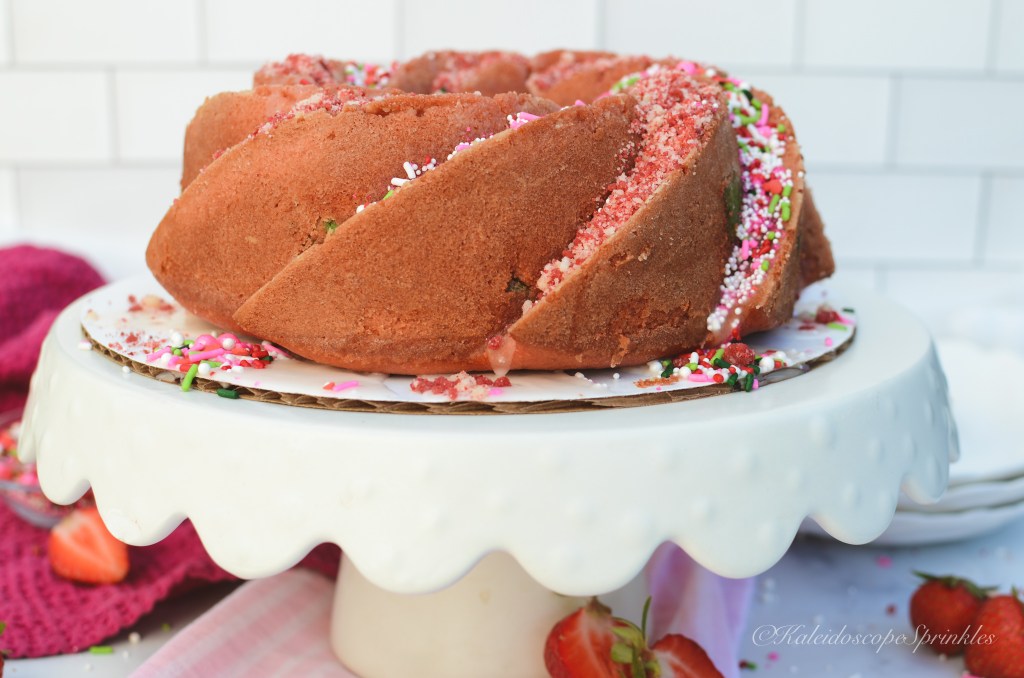
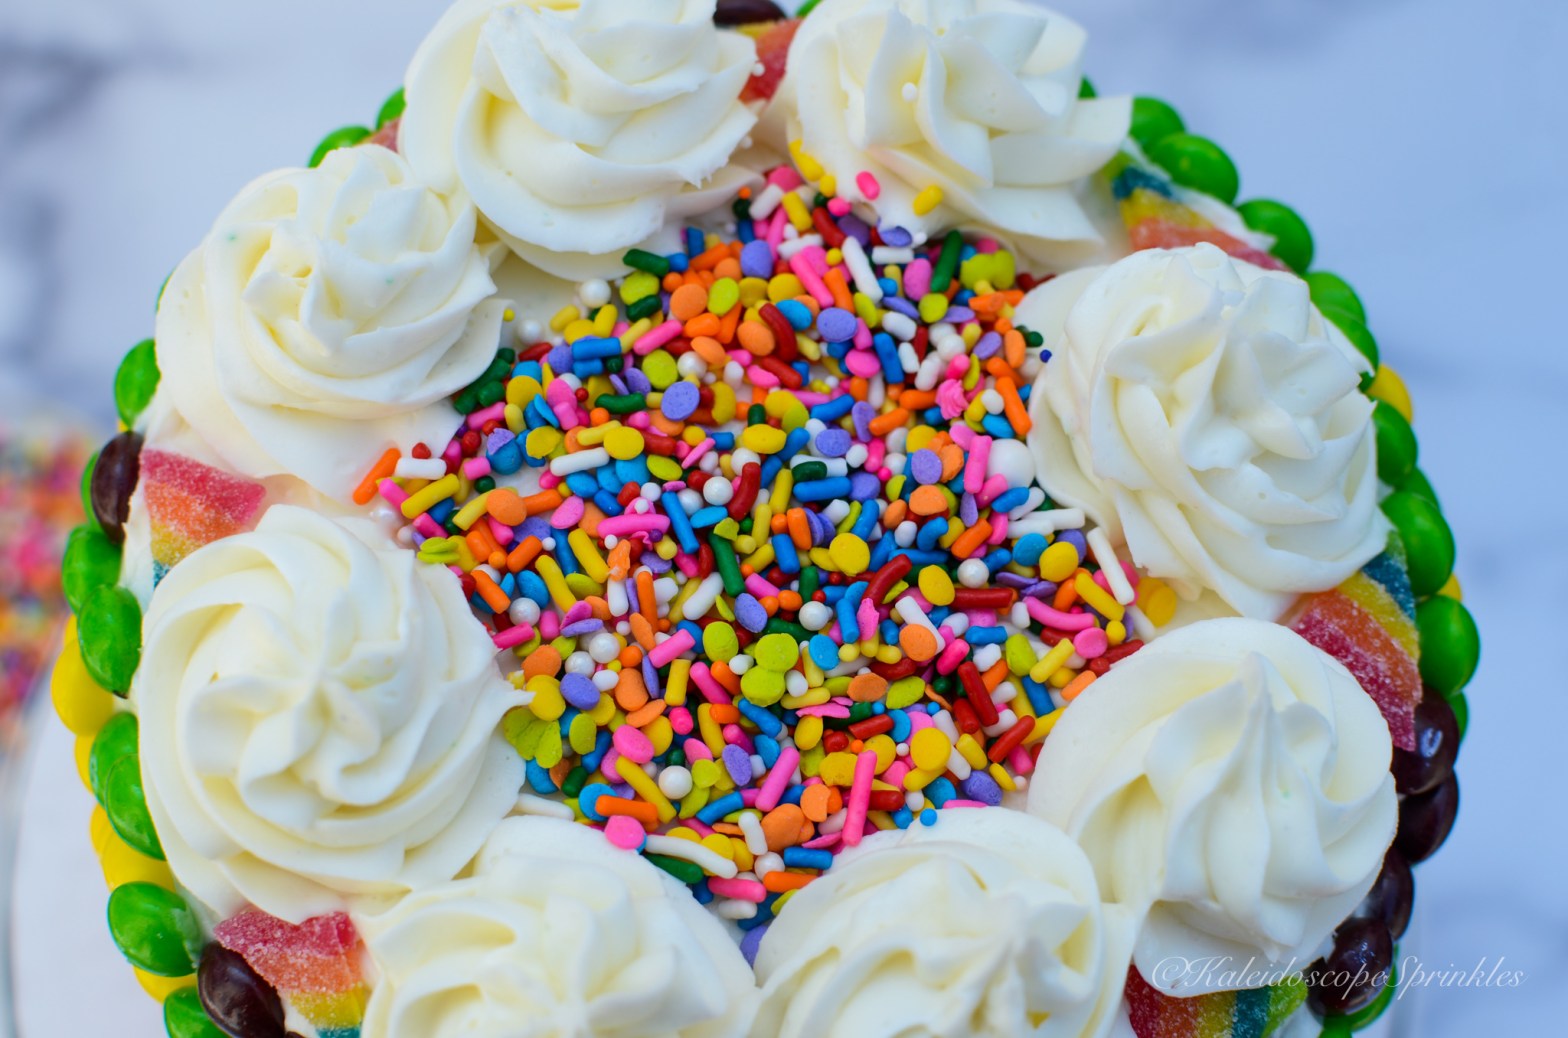
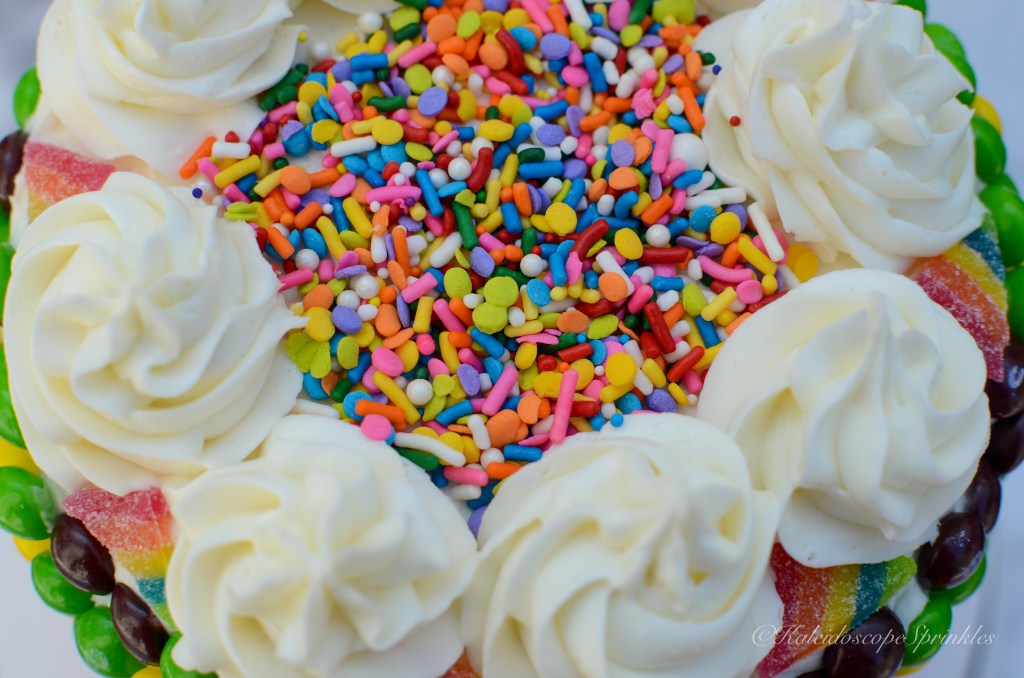
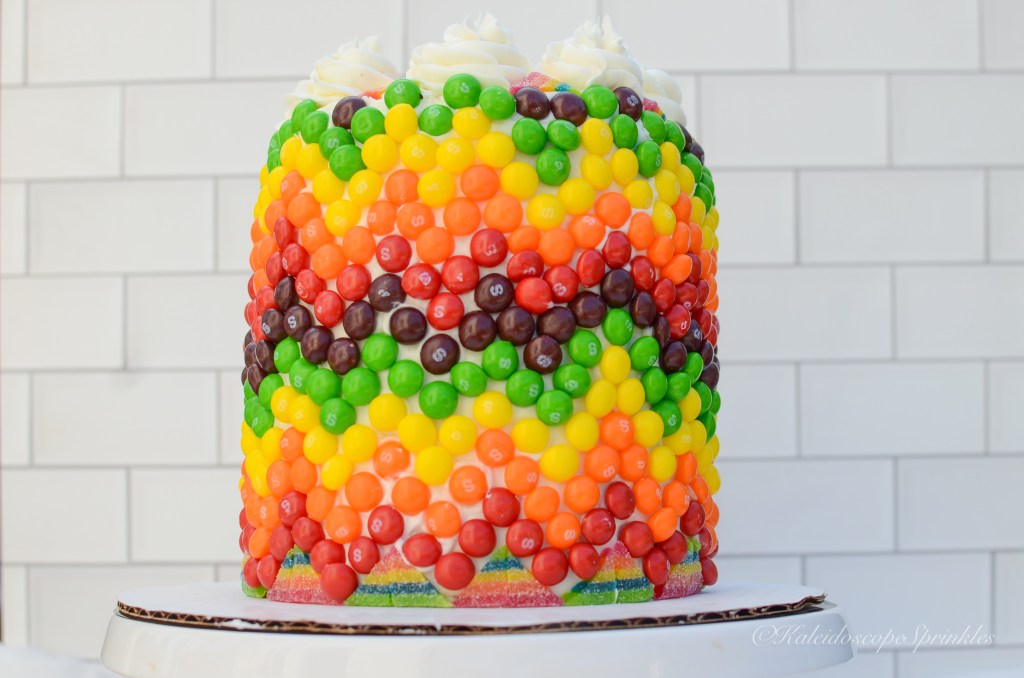
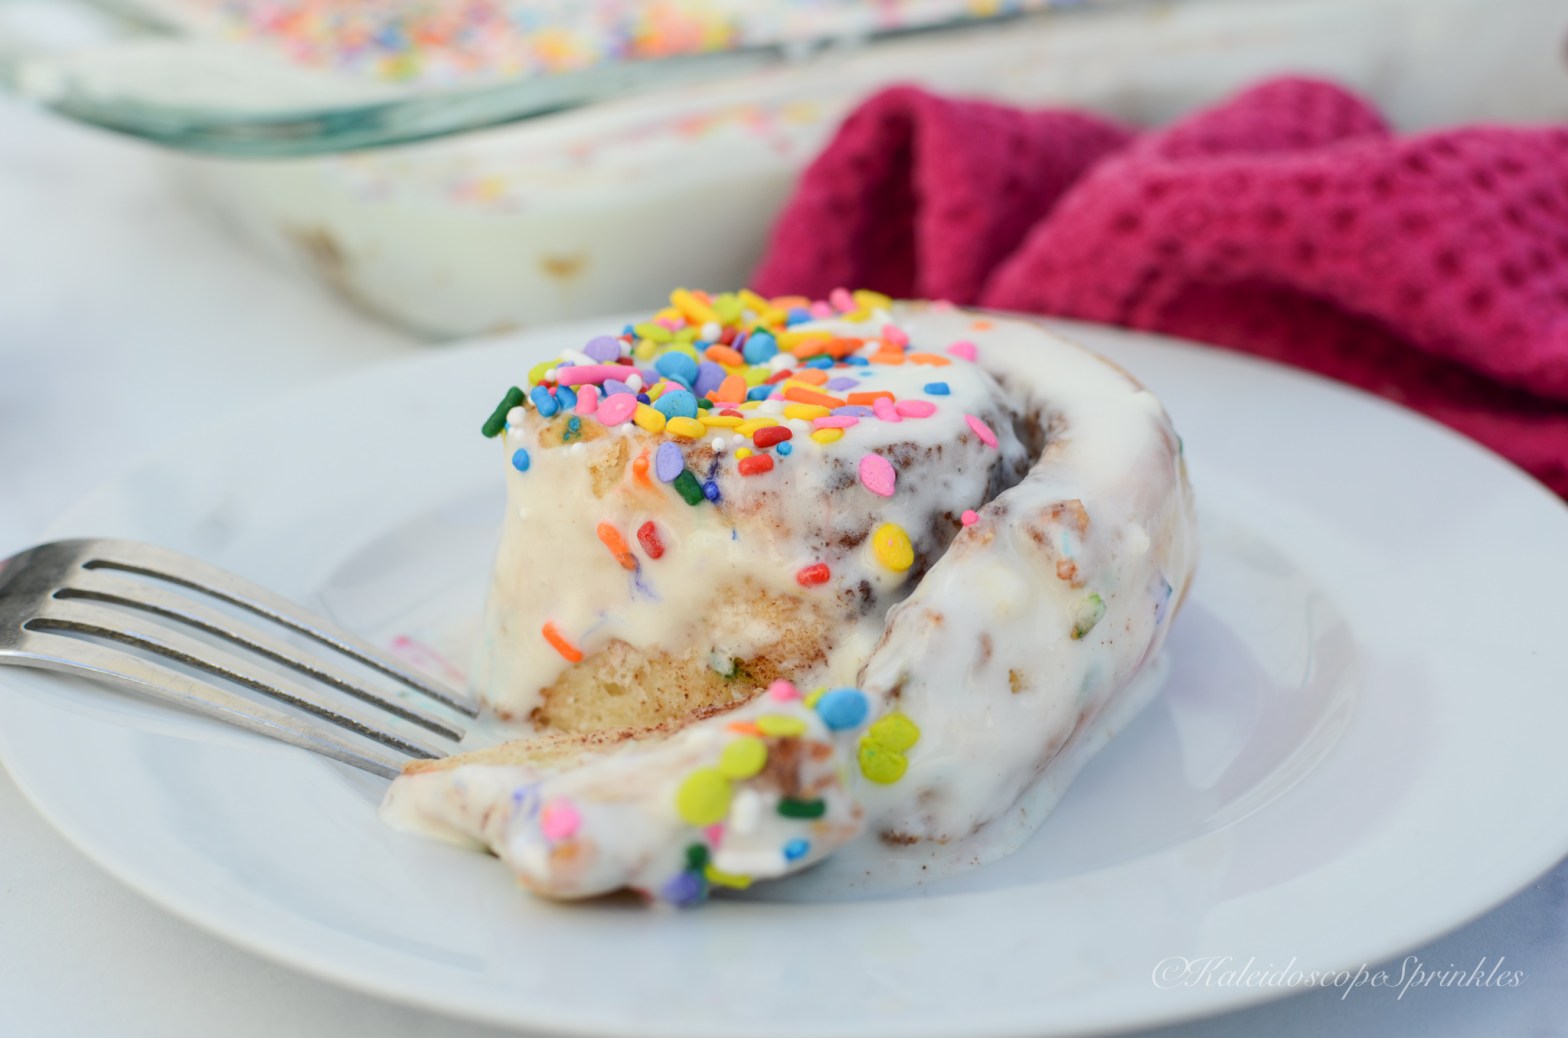
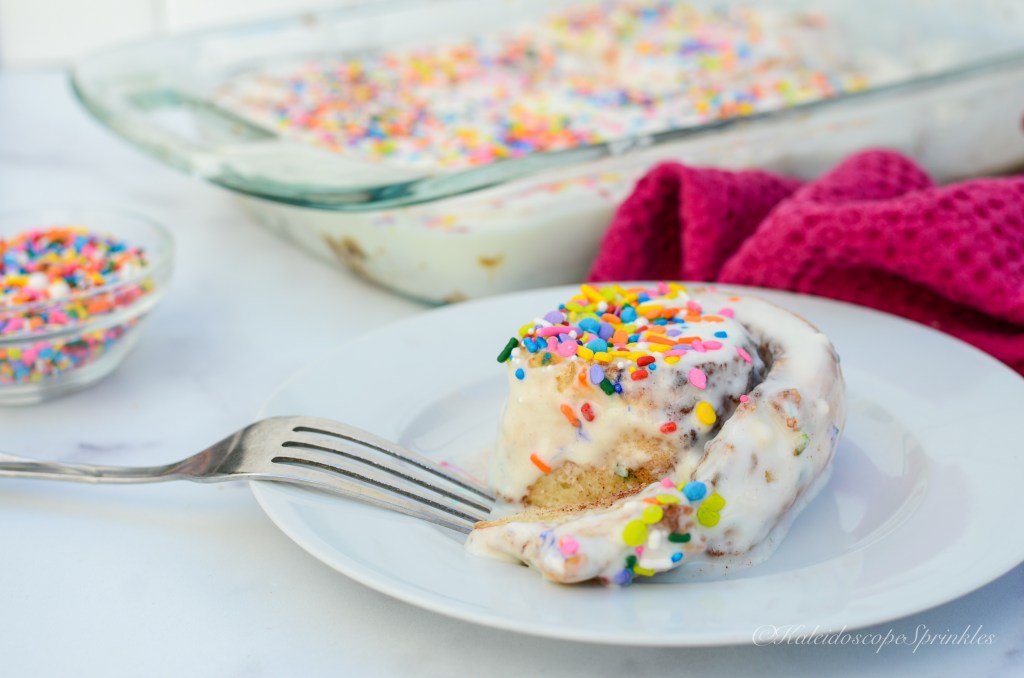
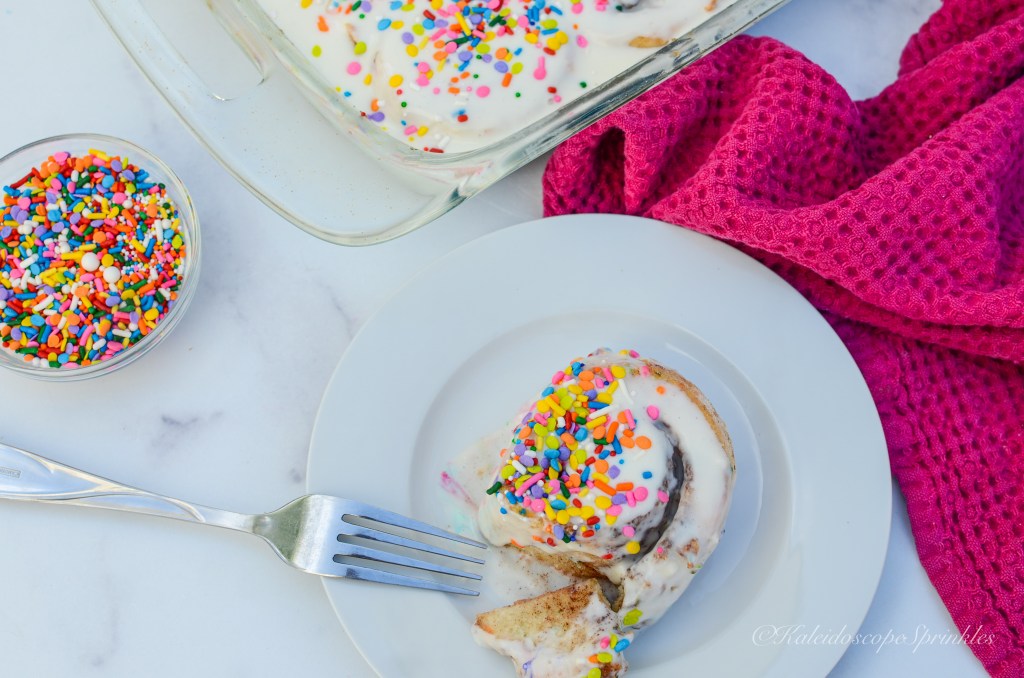
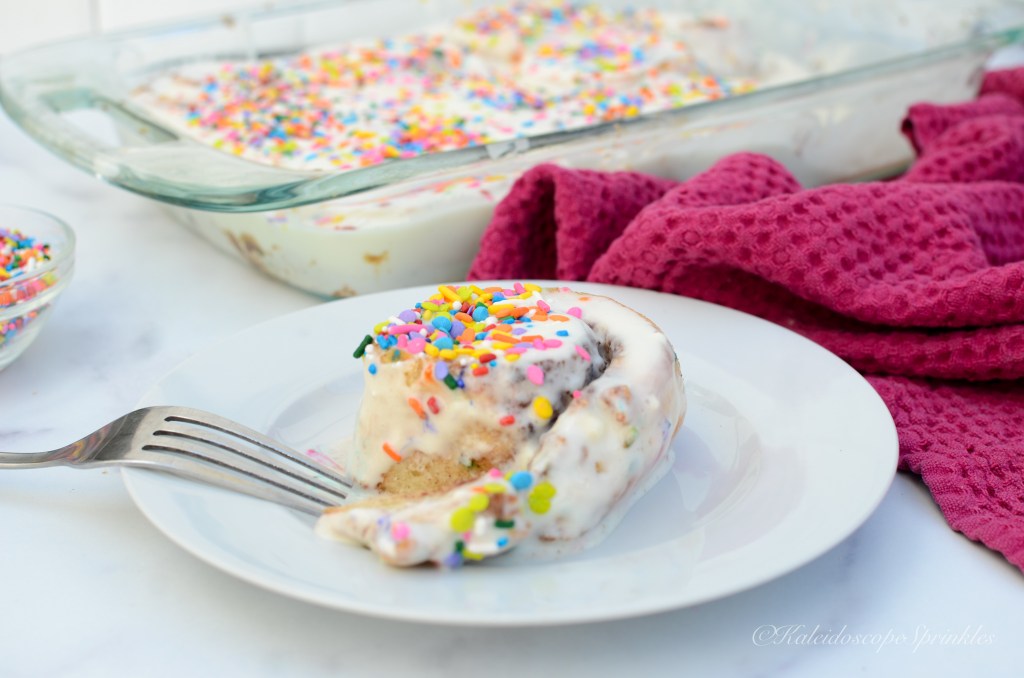
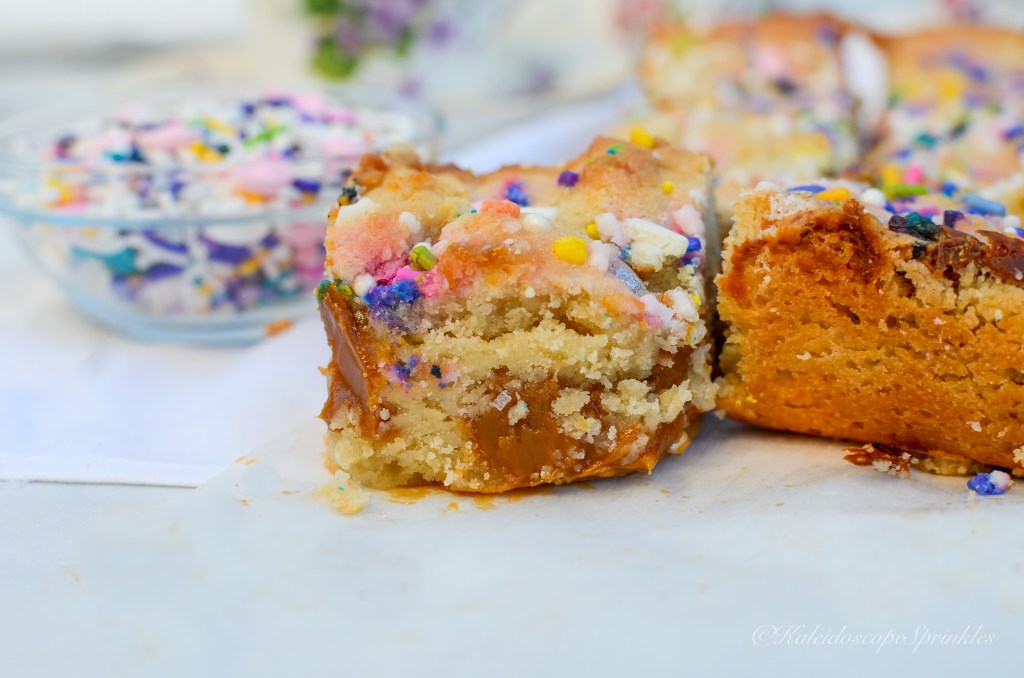
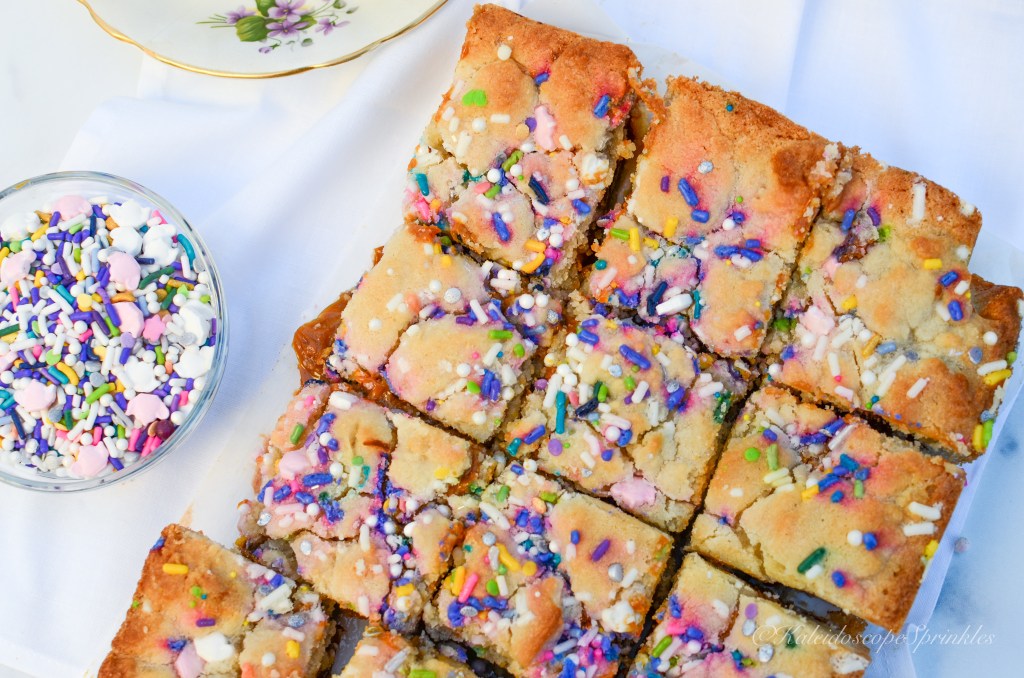
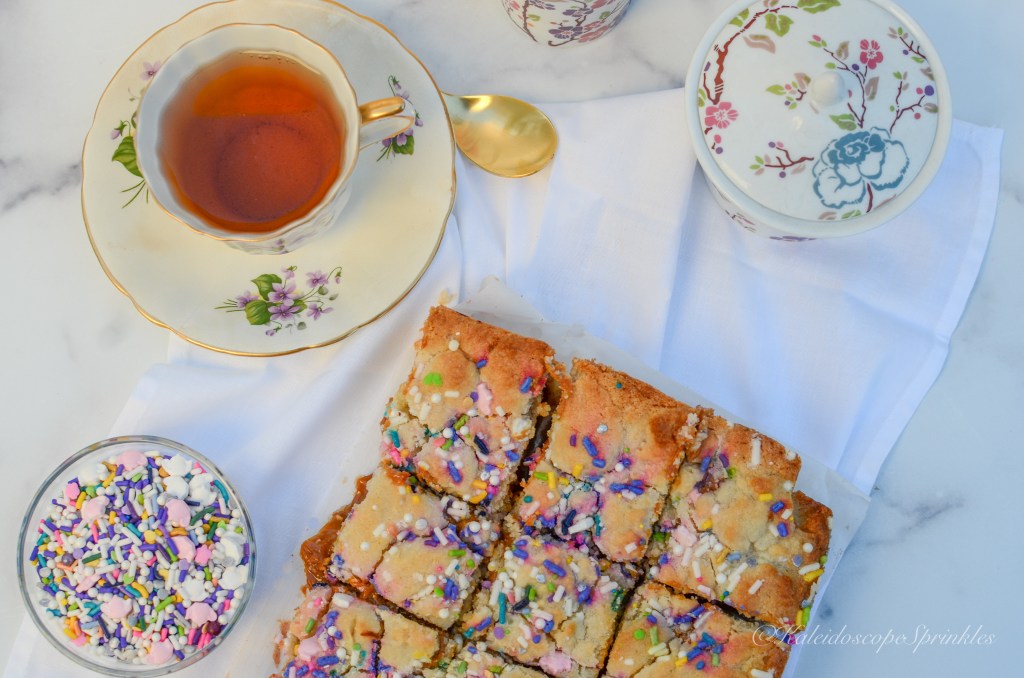
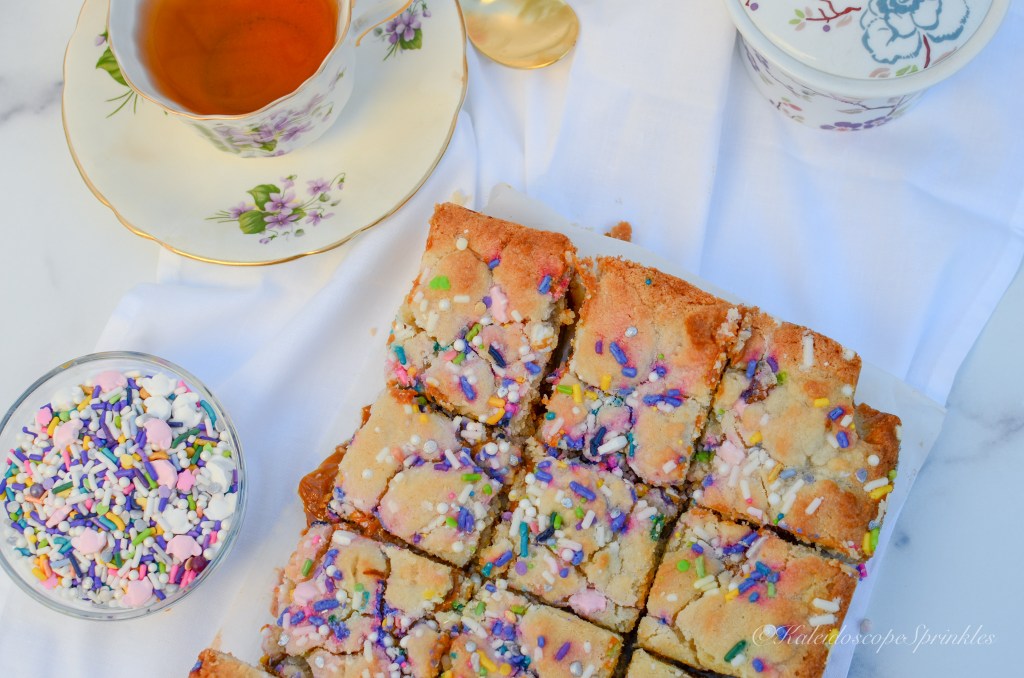
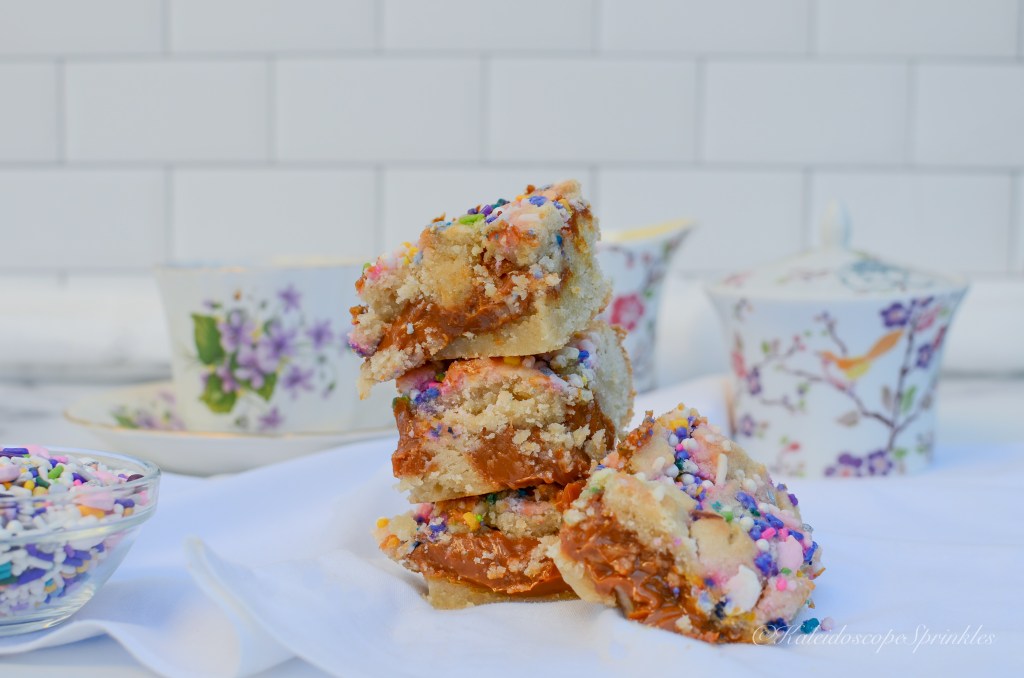
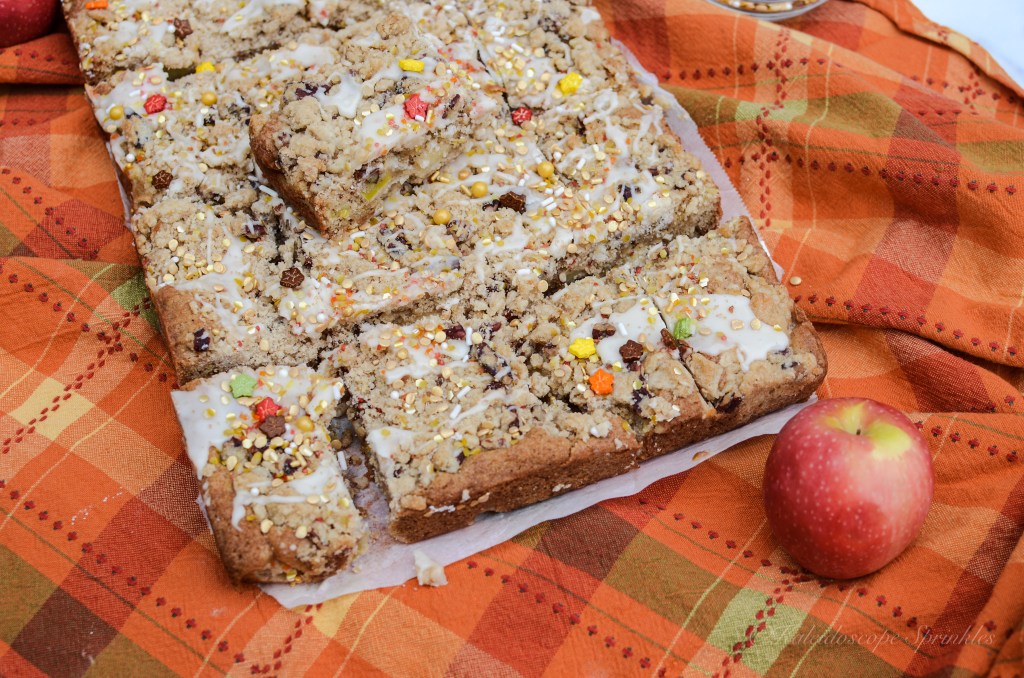
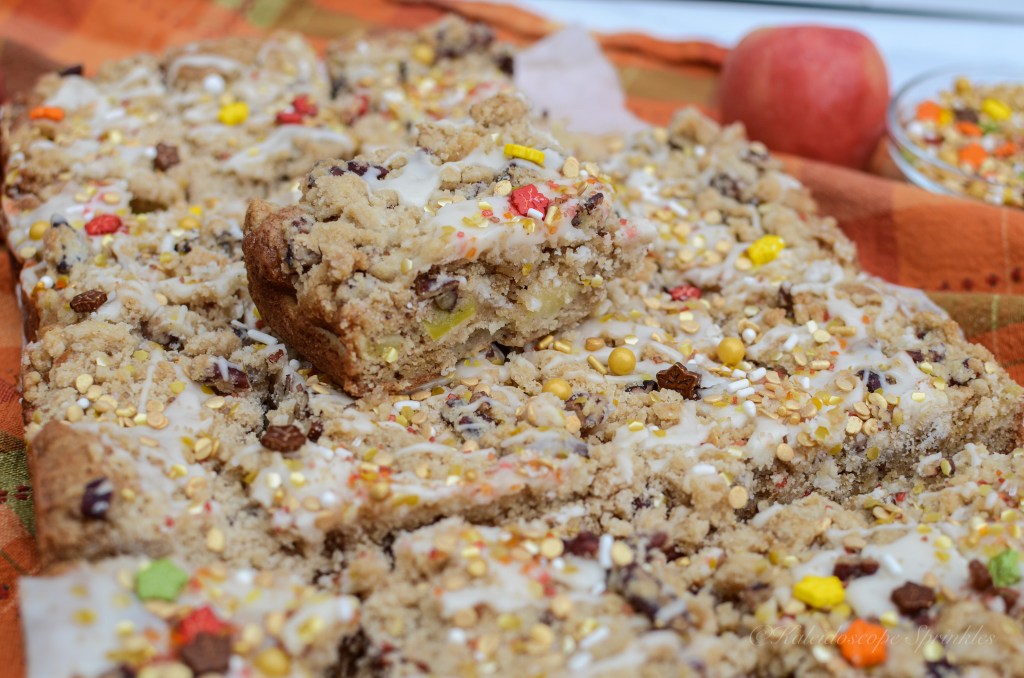
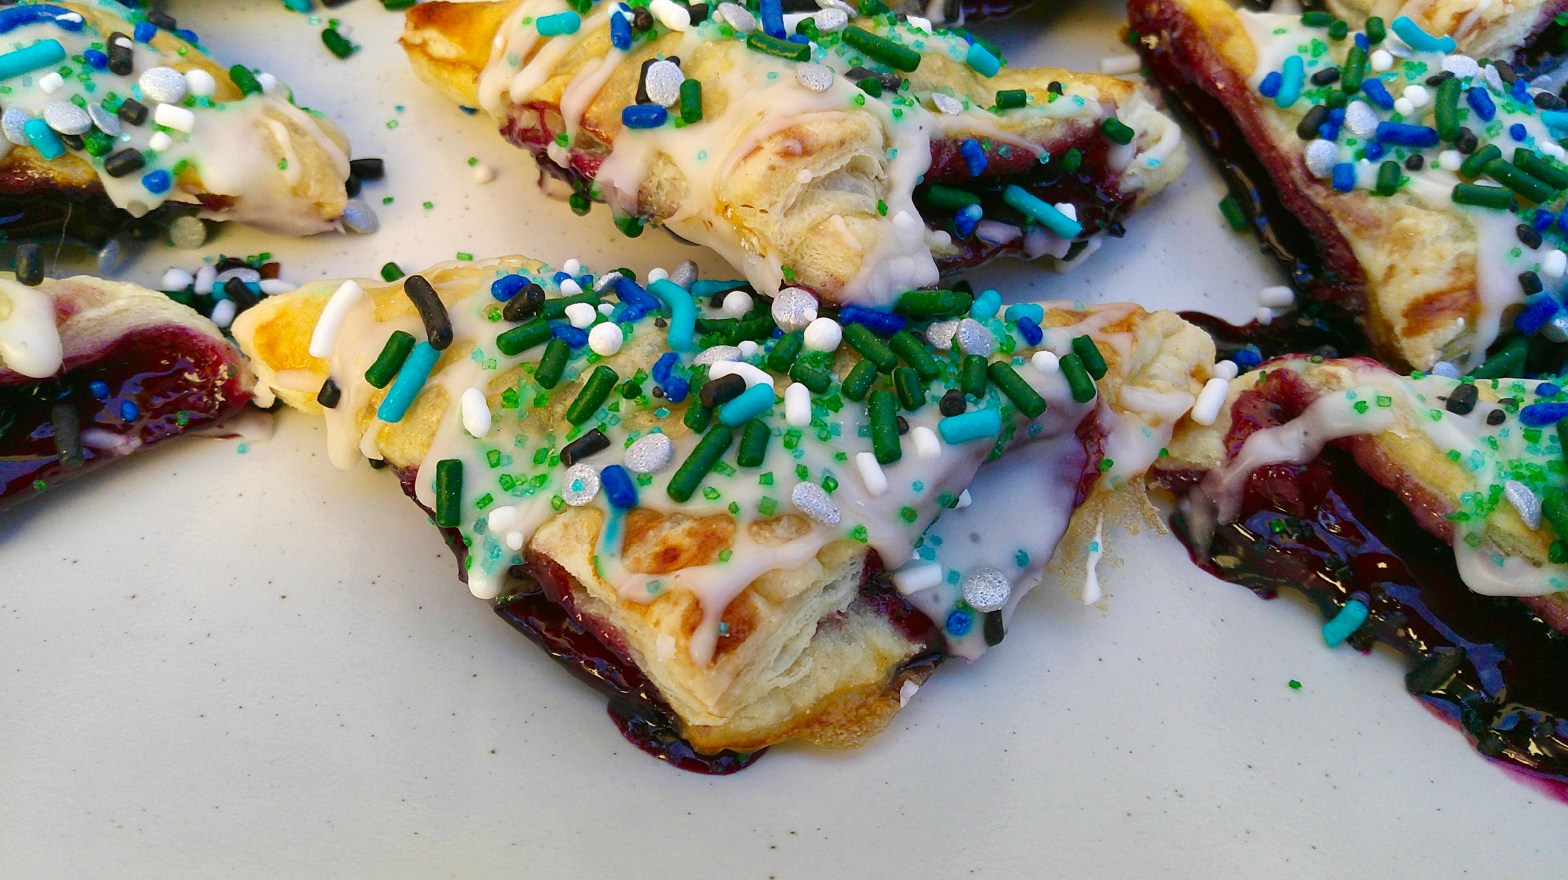
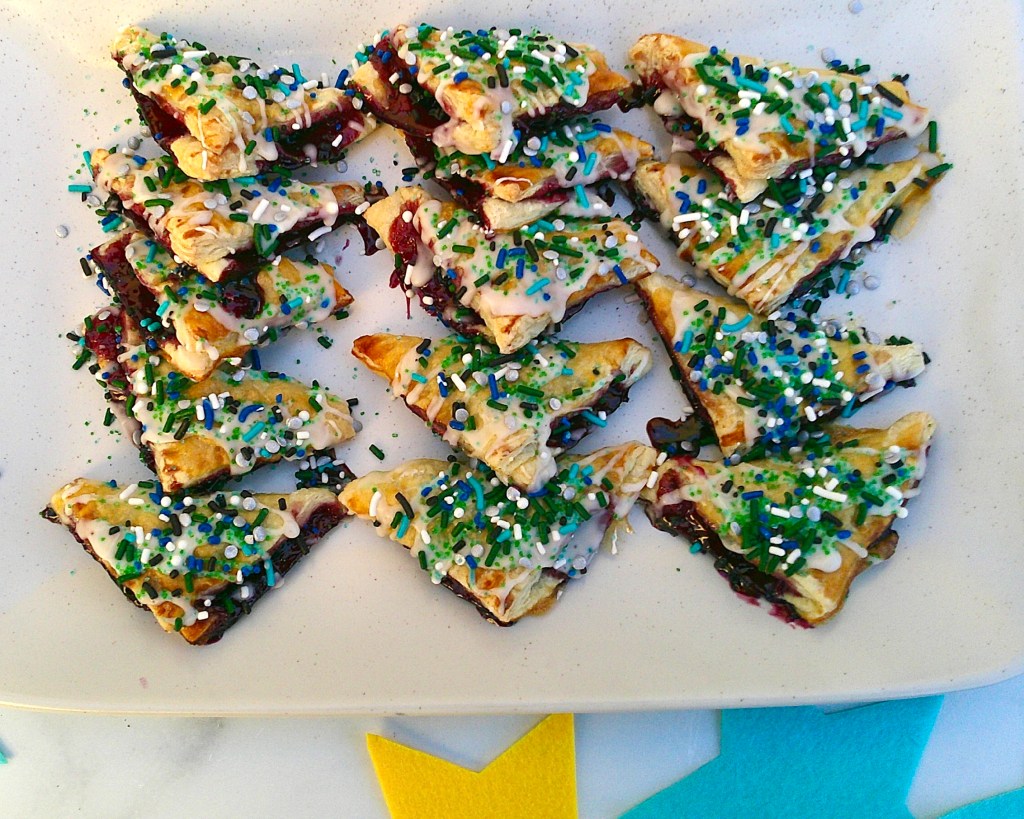
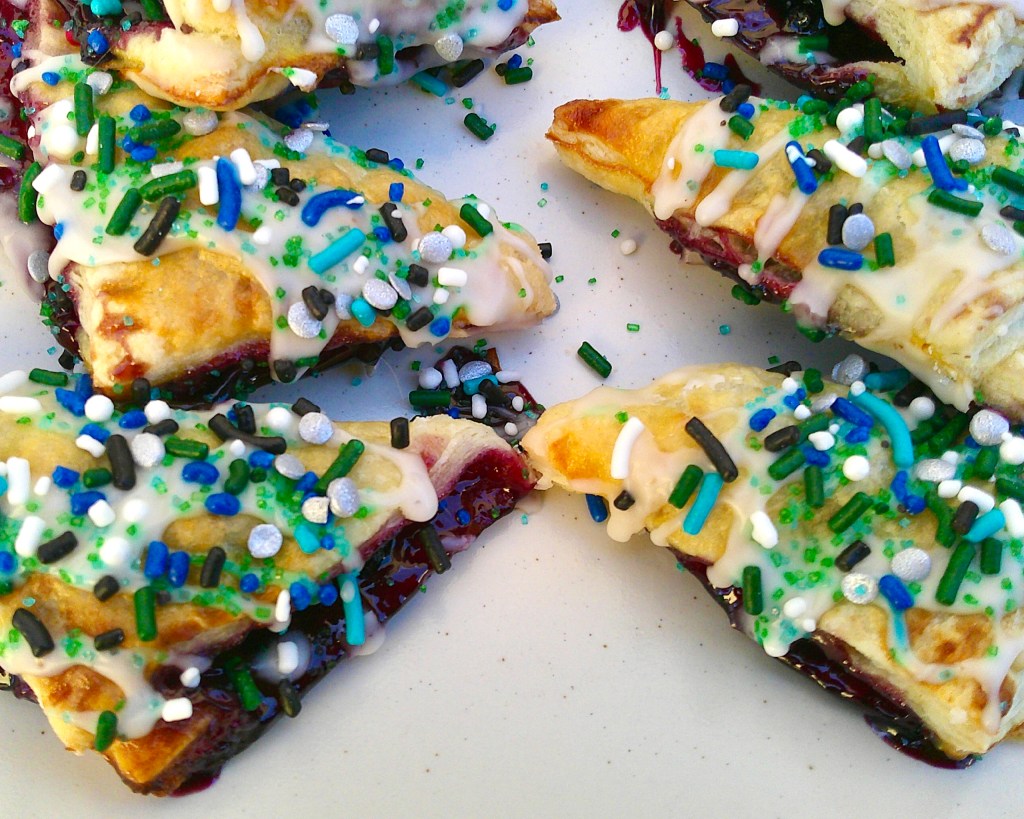
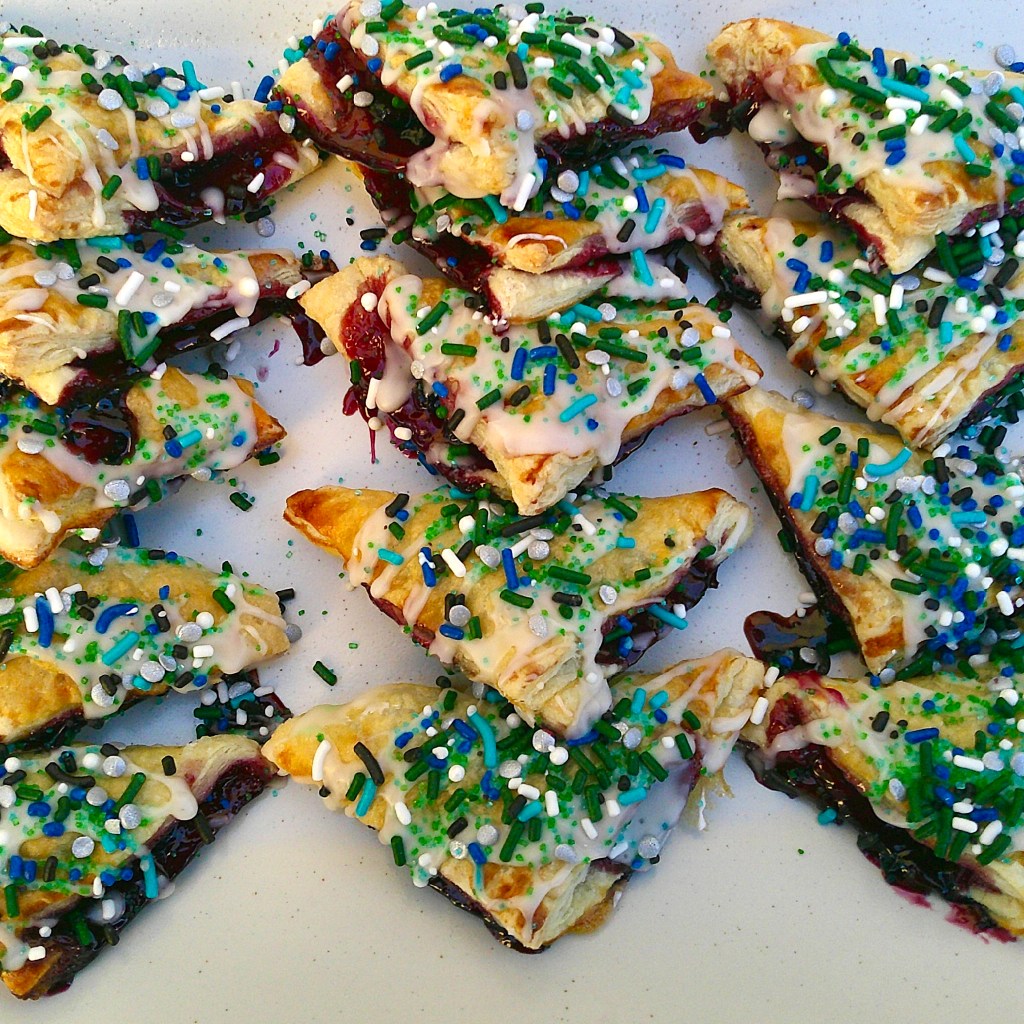
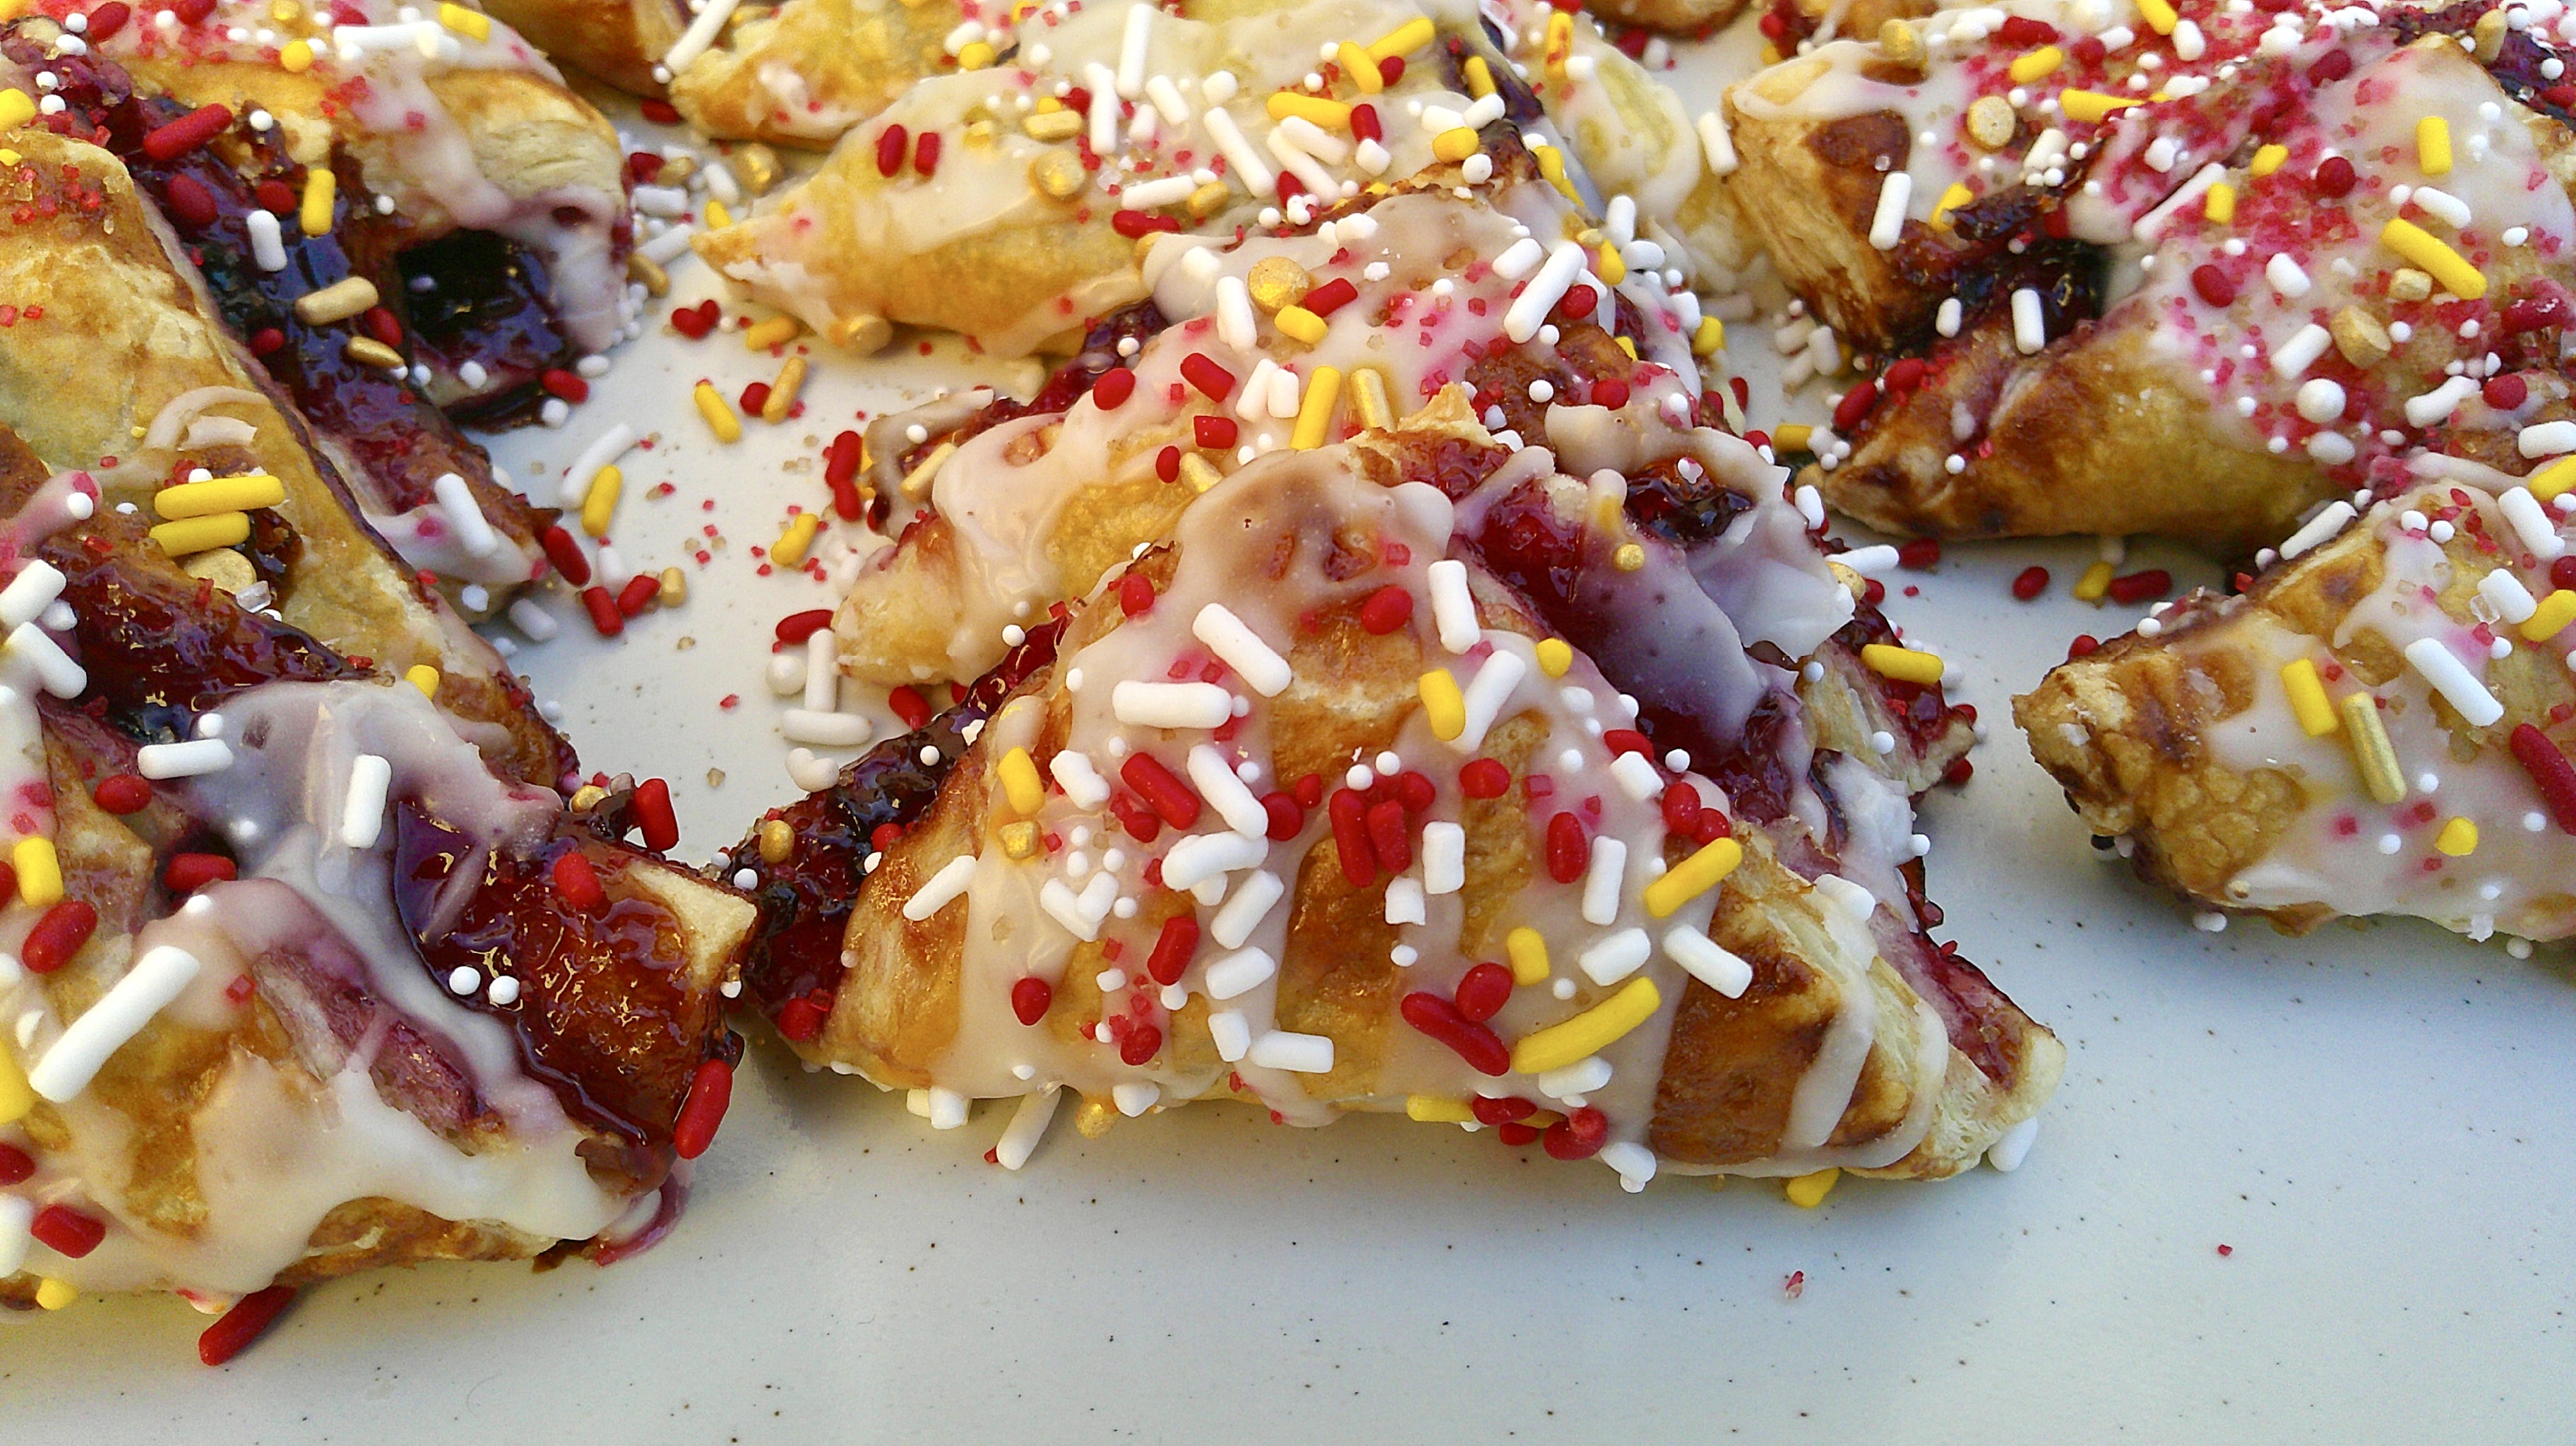
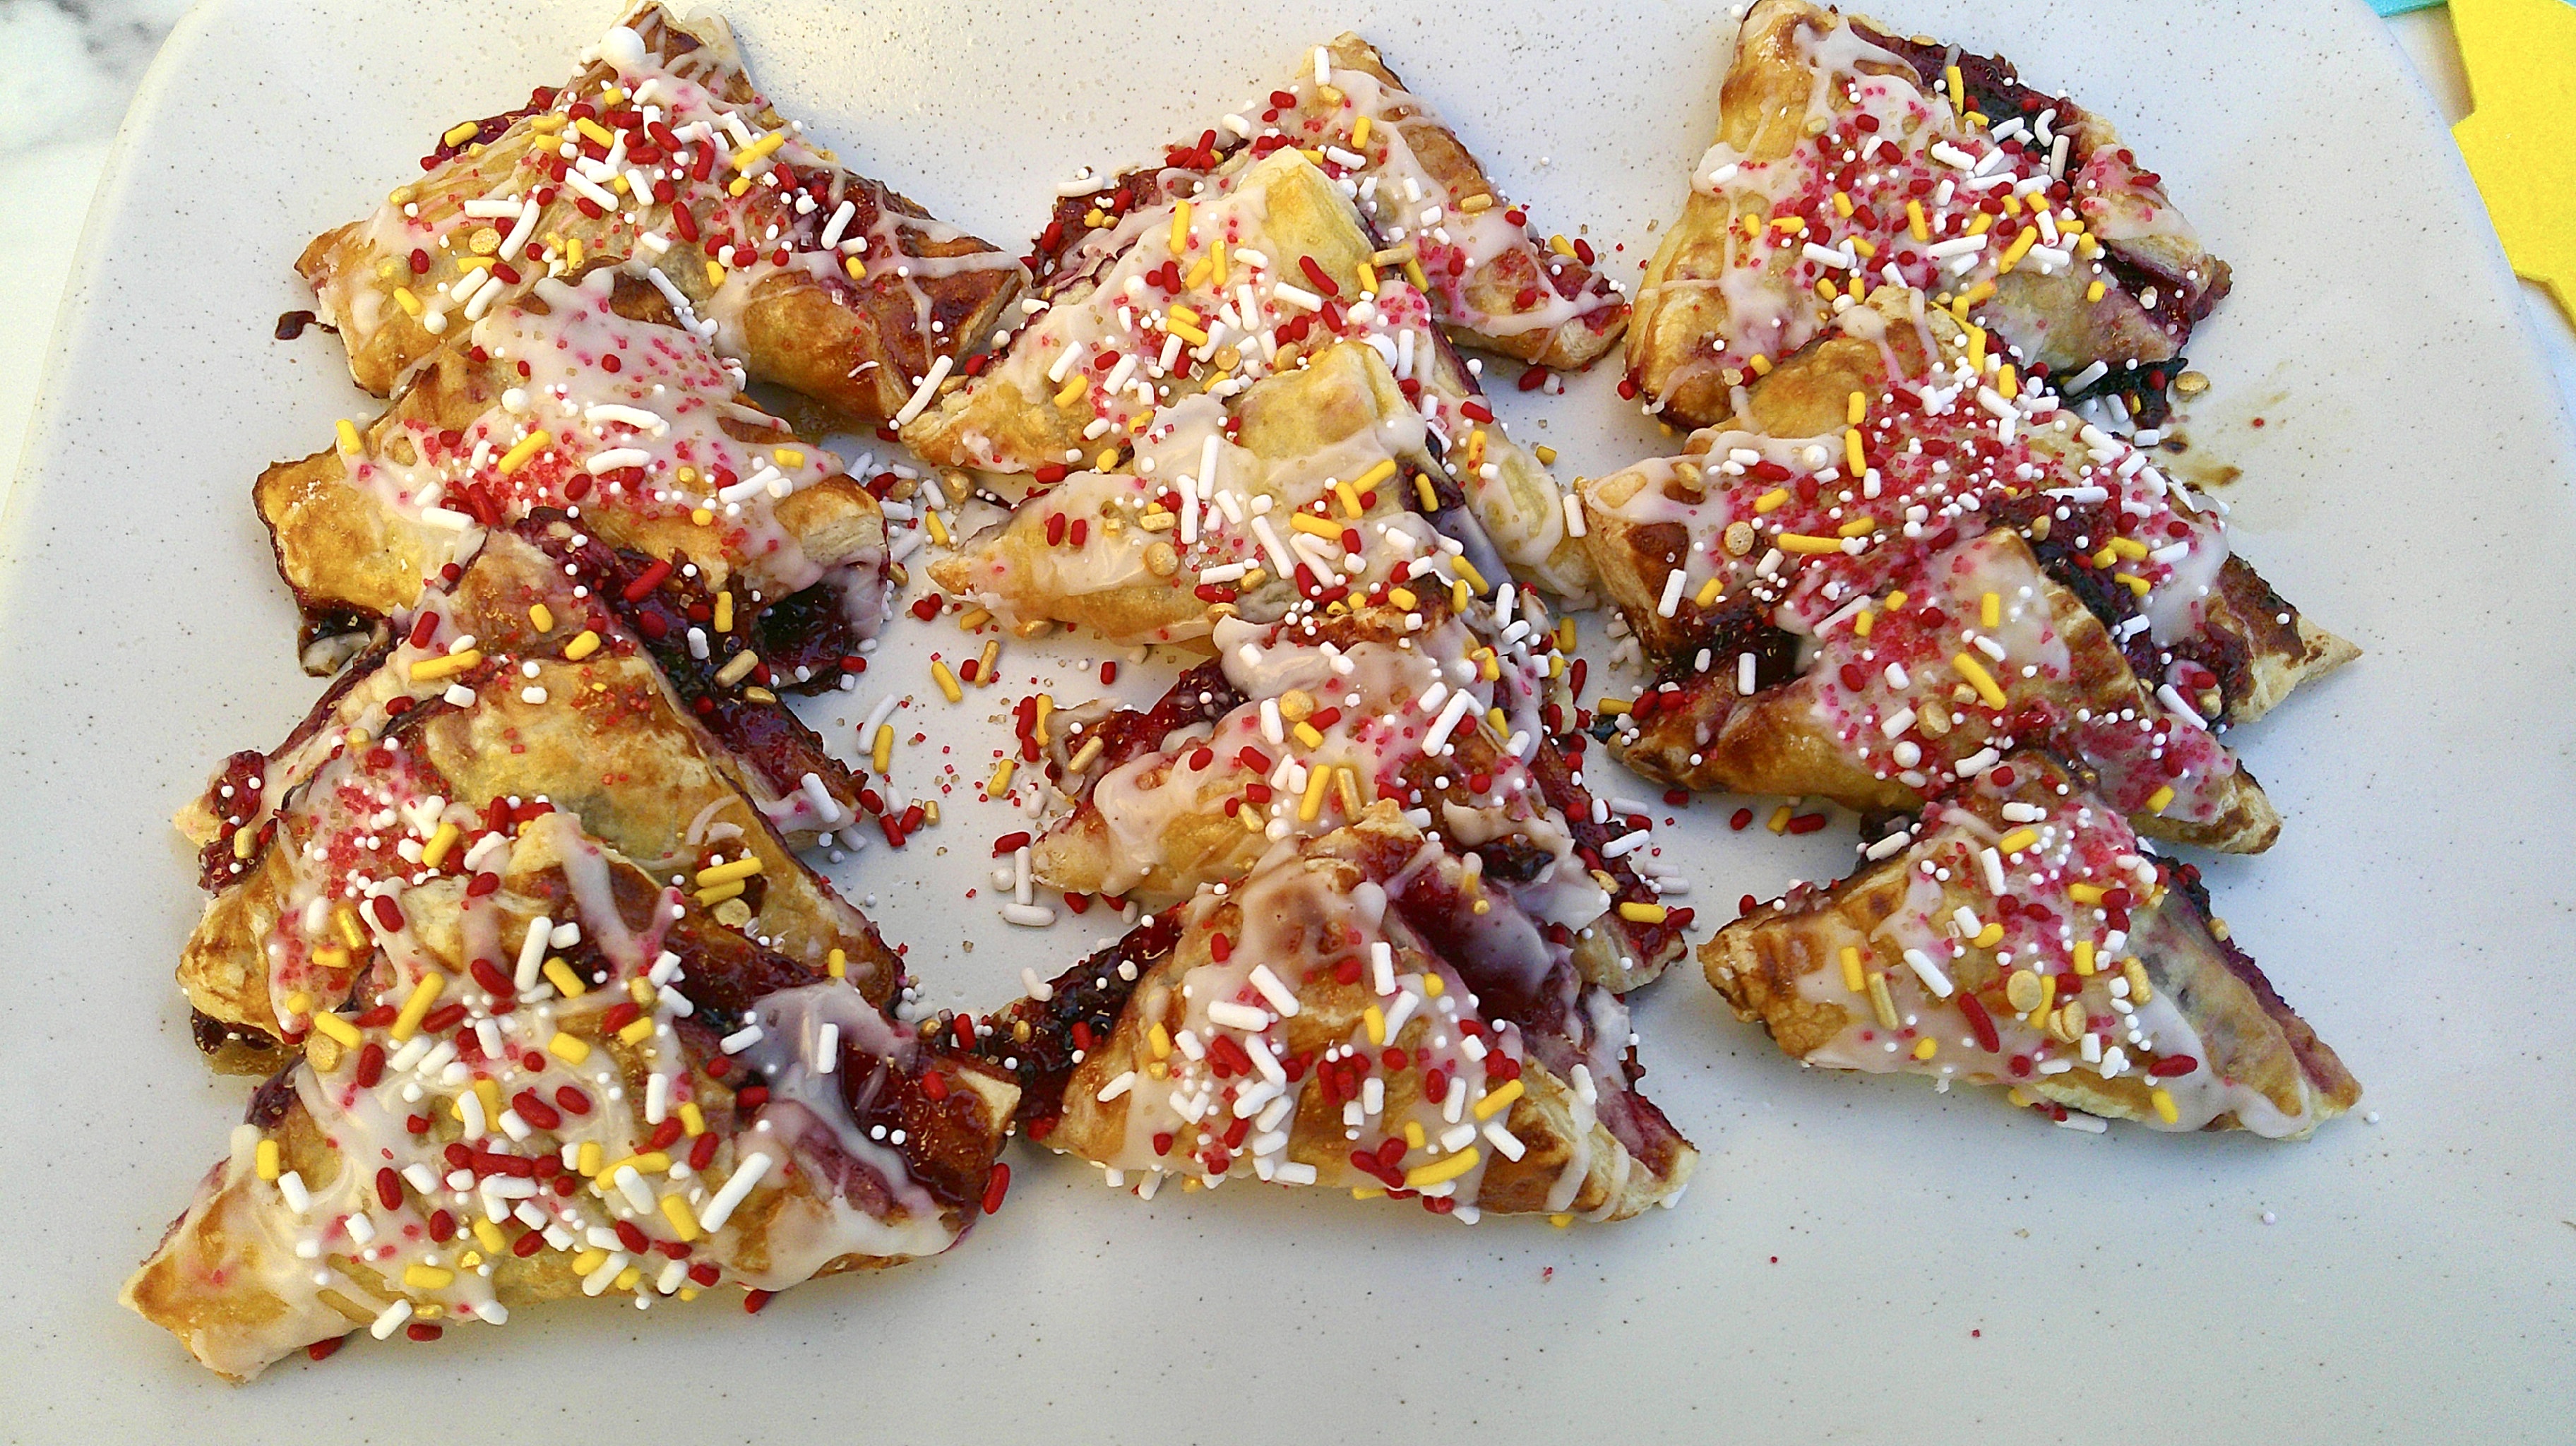
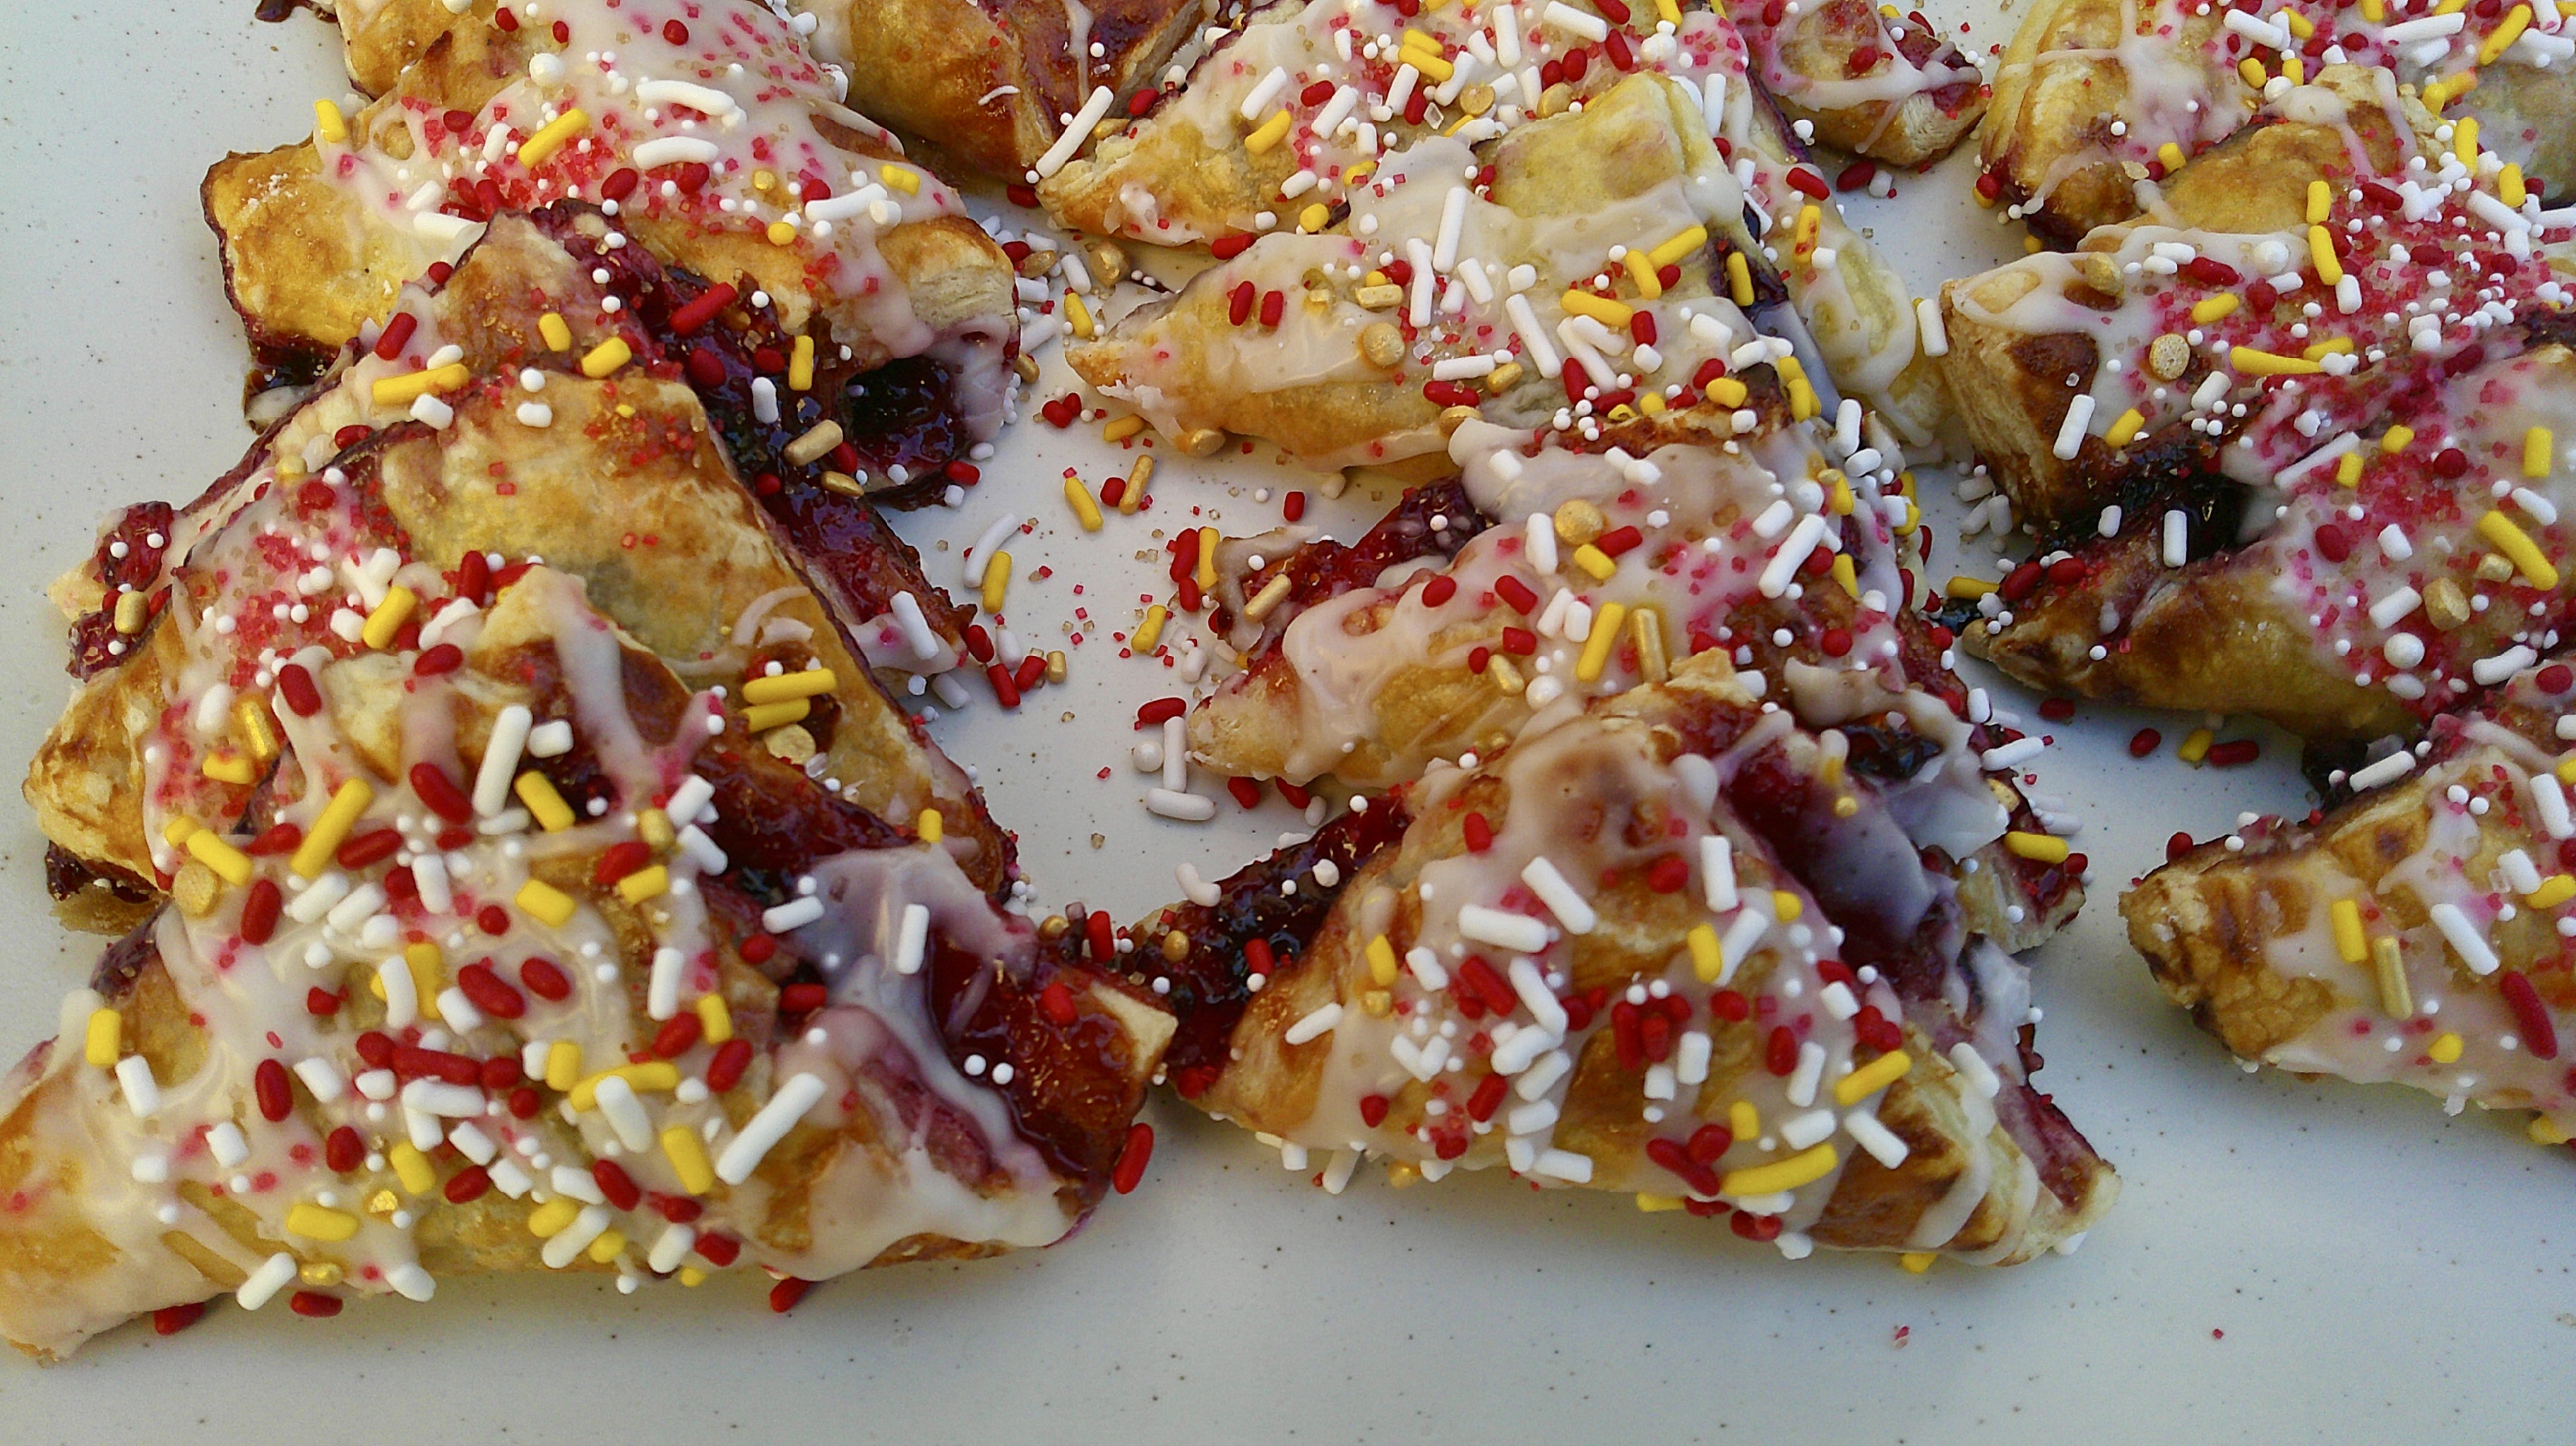
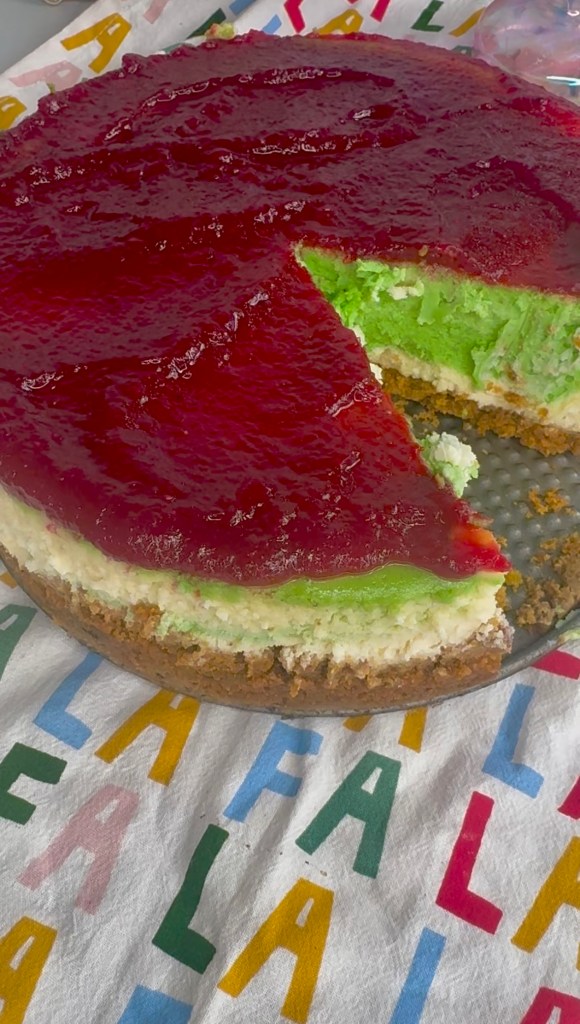
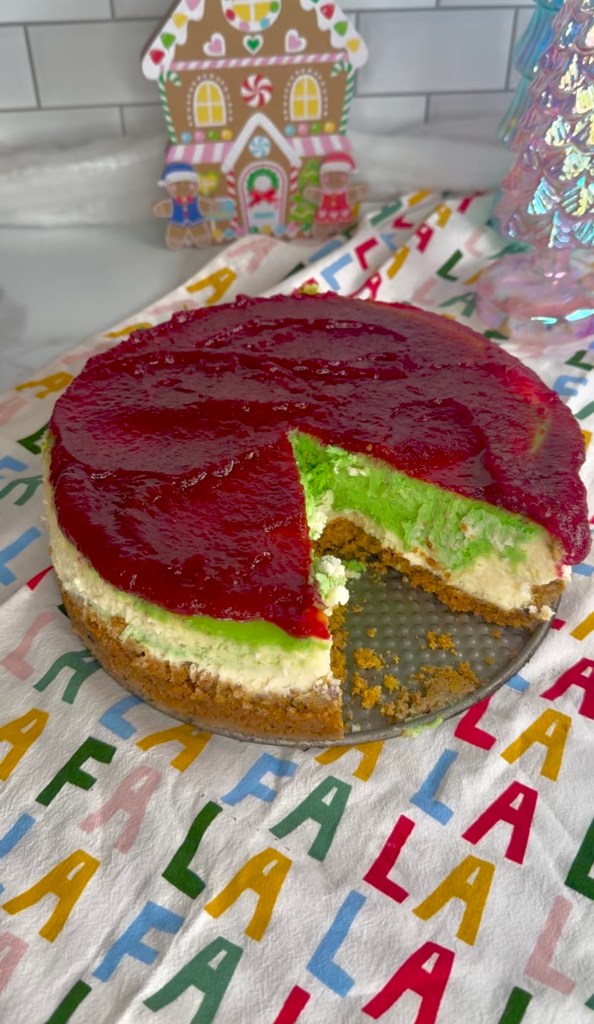
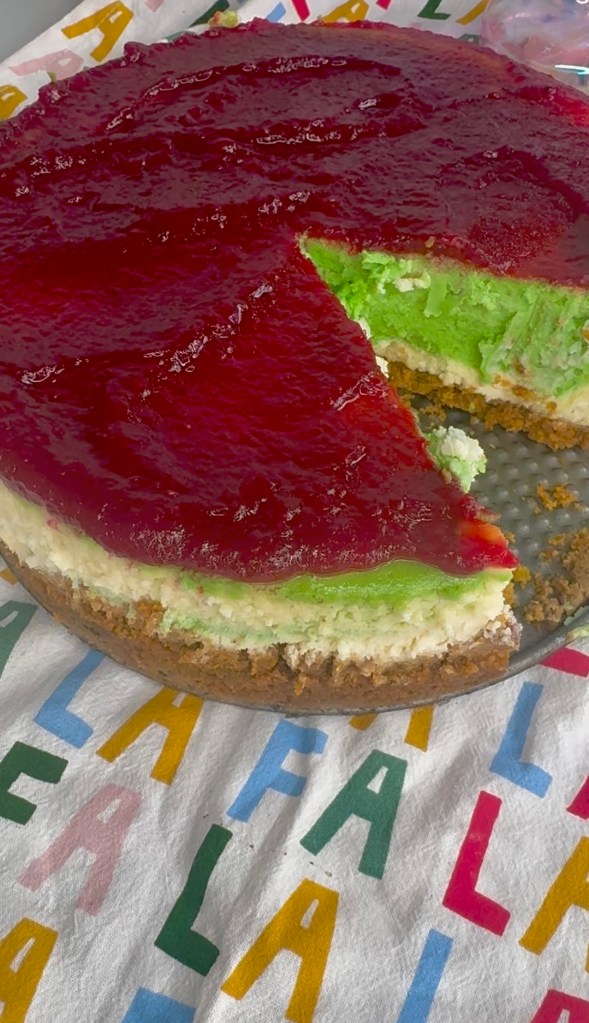
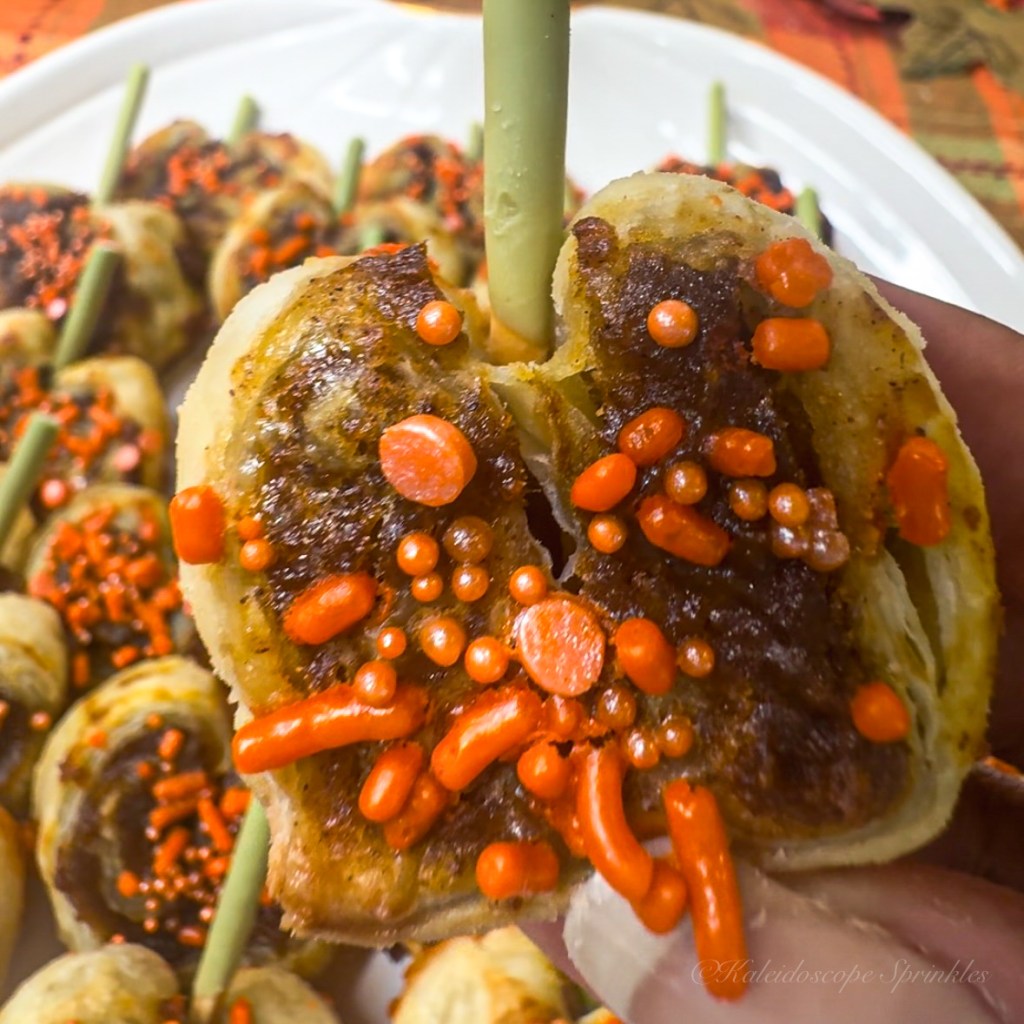
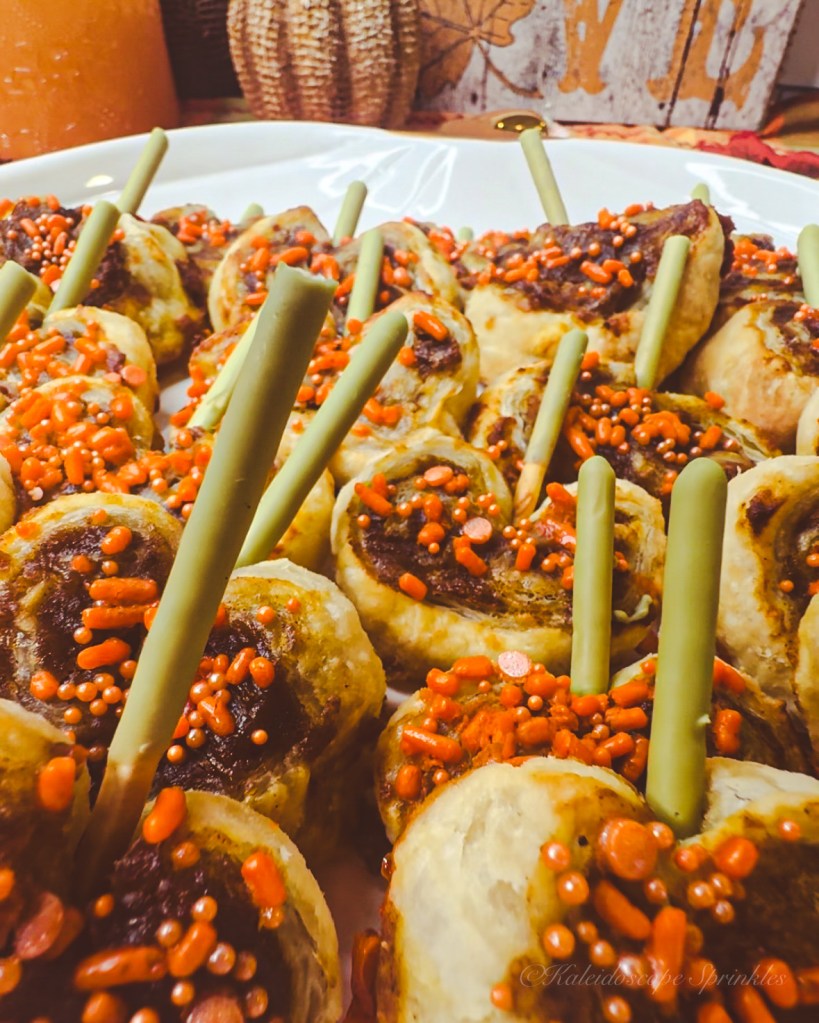
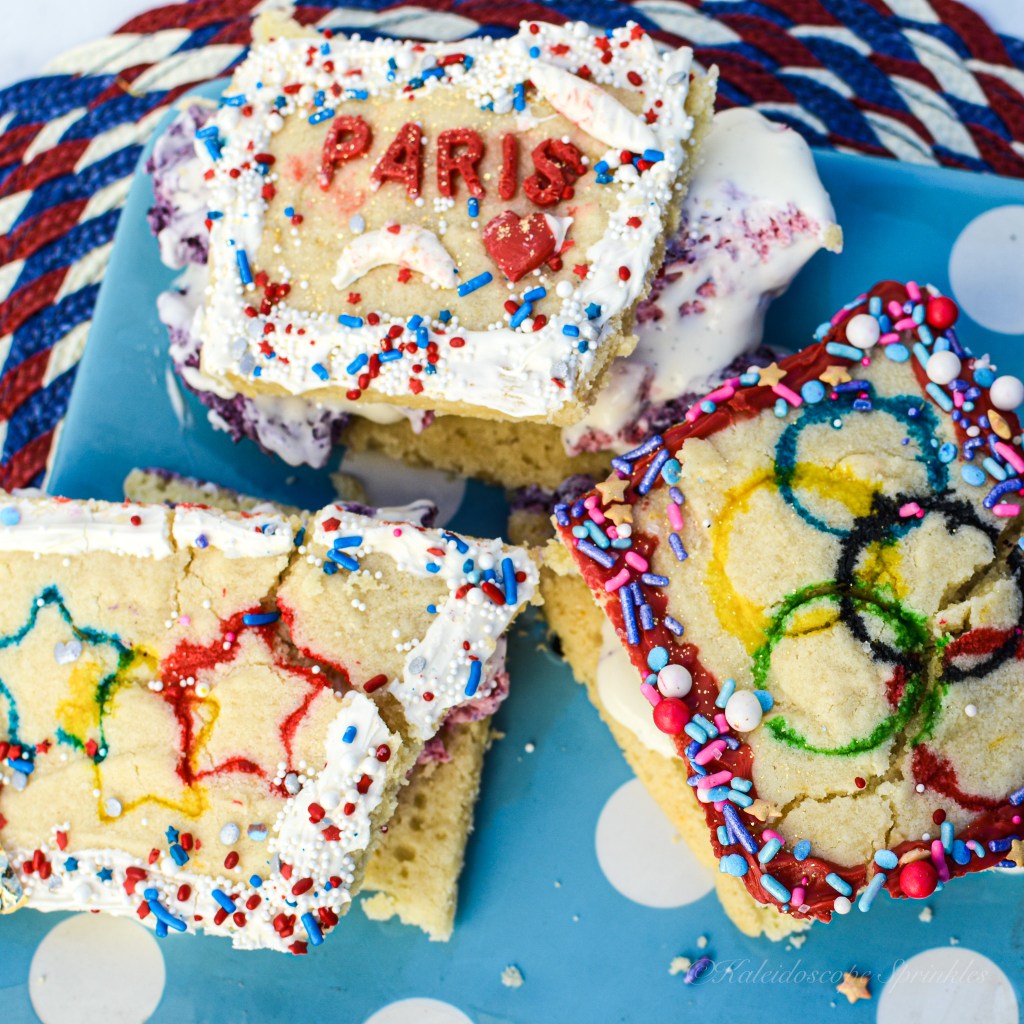
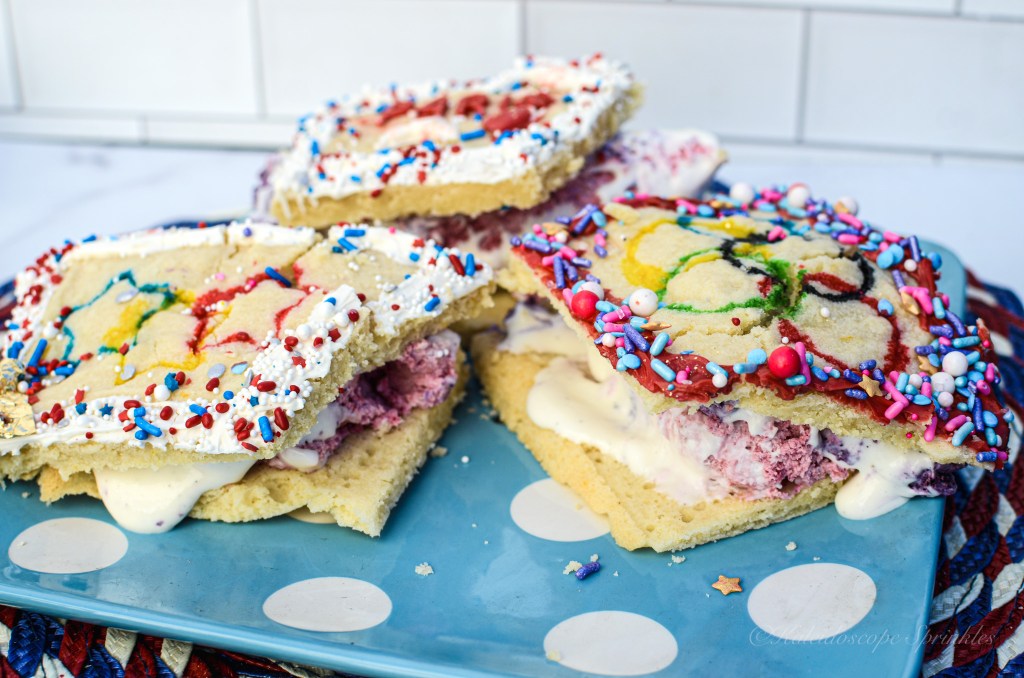
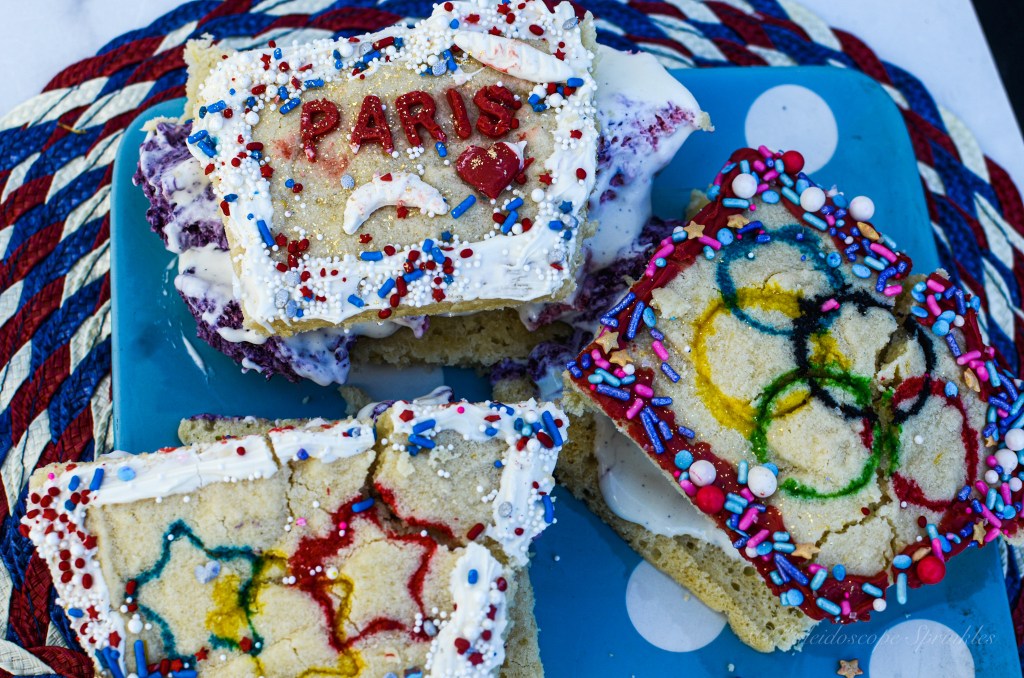
These warm and earth friendly Blue Thai Tea & buttermilk flavored scones will have you celebrating your taste buds and Mother Earth! They are covered with a sweet delicious lemon glaze to highlight the essential needs for conservation. They are then decorated in fondant and even more earthy decoration. Take a bite and pledge this year to do your part to protect this planet.
See the recipe and video for these eco-friendly Earth Day Scones below.
Happy Earth Day 2024!
Earth Day Scones
( Makes 4-8 scones, based on sizes)
Recipe
Ingredients
2 cups all purpose flour
1 tsp. baking powder
½ tsp. baking soda
¼ tsp. salt
½ tsp. lemon zest
½ cup (1 stick) cold butter, semi frozen and grated
½ cup buttermilk
⅓ cup brown sugar, lightly packed
1 large egg
½ cup Blue Thai Tea, (whole or crushed leaves)
Glaze
2 cups confectioner’s sugar
½ tsp. of lemon zest
2 tbsp. lemon juice
1 tsp. vanila extract
1-2 tbsp. of water (depends on preference of thickness of glaze)
Preheat oven to 400F. Line cookie sheet with parchment paper.
In a large mixing bowl mix together flour, baking powder, baking soda, lemon zest and salt. Add grated butter using hands or a fork to press butter into flour mixture, until combined and it resembles course sand. Set aside.
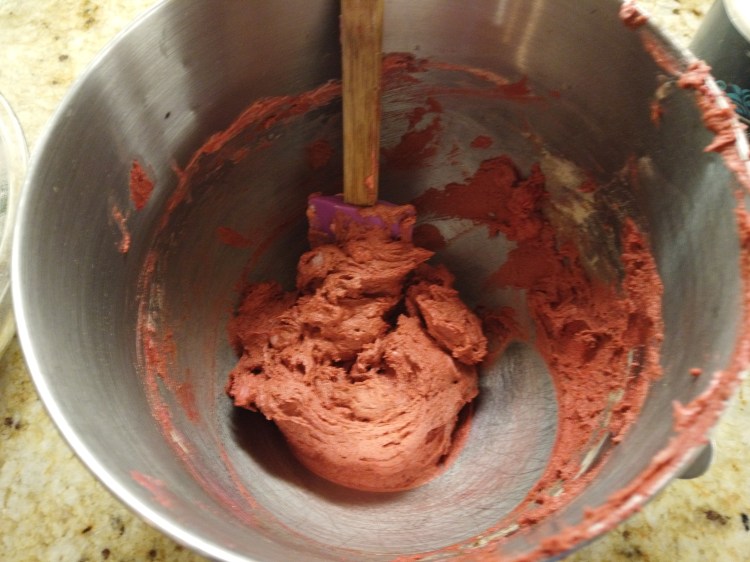
In a medium sized bowl or measuring cup mix together buttermilk, brown sugar, egg and Blue Thai Tea. Stir until combined together. Add the wet mixture to the dry ingredients. Mix together using a spatula or your hands until it forms a dough.
Press the dough out onto a floured surface and form it into a disk about one inch thick. Cut disk into 4-8 pieces. Bake at 400F for 12-17 minutes.
While scones are baking, in a small bowl whisk together confectioner’s sugar, lemon zest, lemon juice, vanilla extract and water. Whisk until the glaze is nice and smooth and slightly runny.
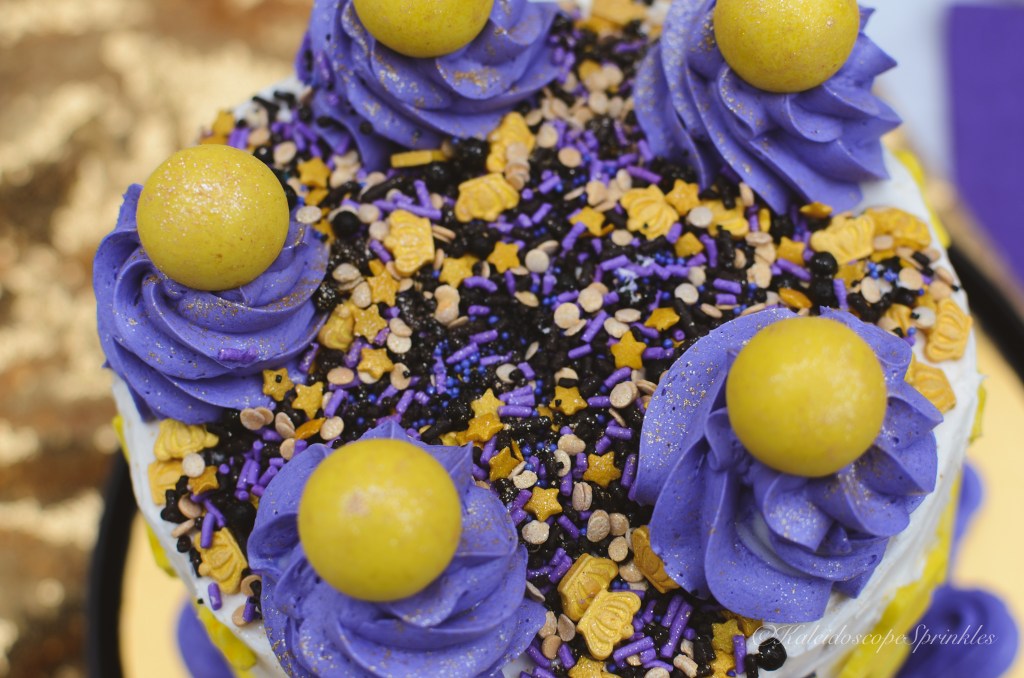
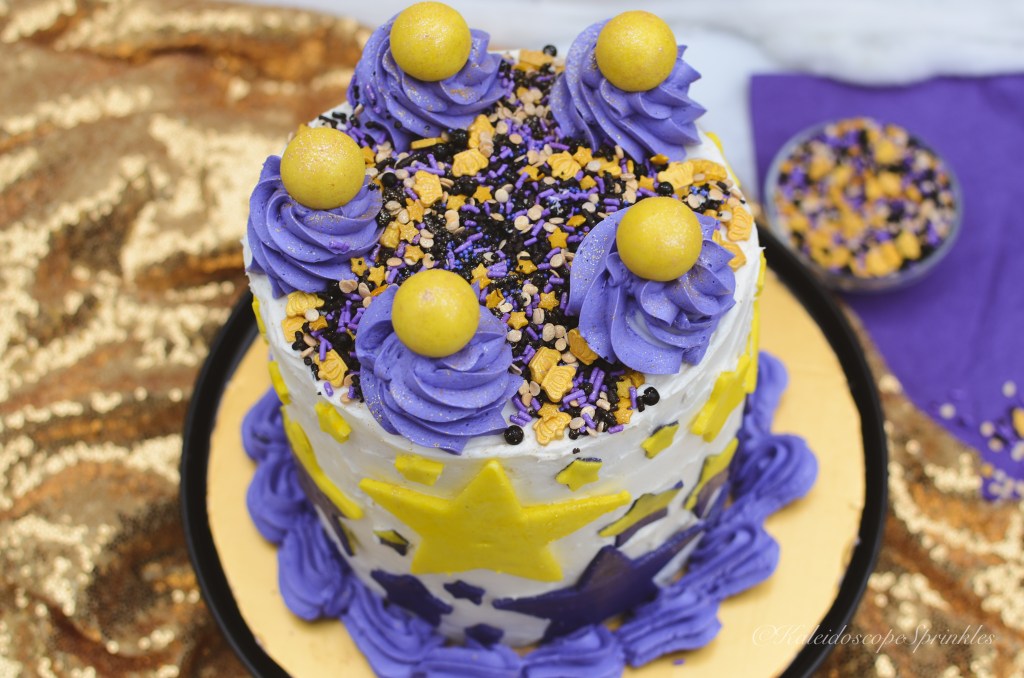
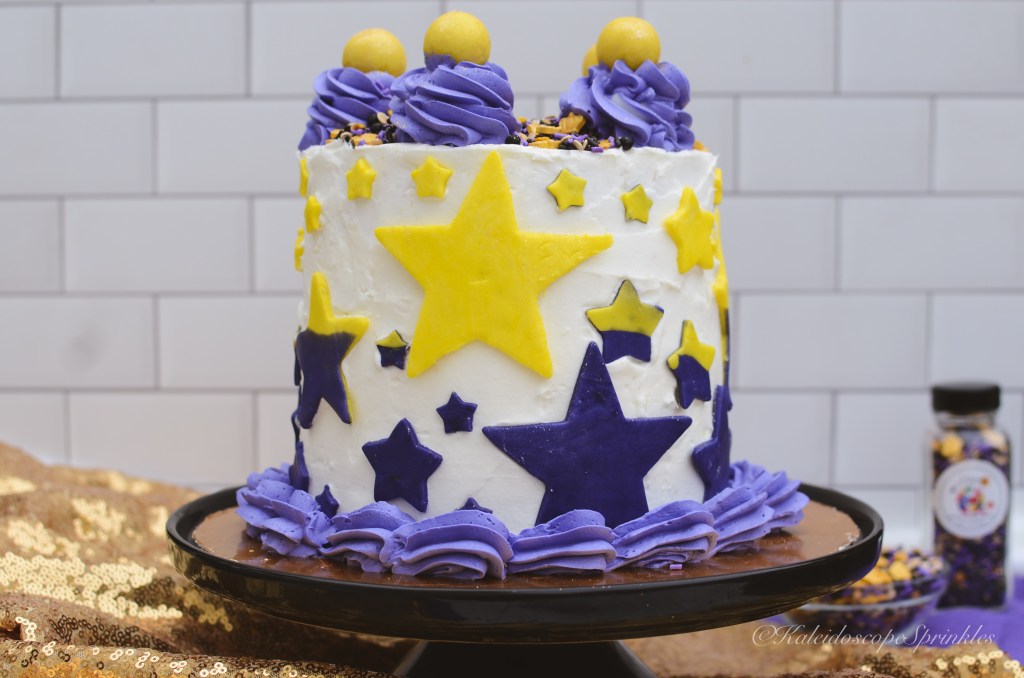
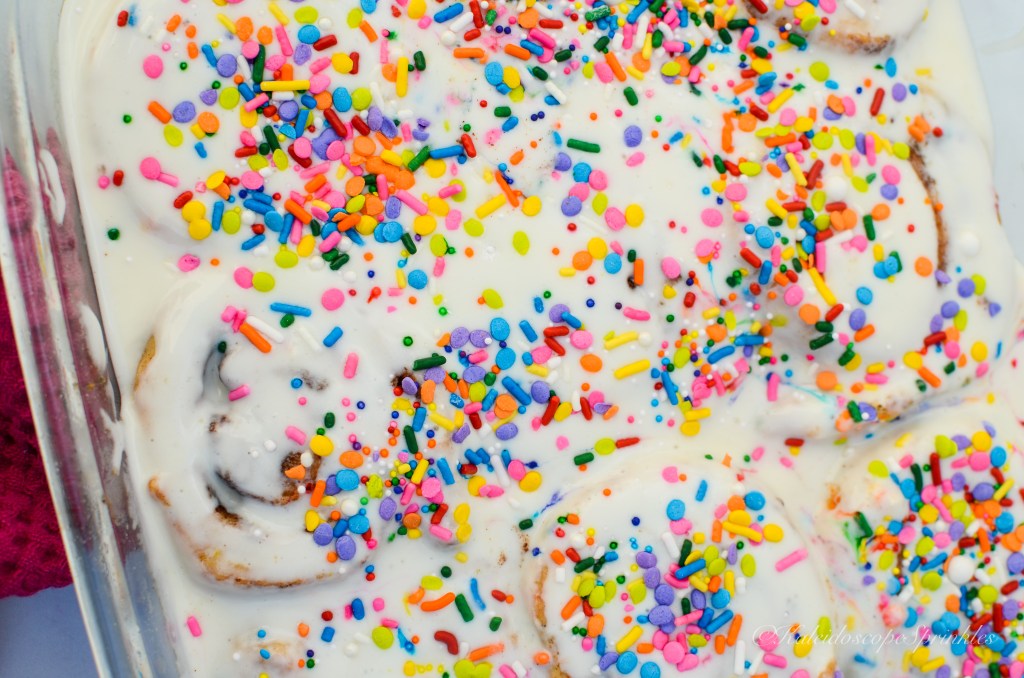
Once the scones have cooled to room temperature. Dip the scones or layer glaze onto the scones to cover them completely. Decorate with fondant, Cosmic Shimmers (edible glitter) and sprinkles.
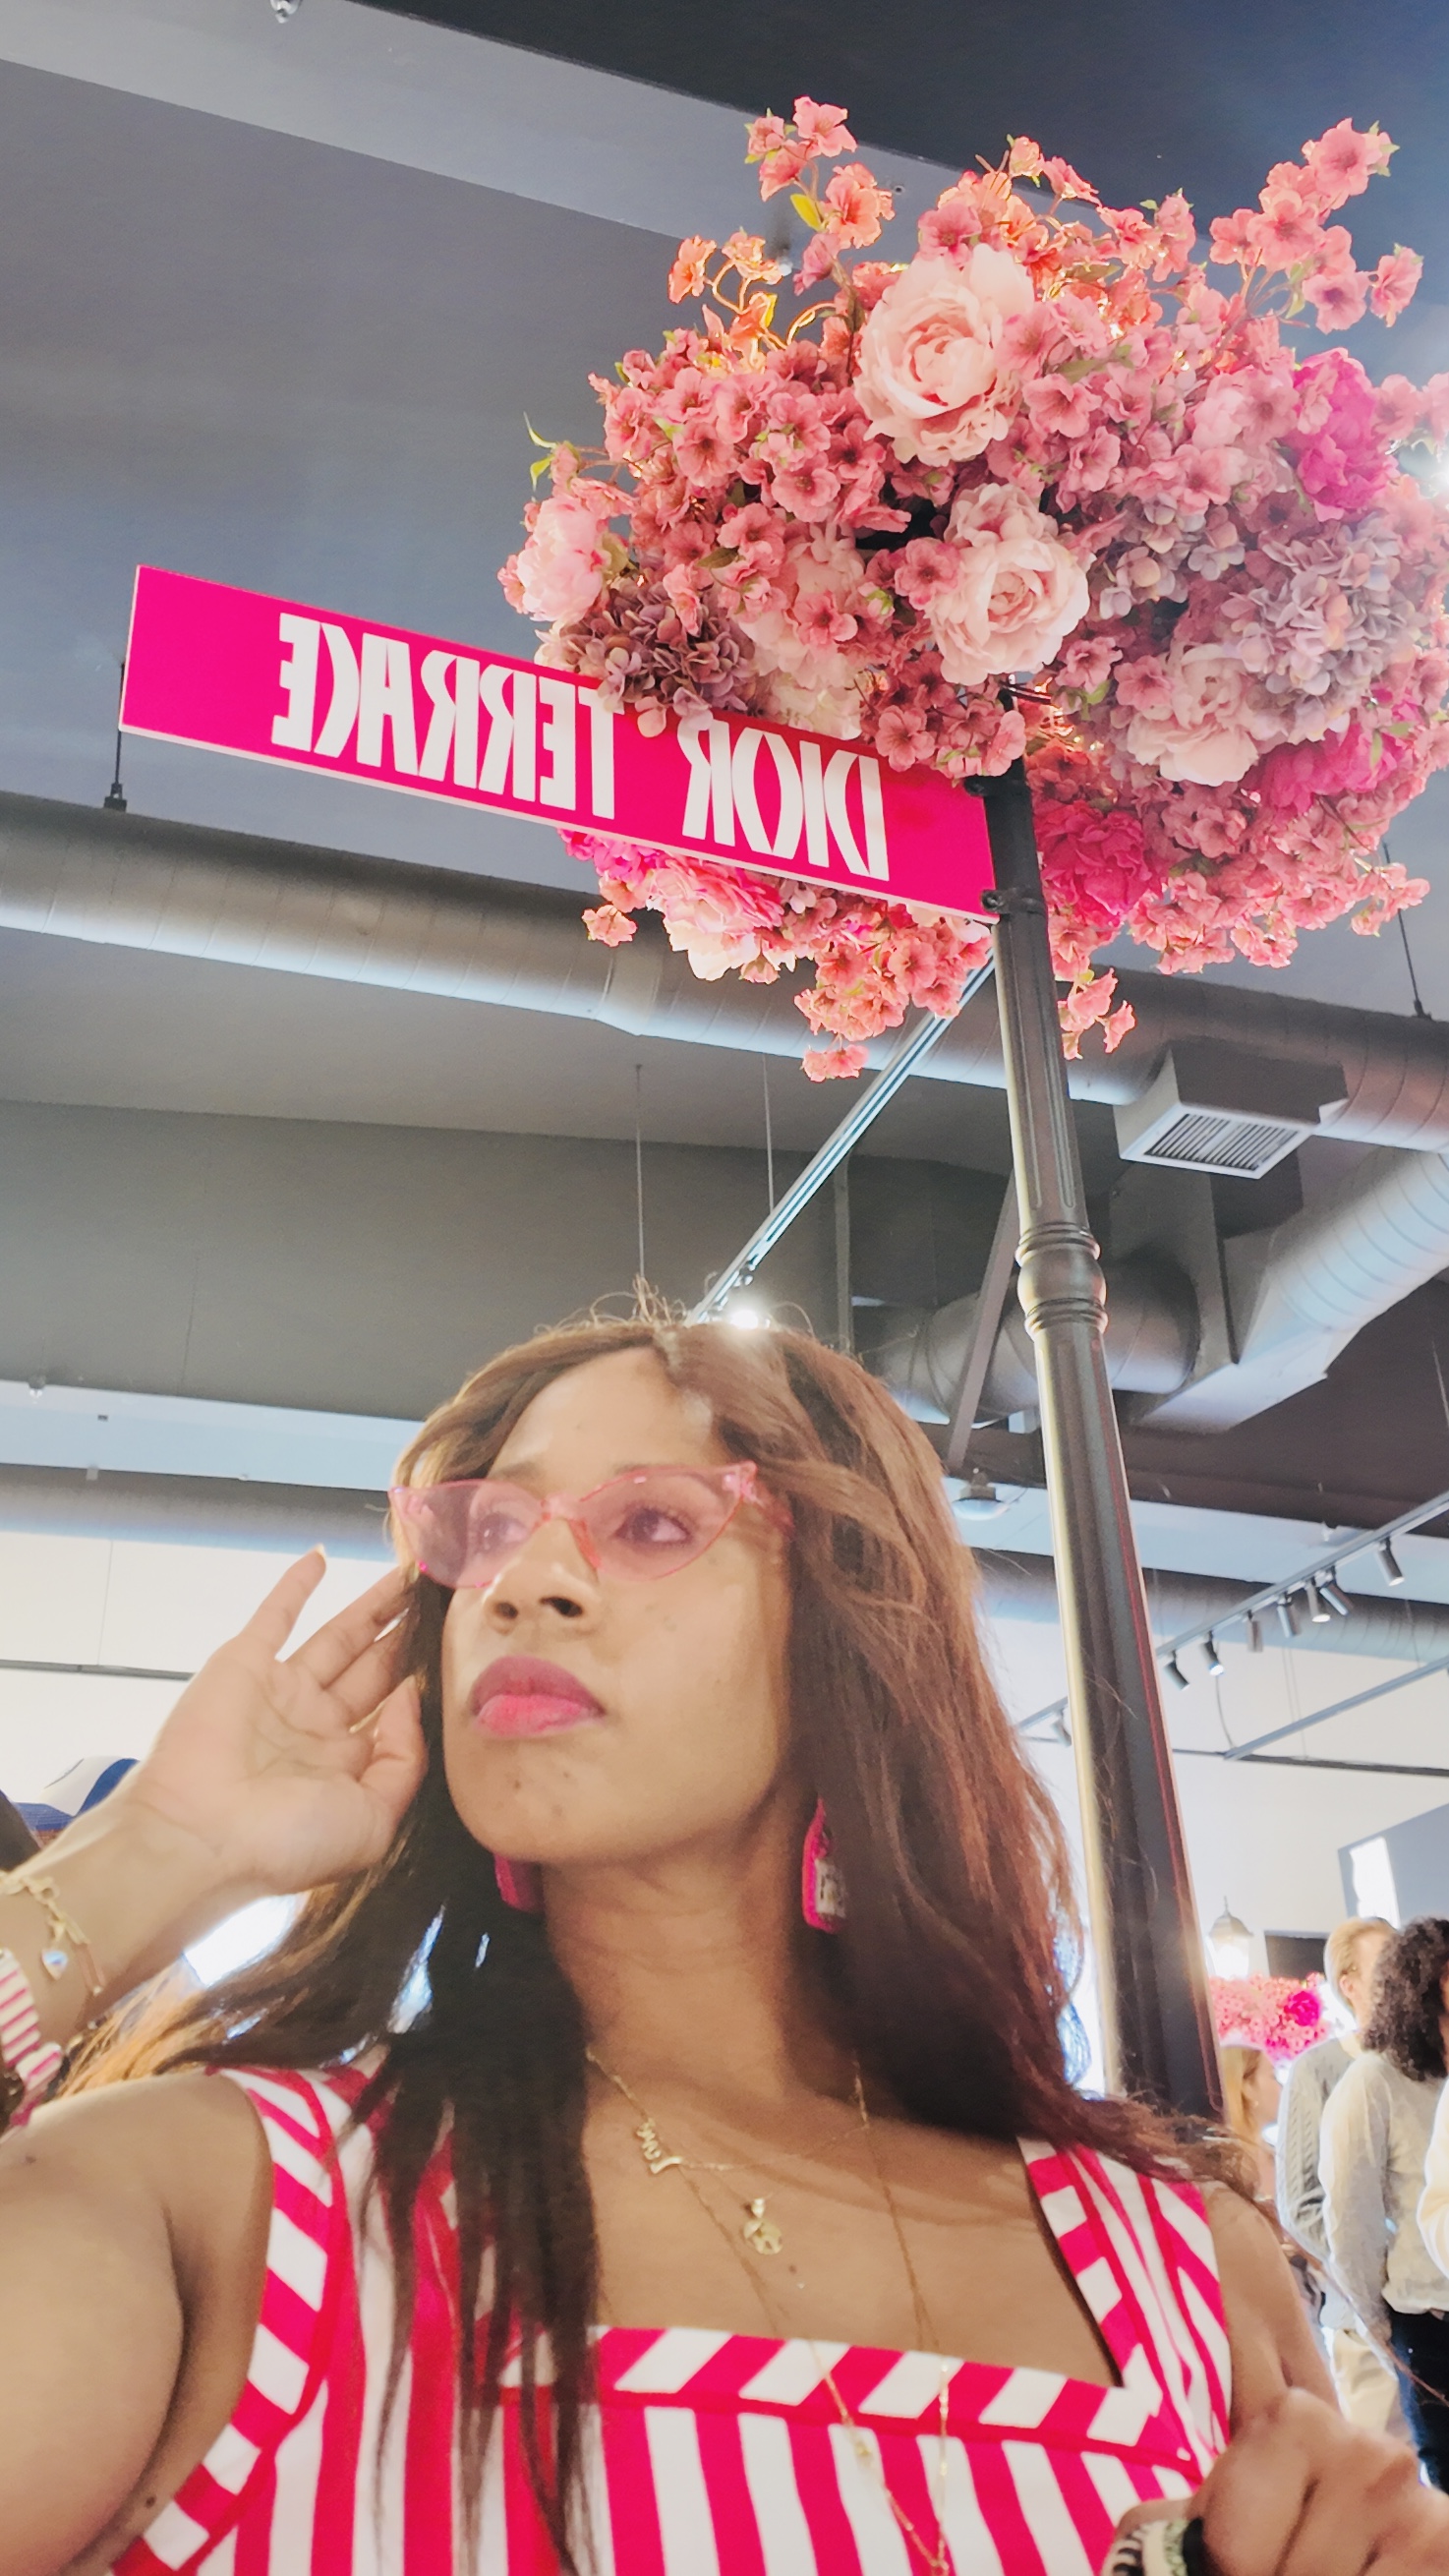
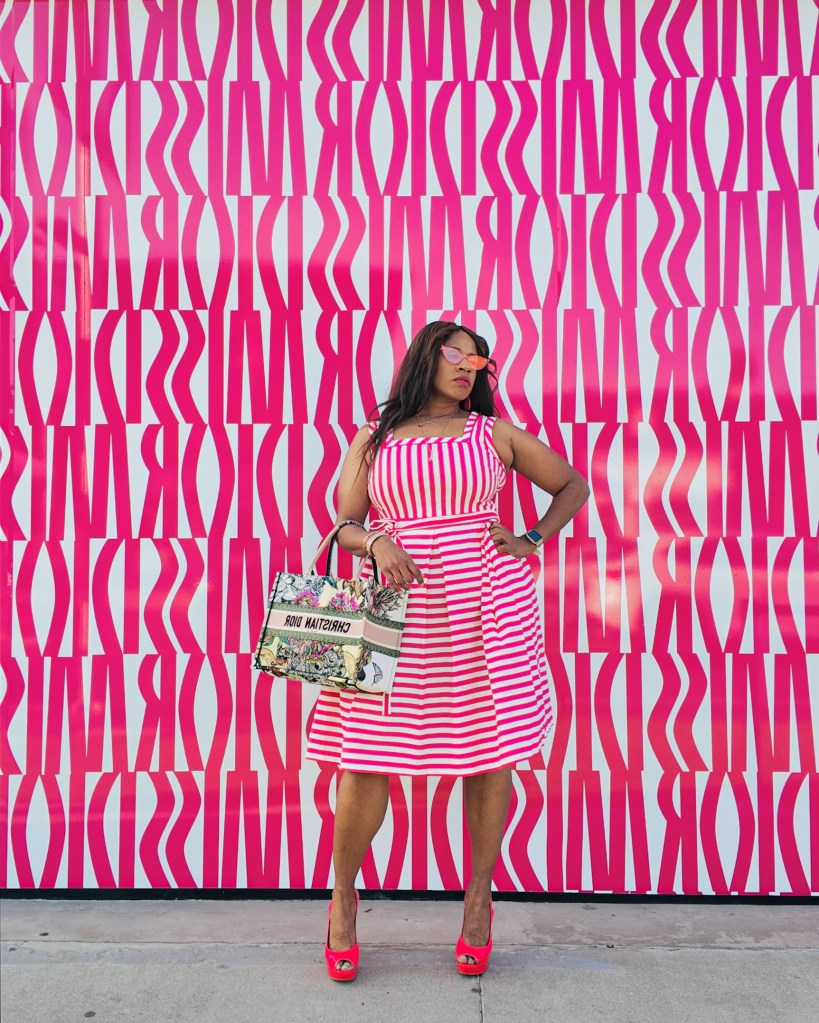
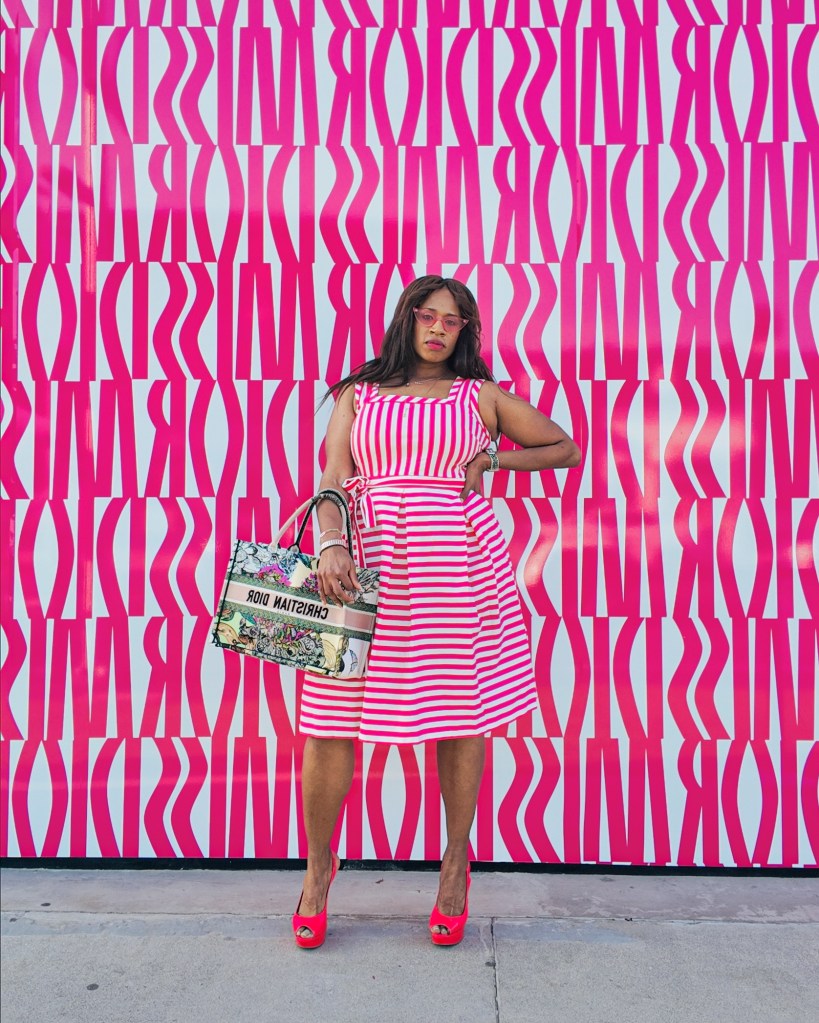
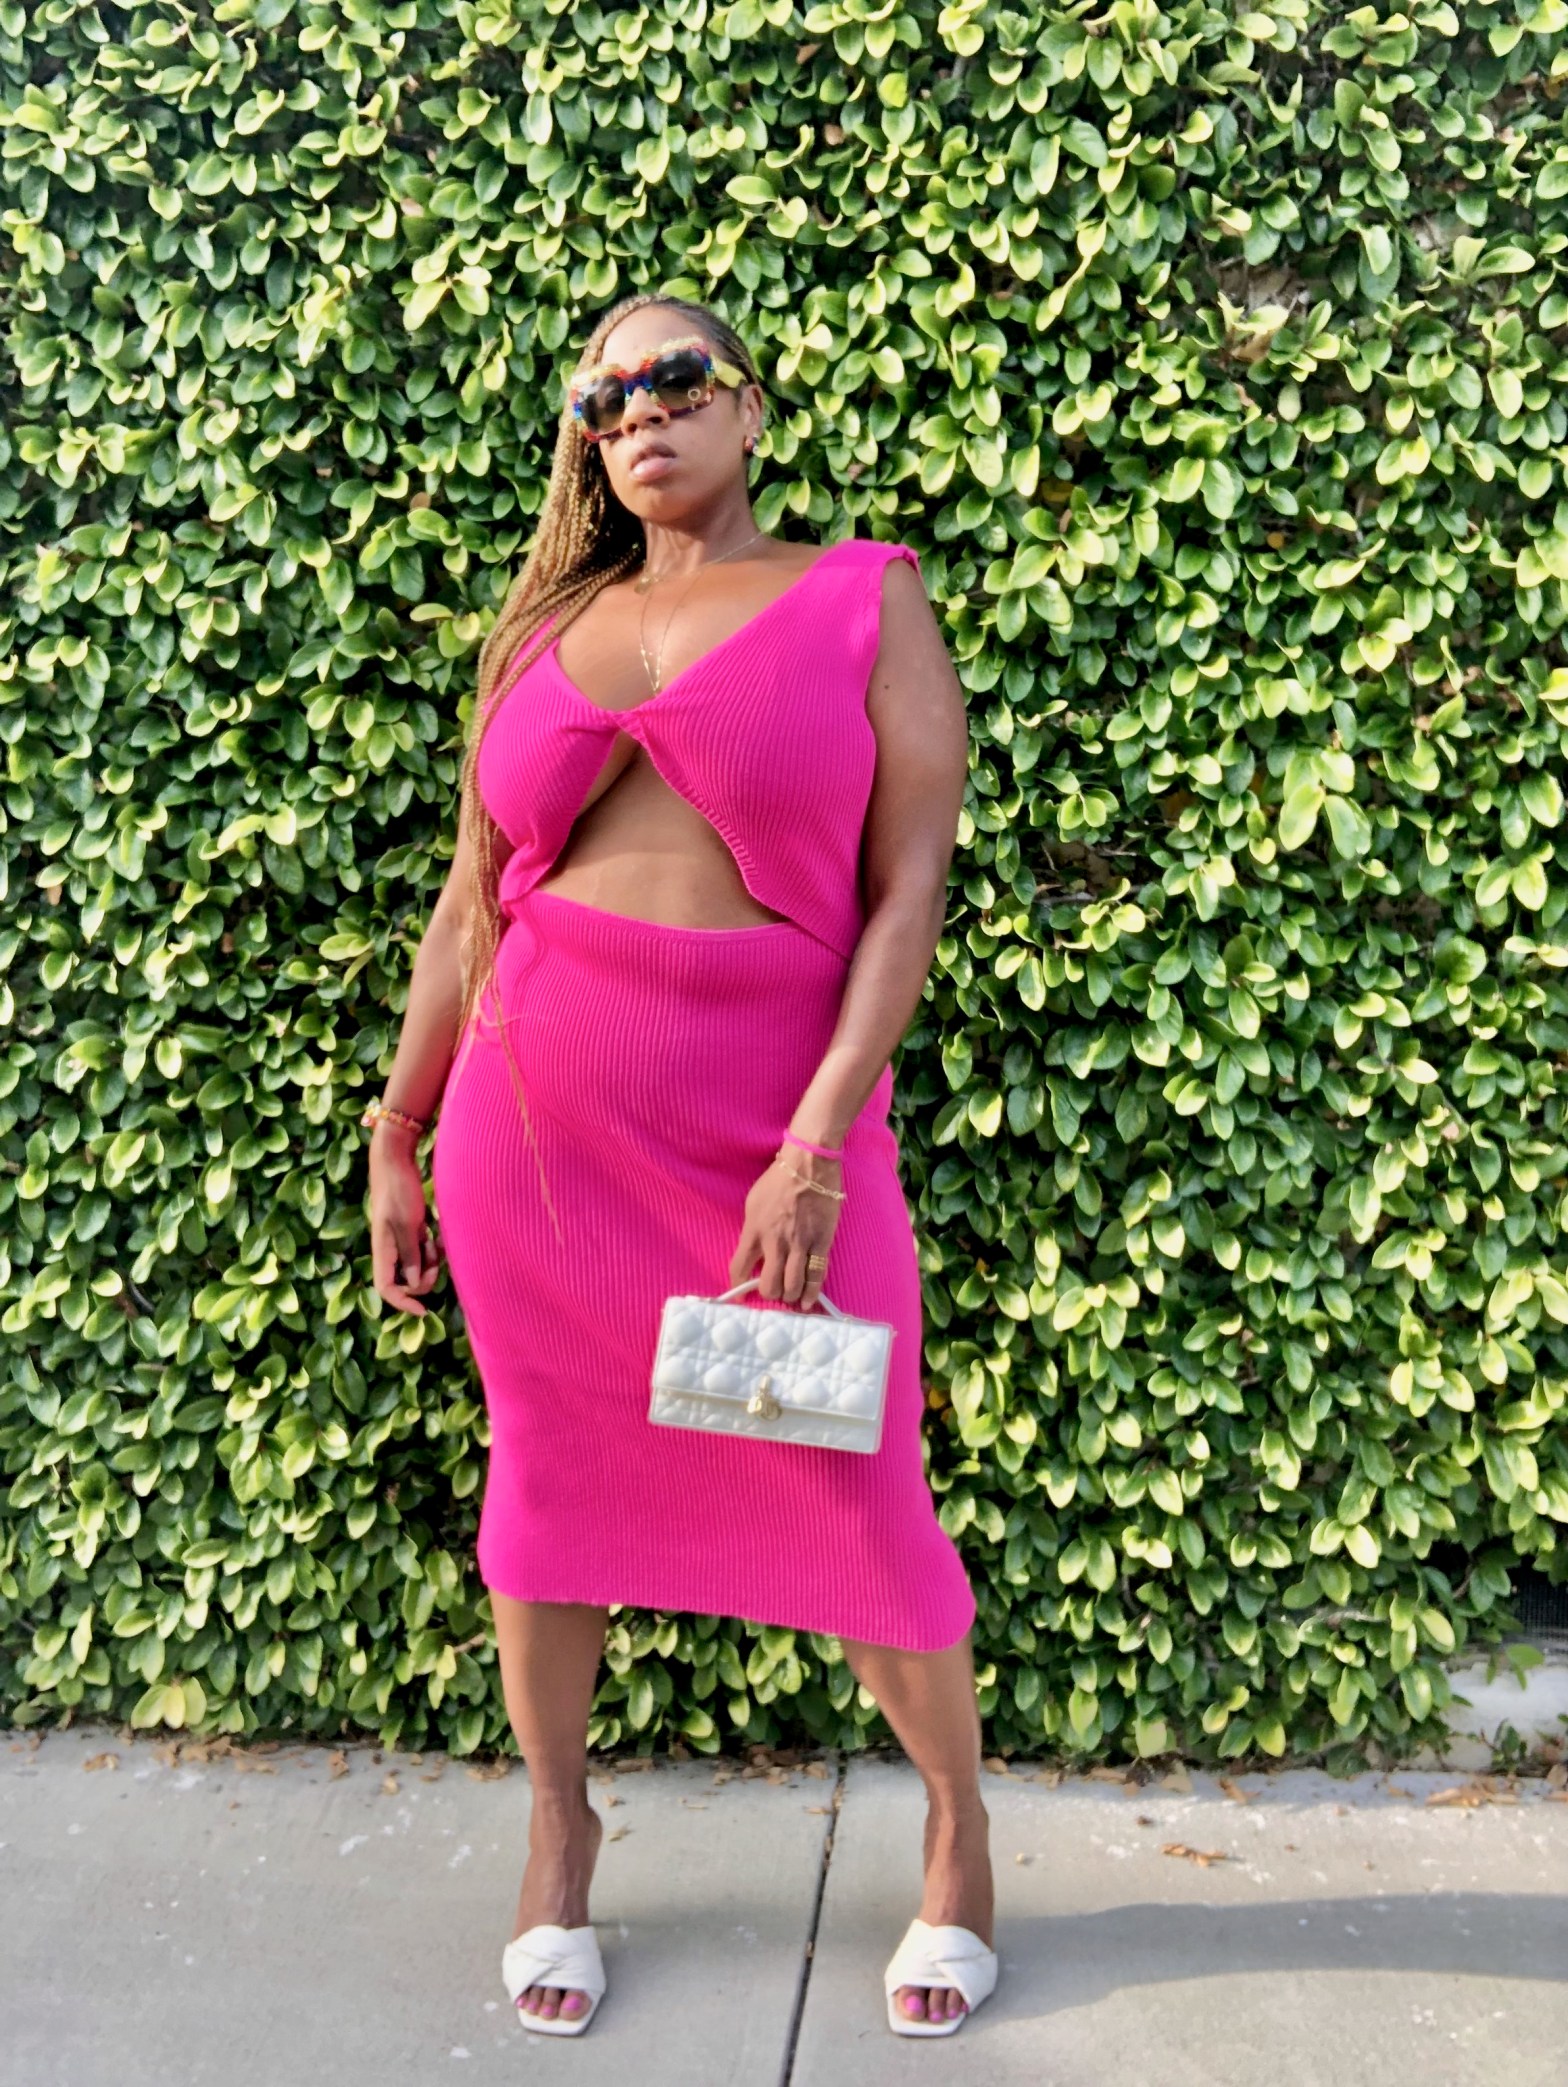
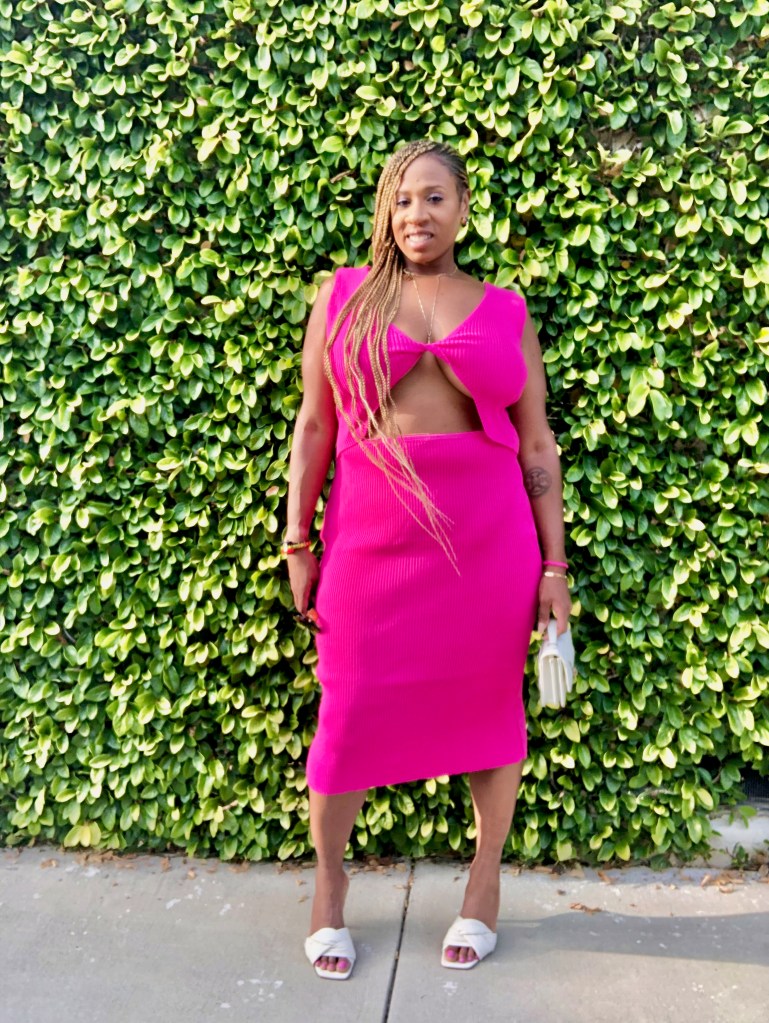
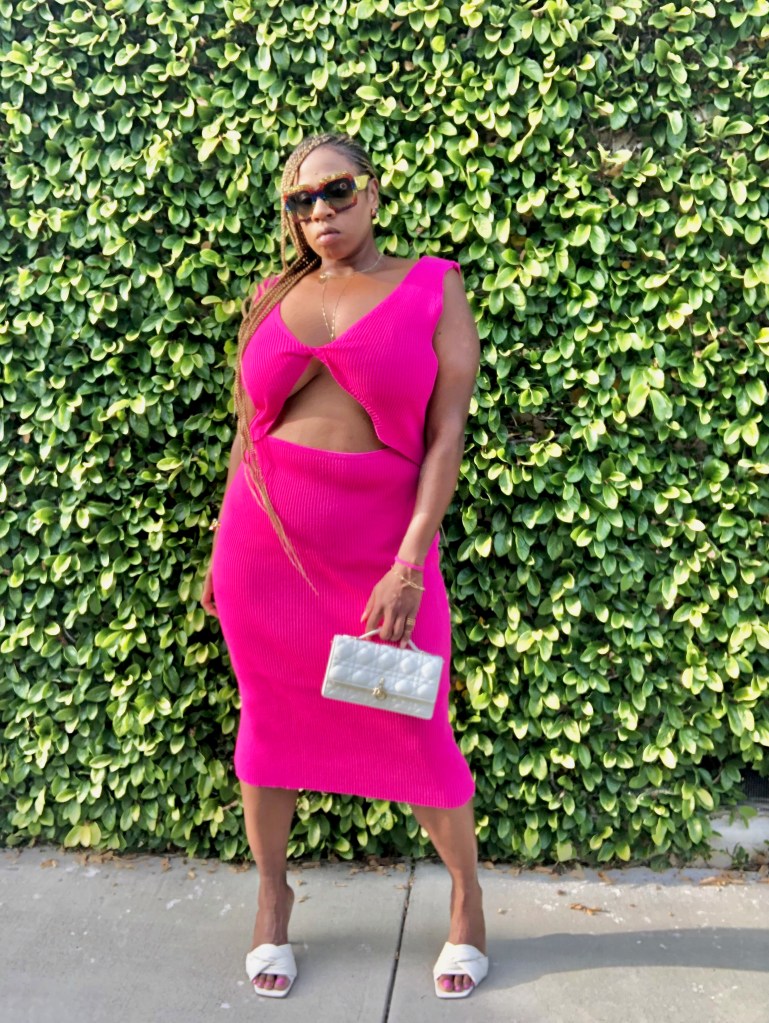
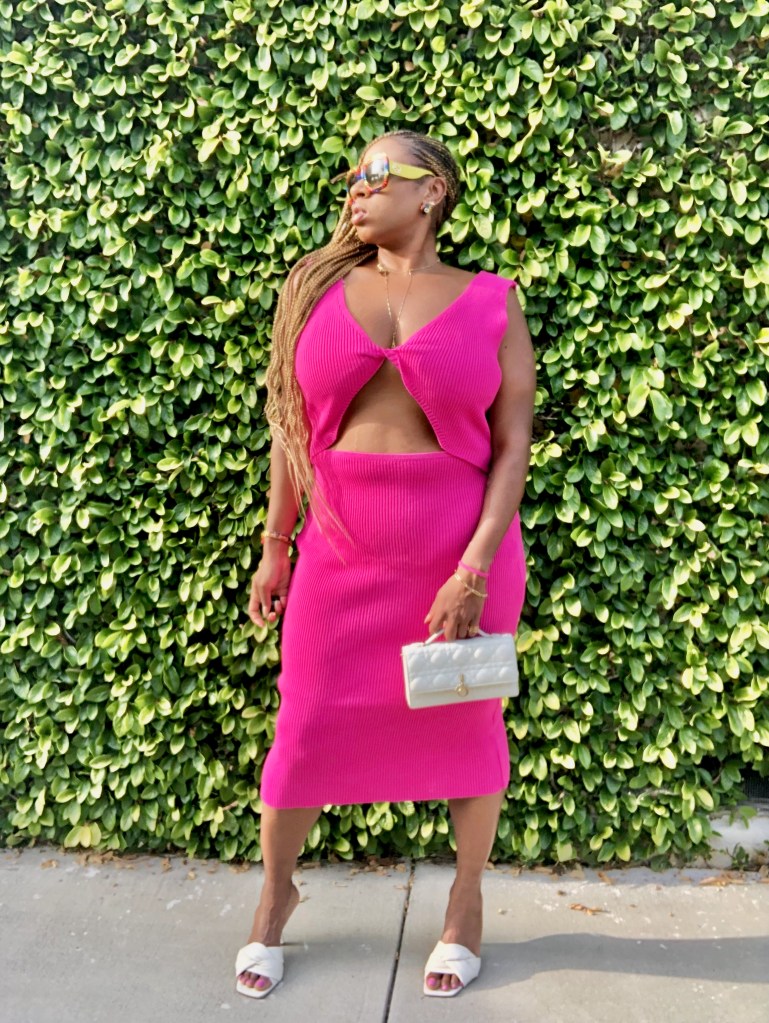
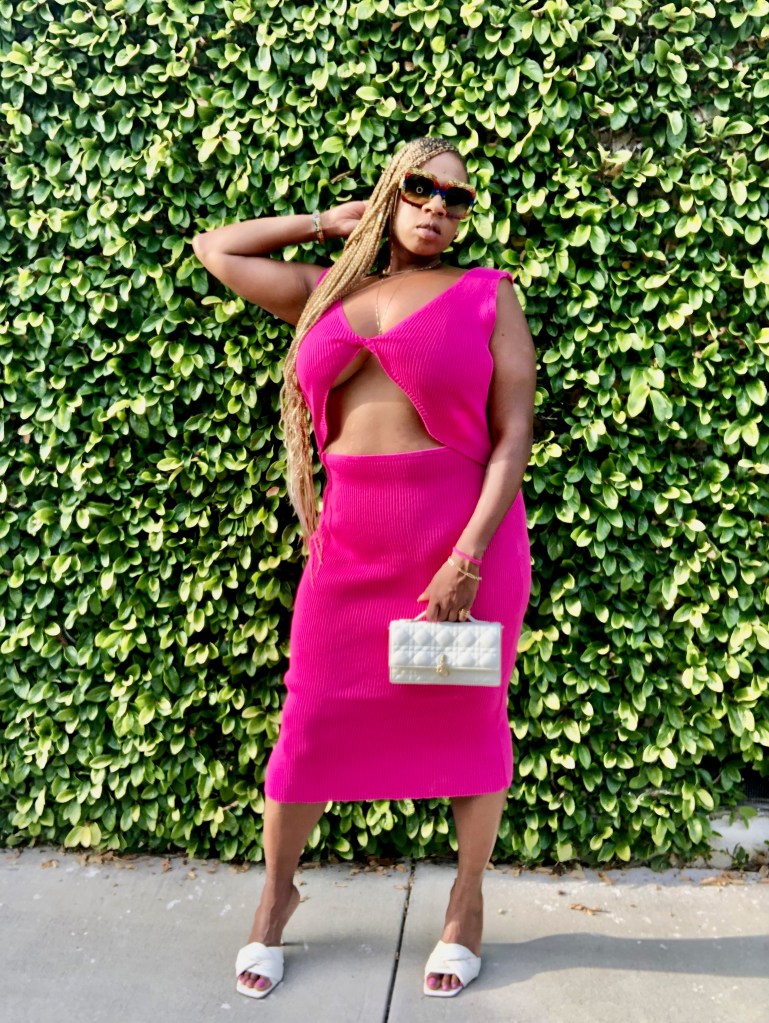
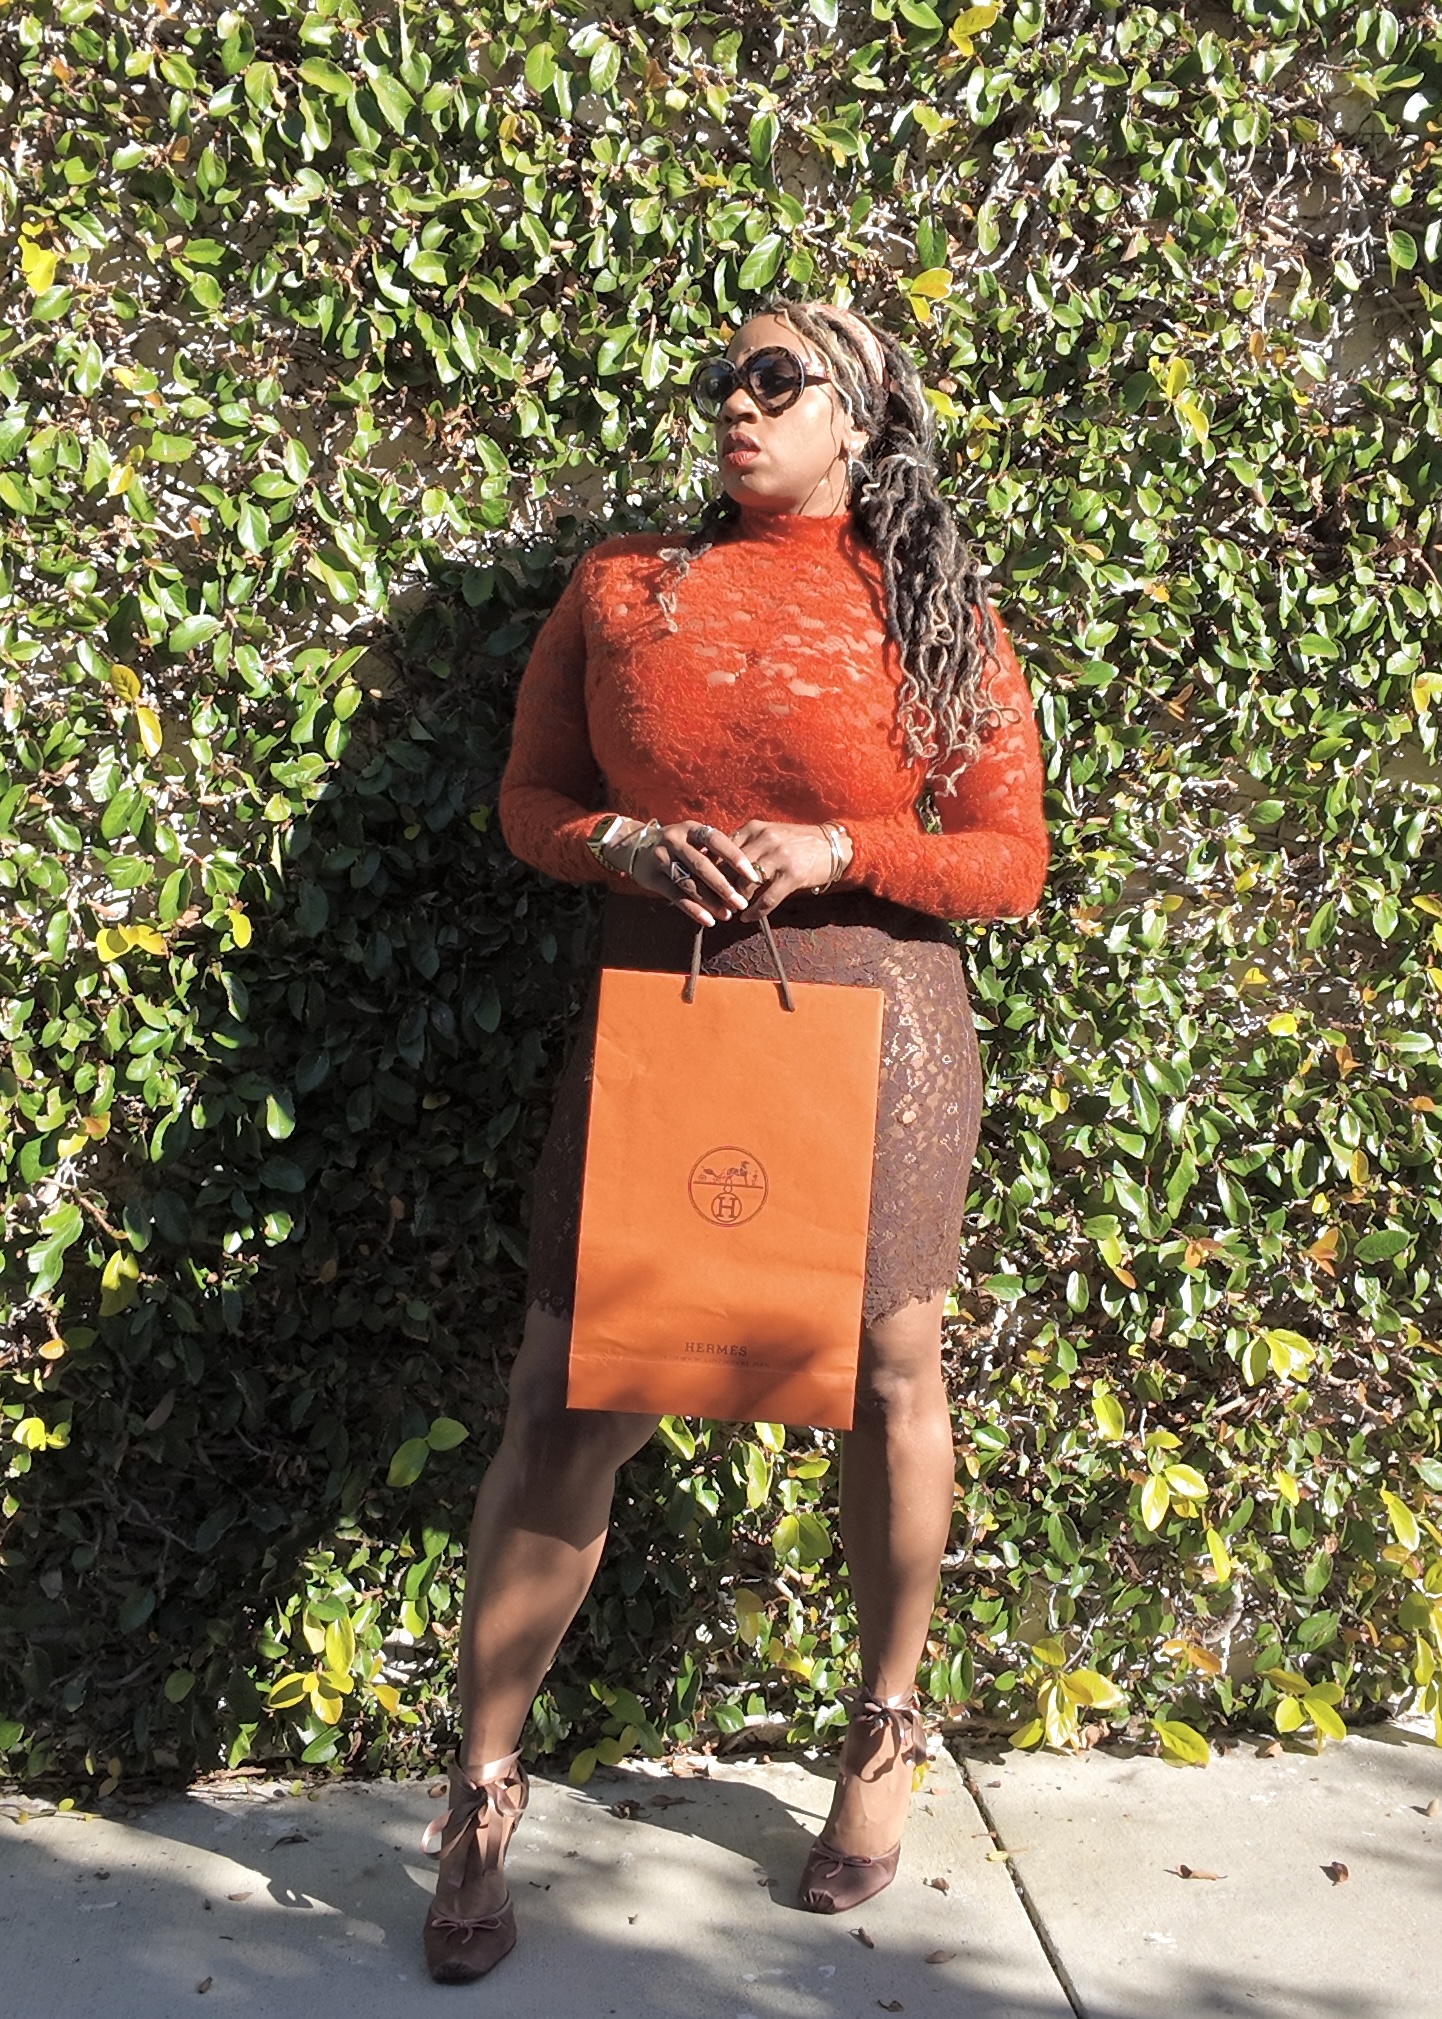
This past weekend I had the opportunity to attend enjoy and celebrate the Miss Dior Avenue pop up located in West Hollywood in celebration of Dior’s new scent, Miss Dior Parfume . The pop-up was full of pleasant aromas, treats and surprises. The beauty and the gelato was incredible. Thank you Dior for always elevating the elegance.
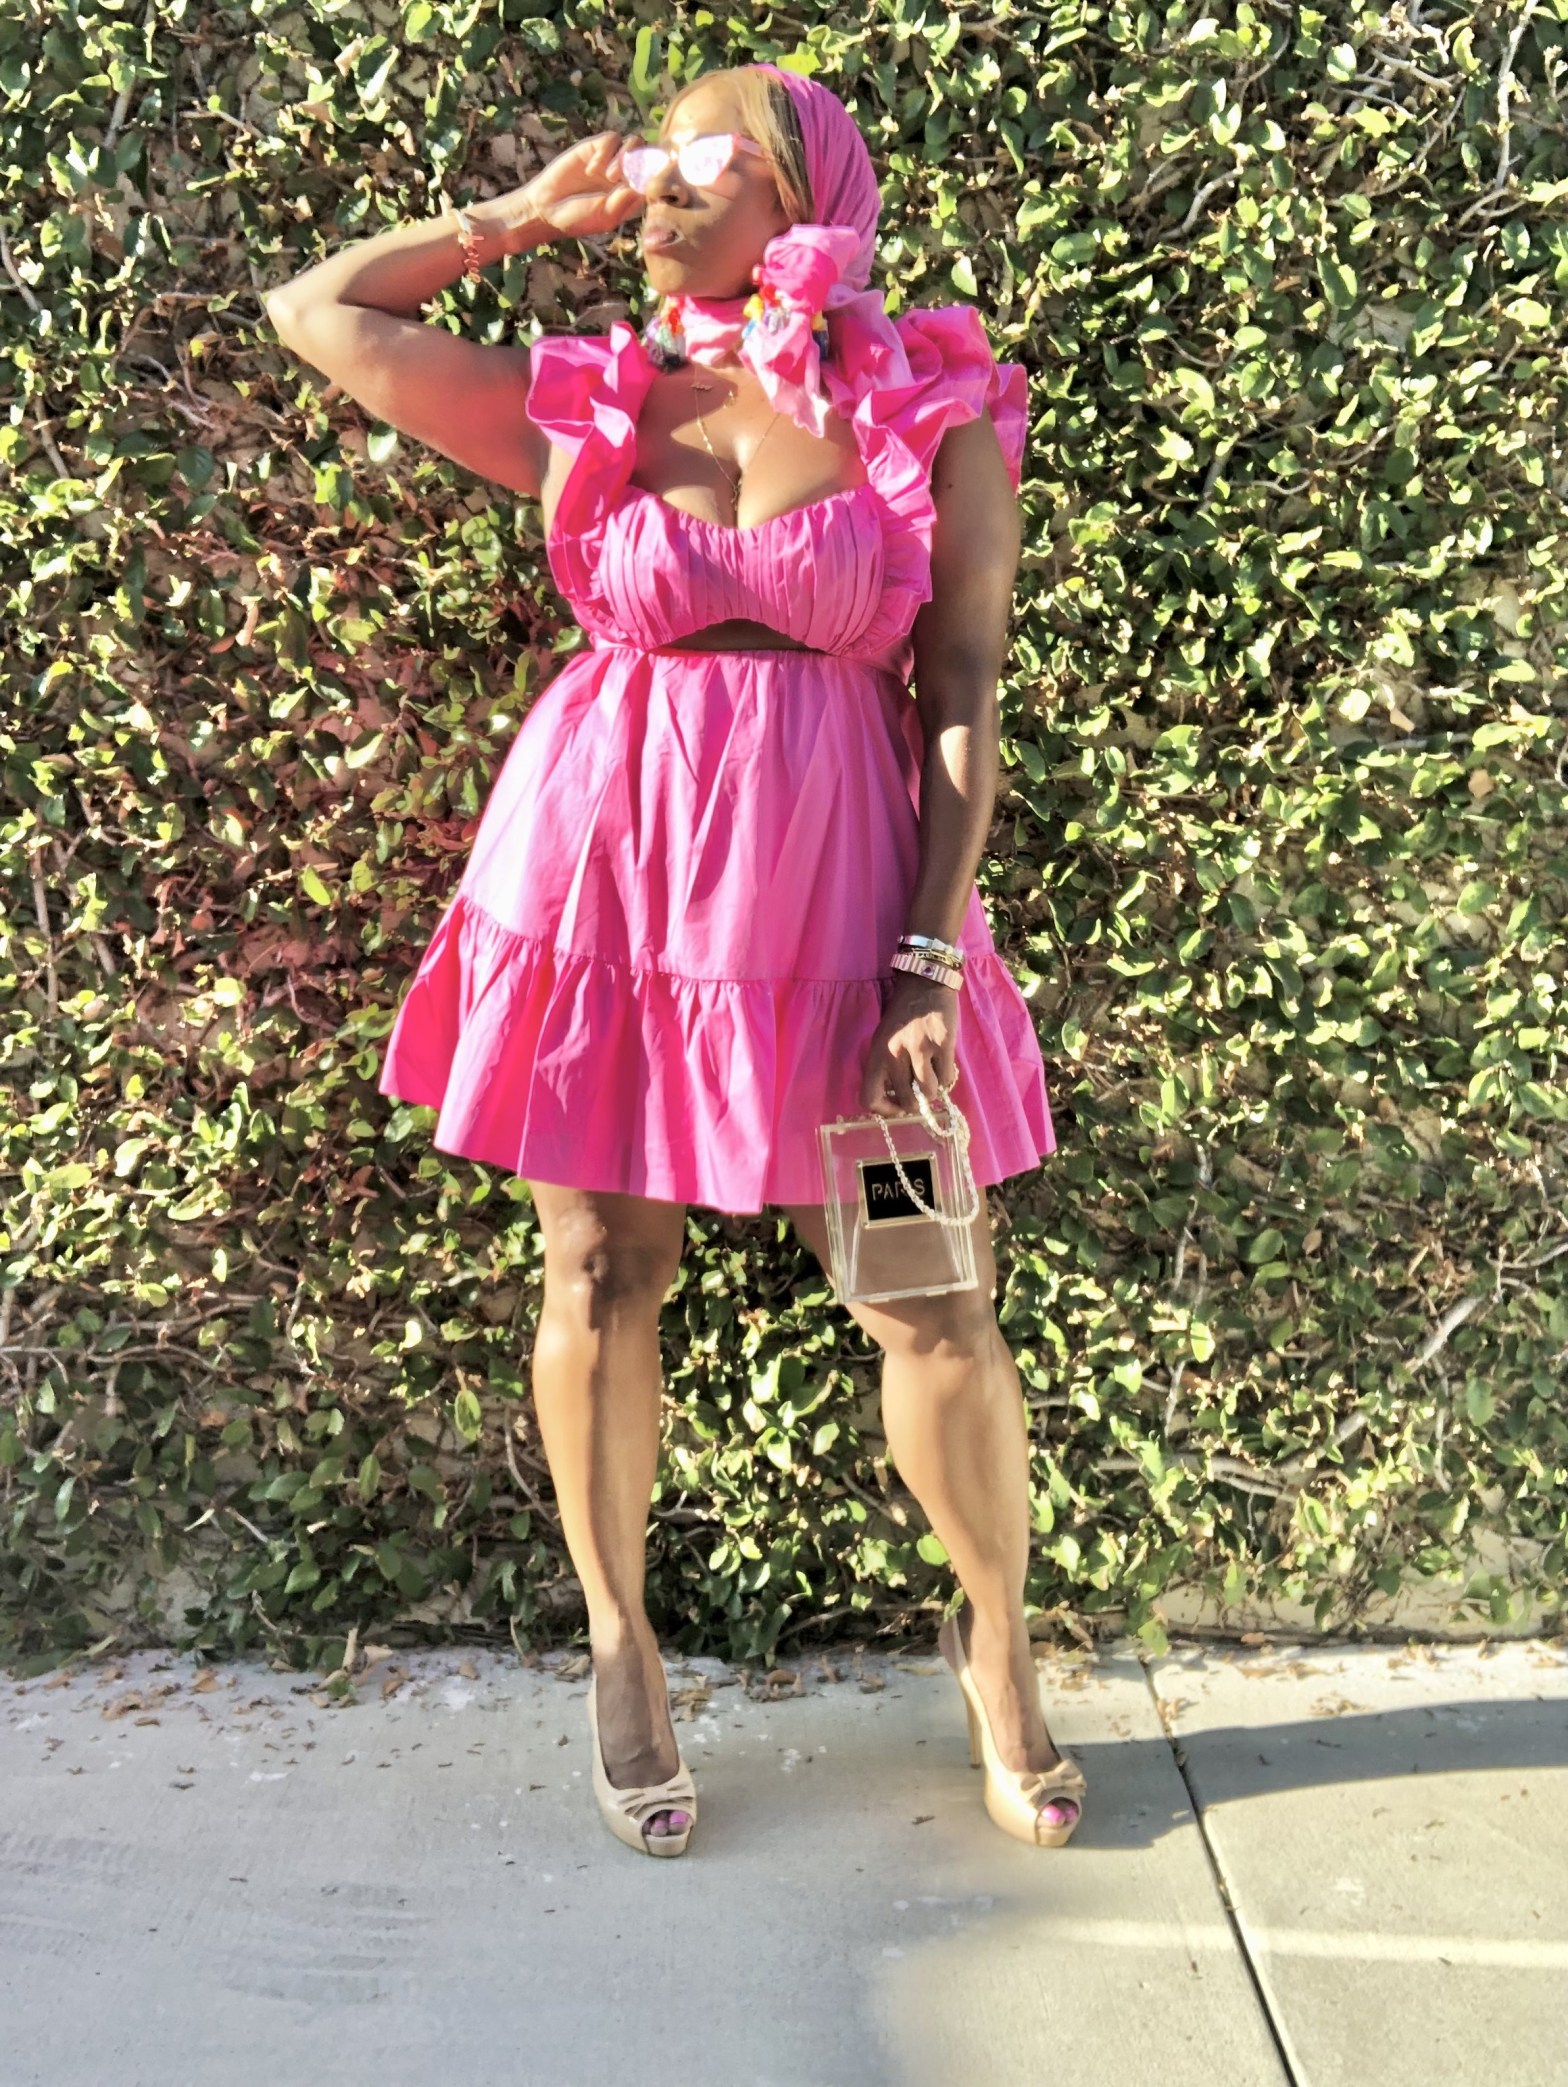
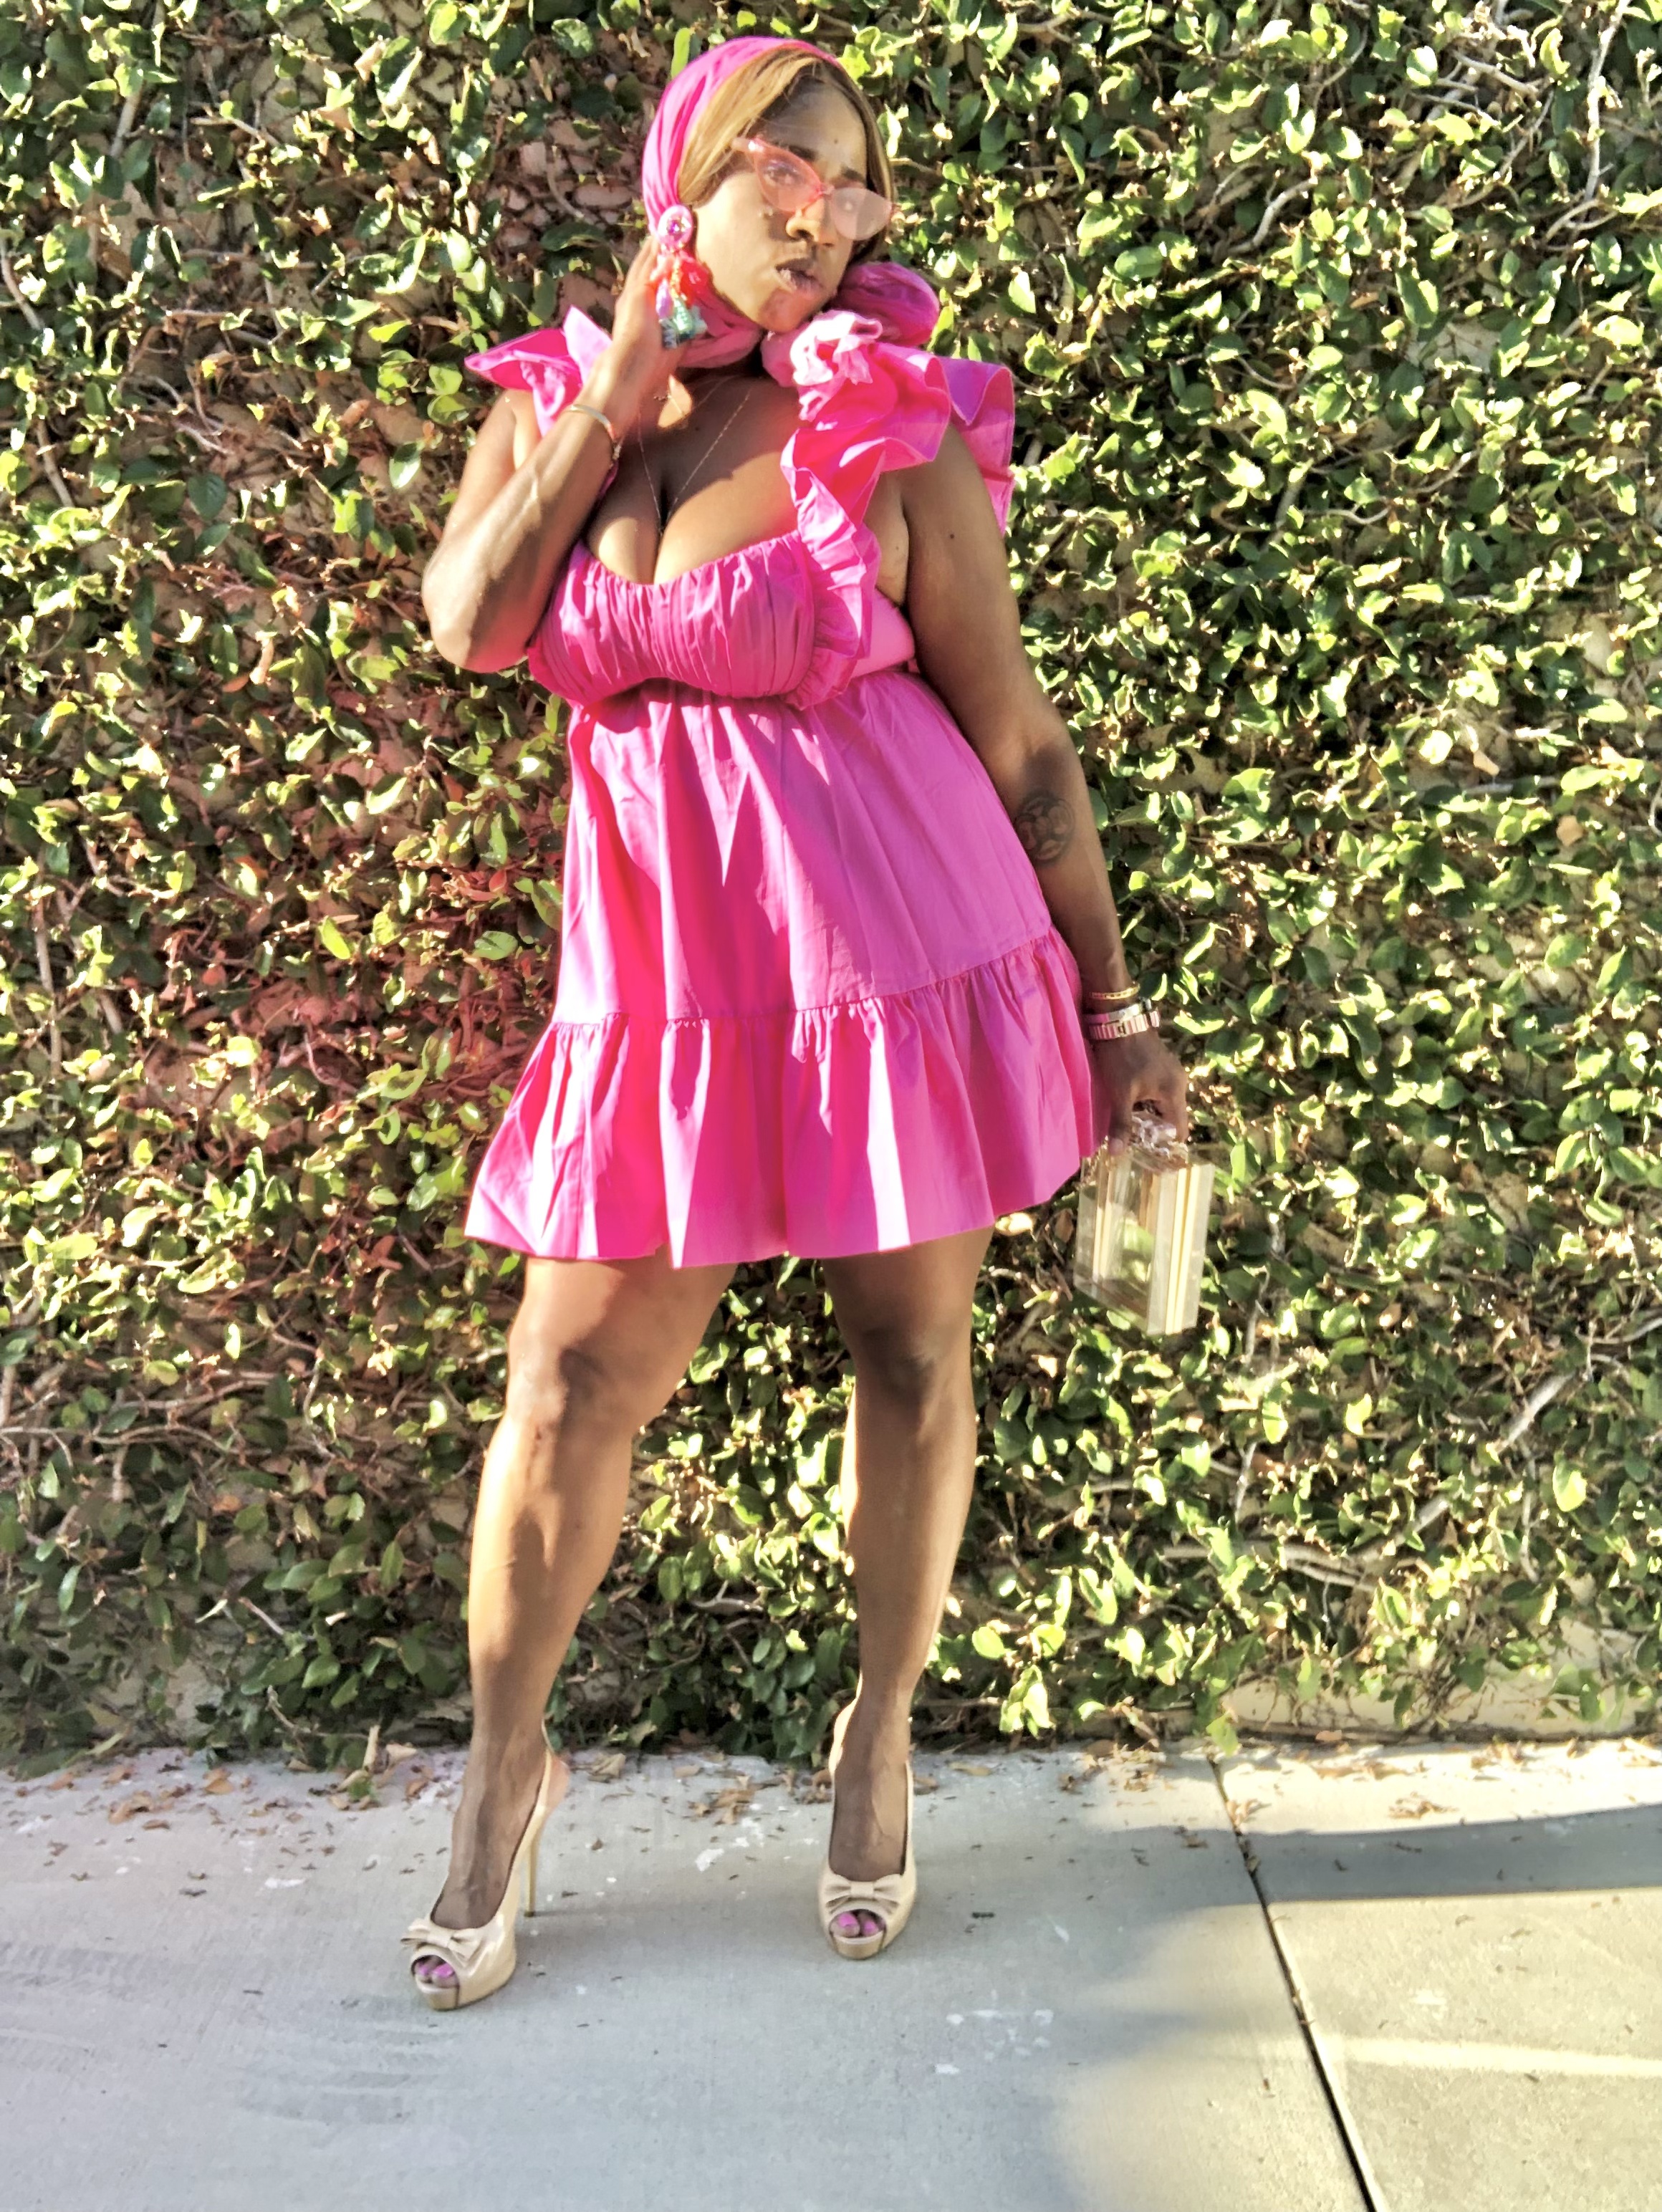
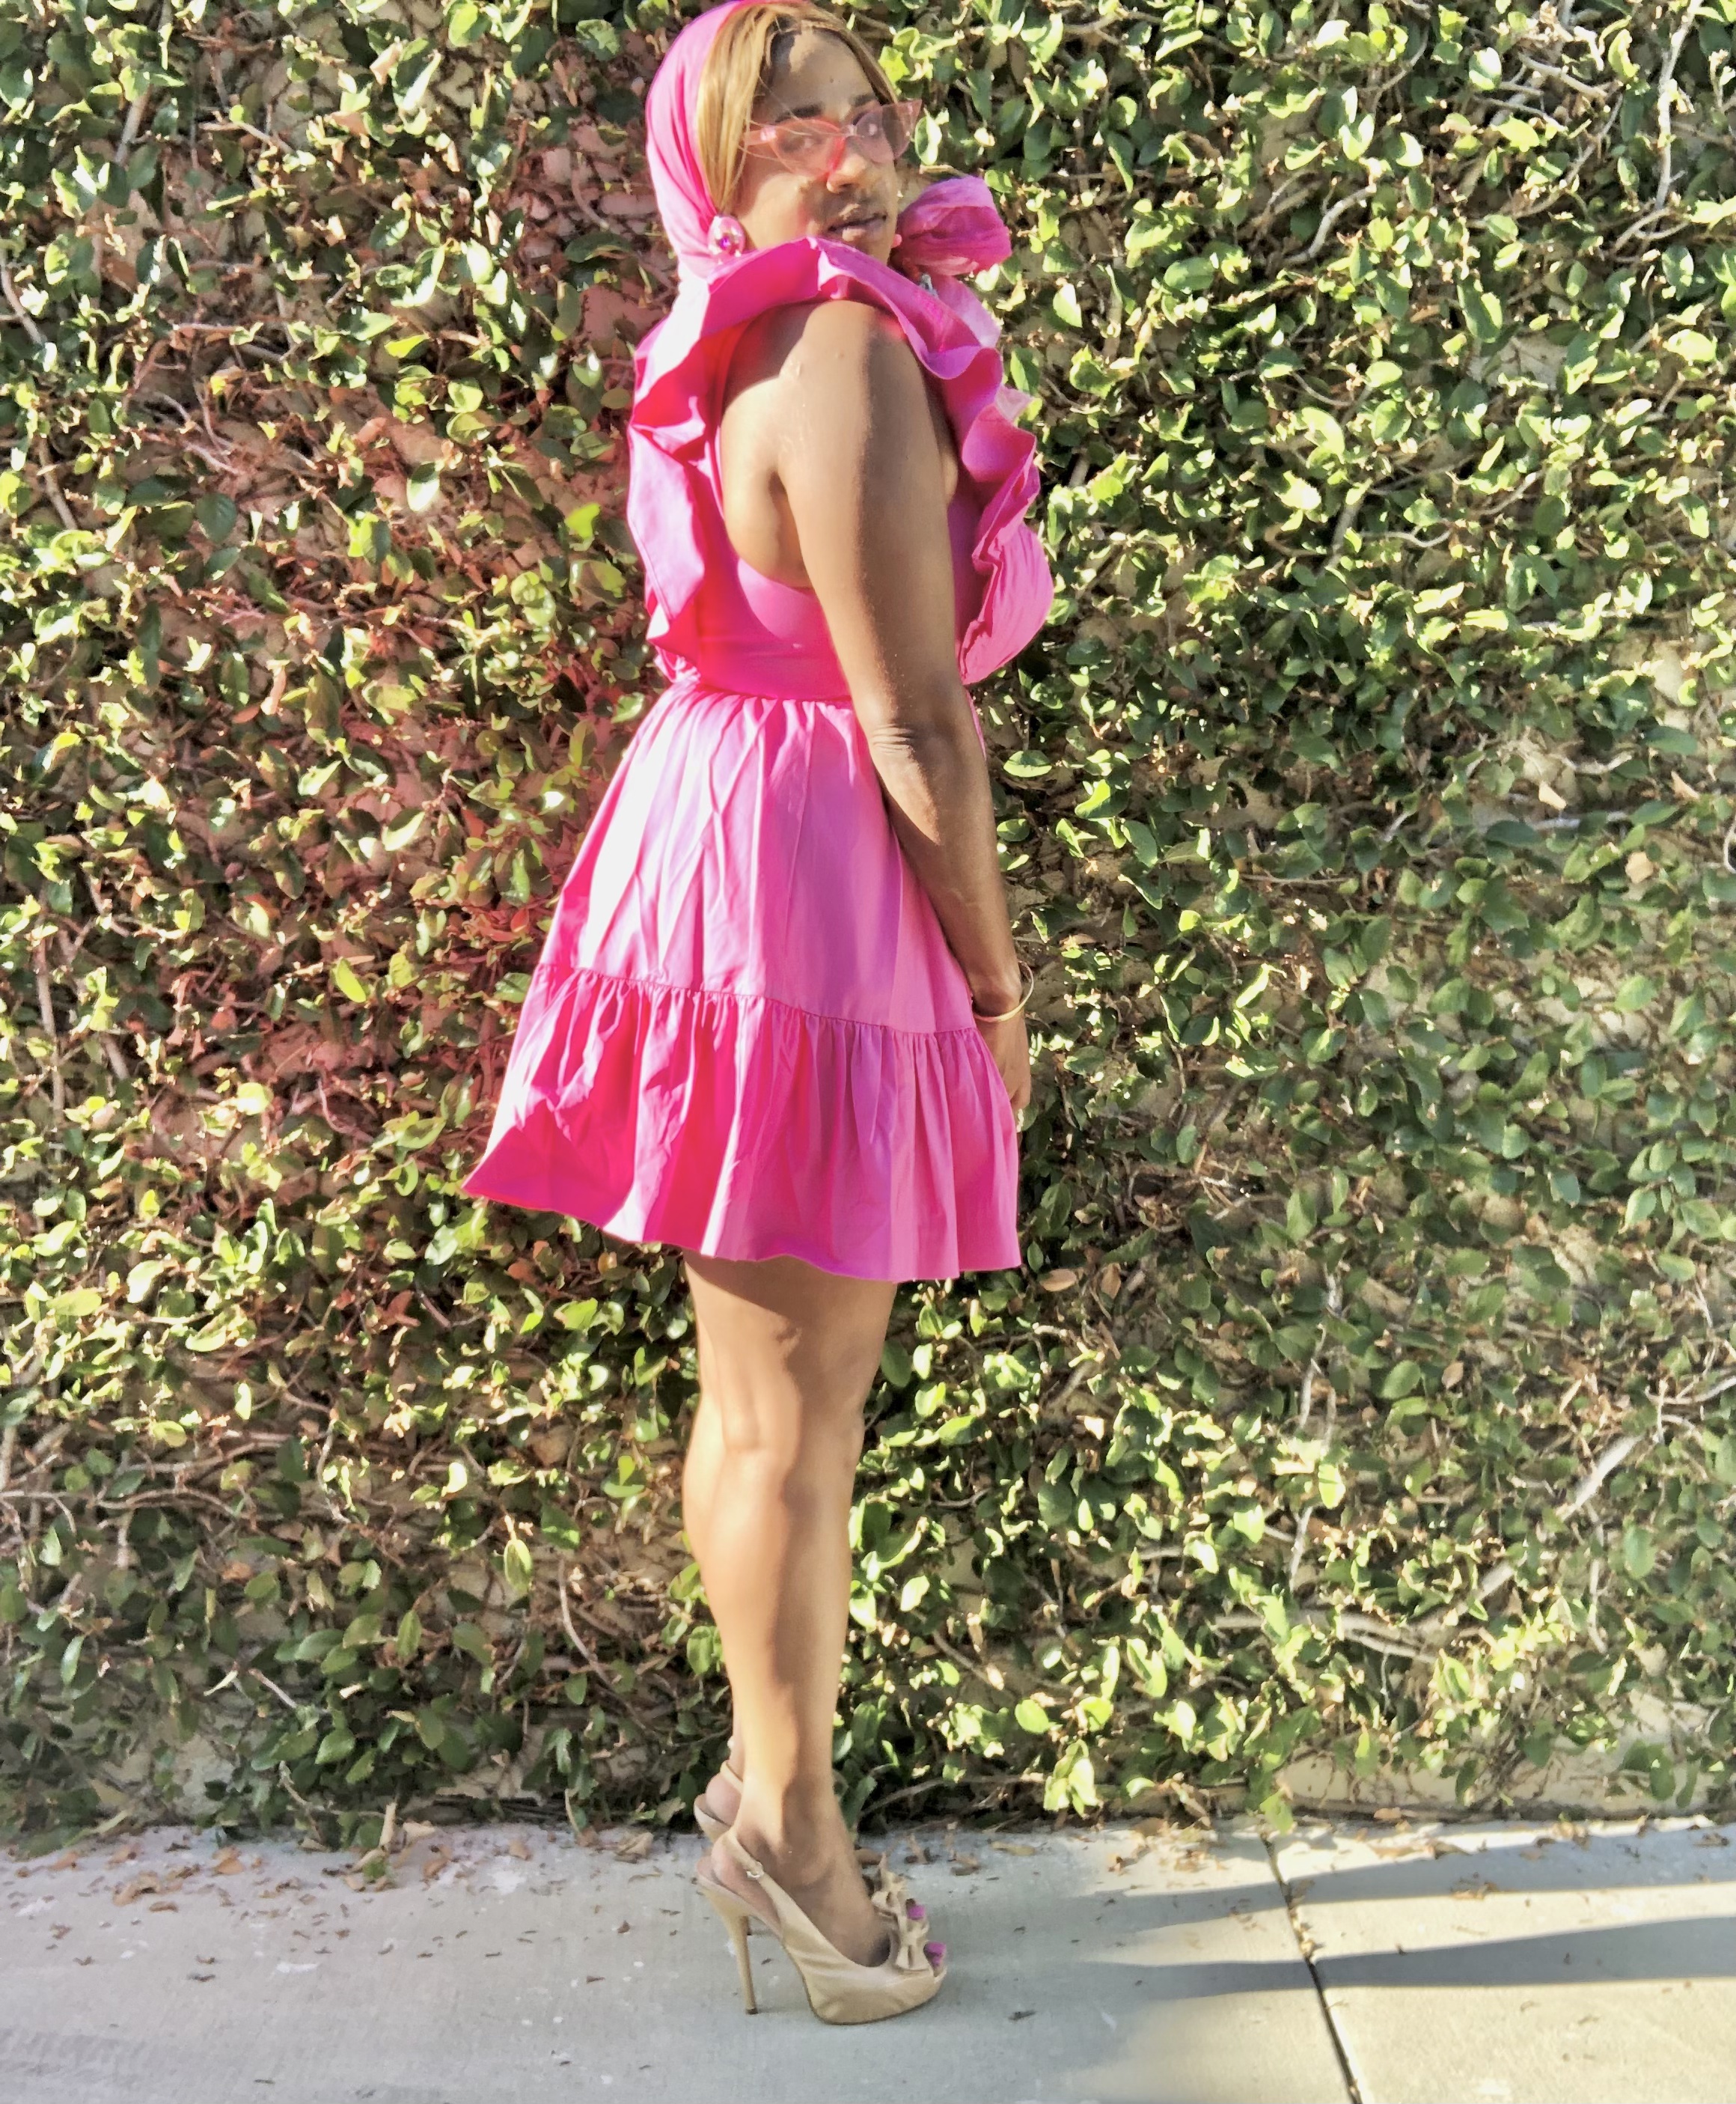
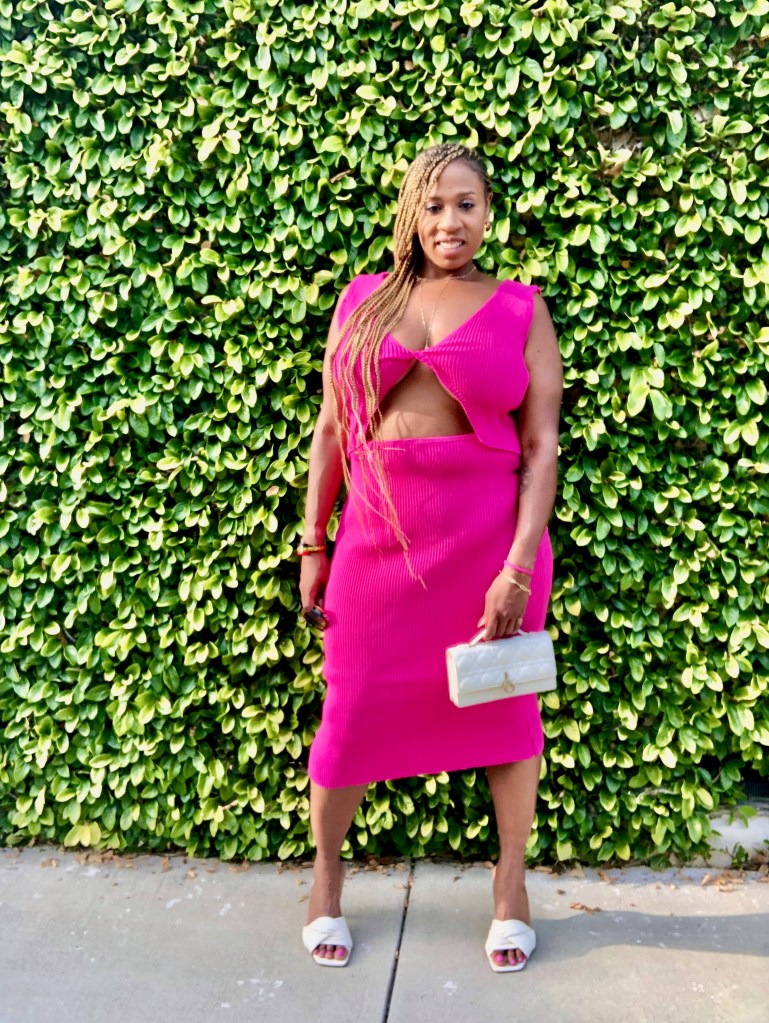
I dressed perfectly for said occasion in my fabulous Parisian Barbie Chic ensemble. Bright pink was the perfect color choice for this event and I’m glad my fashion choice was right on target.
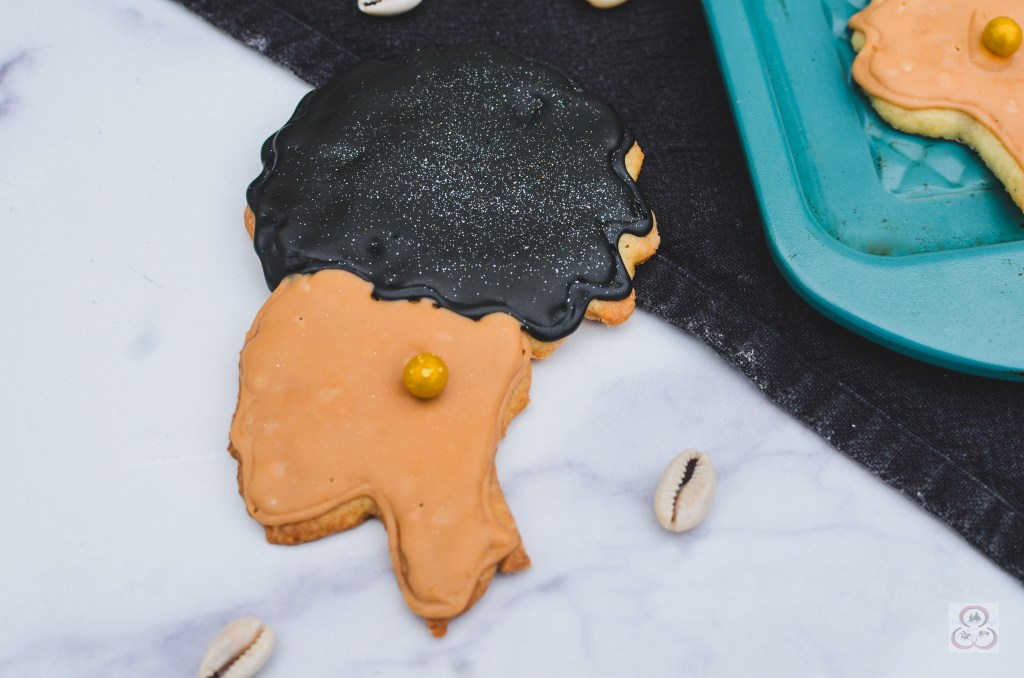
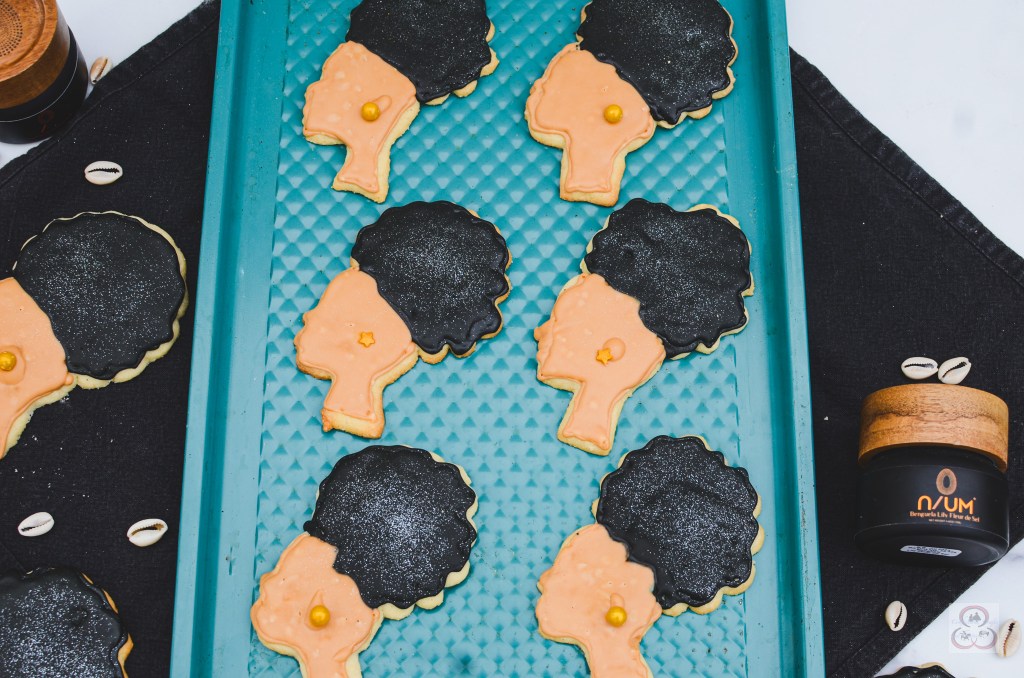
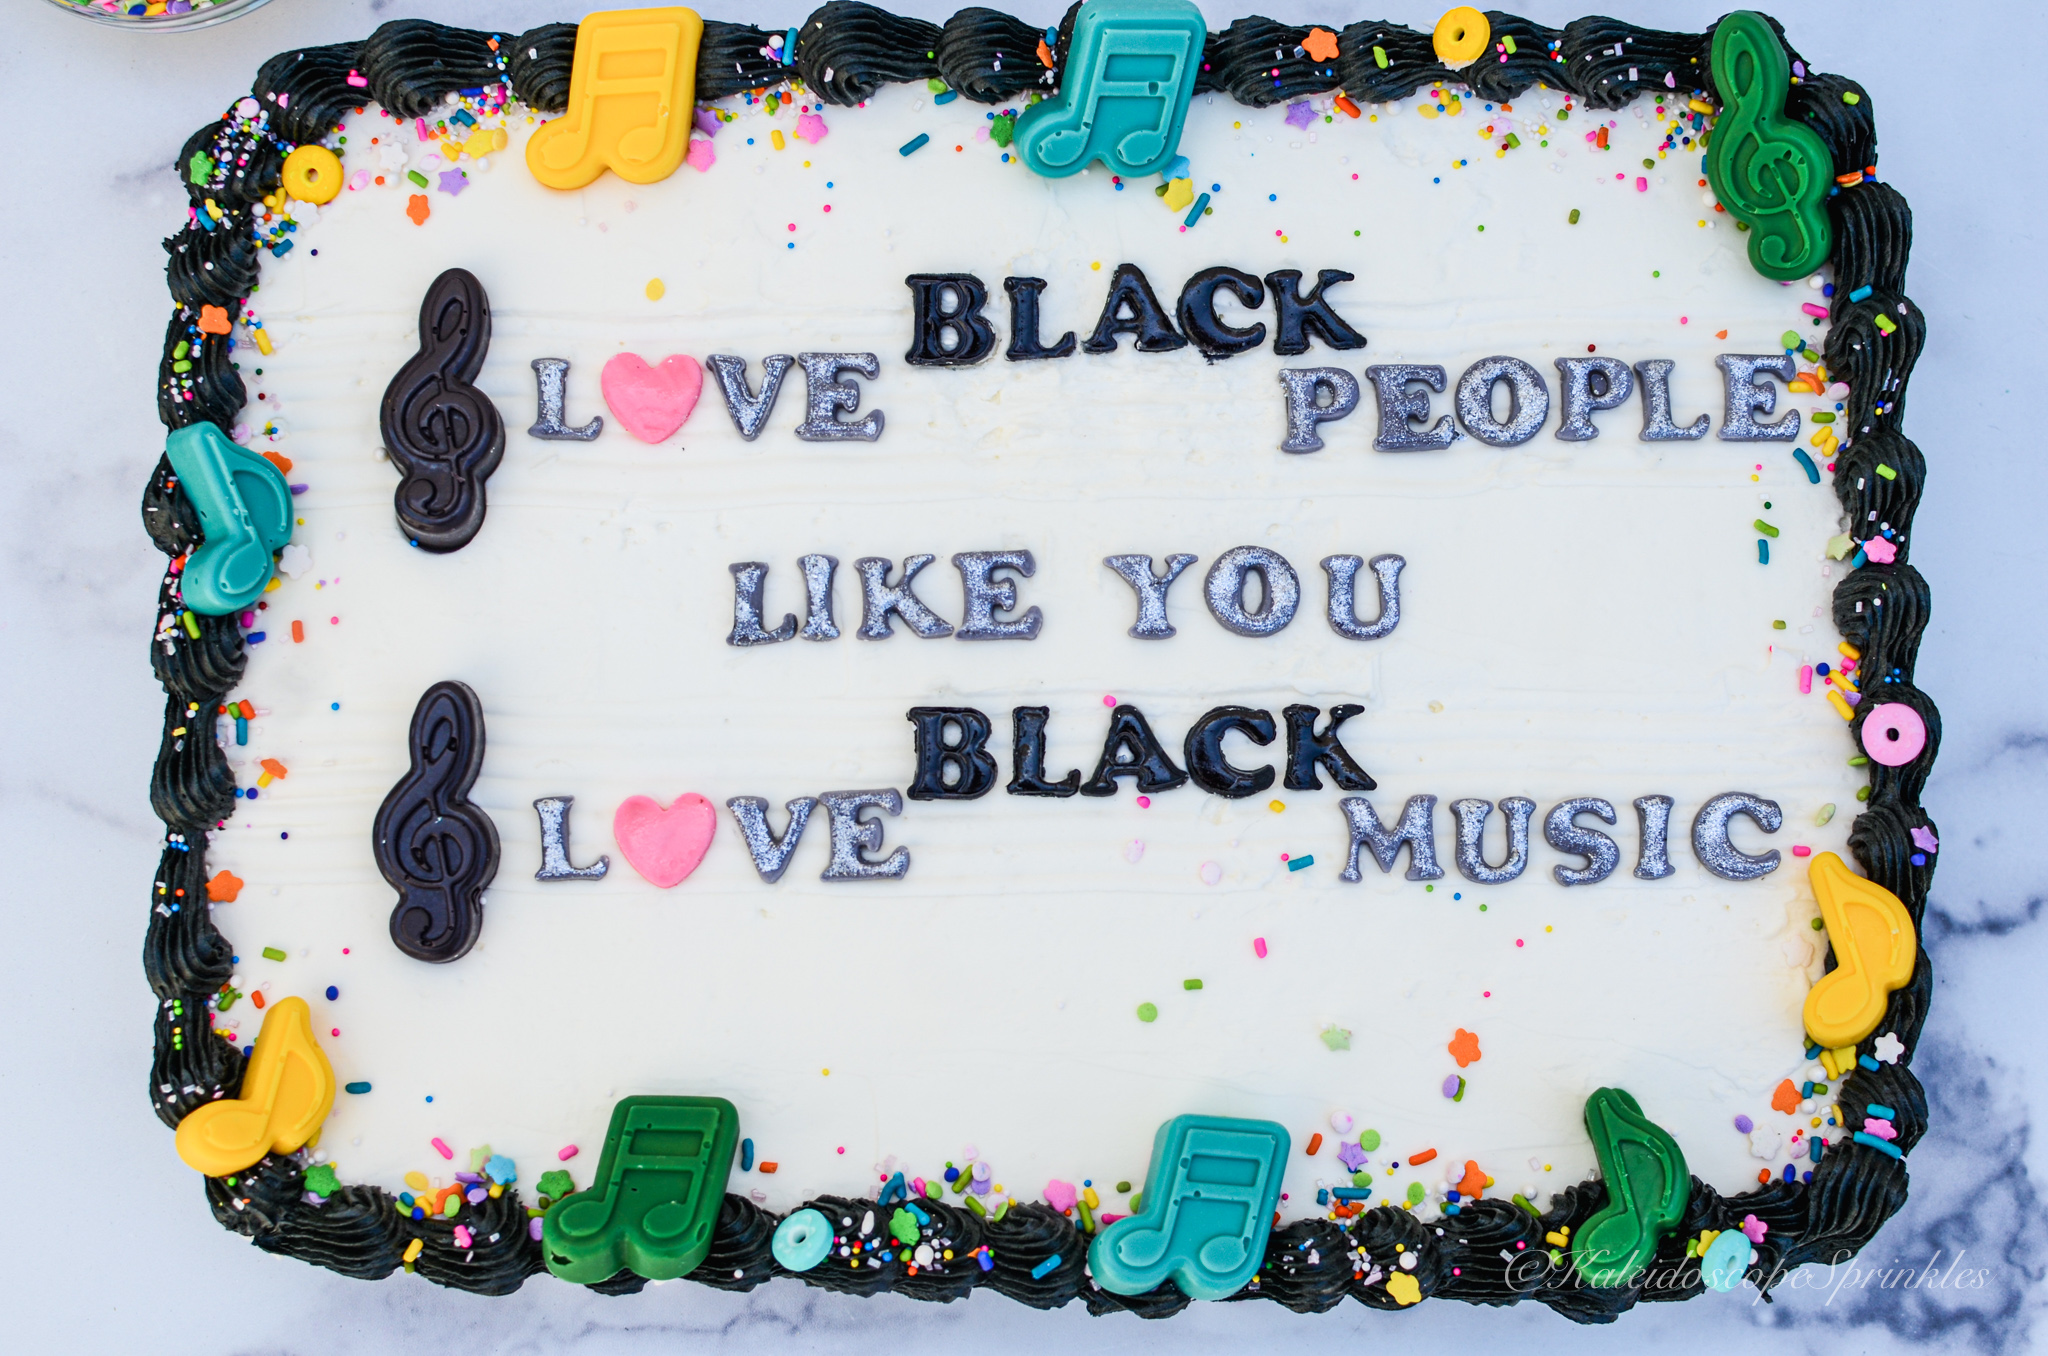
Black History Month (BHM) is steadily coming to a close. Despite having an extra day this year with it being a leap year, this month still doesn’t seem long enough. There is just too much Black history to try and pack into one month. This is why I am a firm believer in celebrating Black history every day.
In the past, I have celebrated in February by taking a trip to Egypt in 2022. I have created Black history recipes and delicious treats. I have attended special Black history discussions. This year, I attended a special Hip Hop exhibit to kick off BHM. I have also highlighted and continue to feature and support Black owned businesses with my purchasing power.
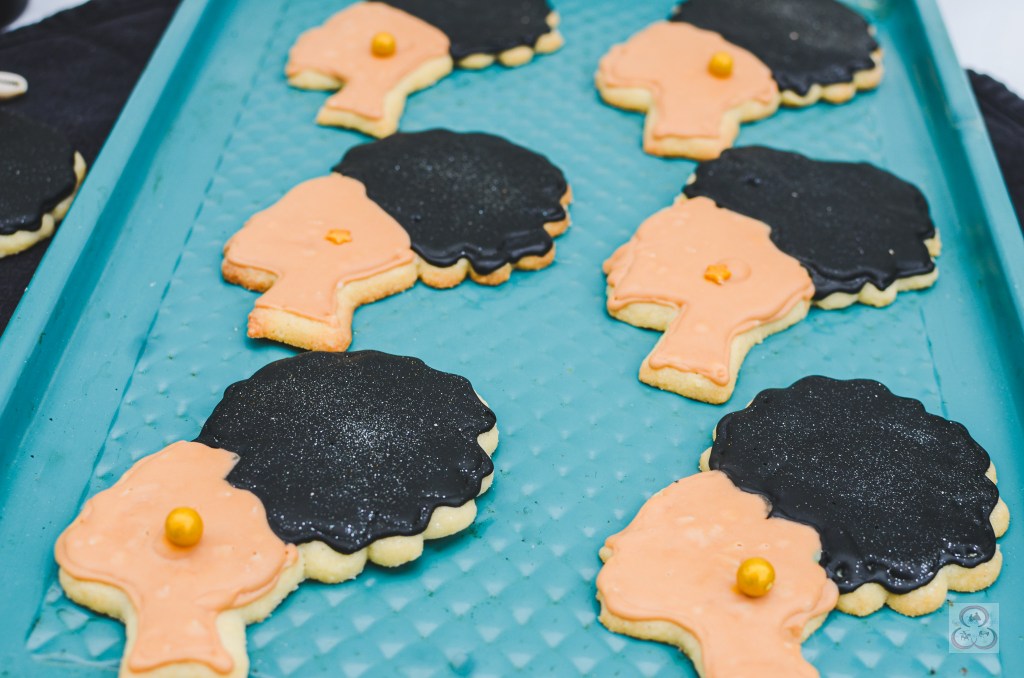
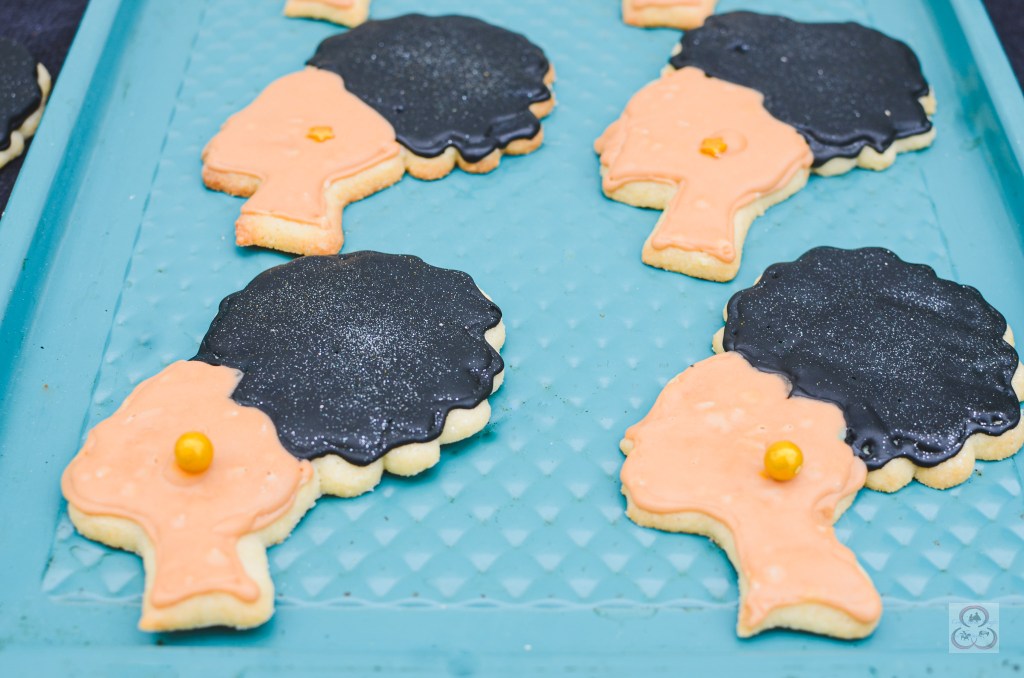
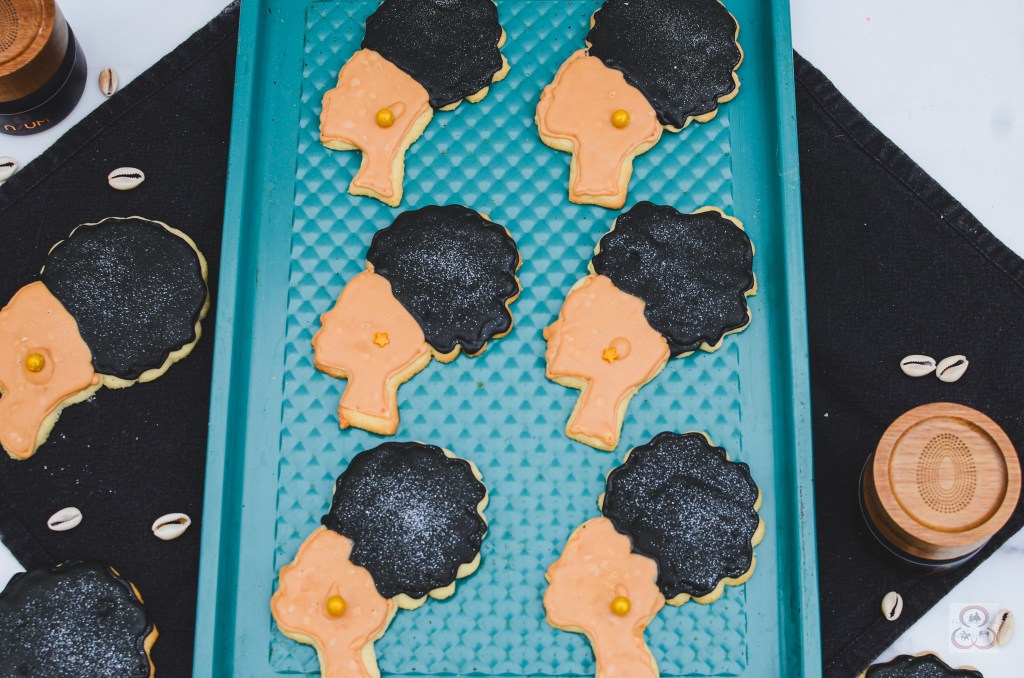
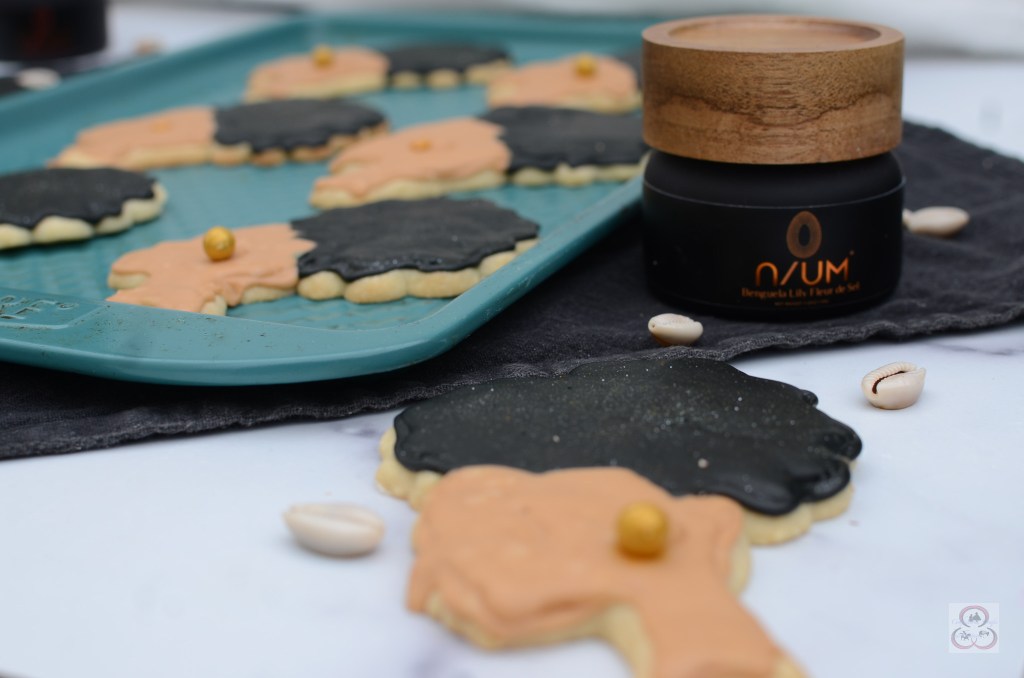
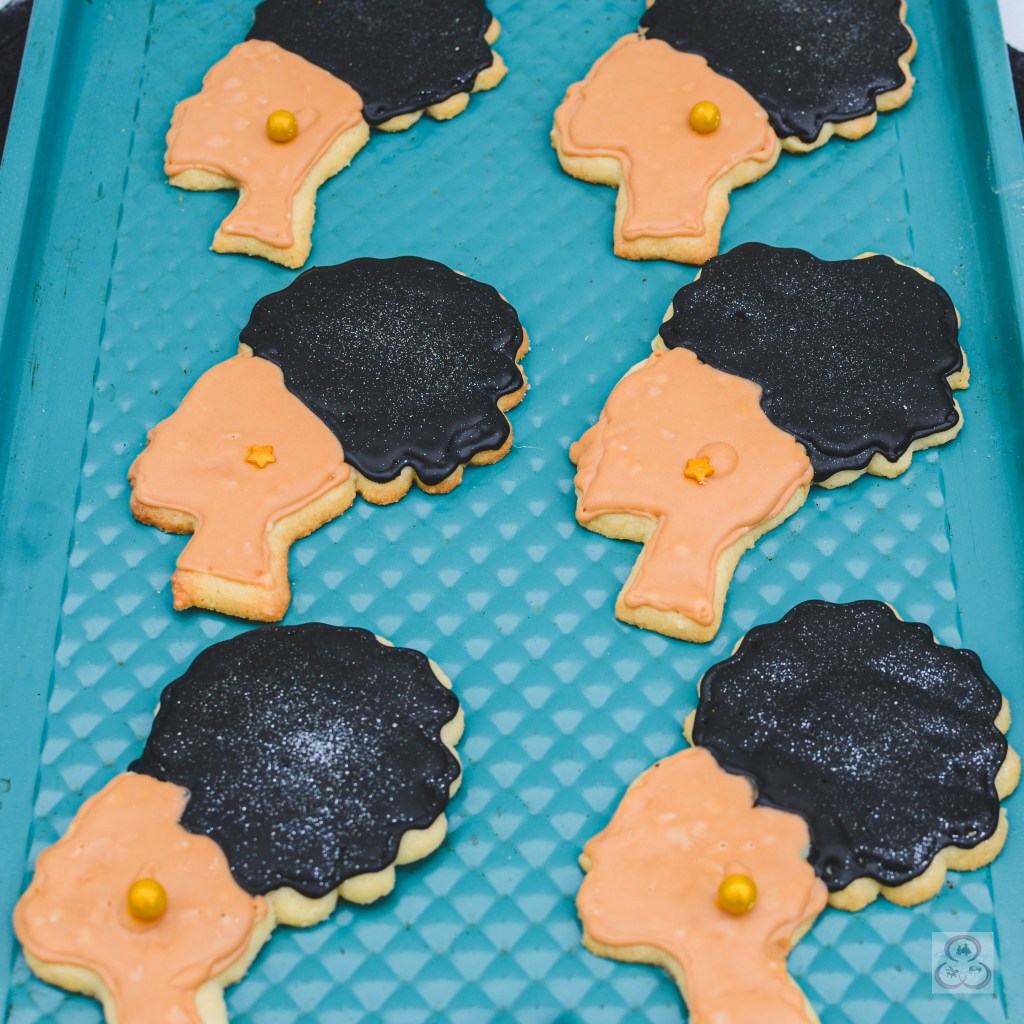
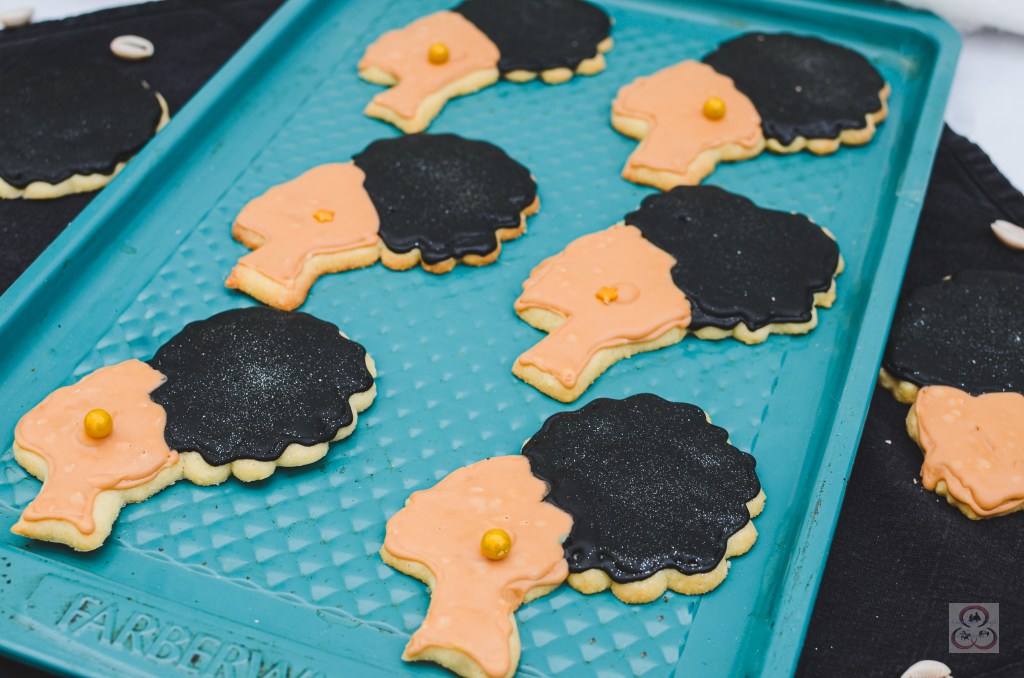
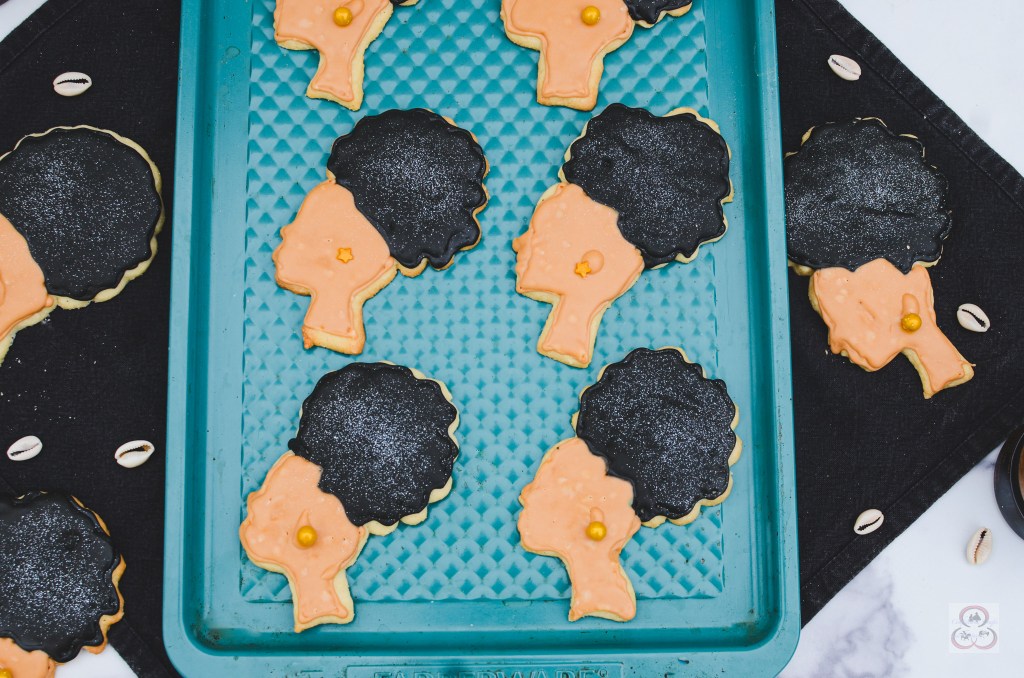
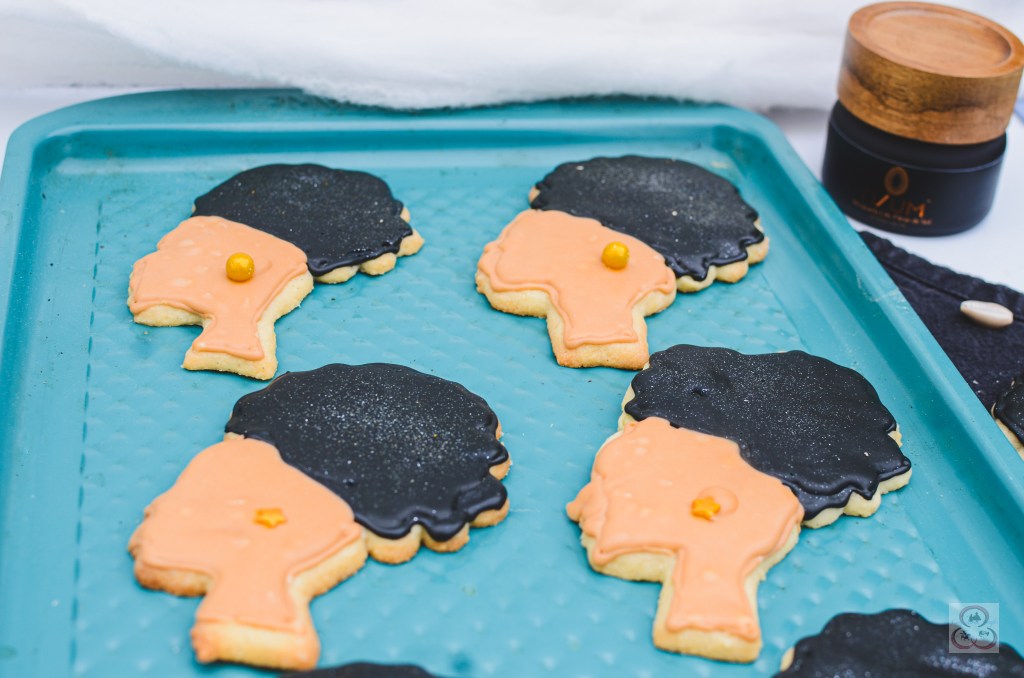
Before the official end of BHM, I wanted to honor the culture with another fabulous business and baked good. I was fortunate enough to receive some African artisan salts from a company called, N/UM. These chef curated salts that are sourced from the Motherland are a perfect way to elevate my confections for this month and anything else I plan to make in the future.
I previously purchased this cute cultural cookie cutter and became inspired with my new flavorful salts to formulate a new cookie recipe.
Check out my Black Queen Cookies filled with the robust yet delicate flavors of Africa.
If you’re interested in purchasing these flavorful artisan salts for yourself, CLICK HERE!
You can get the complete recipe and step by step video for my Black Queen Cookies below.
Some more Black history of you . In 1841 a Black man by the name of Edmond Albius made the widespread use and production of the vanilla bean possible. At the time, Edmond was a 12 year old enslaved boy from the Bourbon Islands was owned by French. He figured out what other botanists had tried to do for centuries.Albius discovered that the vanilla plant could be pollinated by hand using a blade of grass or a swipe of a thumb.
Makes 18-24 cookies
Ingredients Cookies:
2 cups all-purpose flour
¼ cup almond flour
1 tbsp. tapioca flour ( you can substitute cornstarch)
In a medium mixing bowl whisk together flours, baking powder and N/UM salt. Set aside.
In the bowl of an electric stand mixer cream together butter with granulated sugar until blended. Scrape down mixing bowl. Add eggs one at a time. Scrape down mixing bowl again. Add fresh vanilla and almond extract. Add flour mixture to bowl. Mix cookie dough until just combined. Be careful not to over mix or dough will be tough.
Roll out dough onto a floured surface until about ¼ inch (0.63 cm.) thick. Cut out cookies using your cookie cutter. To prevent sticking, dip cookie cutter in flour first before cutting out cookie dough.
Place cut out cookies on cookie sheet with 1 inch separation between each cookie.
Bake in preheated oven for approximately 14 – 16 minutes until dough is slightly golden brown on the edges.
Let cool completely on a wire rack until room temperature.
While the cookies are cooling, in a large mixing bowl using an electric or hand mixer blend together powdered sugar, meringue powder, water and vanilla extract. Add small amount of icing color. Mix until icing is smooth and right consistency.
Place icing into small individual piping bags with each color. Decorate each cookie using royal icing. Allow icing to set.
I love a great getaway. A refreshing trip mostly brings me peace and inspiration. If you have been following my travel blog, TMC LLC, you know that I recently enjoyed and returned from a trip to Puerto Vallarta. Puerto Vallarta was such an incredible adventure. There were many outdoors activities to do, plenty of leisure time and most importantly great food to savor. I had delicious fresh fish tacos, which are my favorite. I also had plenty of snacks and sweets, including authentic Mexican chocolate.
Before my trip to the Mexican peninsula, I had sampled lots of chocolate from all over the globe. This would be my first time having authentic chocolate from Puerto Vallarta and I was looking forward to it. During one of my days causally exploring the city. I was looking for something to eat for dinner and stumbled upon a restaurant that also served as a chocolate shop. My meal for dinner was absolutely delicious, but it left me too full to eat any dessert. I knew I had to come back for the variety of chocolate and sweets being served.
Upon my last day in Puerto Vallarta, I made it back to Vallarta Chocolate Factory. My hotel, Hacienda San Angel, had already provided me plenty of chocolates during my daily turn down service. I was interested in purchasing something I could bring back home with me. I found some authentic Puerto Vallarta cocoa powder in the chocolate shop and quickly scooped some up. I already had an idea of what I wanted to do with this baking ingredient.
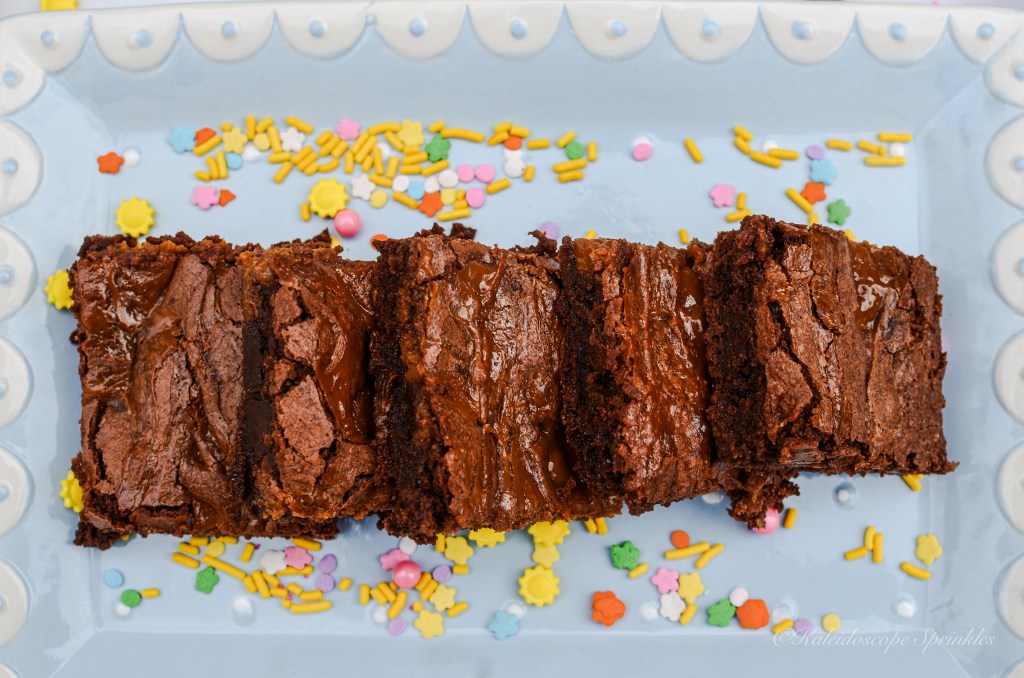
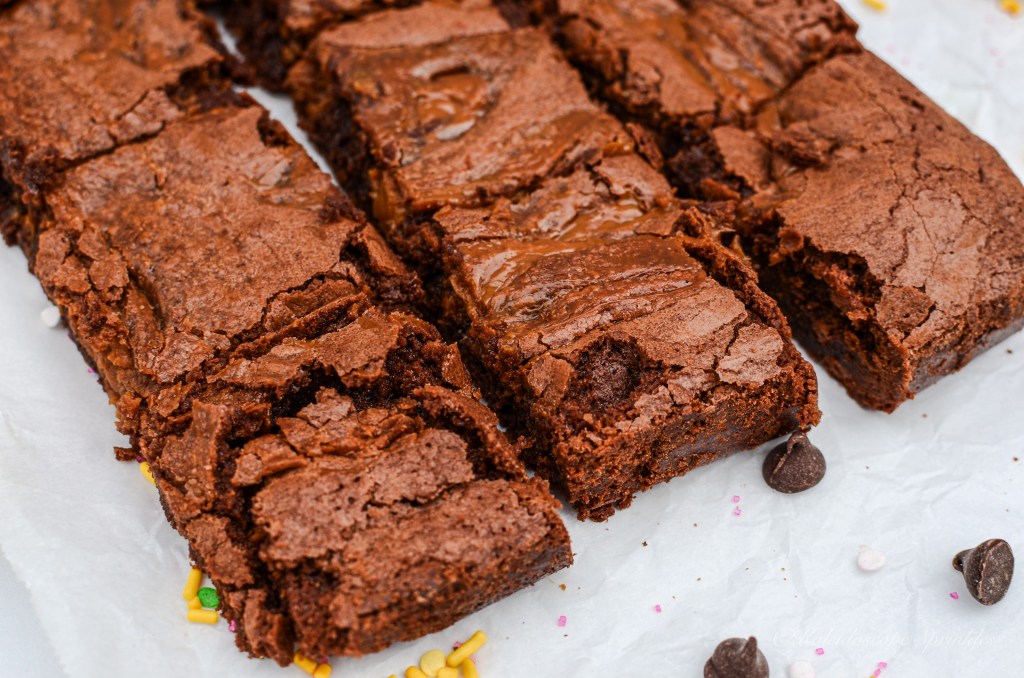
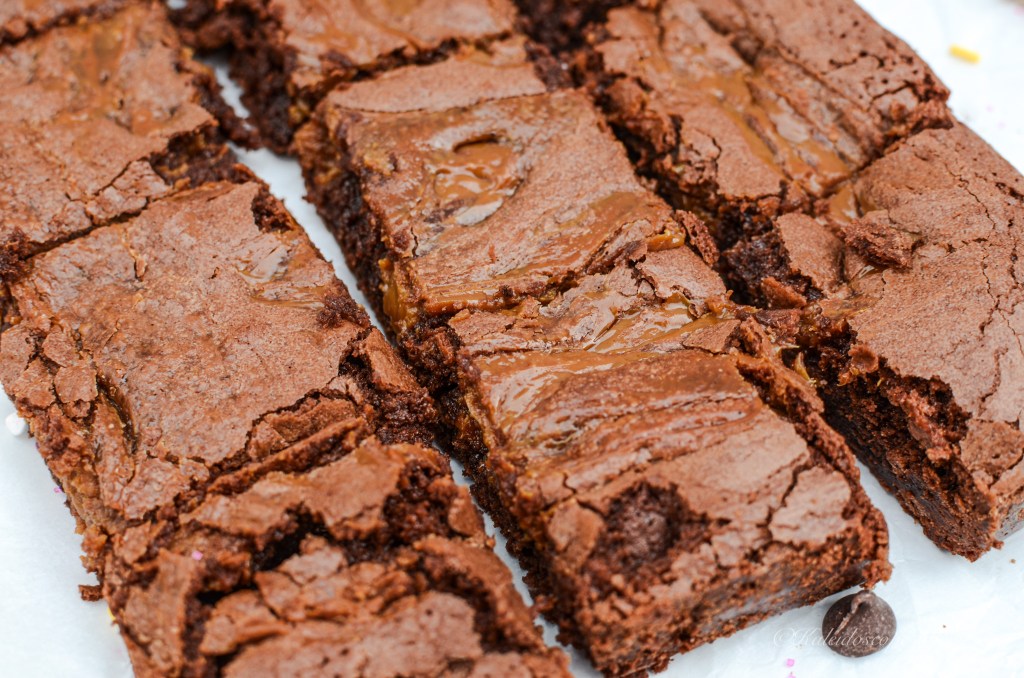
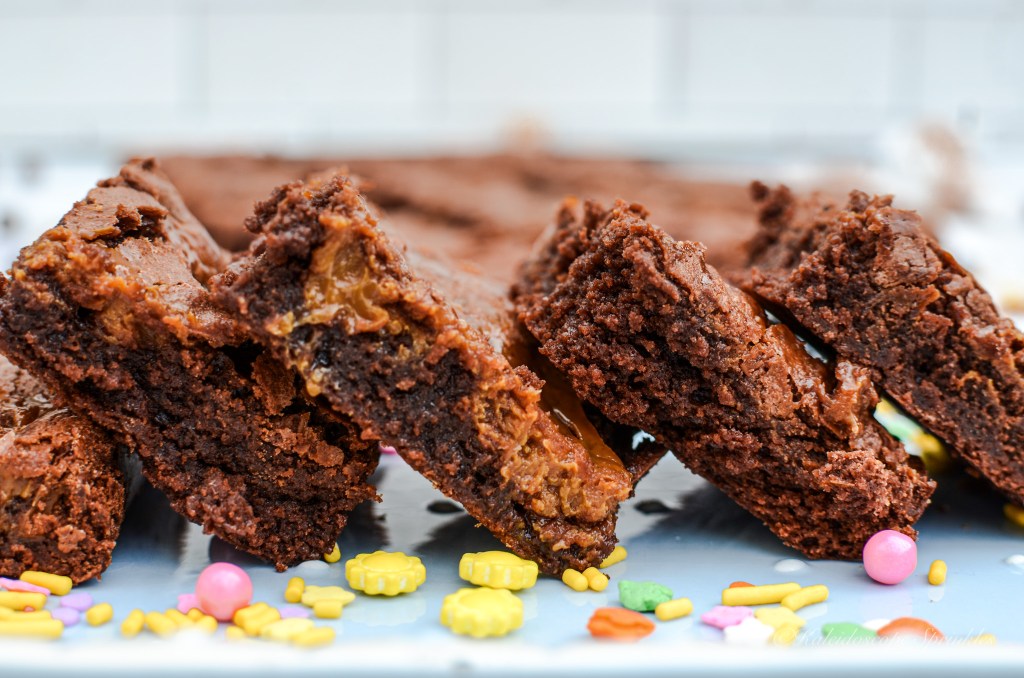
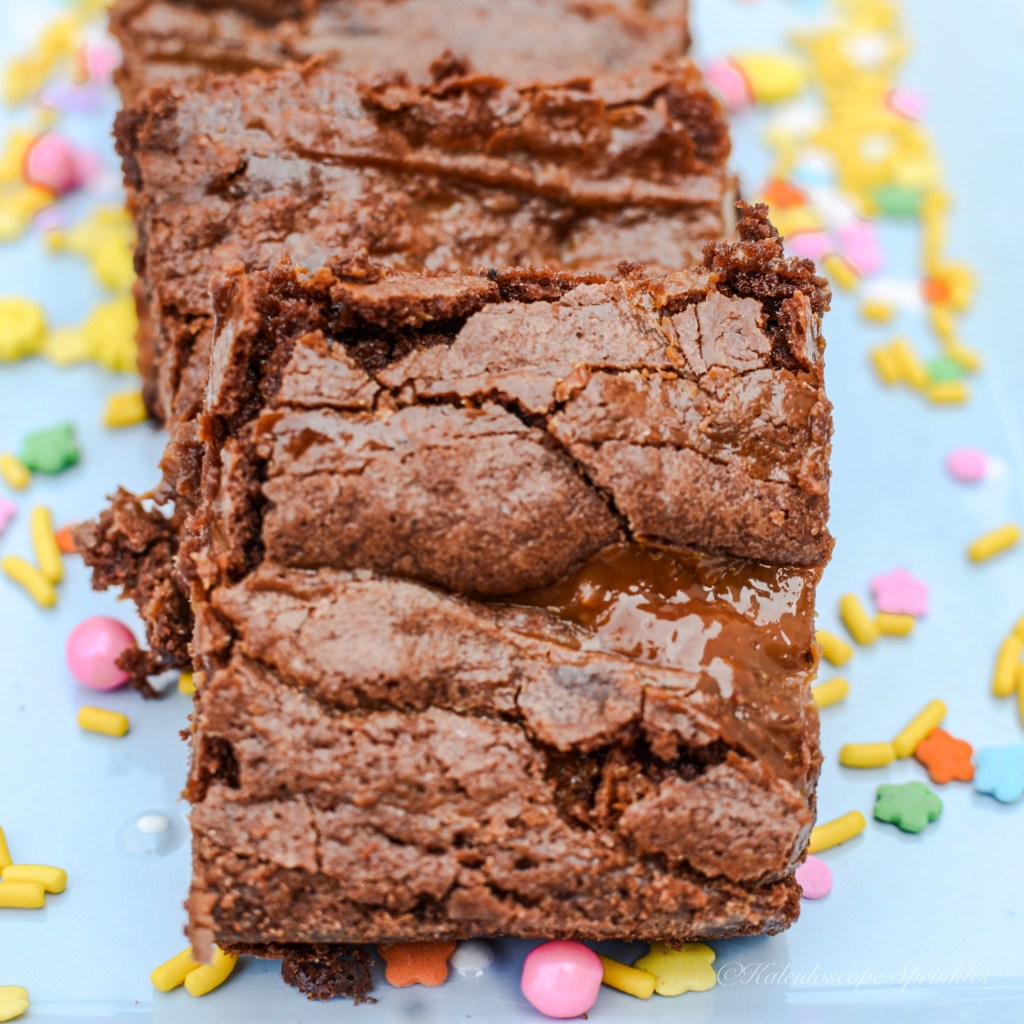
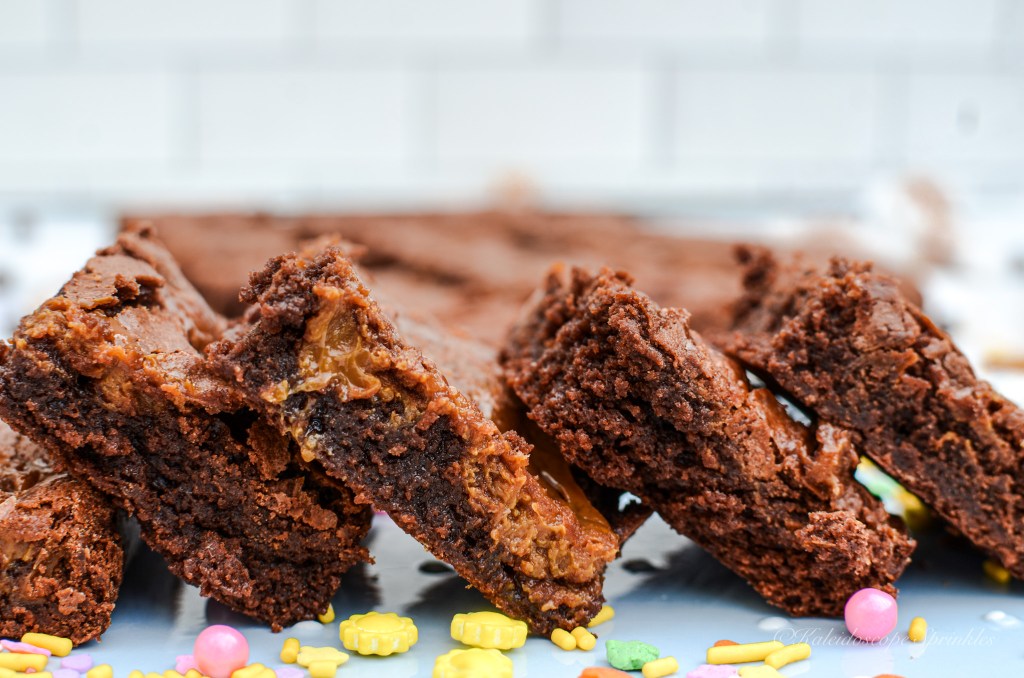
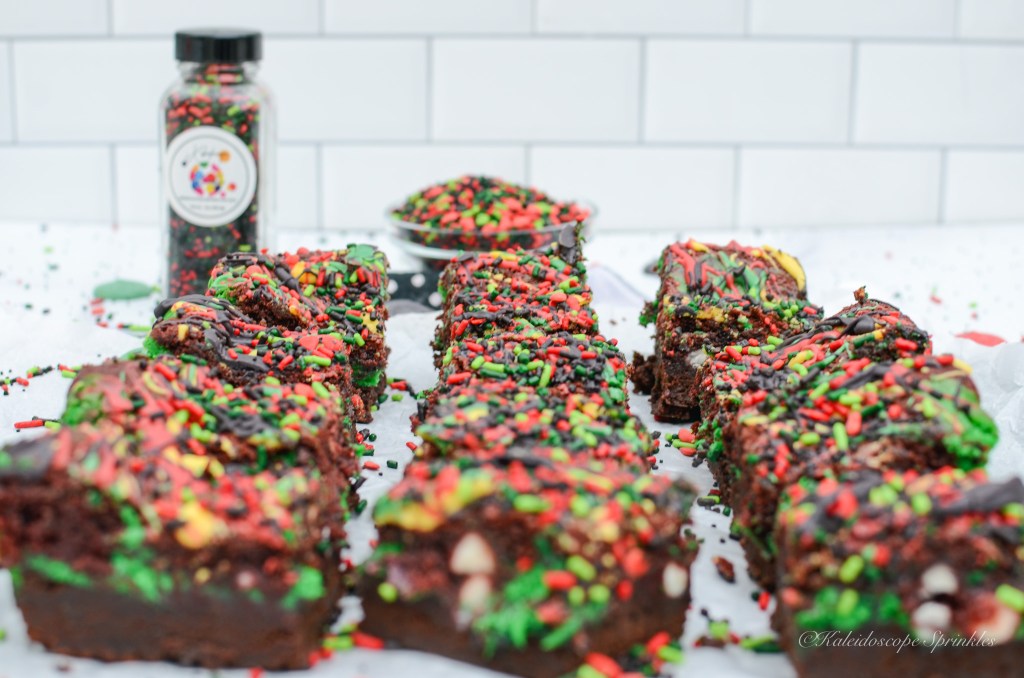
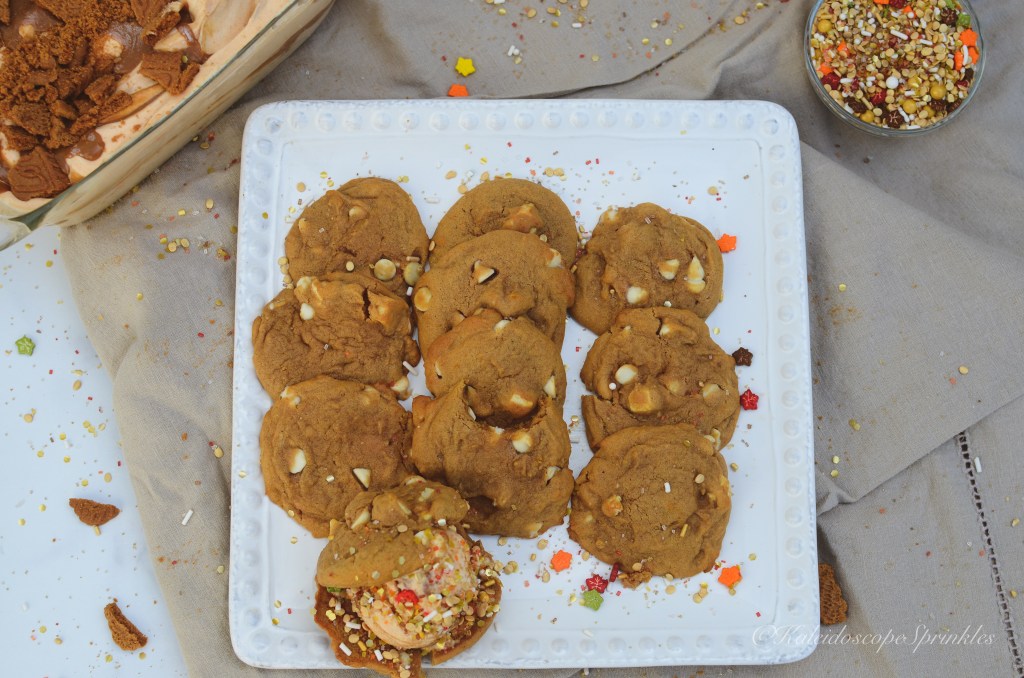
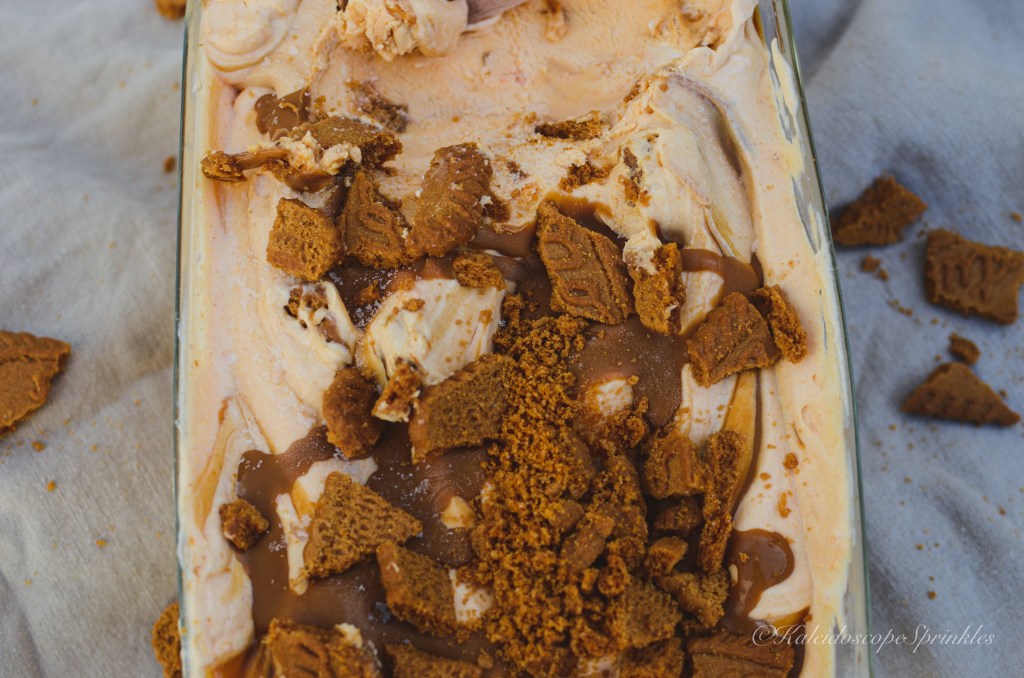
I returned home to my LA estate and quickly got to work in my kitchen. I had some extra dulce de leche* in my refrigerator because I always keep some ready for recipe inspiration. I took out a can of my homemade dulce de leche* and turned my oven on. I whipped up a batch of some amazing Dulce de Leche Brownies and decided to share the recipe with you to enjoy.
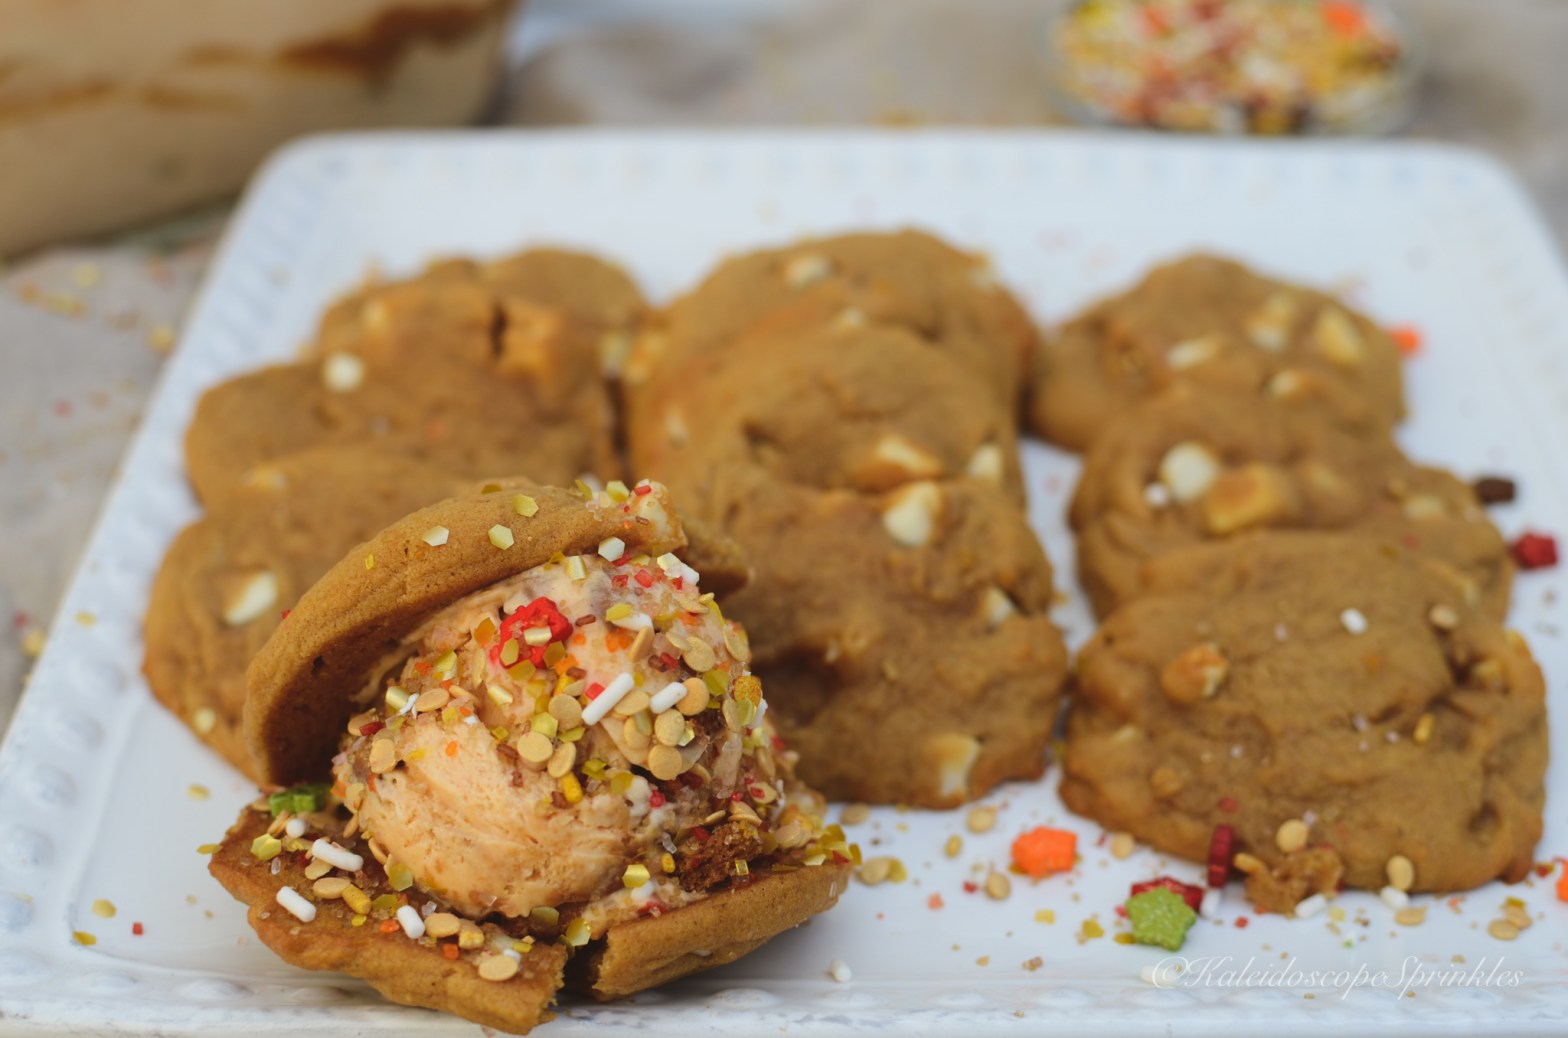
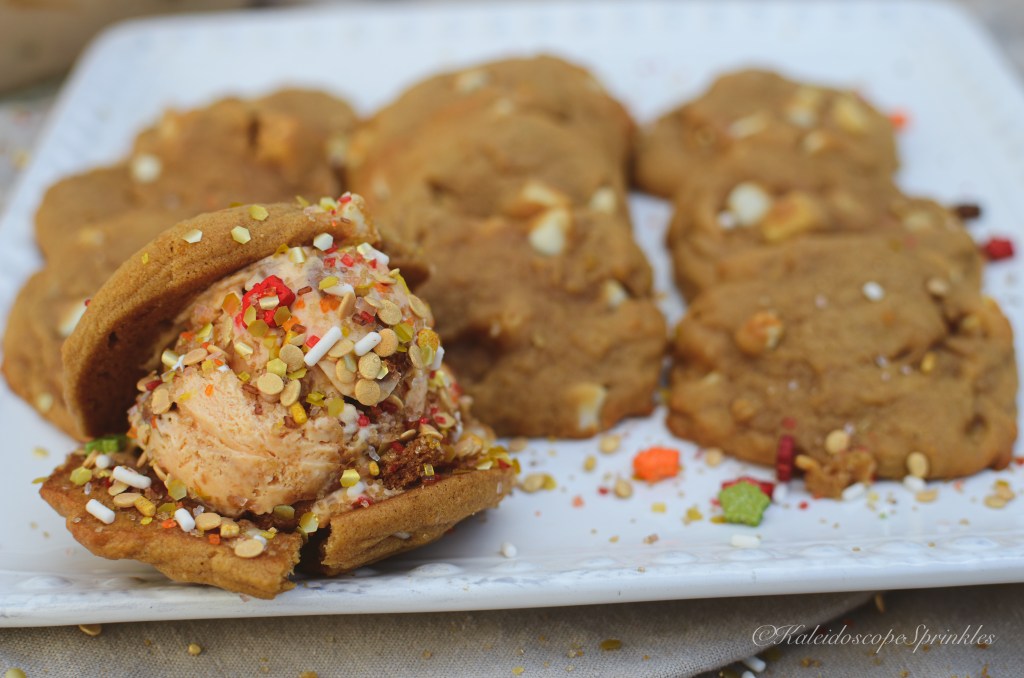
These are easy and quick to make if you’re able make your dulce de leche* ahead of time. The brownies are even more decadent a la mode with vanilla ice cream and Kaleidoscope Sprinkles on top.
See my recipe for these Dulce de Leche Brownies below. I hope you enjoy making them and eating them as much as I did.
Dulce de Leche Brownies
Dulce de Leche Brownies
(Makes 24 brownies)
Ingredients
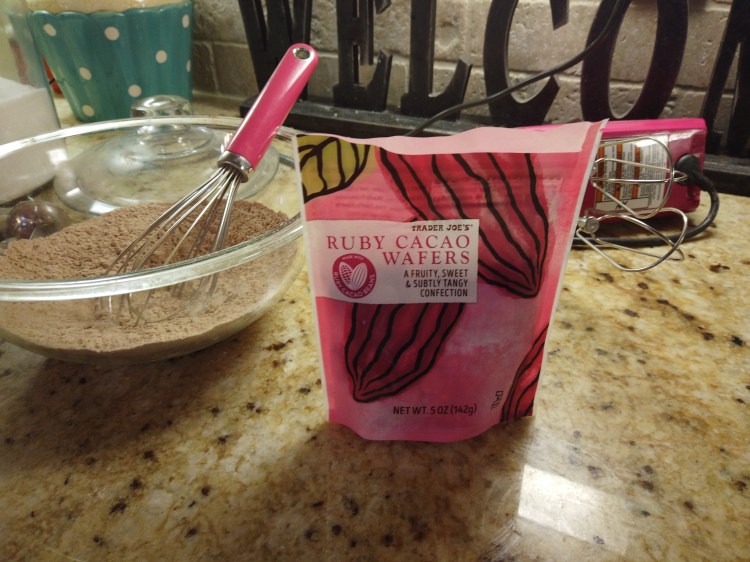
2oz. of Mexican cocoa powder, (or any cocoa powder of preference)
16oz (1 cup/ 2 sticks) unsalted butter
2 cups of granulated sugar
3 large eggs, room temperature
1 tsp. vanilla extract
1 cup of flour
8 oz. can homemade dulce de leche*, room temperature.
Directions
Preheat oven to 350F. Grease and add parchment paper to 9 x13″ pan.
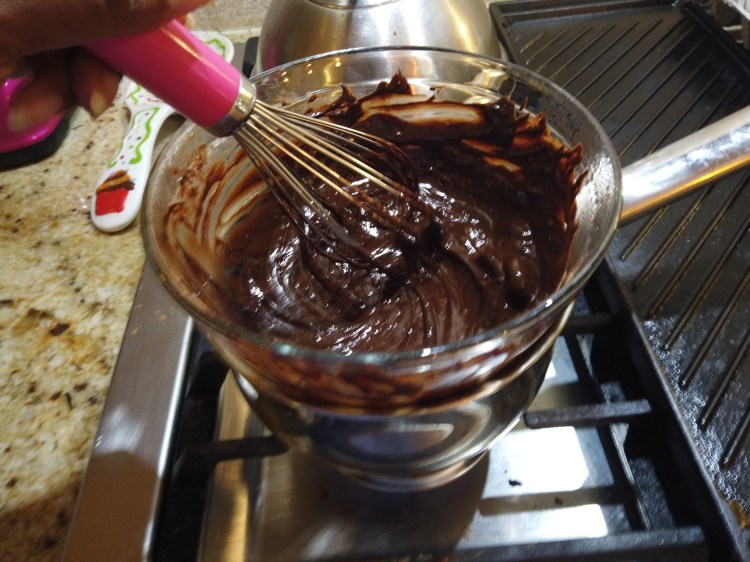
Using a double boiler on low heat, in a large bowl melt and combine together cocoa powder and butter. Once ingredients are combined and smooth, remove from heat and allow to cool down.
Once chocolate mixture has cooled down slightly, add sugar and mix together until ingredients resemble wet sand.
Whisk eggs in one at a time until mixture is fully combined. Add in vanilla extract.
Add flour to mixture and use spatula to fold in flour until fully combined.
Add brownie mixture to 9 x 13″ pan.
Drop dulce de leche in spoonfuls on top of brownie mixture. Use a knife to spread and swirl dulce de leche into the brownie mixture.
Bake brownies for 30-35 minutes or until tester comes out fudgy.
Allow brownies to cool completely to room temperature. Cut brownies into 24 squares.
Serve brownies solo or a la mode with vanilla ice cream and Kaleidoscope Sprinkles on top.
Devour and enjoy!
*Want to know how to make your own Dulce de leche? CLICK HERE
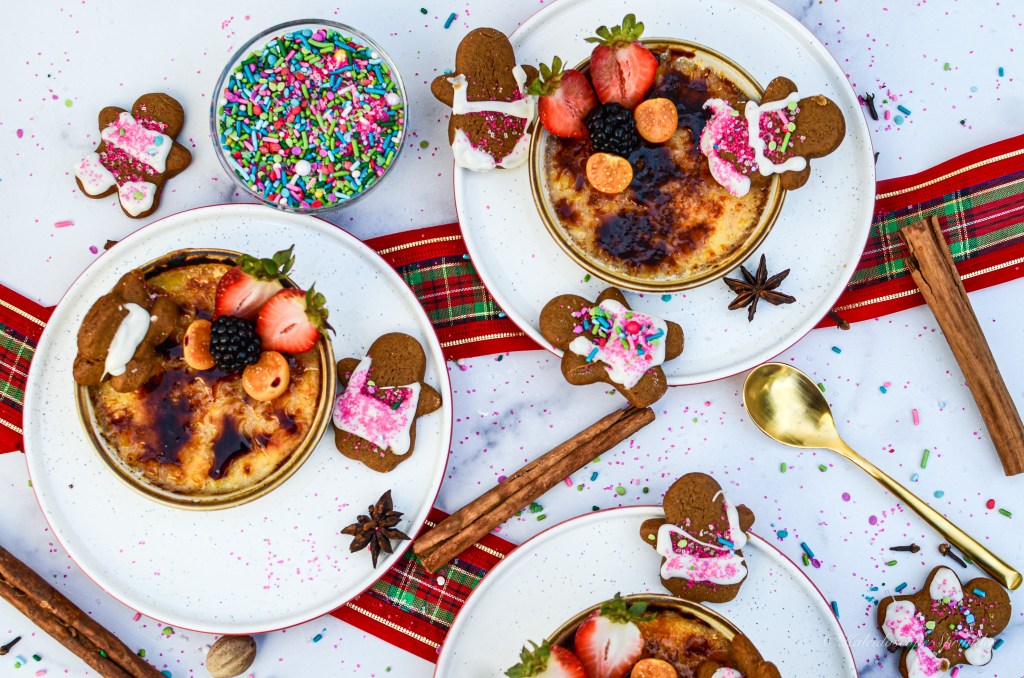
I love a good, classic French dessert. I am a fan of almost most anything sweet, but there is just something special about simplicity. A classic flavor served properly can make my taste buds tingle. I believe that is why créme brûlèe has always been a favorite of mine.
During my many adventures to Paris and all my culinary courses, I have come to understand this basic confection. Créme Brûlèe is essentially a baked custard consisting of four ingredients. Although, it all sounds so simple, it is with precision of ingredients, measurements and bake that a masterpiece can be created. I have made and enjoyed a plethora of this classic caramel recipe, but decided to try something different.
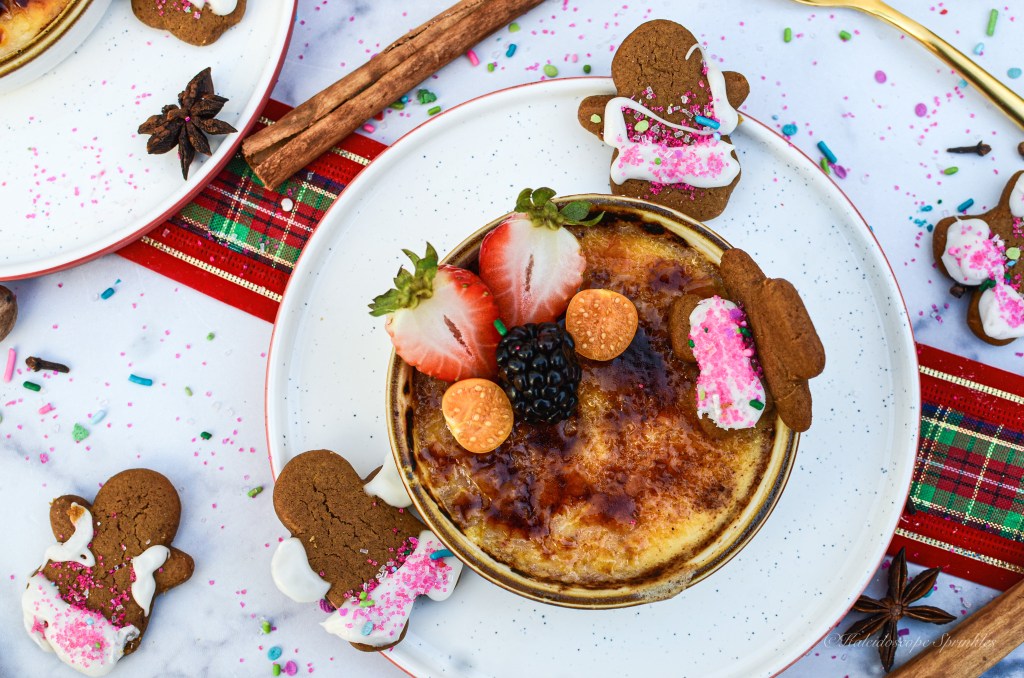
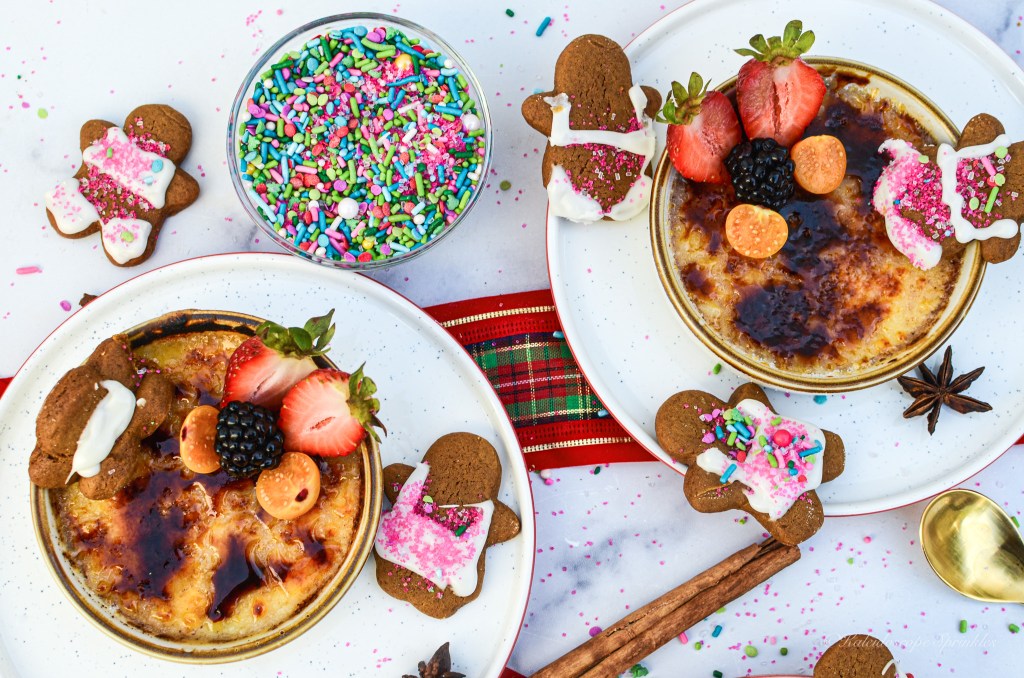
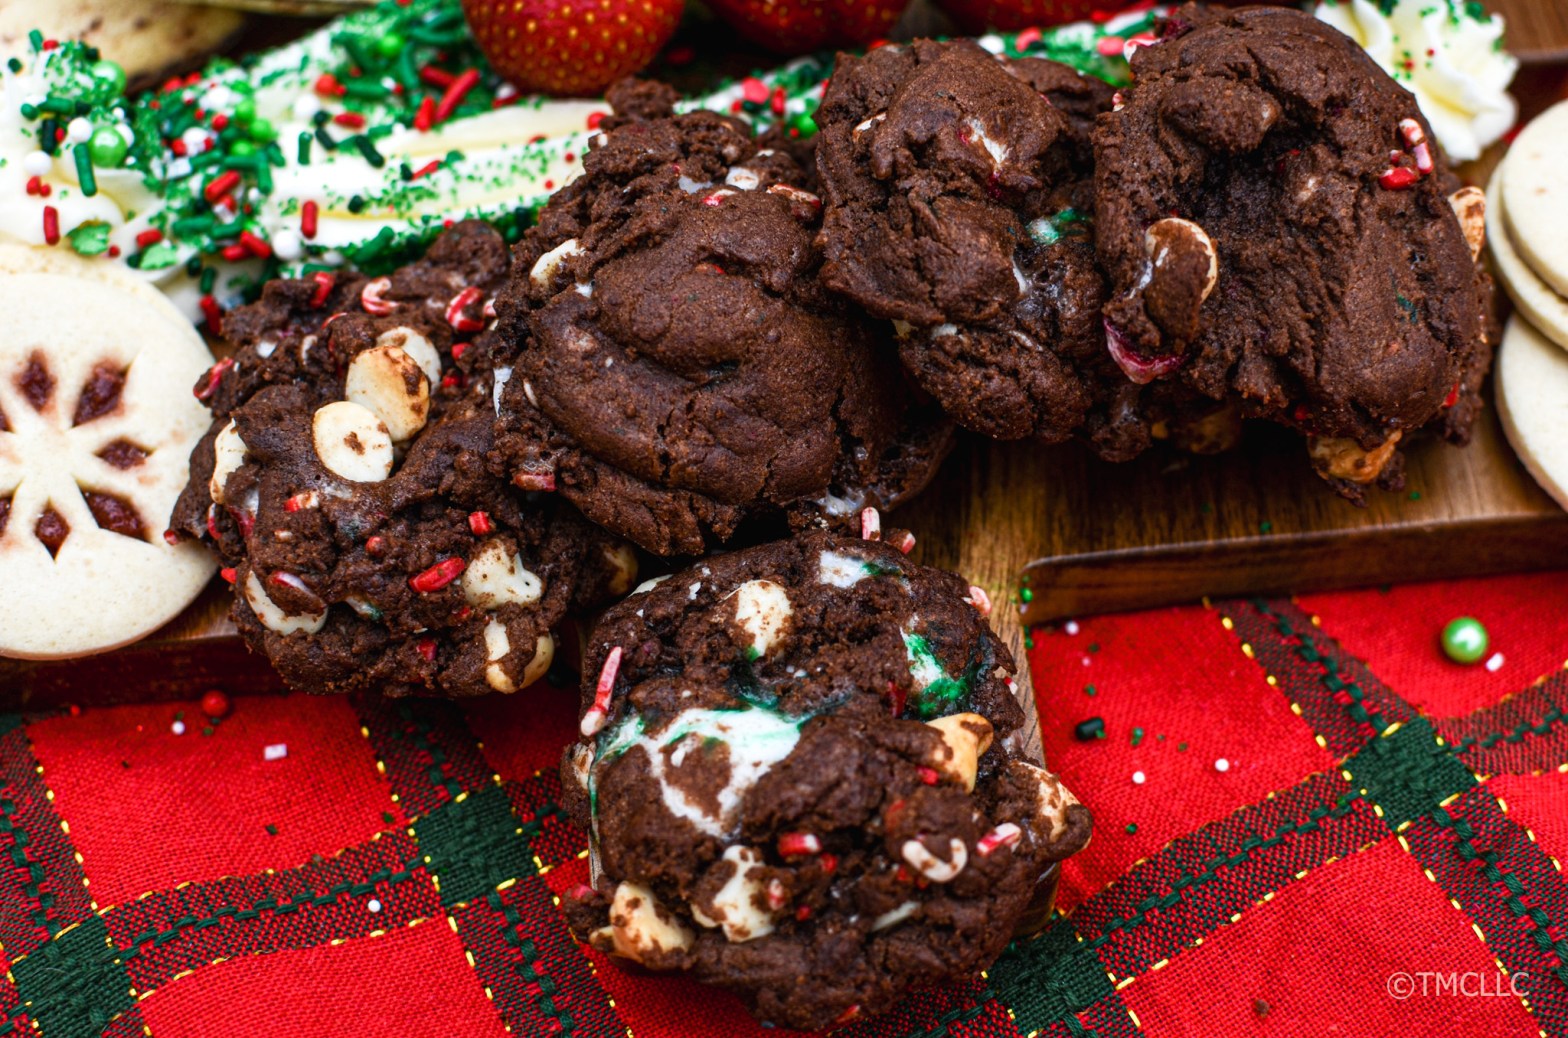
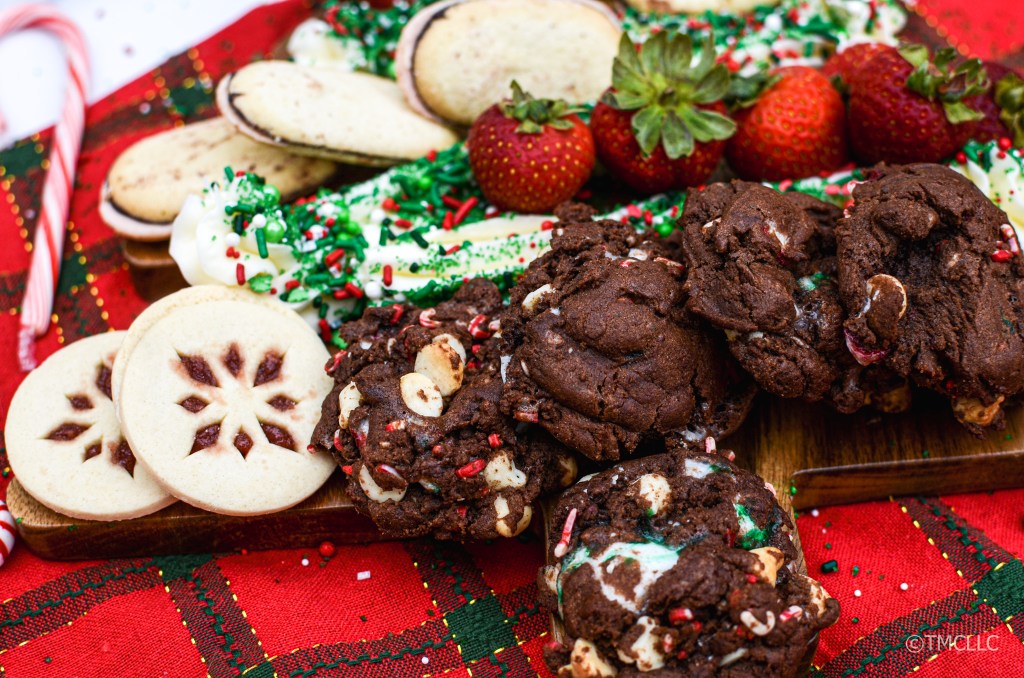
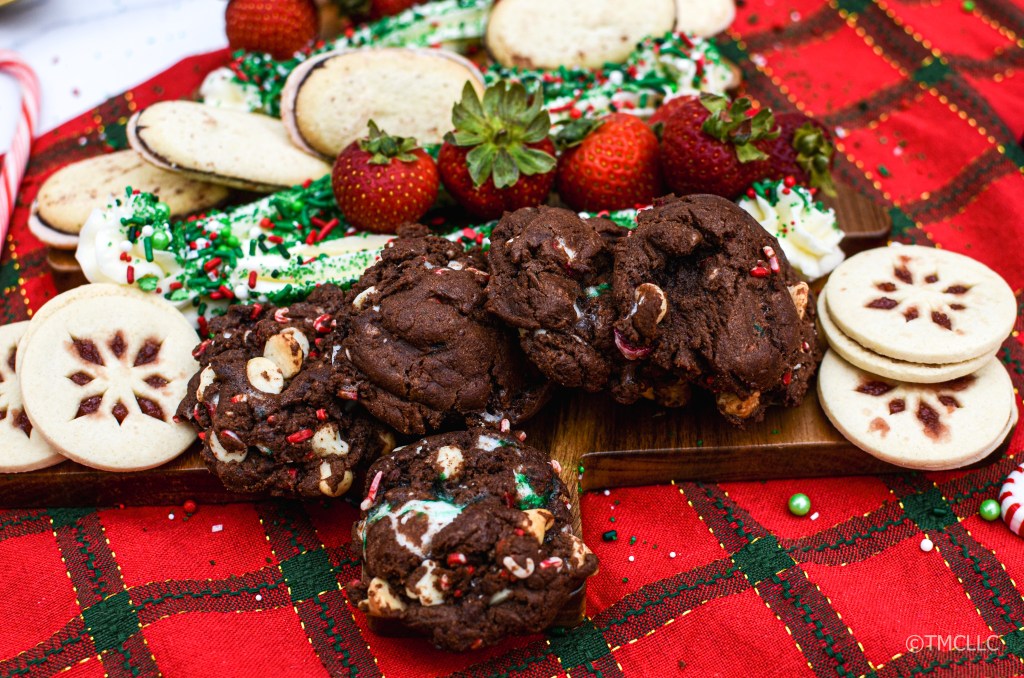
After coming back from another splendid trip to the city of lights, I became inspired to get into the holiday spirit. I decorated both the exterior and interior of my home after unpacking, of course. My Christmas interior designs this year including a brand new pink tree with confectionary ornaments, which was inspired by the Galleries-Lafayette. What better way to celebrate than a holiday inspired Parisian recipe.
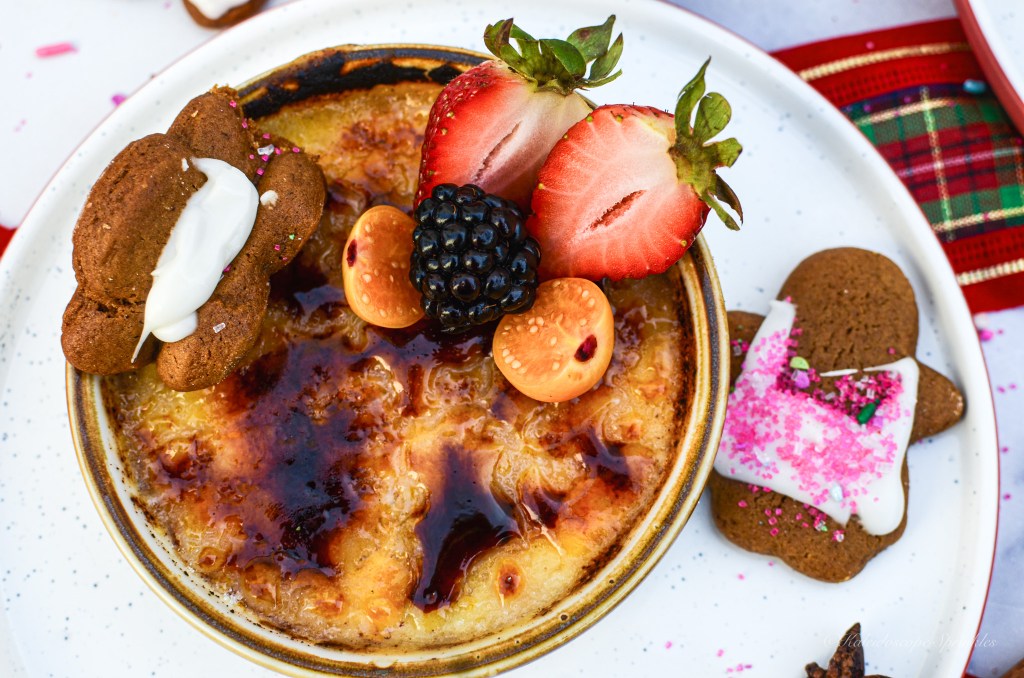
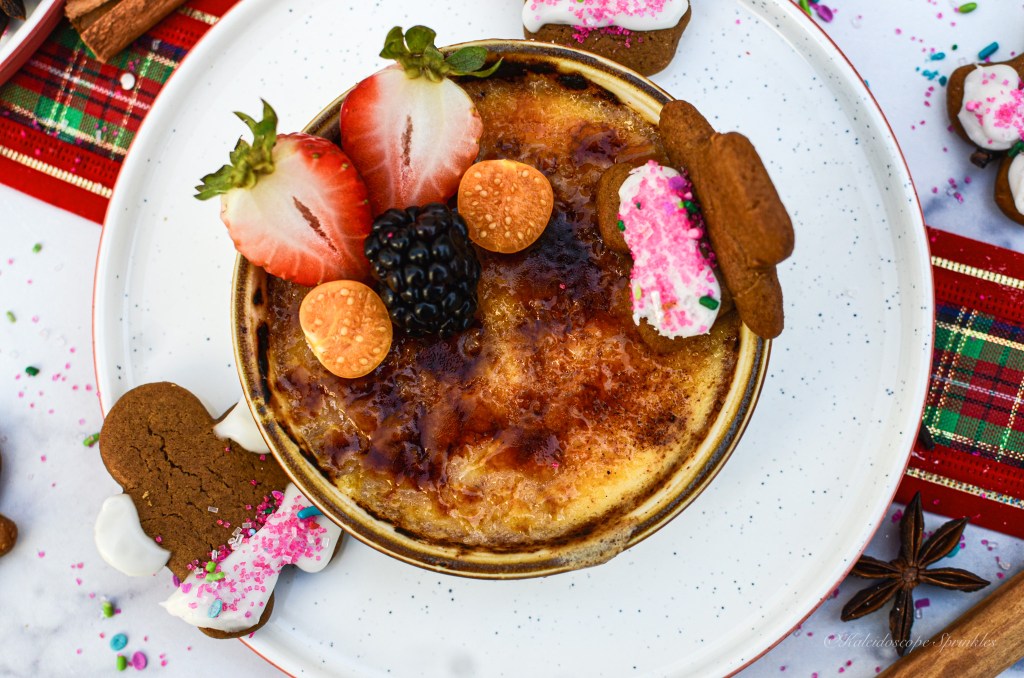
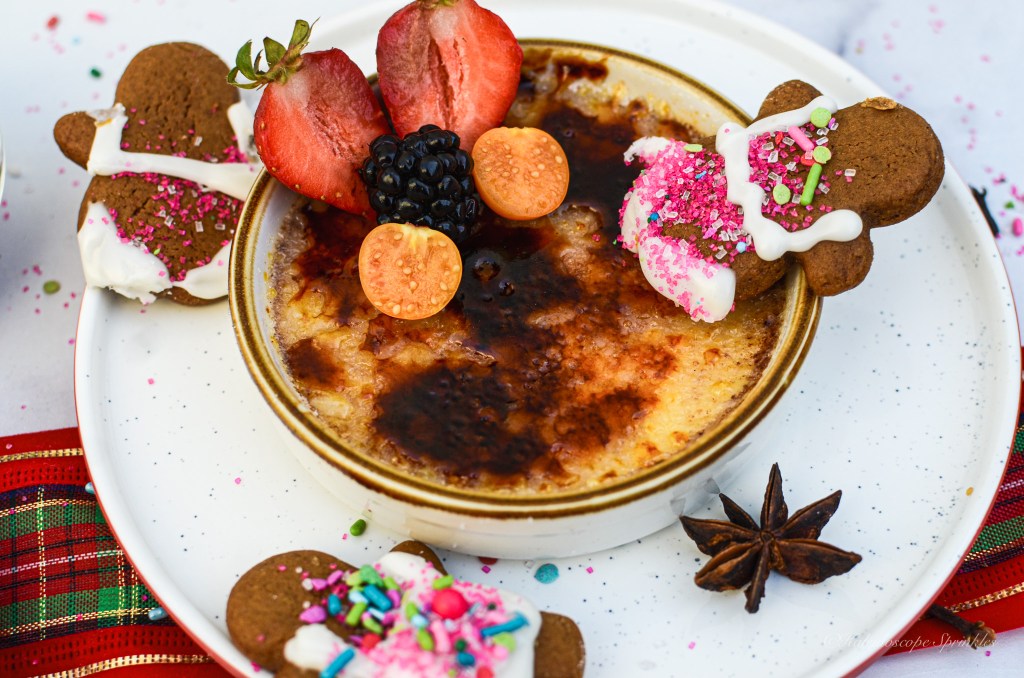
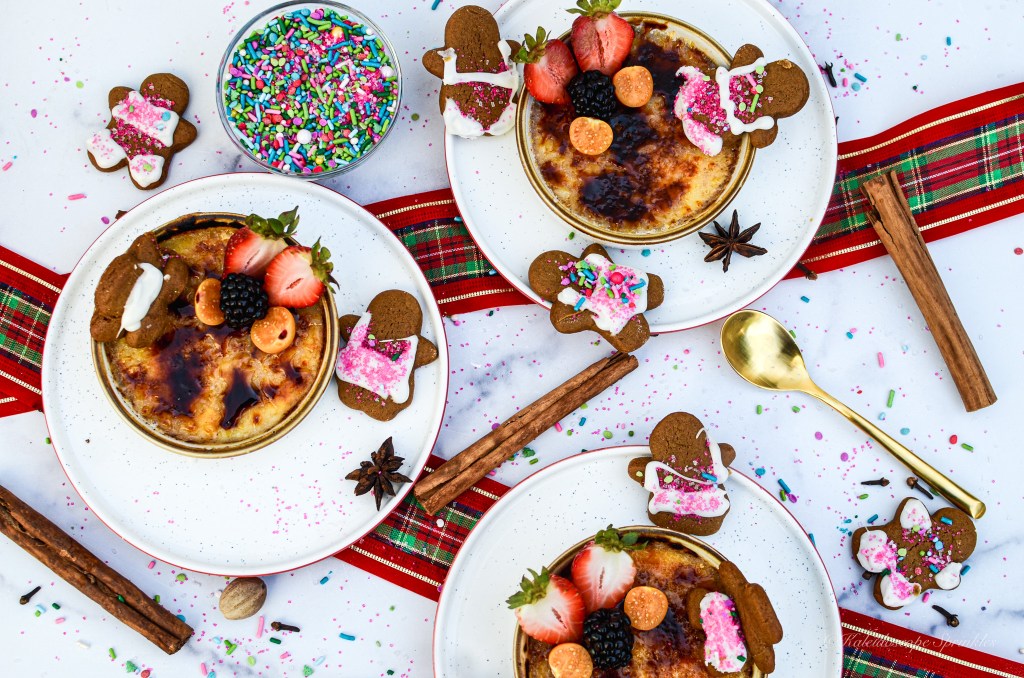
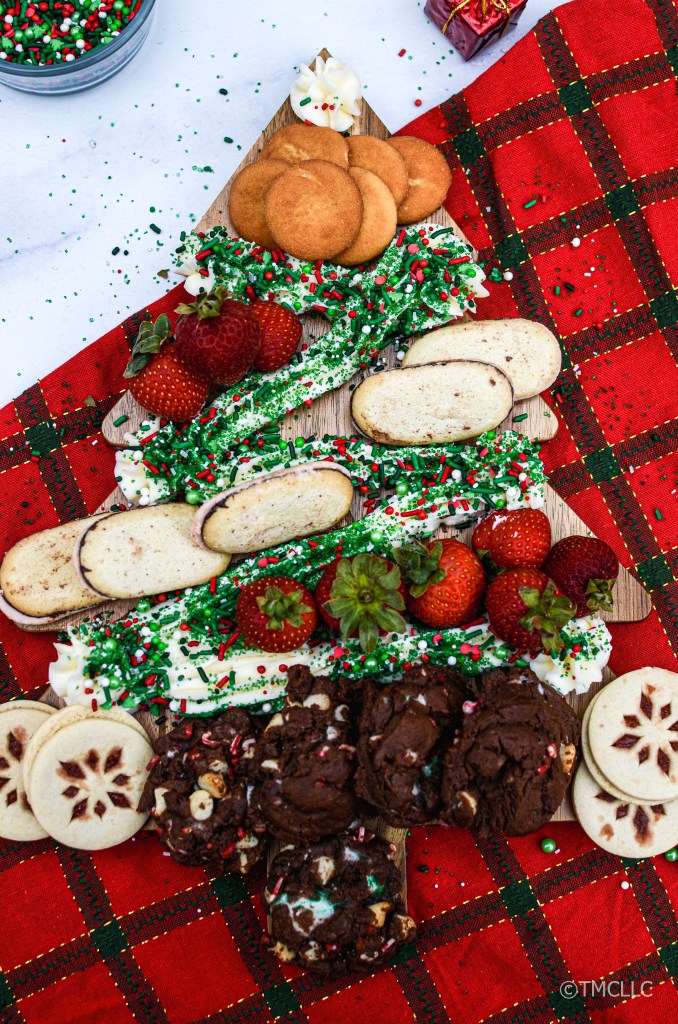
See my recipe for my delicious Eggnog Créme Brûlée with homemade Gingerbread Cookies. I made the cookies even more special by topping them with Kaleidoscope Sprinkle My Goodies Gumdrop Sprinkle Mix. This recipe is full of holiday spices and flavor. I will honestly tell you, this is one of my top 5 recipes!
I hope you truly enjoy this recipe and have a very MERRY CHRISTMAS, HAPPY HOLIDAYS and Happy KWANZAA!
Eggnog Creme Brûlée (Makes 4 large or 8 mini servings)
In medium size bowl, measure out granulated sugar and set aside.
In a large measuring glass, measure out heavy cream. Cut vanilla bean in half length-wise and cut out seeds. Using the back of the knife, scoop up seeds and place them in heavy cream. Set aside.
Using your cheesecloth, make a spice satchel with remaining vanilla pod, cinnamon sticks, star anise, cloves and nutmeg. Tie up satchel with kitchen twine.
Place saucepan over medium heat and add heavy cream. Place satchel into saucepan along with heavy cream. Bring to a simmer. Once cream is simmering, remove satchel from the cream. Turn off heat.
In mixing bowl with granulated sugar, whisk in egg yolks until combined. Slowly pour simmering cream into the egg mixture, a little at a time. Continue to whisk together, add ground cinnamon and nutmeg.
Transfer cream mixture into ramekins. Place ramekins into shallow baking dish. Bake crémes using a Bain-marie (water bath) at 35-45 minutes. Crémes should be slightly set when ready.
Remove from oven and allow crémes to cool to room temperature, then place in the refrigerator.
Once ready to serve, remove from the refrigerator. Cover the surface of each créme with a thin layer of granulated sugar. Use small torch, to brûlée the top and caramelize the sugar.
For Gingerbread Cookies:
In a large bowl, whisk together flour, baking soda, salt and spices until combined. Set aside.
In a large separate bowl, using either a hand or stand mixer, cream together butter and brown sugar on medium speed until combined and mixture is fluffier in texture. Add egg to the mixture. Mix batter until fully combined, but be careful not to over mix. Add vanilla extract. Add molasses. Add the flour mixture.
Once dough is combined, wrap it in plastic and chill in refrigerator for 1 hour (up to 2 days).
Preheat oven to 350F. Line cookie sheet with parchment paper or nonstick liner.
On a generously floured surface, roll out dough about ¼ inch thick. Cut out gingerbread people with cookie cutters. Brush off excess flour. Transfer cut out cookies onto prepared baking sheets.
Bake cookies for about 10-12 mins, until desired softness of cookies has been achieved.
Allow cookies to cool completely to room temperature. Once cookies have cooled. Frost and decorate them with royal icing and sprinkles!
Devour and enjoy your créme brûlée with your gingerbread cookies!
During my latest visit to Paris, on my last day there I had several hours before my departure. I had already checked out of my hotel in the Opéra district and stored my luggage. I was free to continue to enjoy the city before I headed to the airport.
After breakfast and checking out, I decided to trek to Monmartre to burn off some calories and enjoy one of the best neighborhoods in the city. Monmartre has always been a favorite part of Paris for me because of its favorable views and cute stores. I walked around for hours, visited some vintage shops and even enjoyed getting caught in the rain.
On my way back to my hotel from my Monmartre visit I wanted to grab my last meal in Paris before my departure. I was craving something satisfying, but not necessarily French nor fancy. I hopped on Google Maps for ‘restaurants near by my location’ with great ratings. I just so happened to scroll upon Pére & Fish, which was within walking distance and highly rated. I browsed the menu and was sold after I saw a tasty looking fish sandwich. I quickly pulled up the directions for the restaurant and headed there with some pep in my step.
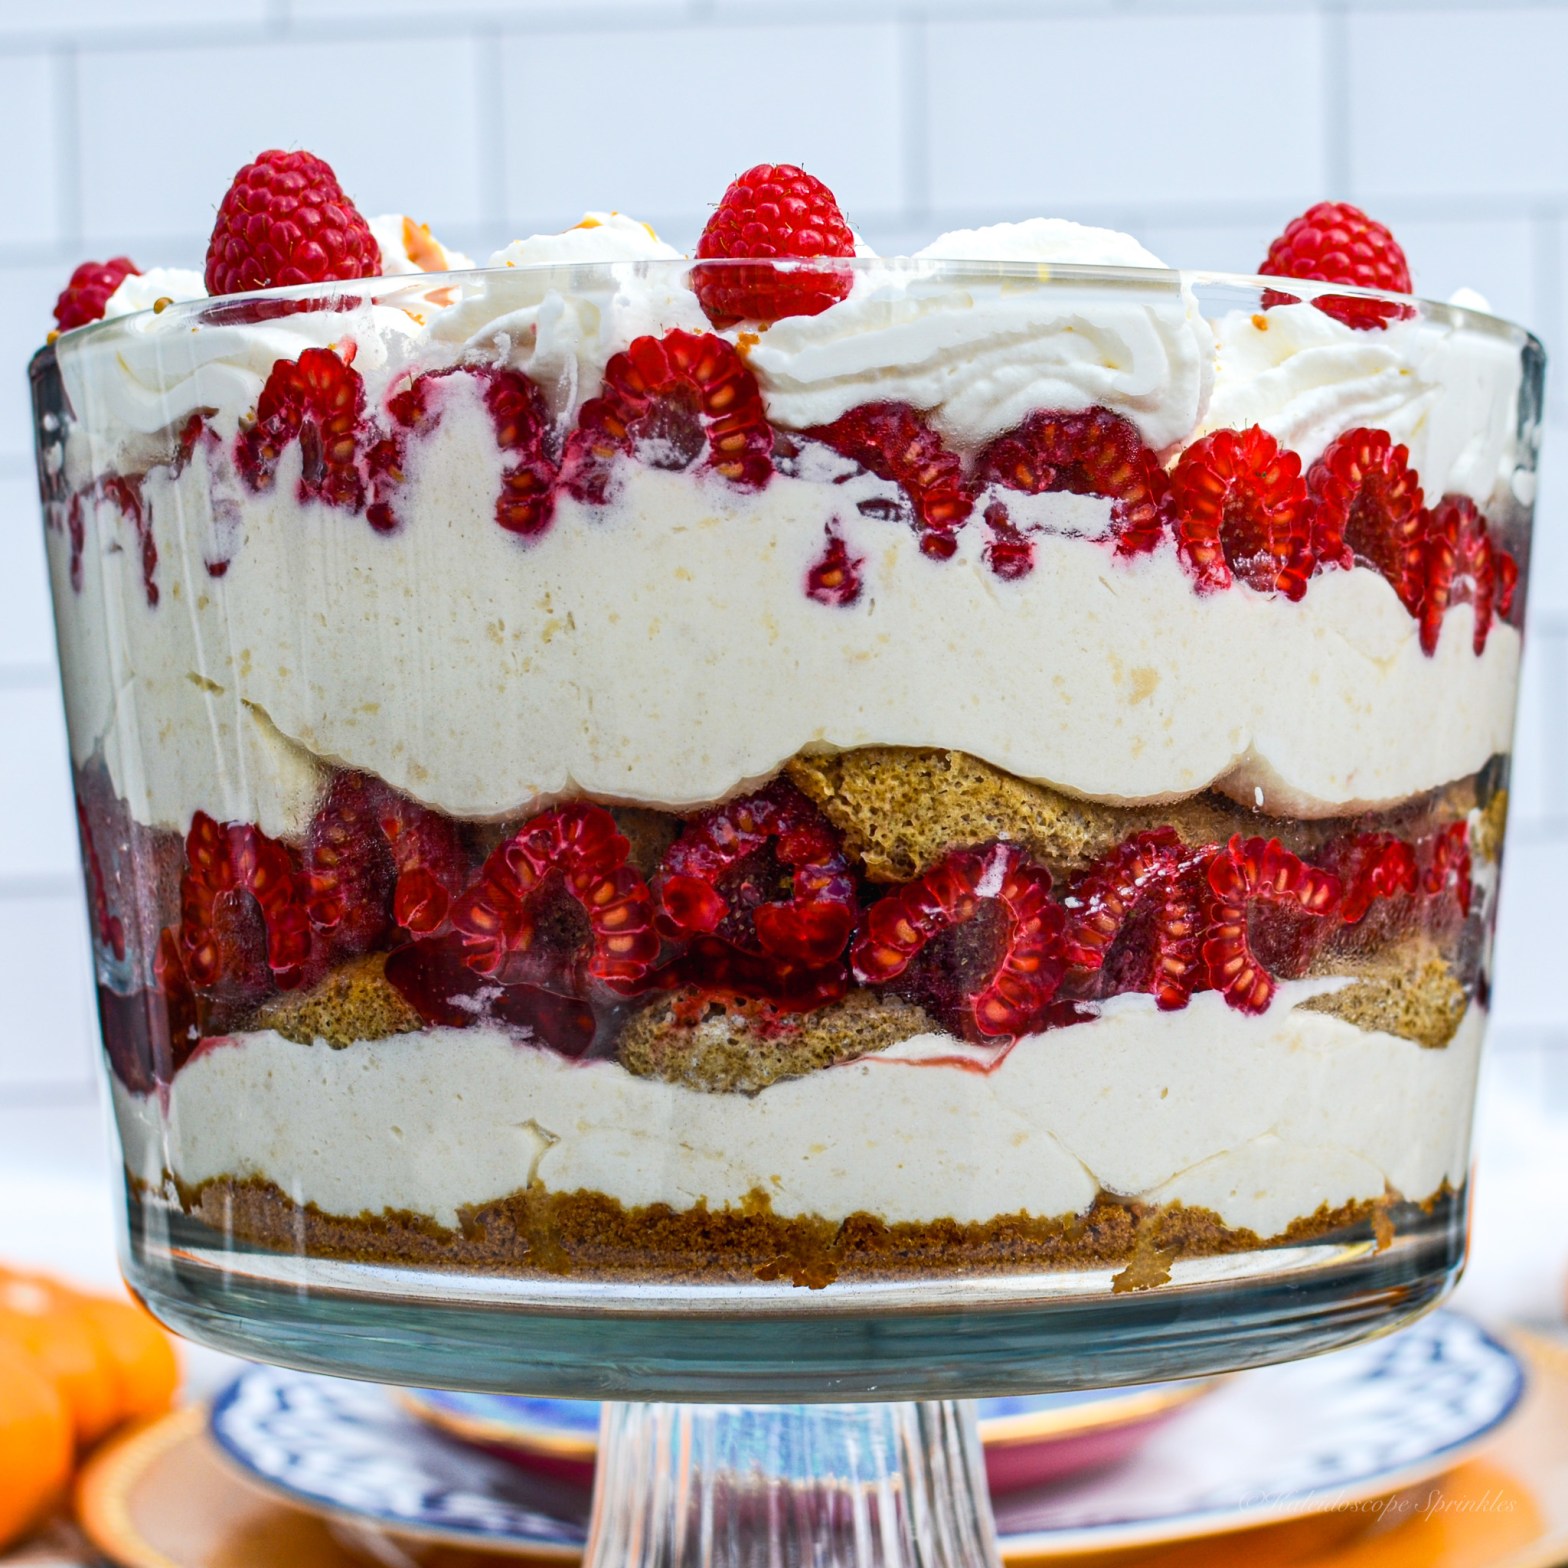
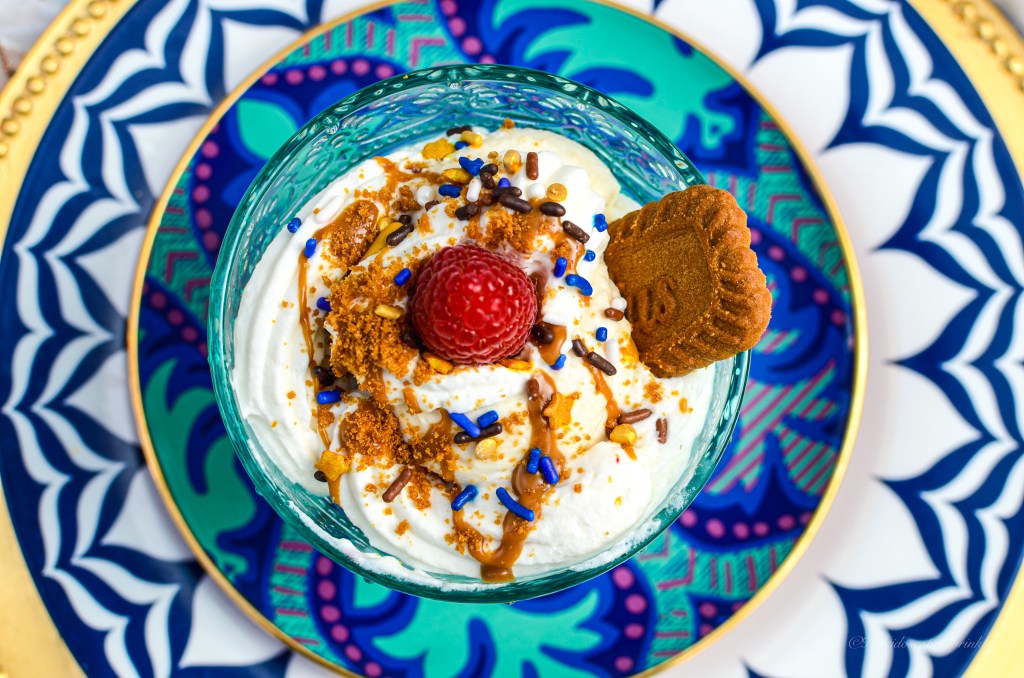
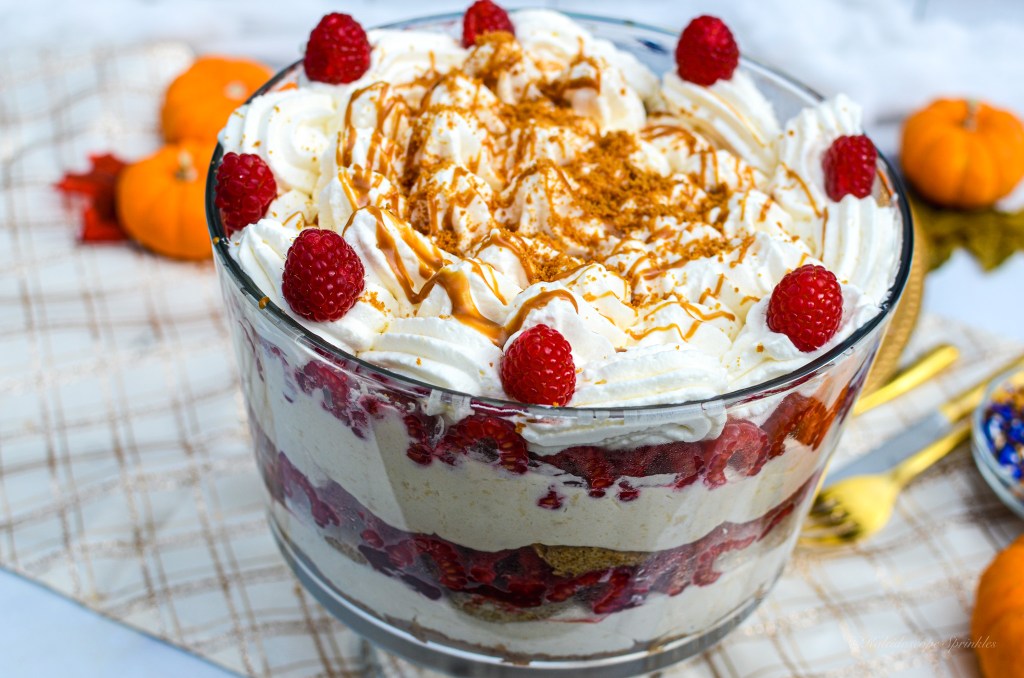
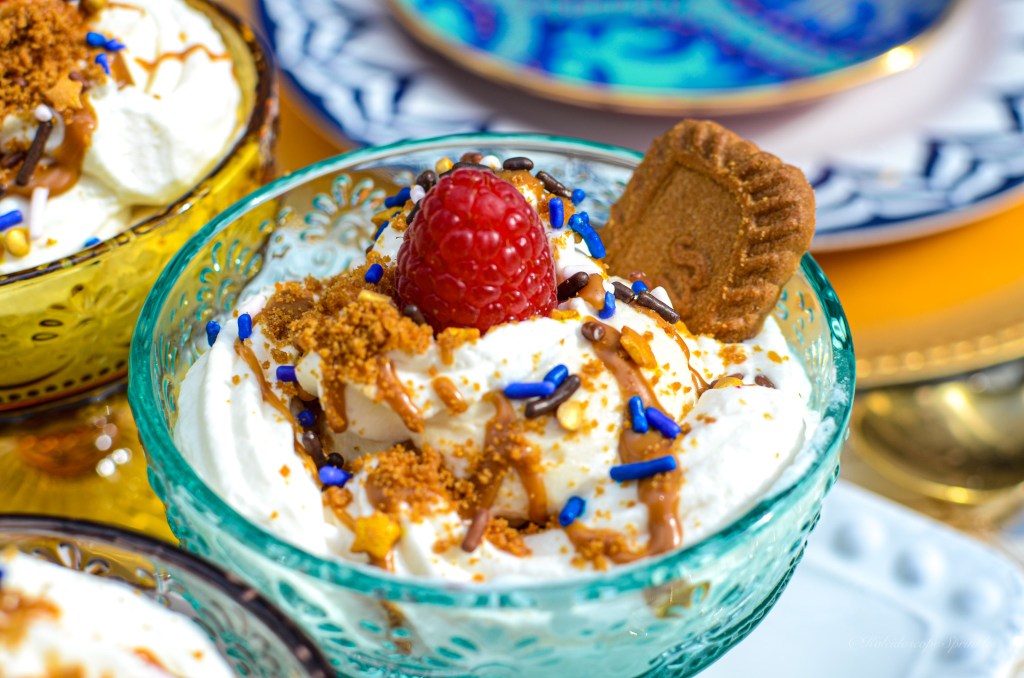
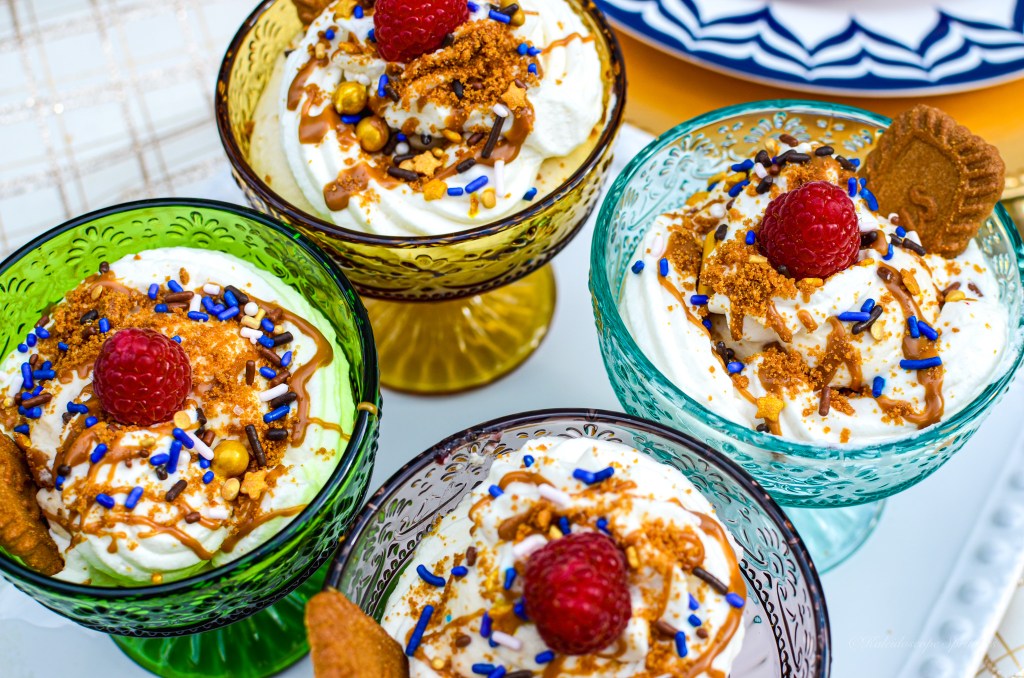
Once I arrived to Pére & Fish I was pleasantly surprised to find out that the restaurant was automated. I walked in and placed my order after browsing through an assortment of fish combos. I happily added dessert to my meal, a raspberry Speculoos tiramisu.
I can honestly say. I was even more pleasantly surprise by my meal. The food was superb for what would be considered “fast food”. What really took my meal over the top was the tiramisu. The combination of raspberries with Biscoff was inventive and delightful. I loved the luscious dessert so much that I decided to recreate my own version once I arrived back home.
My Raspberry Speculoos Tiramisu is on another level and adult friendly. I added more flavor to my dessert by using raspberry liqueur and espresso soaked ladyfingers along with Biscoff cookies. Biscoff, which are spiced cookies actually originated in Belgium. Speculoos, which is Biscoff in cookie butter form, also originated in Belgium. This dessert is the perfect summary of my most recent UK trip by combining both French and Belgian flavors. This RAspberry SPECuloos Tiramisu is super easy to make and requires no baking. It’s also a great recipe to get some RASPECT (respect) from friends and family for Friends/Thanksgiving.
Definitely give this recipe a try this season or anytime you’re in the mood to experience a tempting treat!
See complete video and recipe below.
Tiramisu recipe
RAspberry SPECuloos Tiramisu/ (RASPECT) Tiramisu
Serves (8-12)
Ingredients
4.4oz (½ pack) Biscoff cookies, finely chopped
¼ cup (4oz.) Biscoff cookie butter (Speculoos), plus more for topping
8oz. mascarpone cheese, room temperature
10 oz. raspberry preserves, heated
16 oz. fresh raspberries
8oz heavy cream, chilled
8oz. confectioners sugar
1 tsp. (.20 oz) vanilla extract.
1 package (7oz). Italian ladyfingers
1 ½ cup (12oz/ 375ml.) old strong brewed coffee or espresso
½ cup (4 oz/ 125ml) raspberry liqueur, I used Chambord
Using a food processor or manually, chop Biscoff cookies until finely chopped, wet sand-like texture. Set aside.
Using a hand or stand mixer, in a medium sized bowl whip together mascarpone cheese and Speculoos until fully combined. Whip for about 3-5 minutes until mixture is fluffy. Set aside.
Using a hand or stand mixer, in a large chilled bowl add heavy cream. Whip heavy cream on high for about 3-5 minutes until soft peaks have formed. Add confectioners sugar and vanilla extract to heavy cream. Continue to whip cream for another 3-5 minutes until stiff peaks have formed.
Using a spatula, add ¾ of whipped cream (save ¼ for top of tiramisu) to cheese/ Speculoos bowl. Carefully fold whipped cream into cheese mixture, trying not to knock out air from whipping cream. Once fully combined, keep chilled until ready to assemble the tiramisu.
Ready to assemble using triffle dish or individual serving cups. Place chopped Biscoff cookies on bottom of dish/es, save some chopped cookies for the topping. (The next layers are up to your preference). Spoon or pipe Speculoos cream evenly into the trifle dish. In a bowl, add coffee and raspberry liqueur. Dip ladyfingers into coffee mixture. Add to soaked ladyfingers to trifle dish. Safely heat up raspberry preserves slightly using stovetop or microwave. Add and spread half of raspberry preserves to trifle dish. Add half of raspberries on top. Repeat the steps until trifle dish is ¾ full or to serving size of your choice for individual servings.
Top tiramisu with remaining whipped cream, chopped Biscoff cookies, melted Speculoos, fresh raspberries and Sprinkle Mix.
Devour and Enjoy!
*For a kid friendly version of this recipe, you may substitute the raspberry liqueur with raspberry syrup or omit it all together.
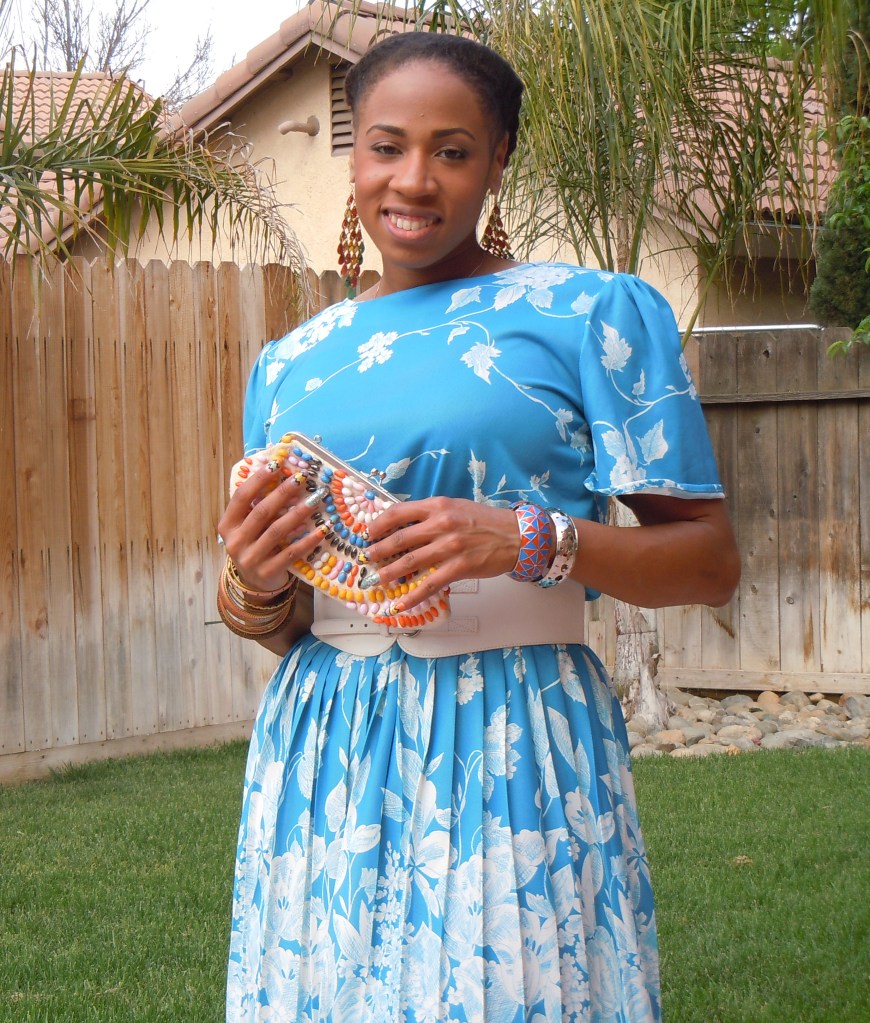
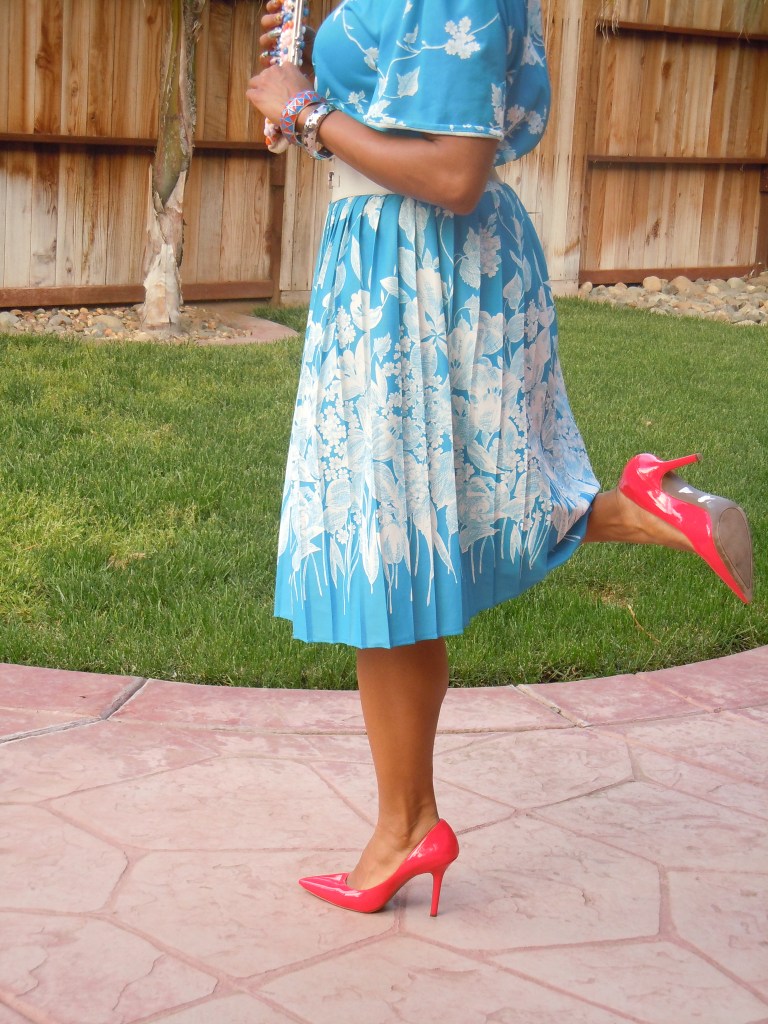
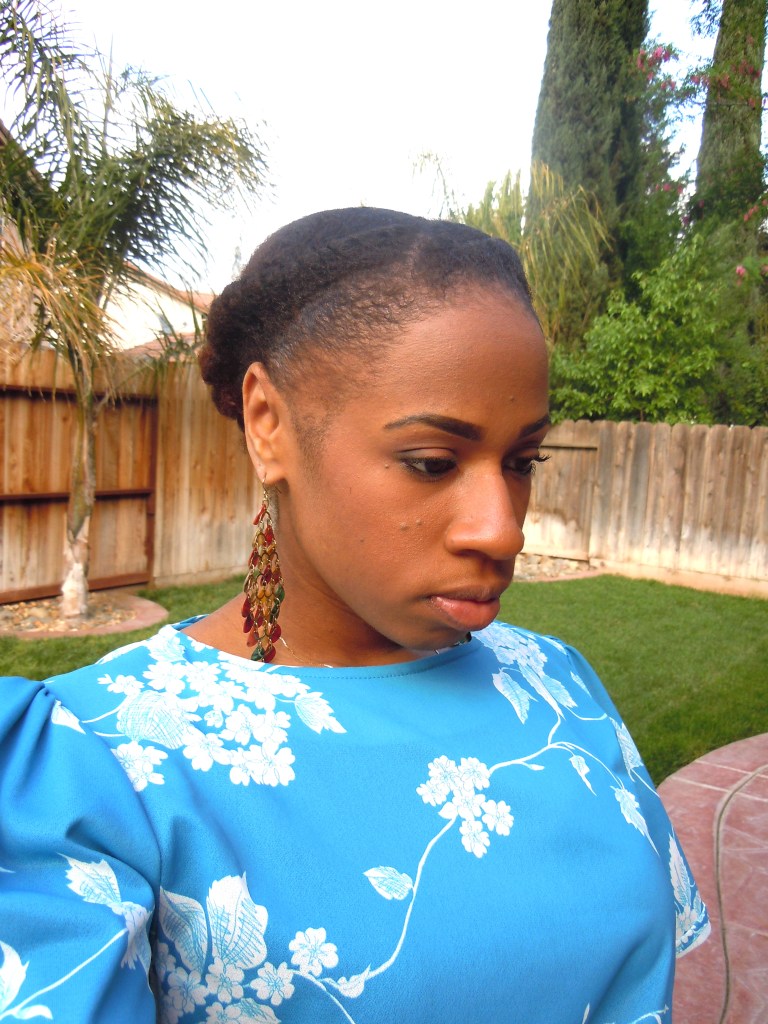
Fall fashion is one of the reasons this season is absolutely my favorite. Fall fashion means adorning extra layers of clothing, wearing heavier fabrics and pieces with colorful accessories to keep you warm. As the temperatures drop, the warmth not only from the clothing but the upcoming season fills my heart.
This year’s fall season was even more special since I was able to return to my favorite city. For the past couple of years I have been able to visit Paris in Autumn, but a little earlier into the season. September in Paris is a lovely affair, it can be seasonably warm though. The crowds may be less in September, but so are the garments since the average temperature is still a mild 22 C/ 71 F. That means not being able to wear fabulous coats, scarves, gloves and other warm accessories I love to put on.
October in Paris is an entirely different scenario. The average temperatures have dropped to a chilly 15 C/ 63 F. There is definitely a crisp air with gusts of wind and rain on many days. This means October is the best season to truly enjoy all that encompasses fall fashion.
Being fully immersed in the fashion capital of the world during my favorite season is truly a privilege. French fashion heavily influences my daily fashion choices, but during an autumn in Paris I have a higher standard to uphold.
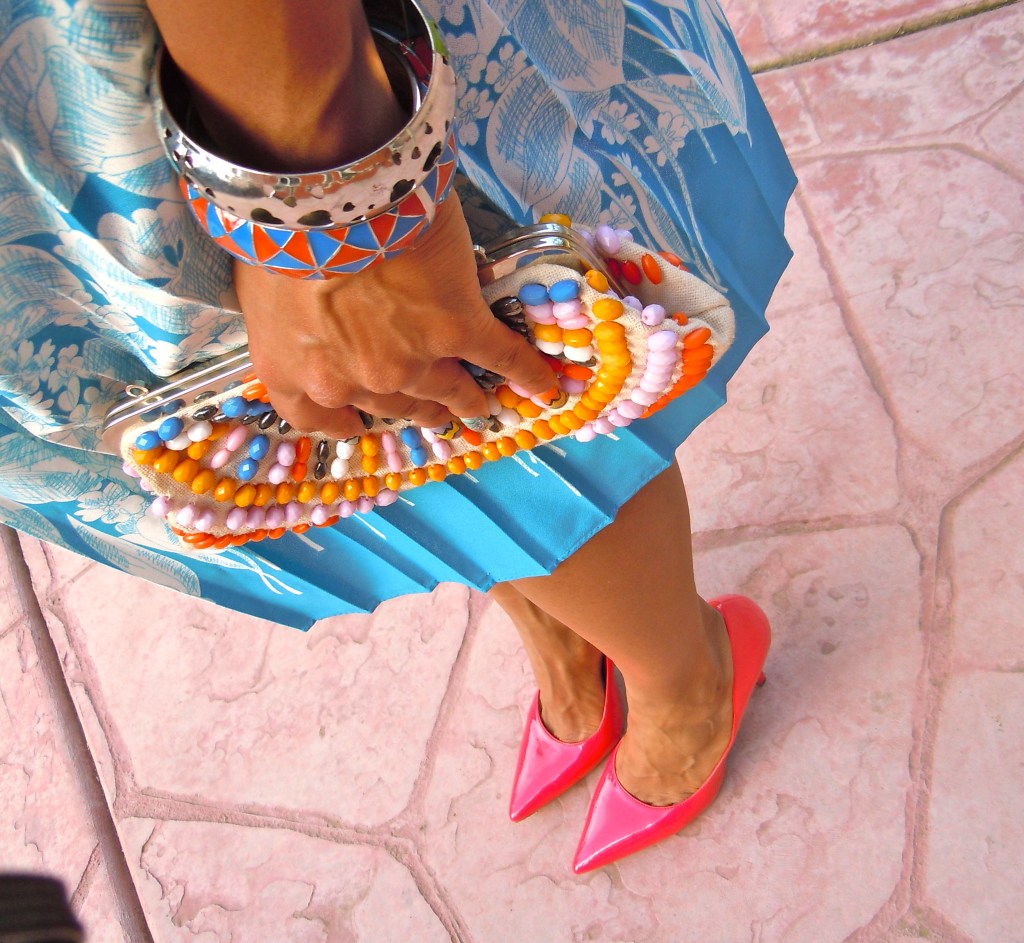
When it comes to fashion, Parisians understand that elegance comes from simplicity. This year, I tried to keep my fashion ensembles clean, comfortable and chic as the locals do. The secret this year to my fashion choices was using my colorful coat and handbag as the focal point to my ensembles.
Please see my French Fall Fashion Look book below. Let me know your thoughts on my outfits in the comments.
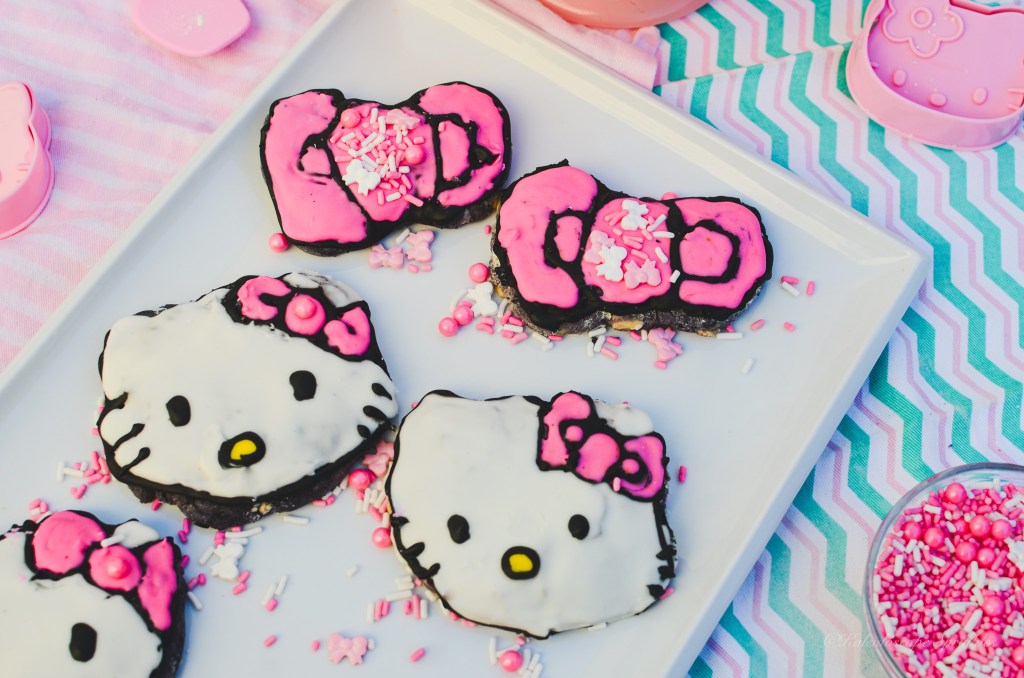
It’s National Cat Day! Today is a day that I celebrate every year because of my adoration and affinity for cats. As long as I can remember, cats have always been my spirit animal. There is just something about the way cats carry themselves and respect true love and affection. It’s as though cats secretly know they are royalty. When I was about 5-6 years old, I recall adopting my first pet cat named ‘Beautiful.’ She wasn’t officially adopted, but she was a stray cat that our family took in and cherished.
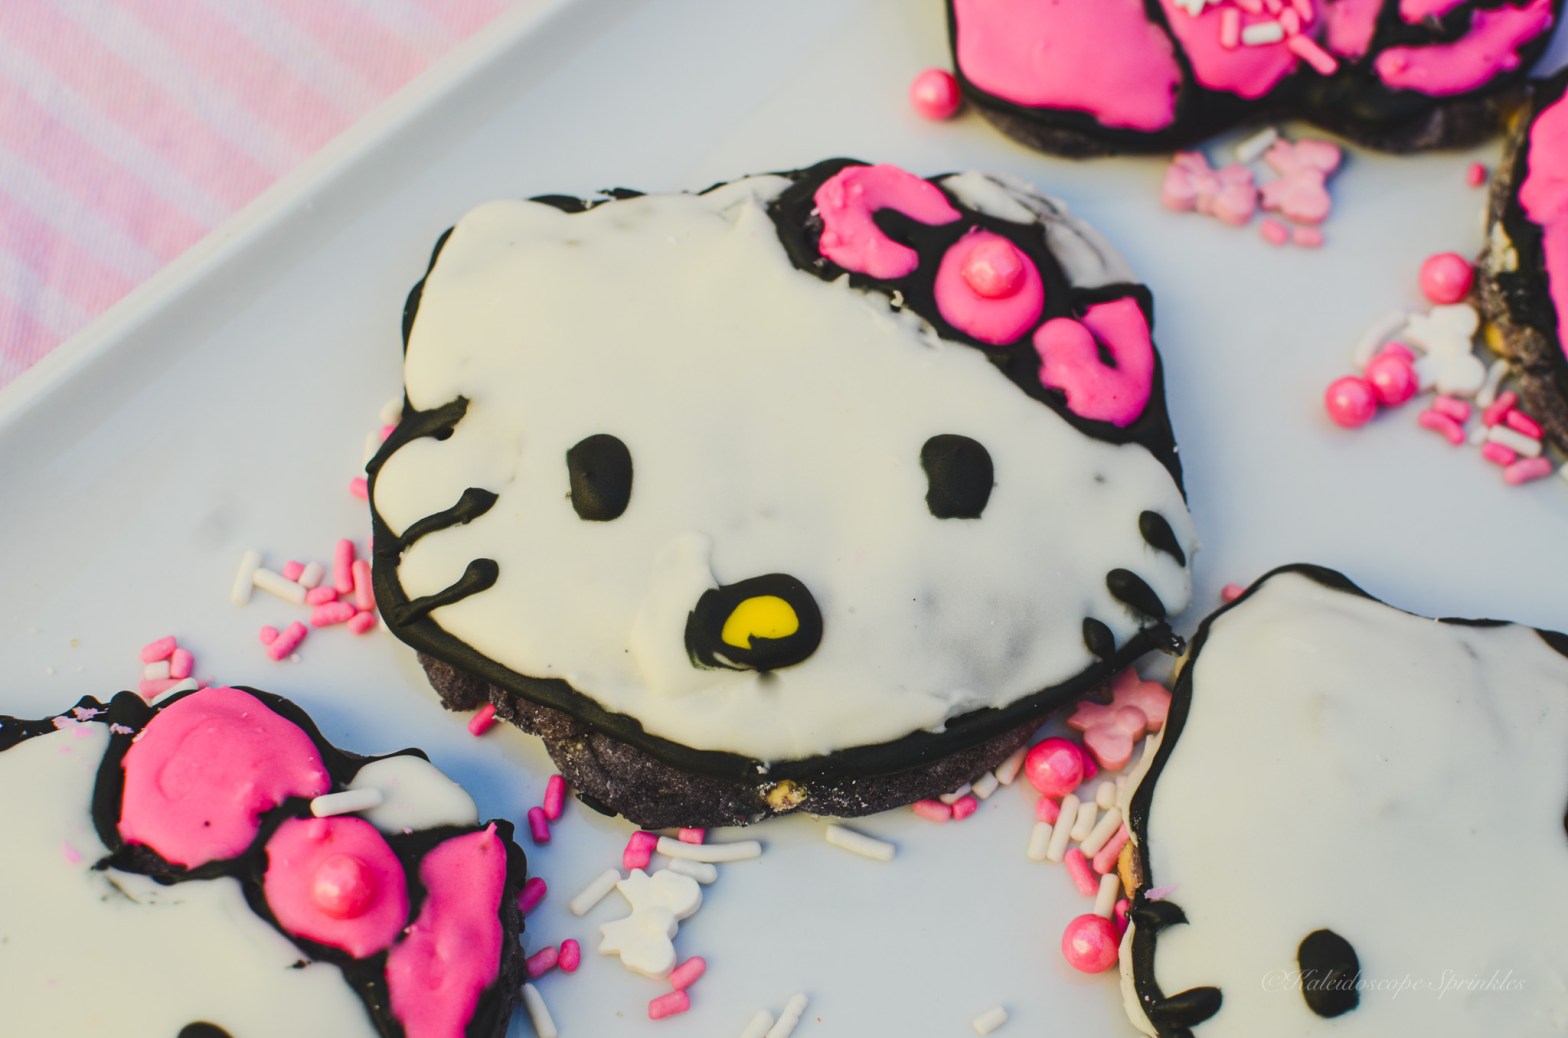
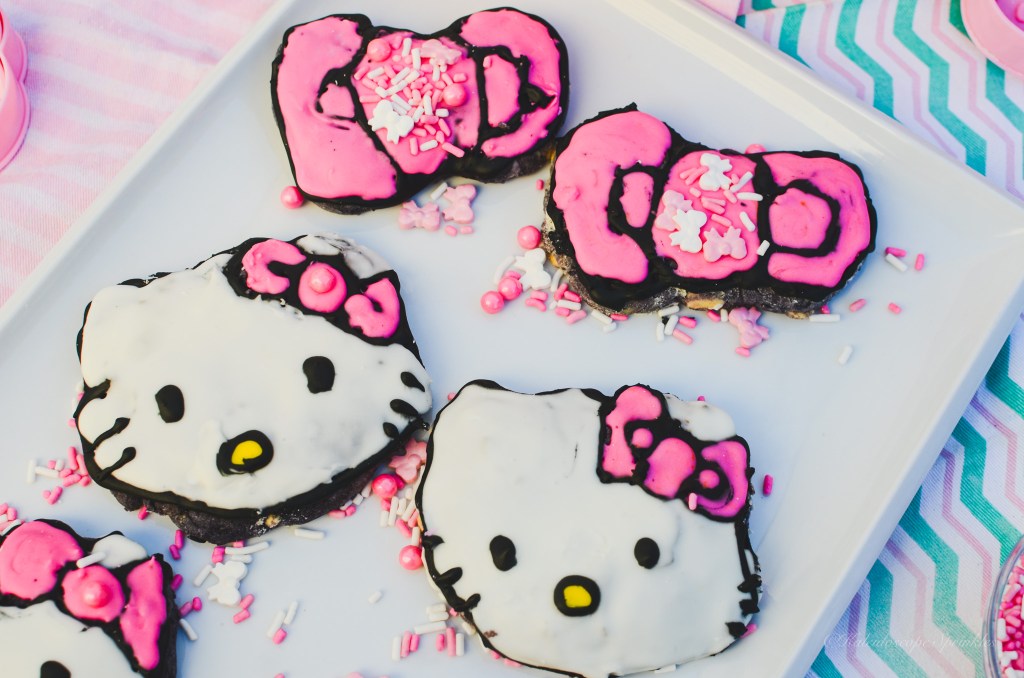
As a child growing up in California I quickly adapted and admired everything Sanrio. The Japanese created, colorful cartoon characters became my childhood obsession, especially Hello Kitty. As an adolescent, this magical kitty was so bright and cheery I was automatically drawn to her. She just seemed to be so happy and pleasant to be around. I continued to cherish cats and Hello Kitty throughout my childhood and into adulthood.
Hello Kitty has always been “that girl.” Now as a grown woman I feel like I can relate to Hello Kitty even more. Hello Kitty represents finding simple happiness in our current chaotic world.
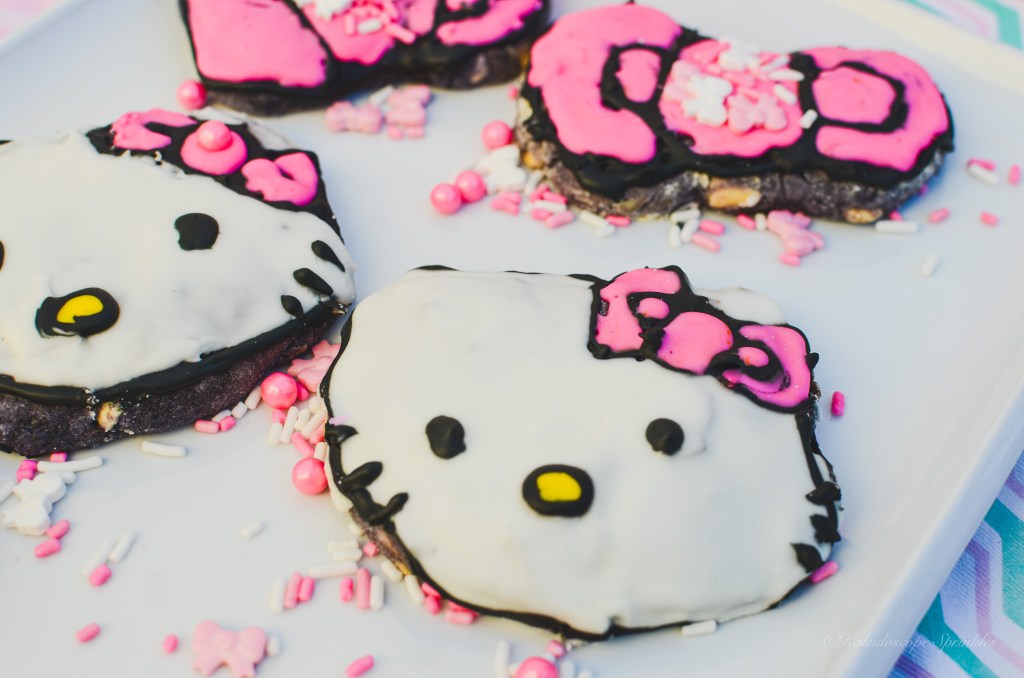
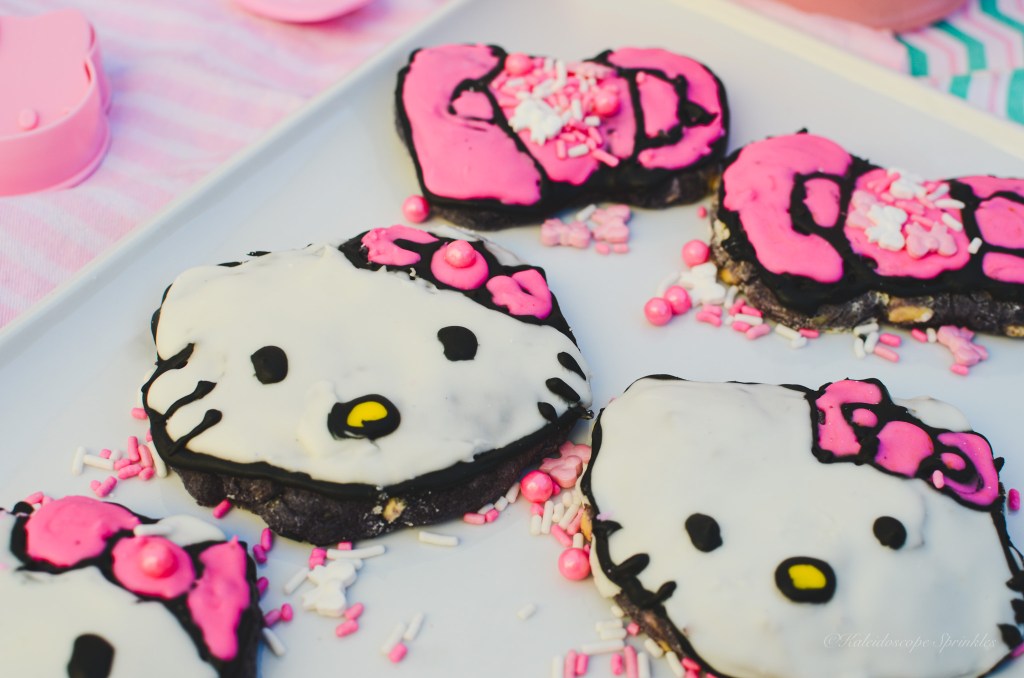
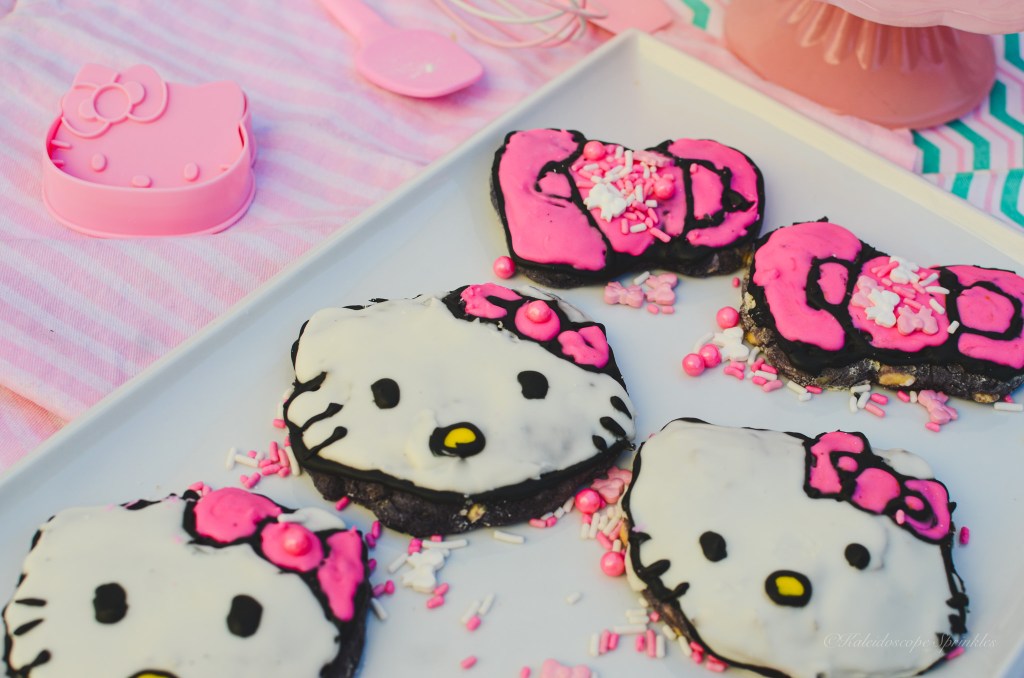
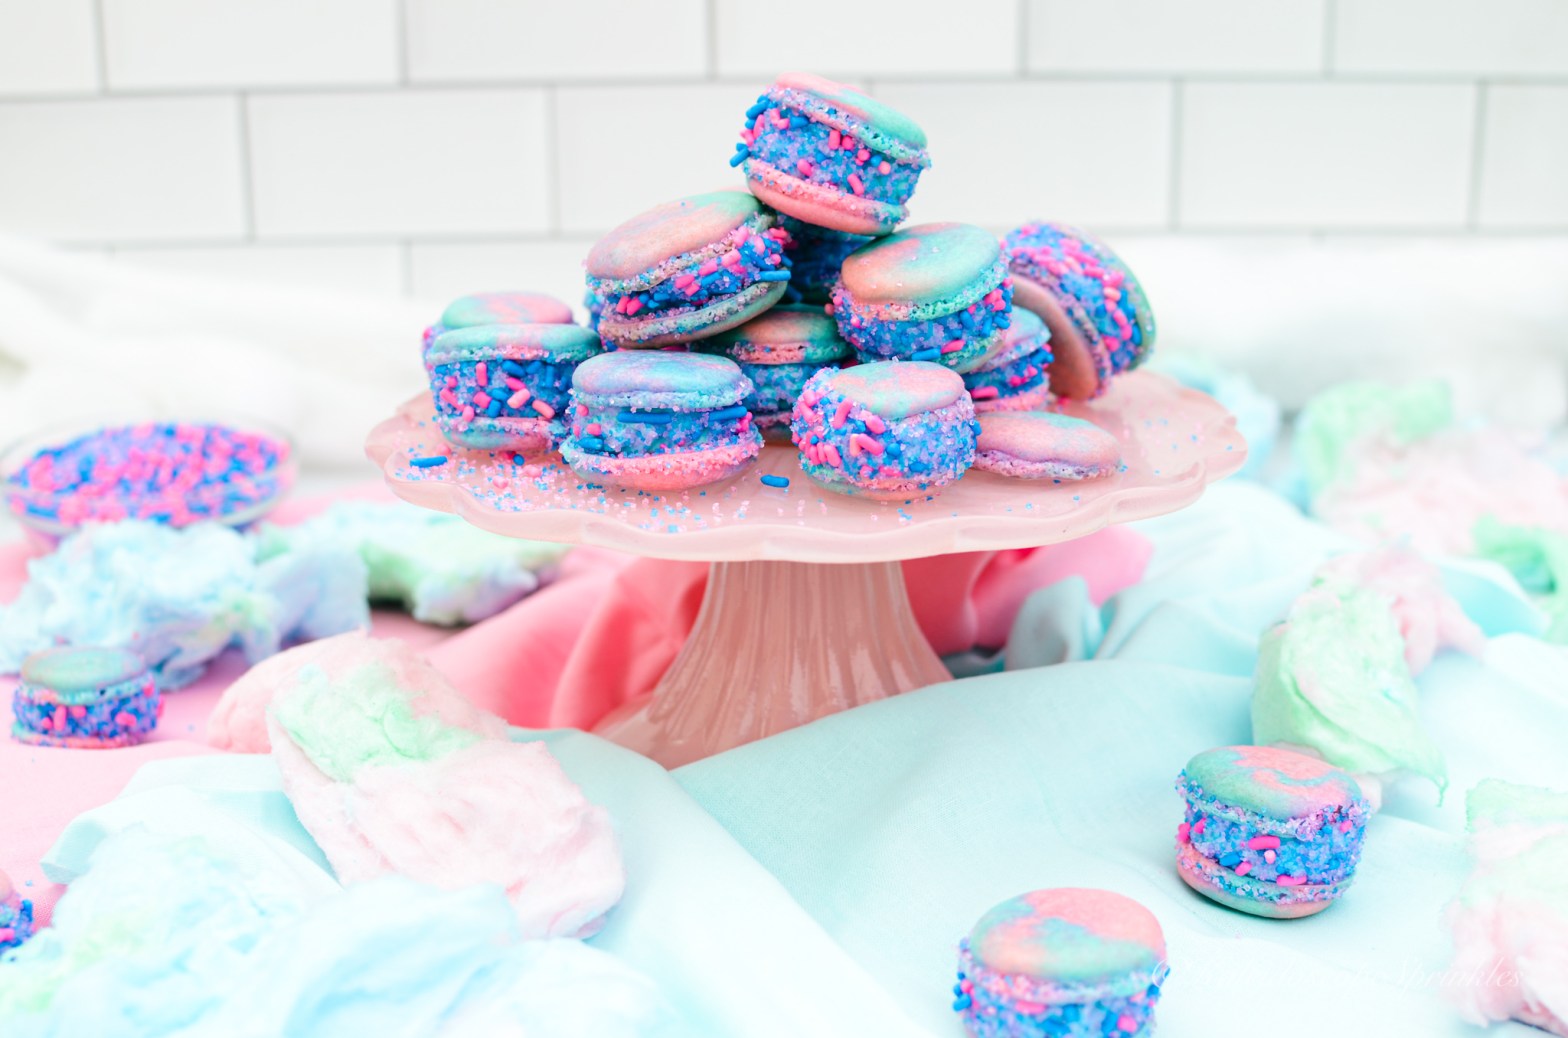
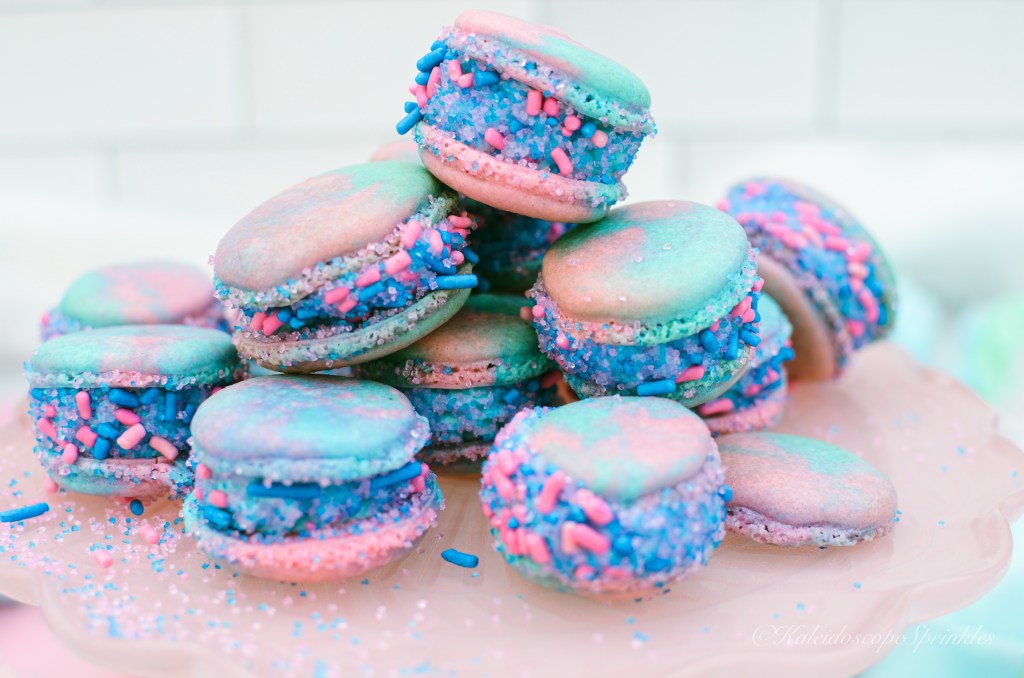
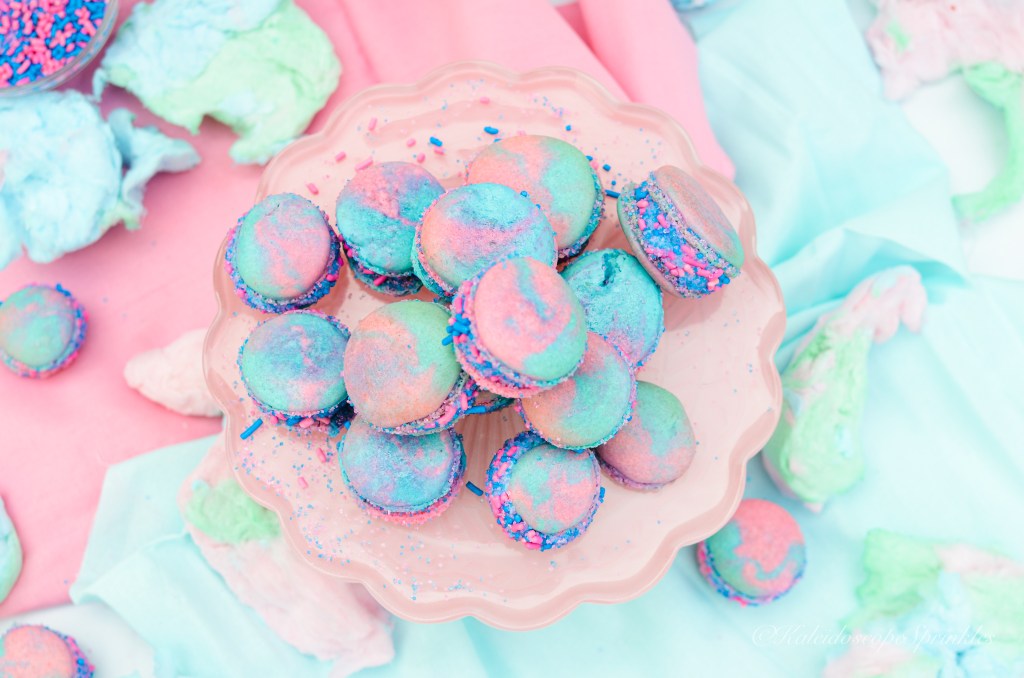
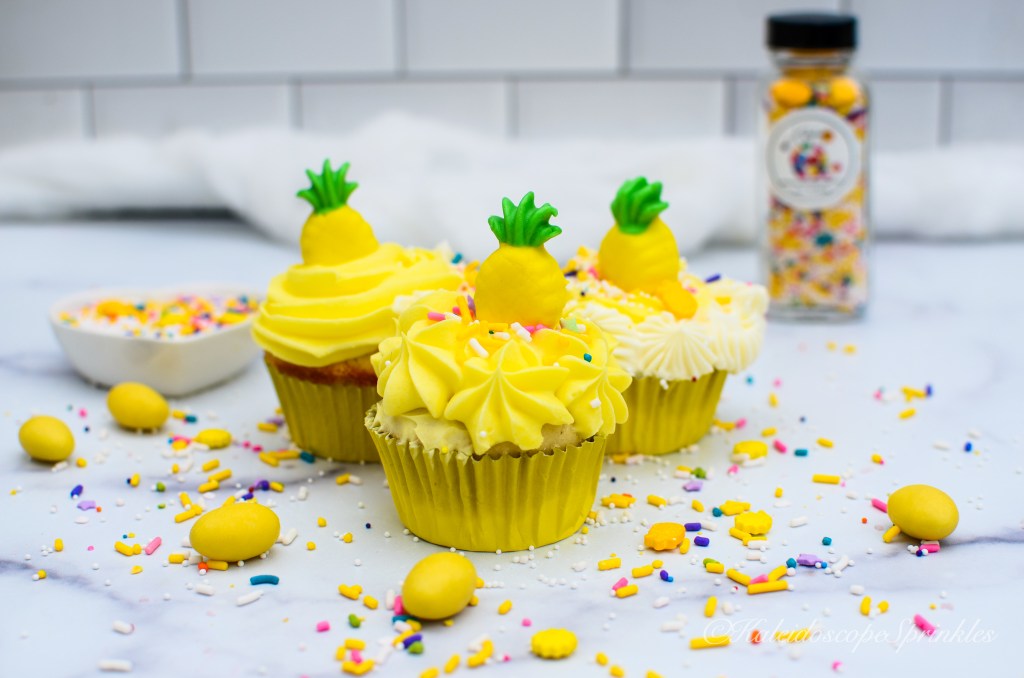
This year I decided to celebrate National Cat Day by not only enjoying time with my adorable cat, Butterscotch, but also celebrating the world treasure that is Hello Kitty. I thought the perfect recipe would be some pretty purple ube/potato cookies decorated fabulously. I decided to add even more pizzazz by using some Kaleidoscope Sprinkles to decorate the cookies as well.
The cookies turned out super cute, delicious and perfect for enjoying all that is today.
You can find the complete recipe and step by step video below.
Hello Kitty Cookies
Ingredients
Hello Kitty Cookies:
1 ½ cup flour
½ tsp. salt
1 tsp. baking soda
¼ tsp. lemon zest
12 tbsp. (¾ cup) unsalted butter, room temperature
1 cup brown sugar
½ cup pureed ube potato
2 eggs, room temperature
1 tsp. vanilla extract
1 cup white chocolate chips
Royal Icing
4 cups confections sugar
3 tbsp. meringue powder
2 tbsp. lemon juice
7-8 tbsp. water
Food coloring gel for royal icing, for decorating (optional)
In a medium sized bowl, combine flour, salt, baking soda, cinnamon, nutmeg and orange zest. Set flour mixture aside.
In a large separate bowl, using either hand or stand mixer, cream together butter and brown sugar. Cream butter and sugar together until butter is pale yellow and doubled in size. Add sweet potato. Add eggs one at a time. Mix until smooth. Add vanilla extract. Add half of flour mixture to cream mixture and stir until incorporated. Add second half of flour mixture. (Add purple food gel for more color, optional). Stir until incorporated. Add white chocolate chips to batter. Slowly fold in until combined.
Cover dough with plastic wrap and place cookie dough in refrigerator for 30 minutes to overnight.
Once ready to bake cookies, remove dough from refrigerator to rest for at least 15-20 minutes before baking.
Preheat oven to 350F.
Line cookie sheets with parchment paper or non-stick mat. Using rolling pin, roll out cookie dough onto a heavily floured surface (dough is very wet dough) until ½” thick. Use floured cookie cutter to cut out cookies. Place cut out cookie dough onto sheet 1.5-2″ apart. Bake cookies for 12-15 minutes until cookies are slightly golden and firm to touch. Remove from oven and allow cookies to cool completely to room temperature.
*If not, using cookie cutter then no need to roll out cookie dough. Use cookie scoop or ice cream scoop, place cookie dough onto sheets about 1.5-2 inches apart. Bake for same amount of time.
While cookies are baking, make royal icing for decorating cookies later.
To make icing:
In a large bowl, add confectioners’ sugar, meringue powder, lemon juice and 6 tablespoons of water. Using a hand mixer or a stand mixer with fitted with a whisk or paddle attachment, beat icing ingredients together on high speed for approximately 2 minutes. When lifting the whisk/paddle up off the icing, the icing should drizzle down and smooth out within 5-10 seconds for proper consistency. Set aside until ready to decorate.
Once cookies are completely cooled. Decorate cookies by frosting them with royal icing and Kaleidoscope Sprinkles.
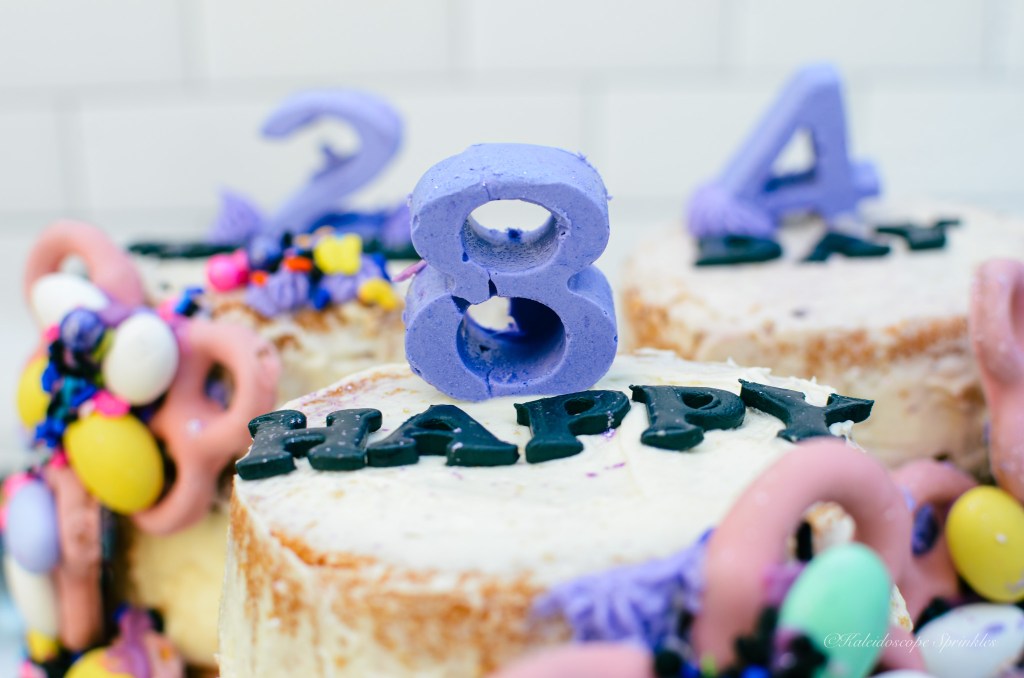
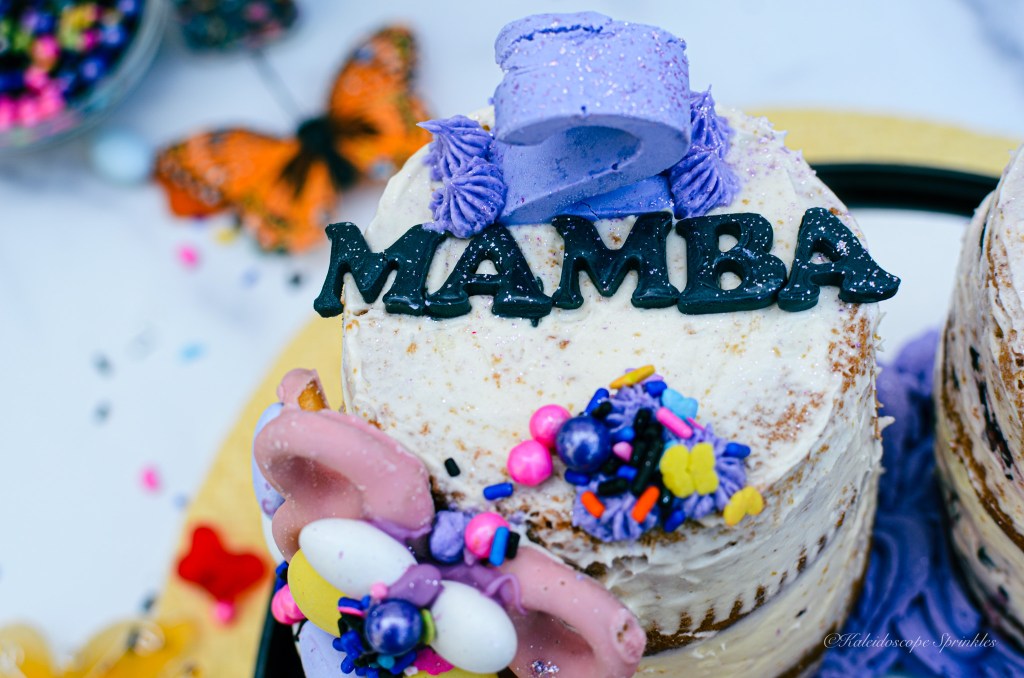
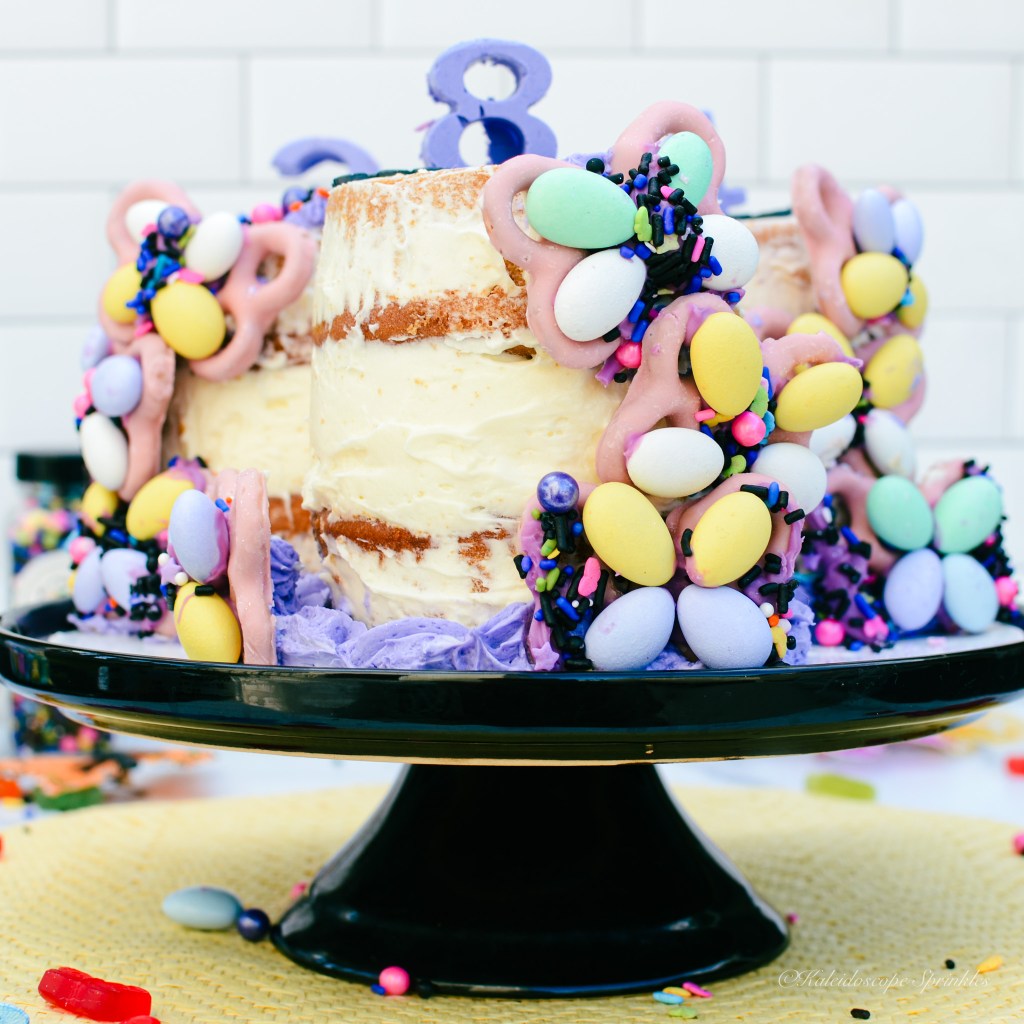
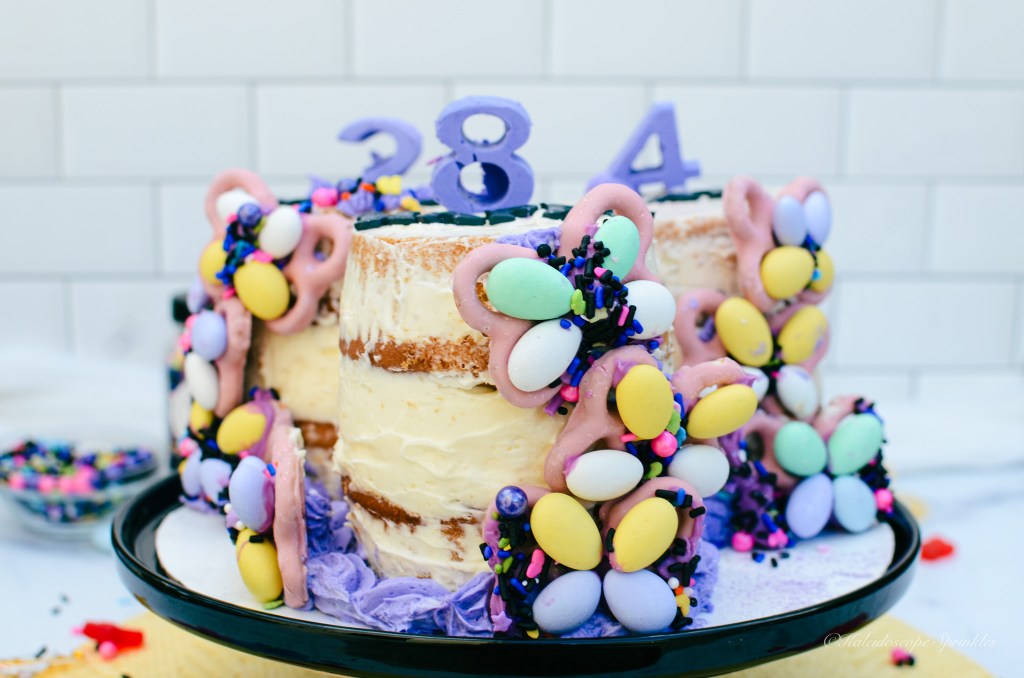
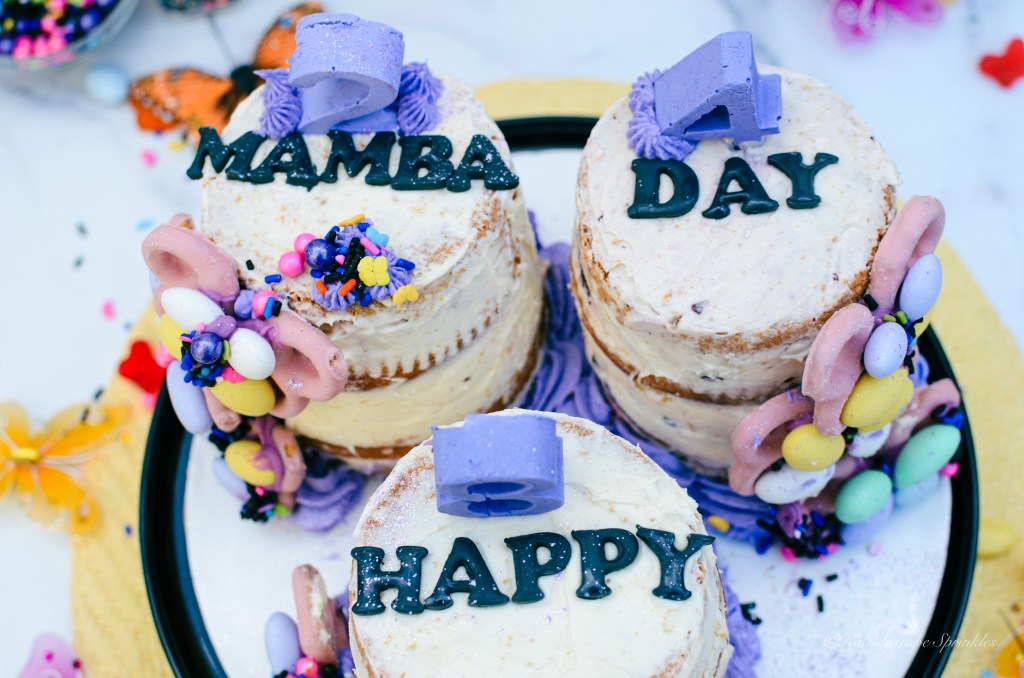
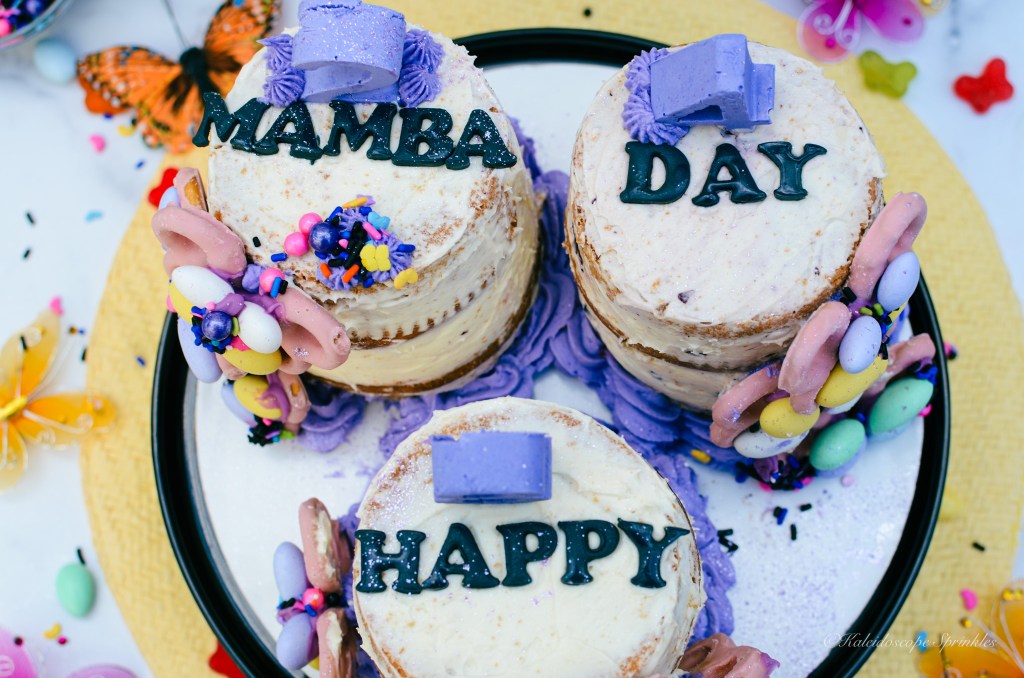
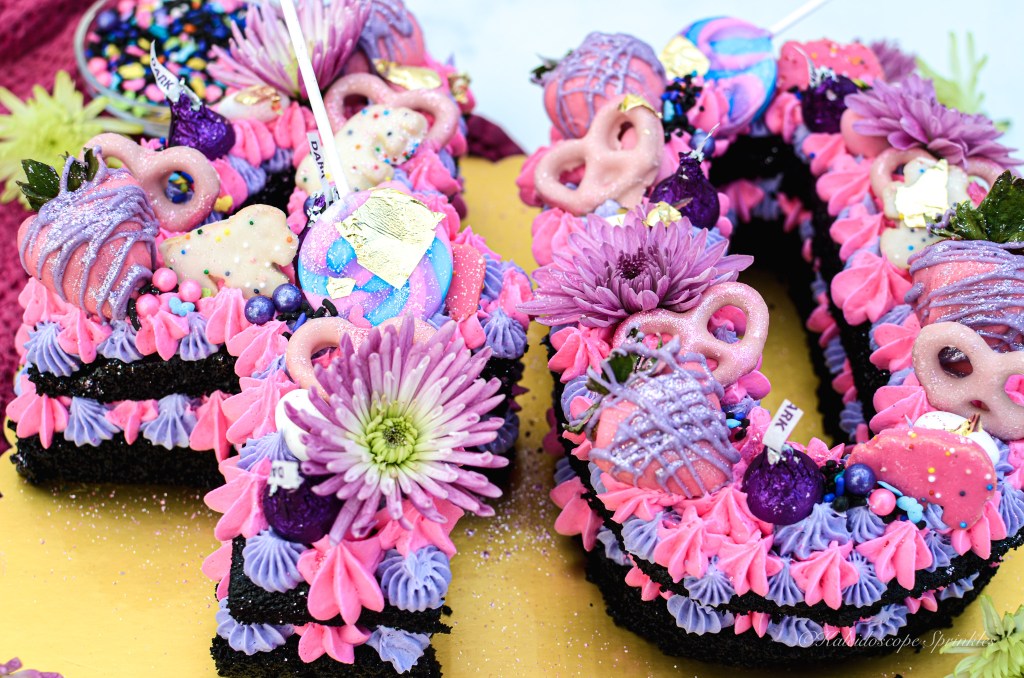
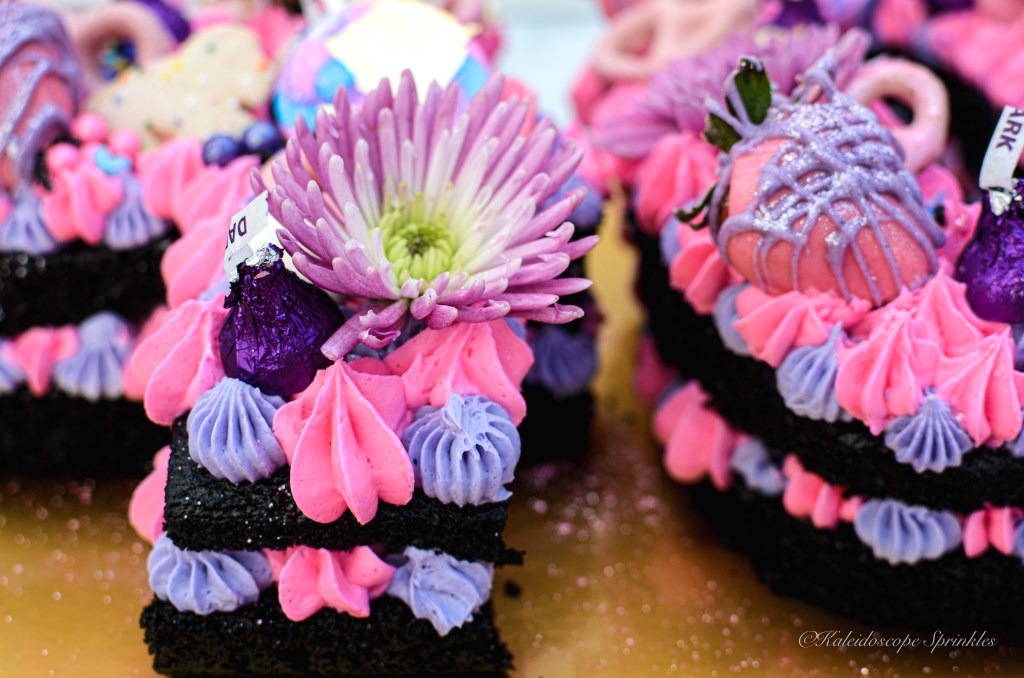
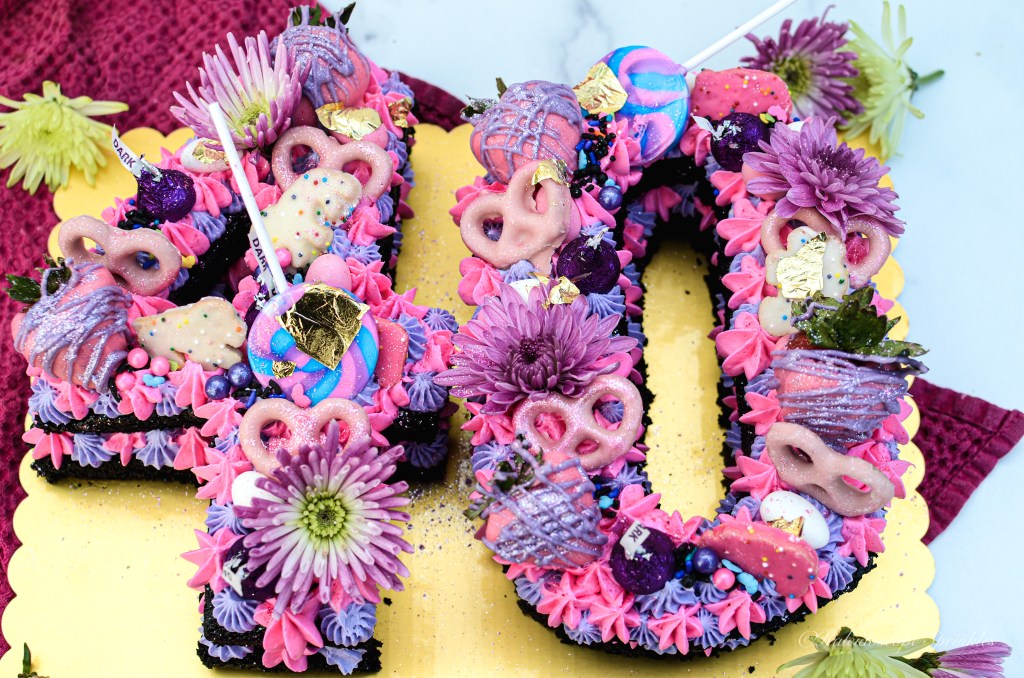
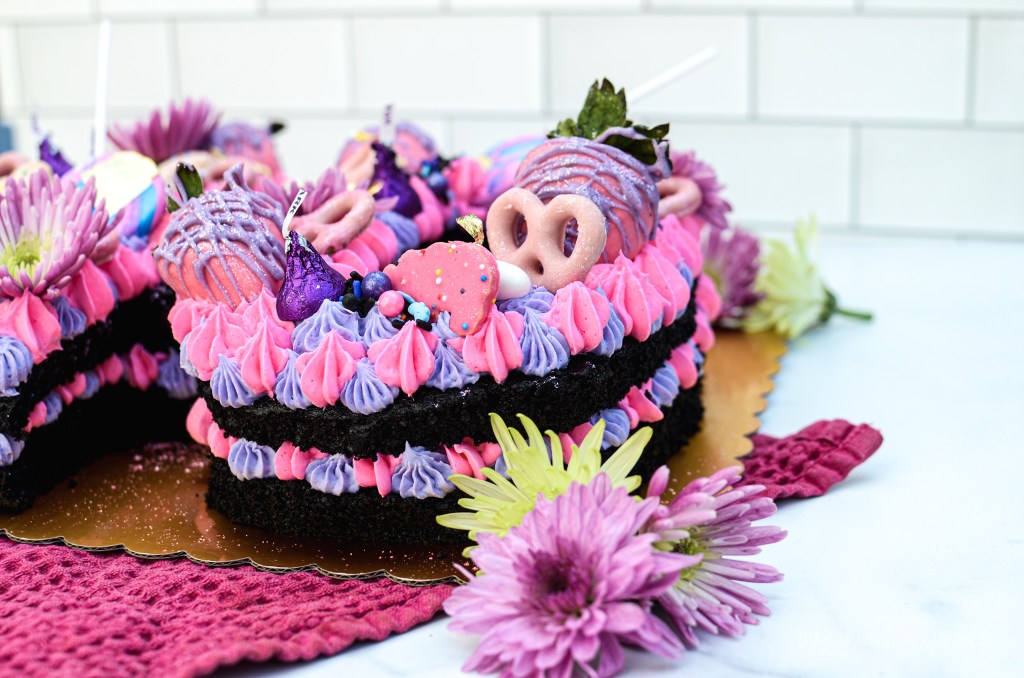
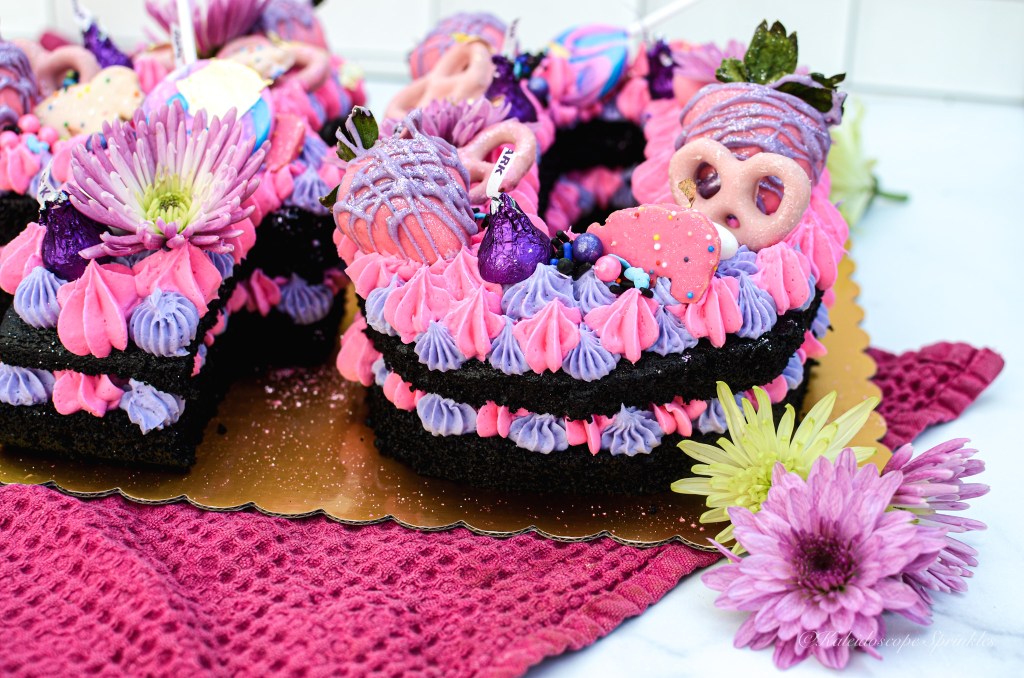
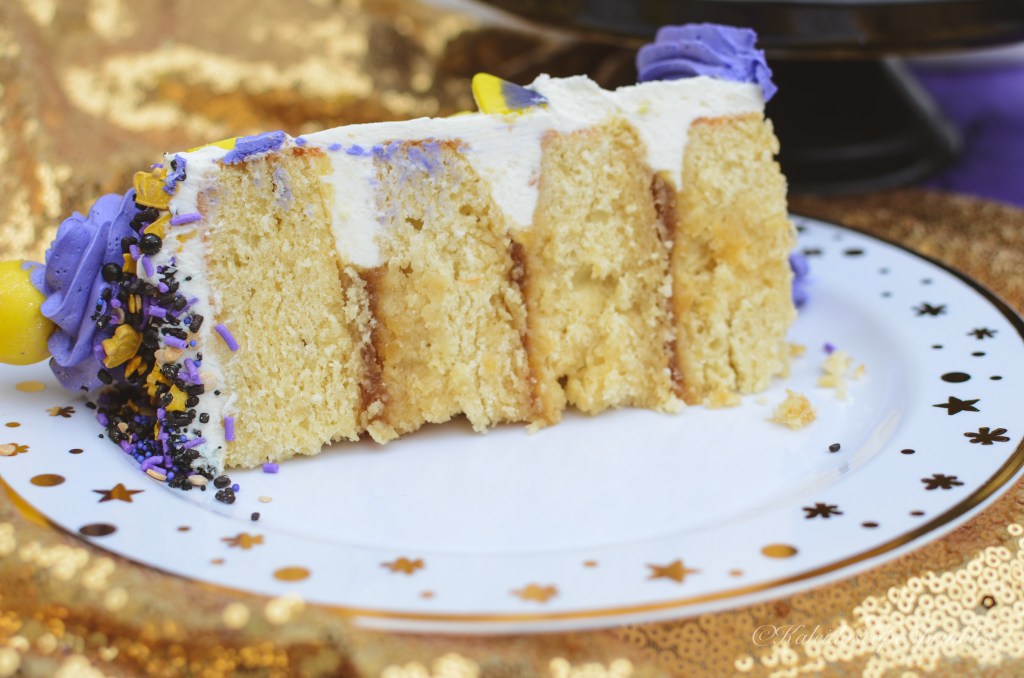
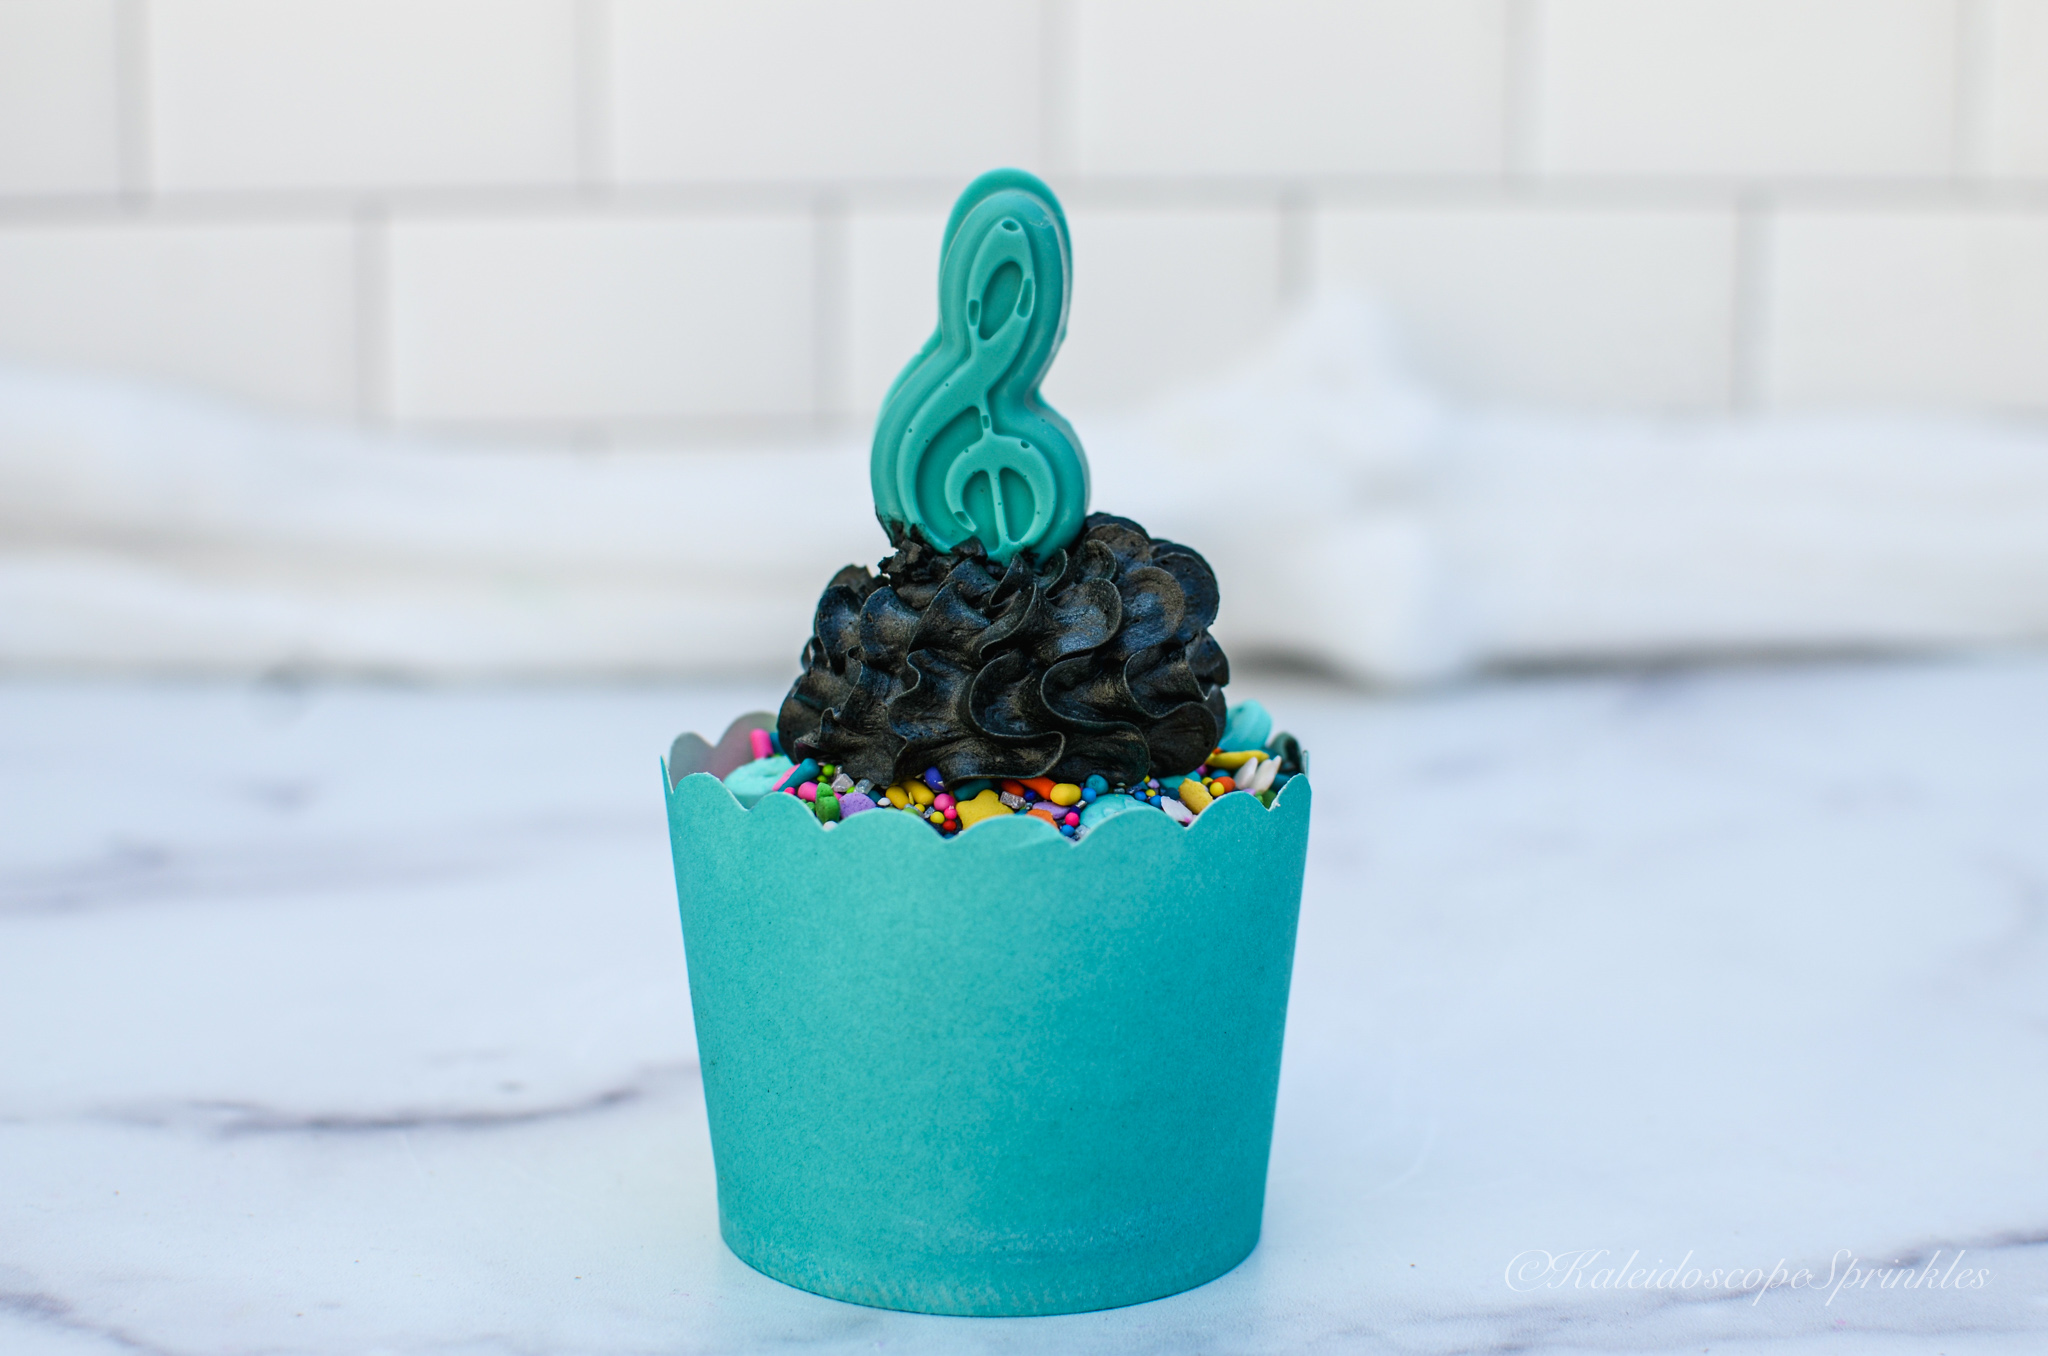
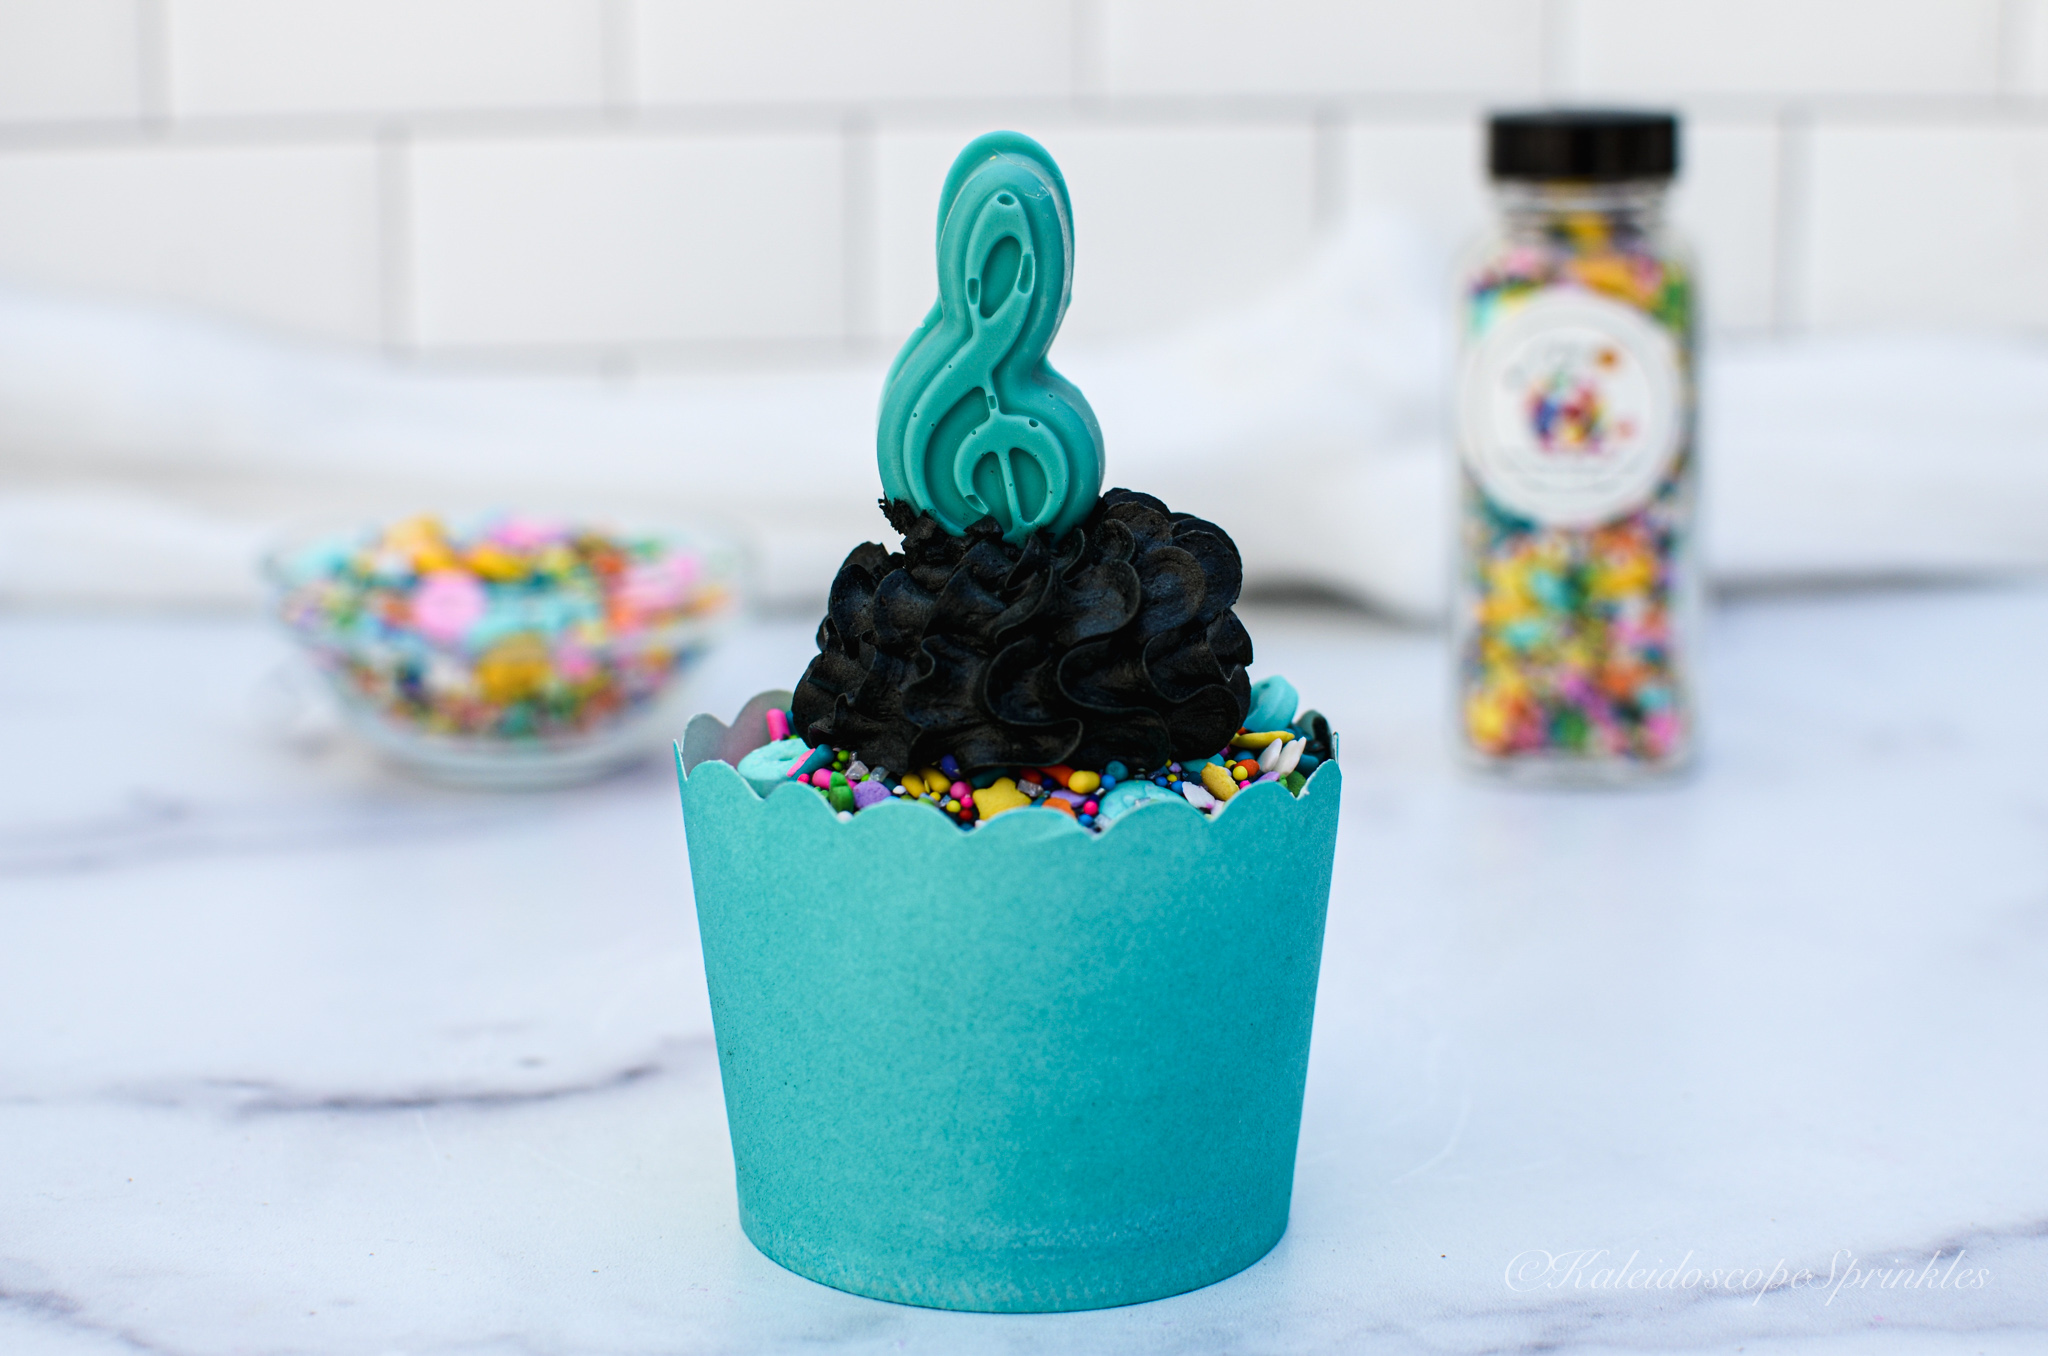
Happy 8/24 or otherwise known as Kobe Day. Kobe Day, which was once considered a local Los Angeles holiday, has now blossomed into an international celebration. Well deserved as it is, Kobe Day is a day to recognize and remember my forever favorite, Kobe “Bean” Bryant. Kobe’s birthday is actually on August 23rd, but today is recognized for Kobe’s numbers and contribution to the world. I celebrate annually in my own way, whether with confections or anything of my choosing.
I knew that this month was going to be a busy one with my extended vacation to Barbados being the pinnacle of August. Before my Caribbean Crop Over carousel, I came to the conclusion that I wanted to create a Kobe cake before I left. In the previous years, I have celebrated with a humongous letter cake, cupcakes, cake pops and other things. I wanted to celebrate Mamba’s birthday and Kobe Day again this year, but I didn’t want something big that would waste away while I was away. Also, I didn’t want to spend too much time with an ornate confection, since my time was so limited. I got an amazing idea to repurpose some store bought treats, but upgrade them to another level.
While putting together my monthly Costco delivery I came across some summer baked goods on sale. I quickly added these scrumptious Mini Lemon Cakes to my Instacart and got to brainstorming. This was the perfect time to recreate a quick cake for Kobe Day. I thought adding some fresh fruit to the mini cakes would elevate them, so I came across some purple blackberries to contrast the yellow lemon filling. Definitely on theme for Kobe Day. I got even more inspired from Kaleidoscope Sprinkles summer sprinkle mix, Black Butterfly mix. I made my own pretzel butterflies and added some pastels in honor of Gigi.
The mini Mamba cakes came out amazing and I am quite proud of the final product. I stuffed the cakes in the freezer while I was out of town. The cakes are now freshly defrosted and ready for consumption today.
I celebrate Kobe and Gigi every day with keeping Mamba Mentality alive, but today is extra special and even better with cake!
As mentioned in my previous post, we are in a 90s fashion renaissance. With 90s fashion comes the influx of America’s favorite clothing material, denim. Apparently Canadians appreciate this widely versatile fabric as they have named an entire ensemble after it. I have never been a fan of the Canadian tuxedo, also known as the “denim on denim” look. My OCD has never settled with different denim colors and layers making up a complete outfit.
With this rebirth of denim fashion I have found better clothing options and an improved way to optimize this choice. The days of only having denim button ups, jeans and those horrible granny looking denim dresses have long gone. Today there are not only retro denim looks to upgrade, but also better fitting and stylish denim fashion options.
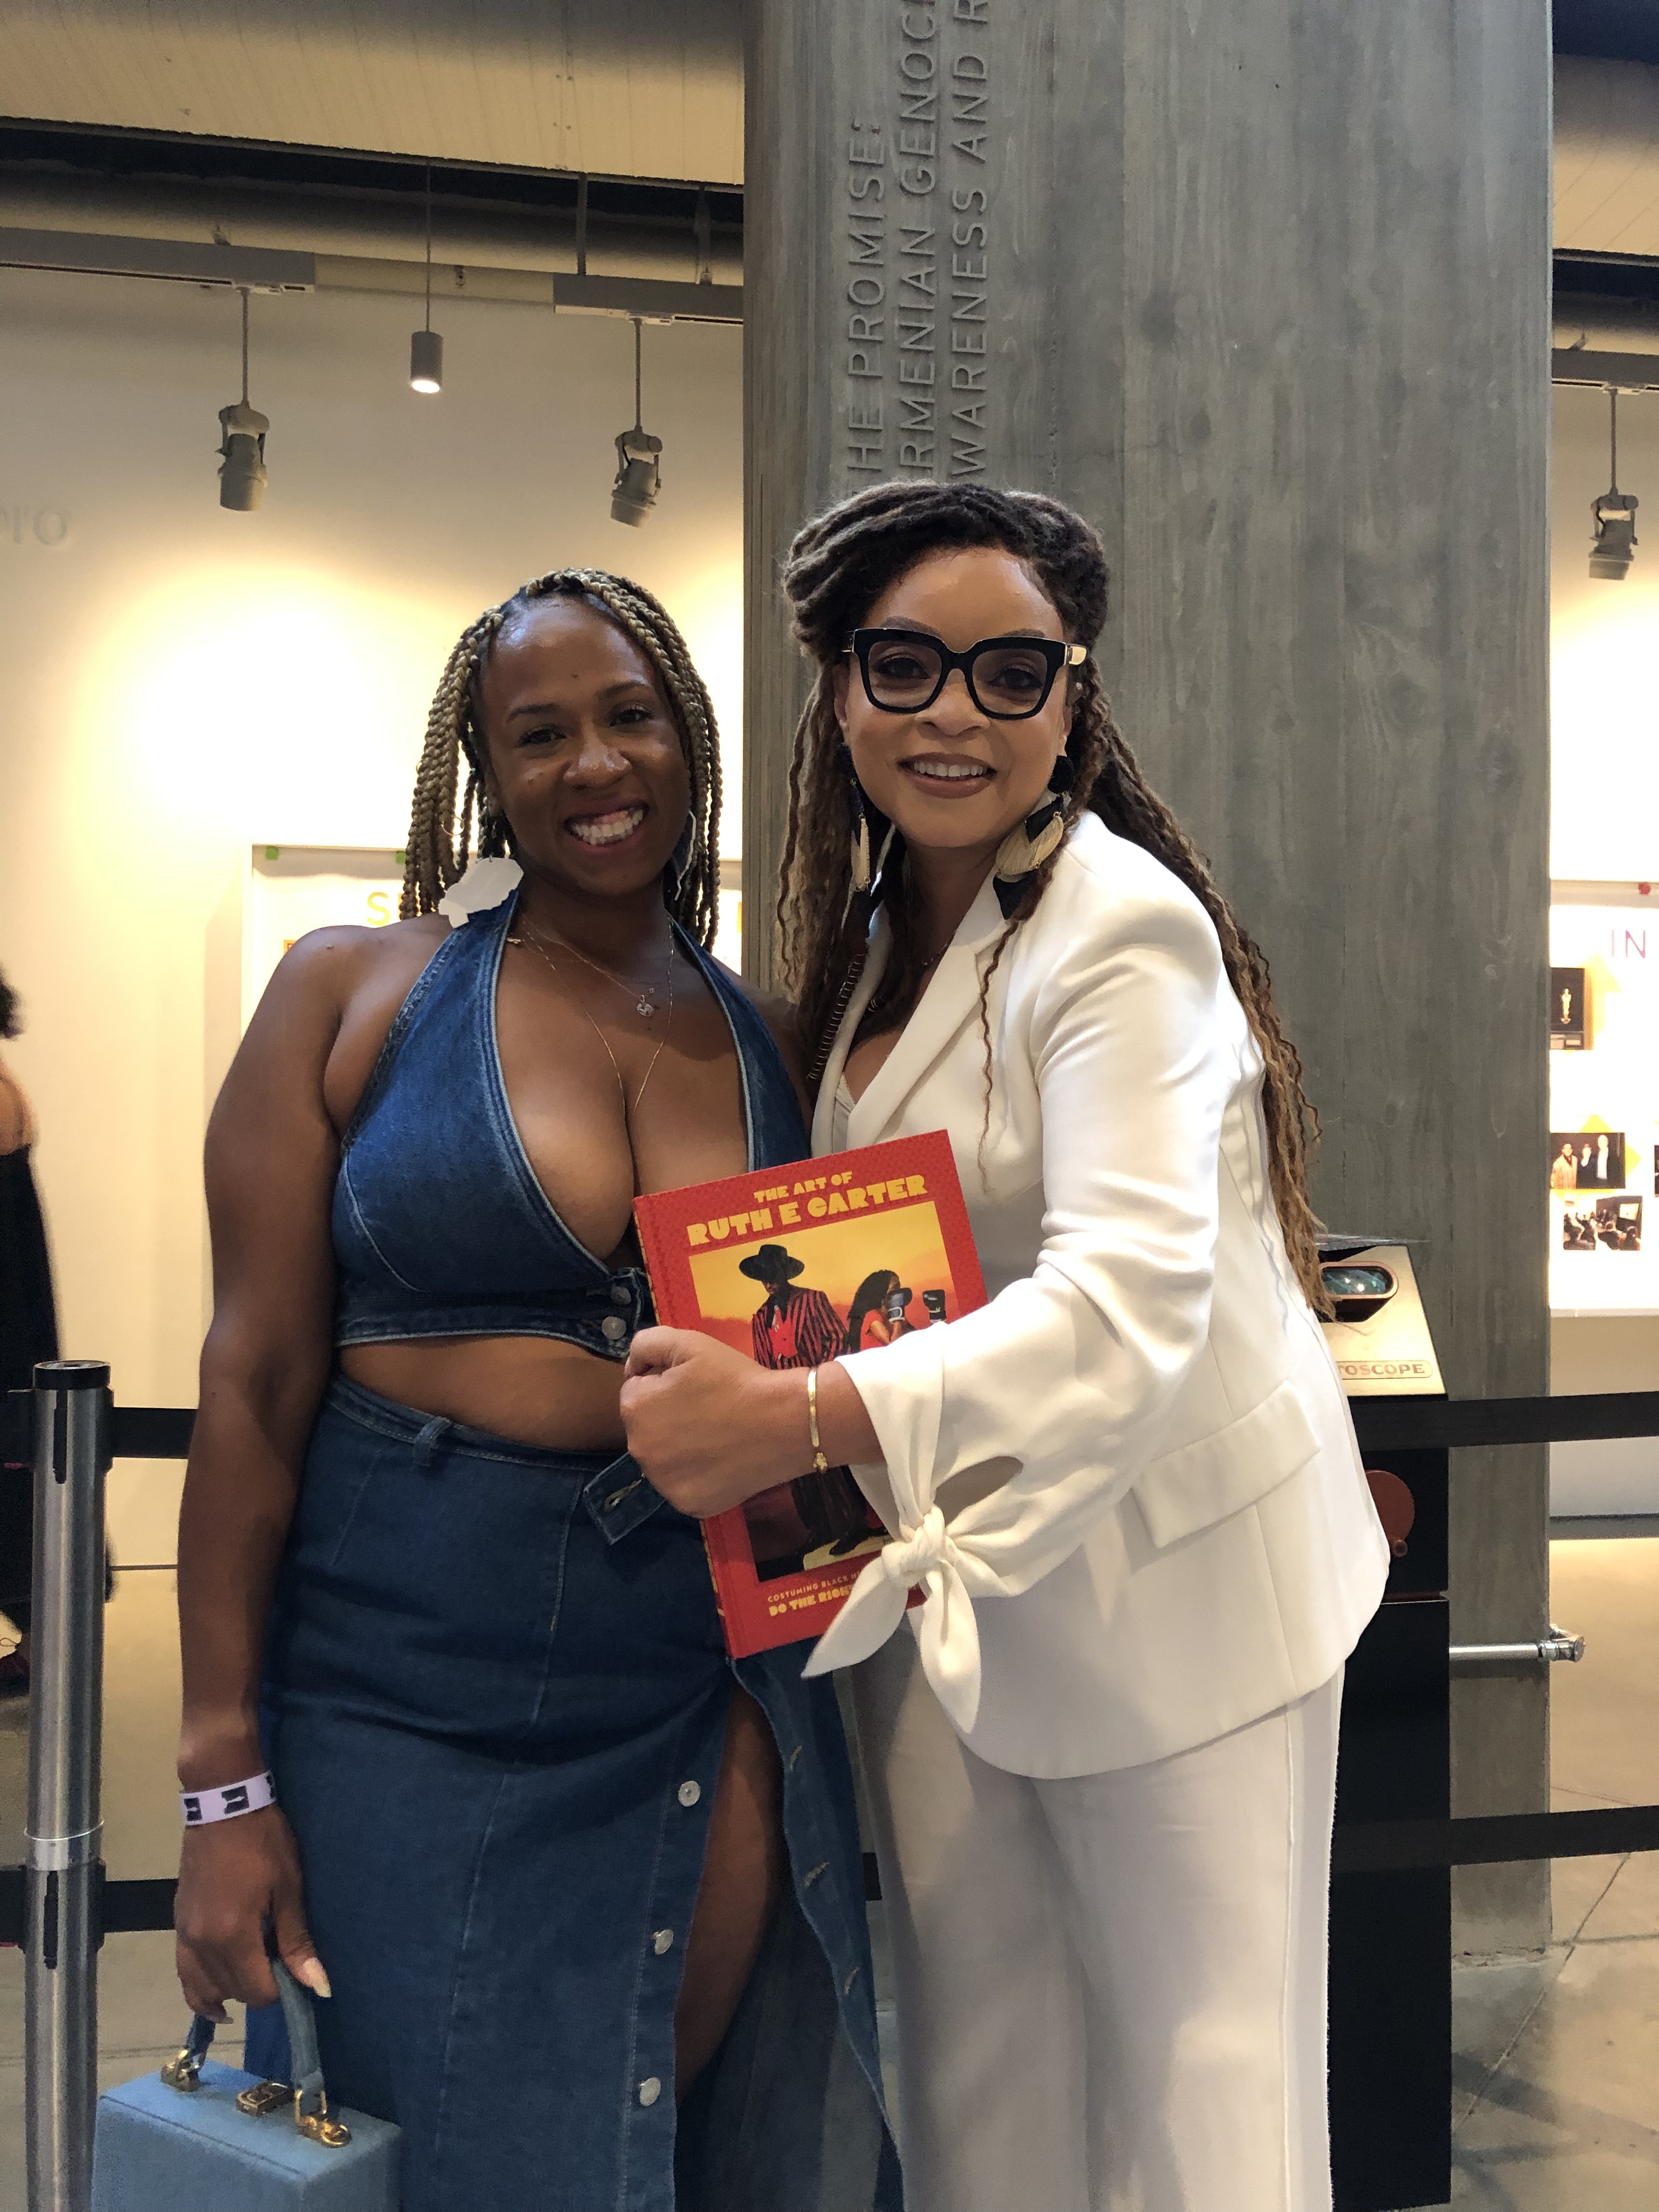
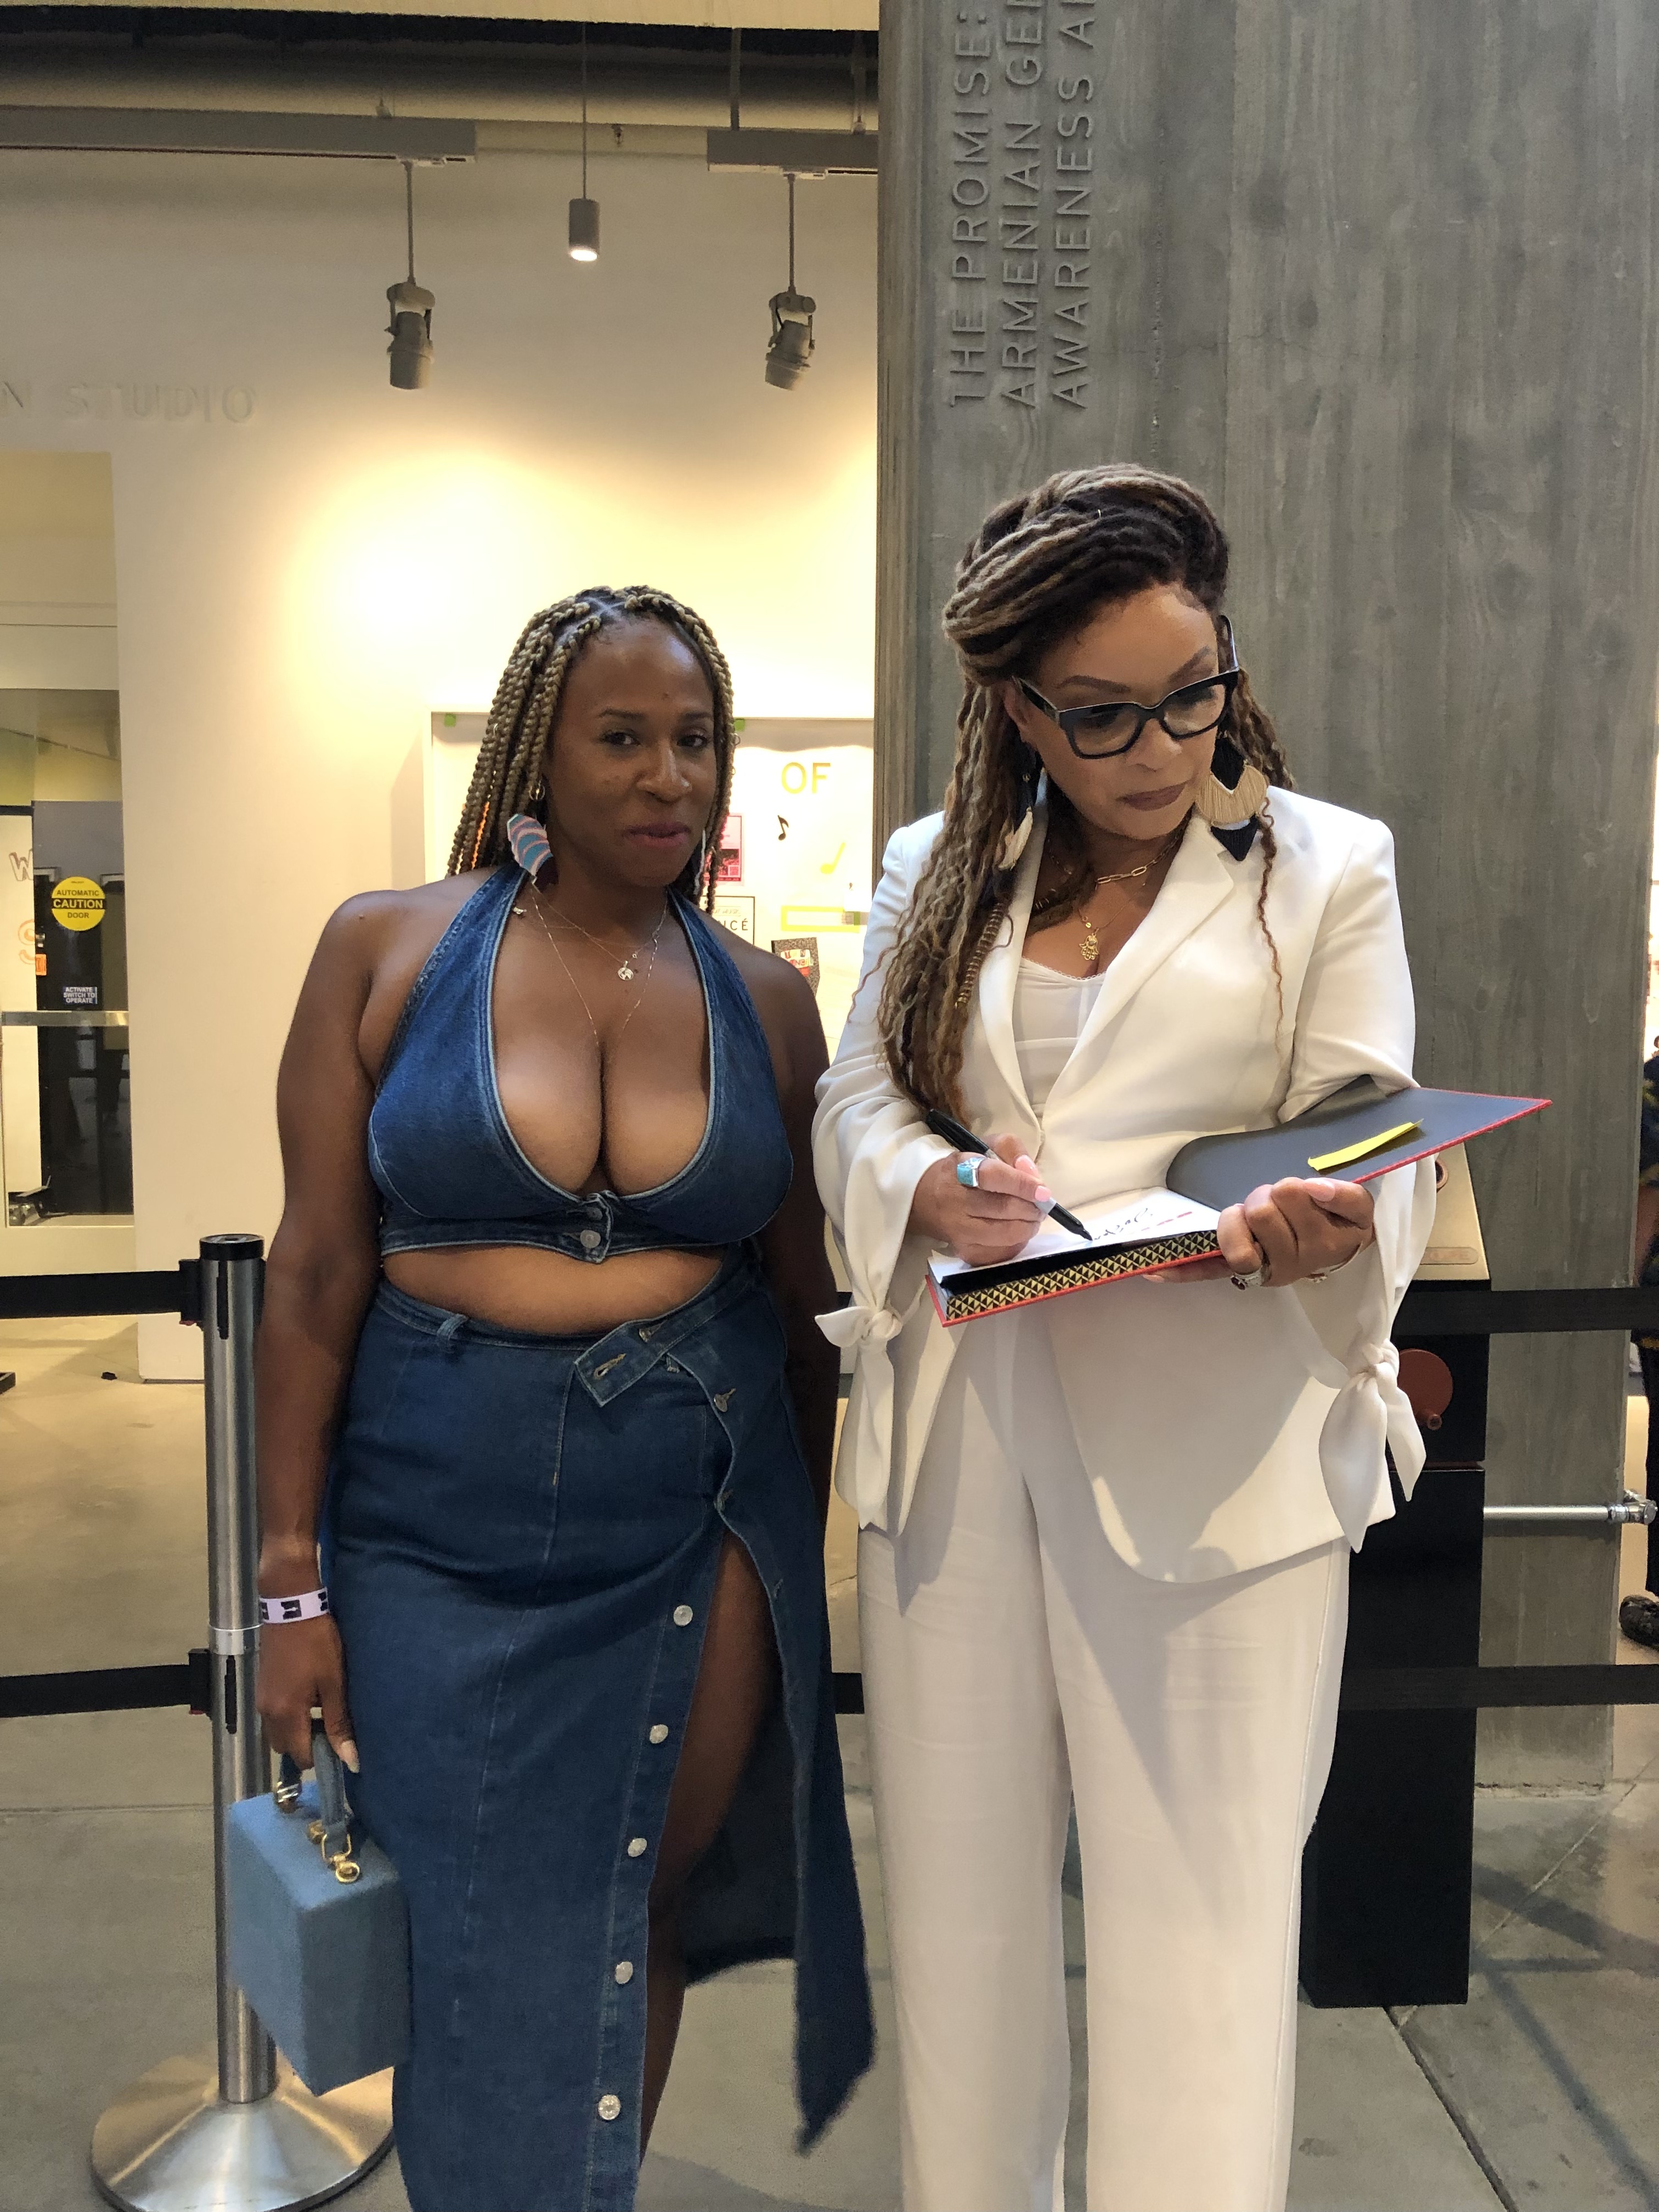
While I was perusing my Amazon wish list during Prime Day, I forgot about some previously saved denim pieces I wanted to add to my shopping cart. Thankfully, I was able to purchase them on sale last month and add some classic clothing options to my collection. I bought a denim halter top, skirt and some classic fitting jeans that I will be wearing until the seams bust.
With this sweltering summer heat, I was able to wear my updated Canadian tuxedo and was quite pleased with complete look. What made my look even more incredible was I wore it to meet the iconic Academy Award winning costume designer, Ruth E. Carter, in this look
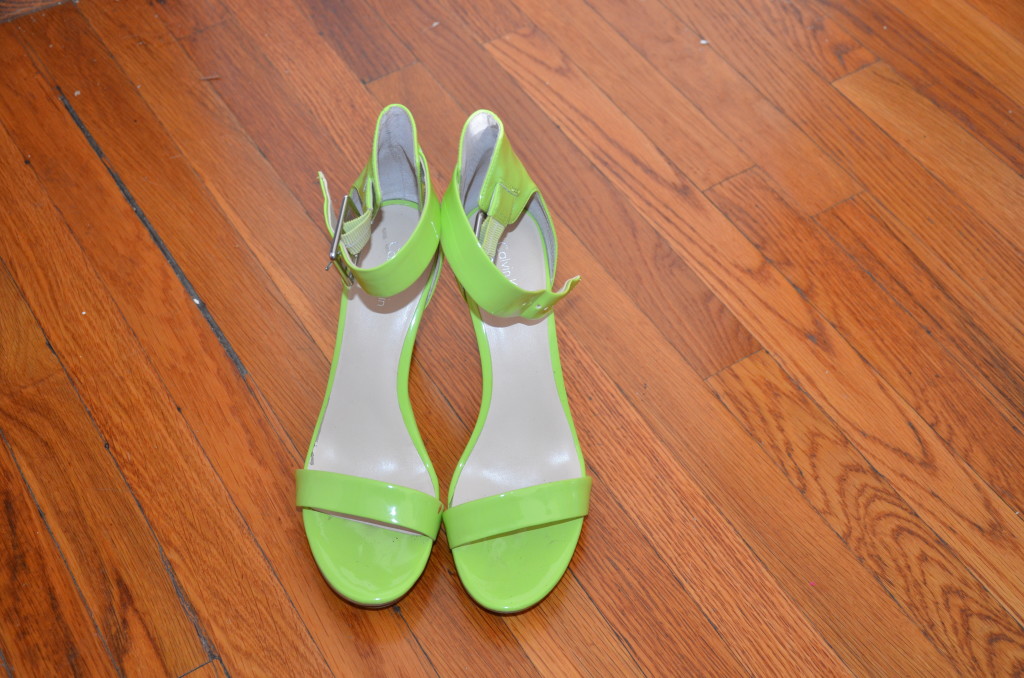
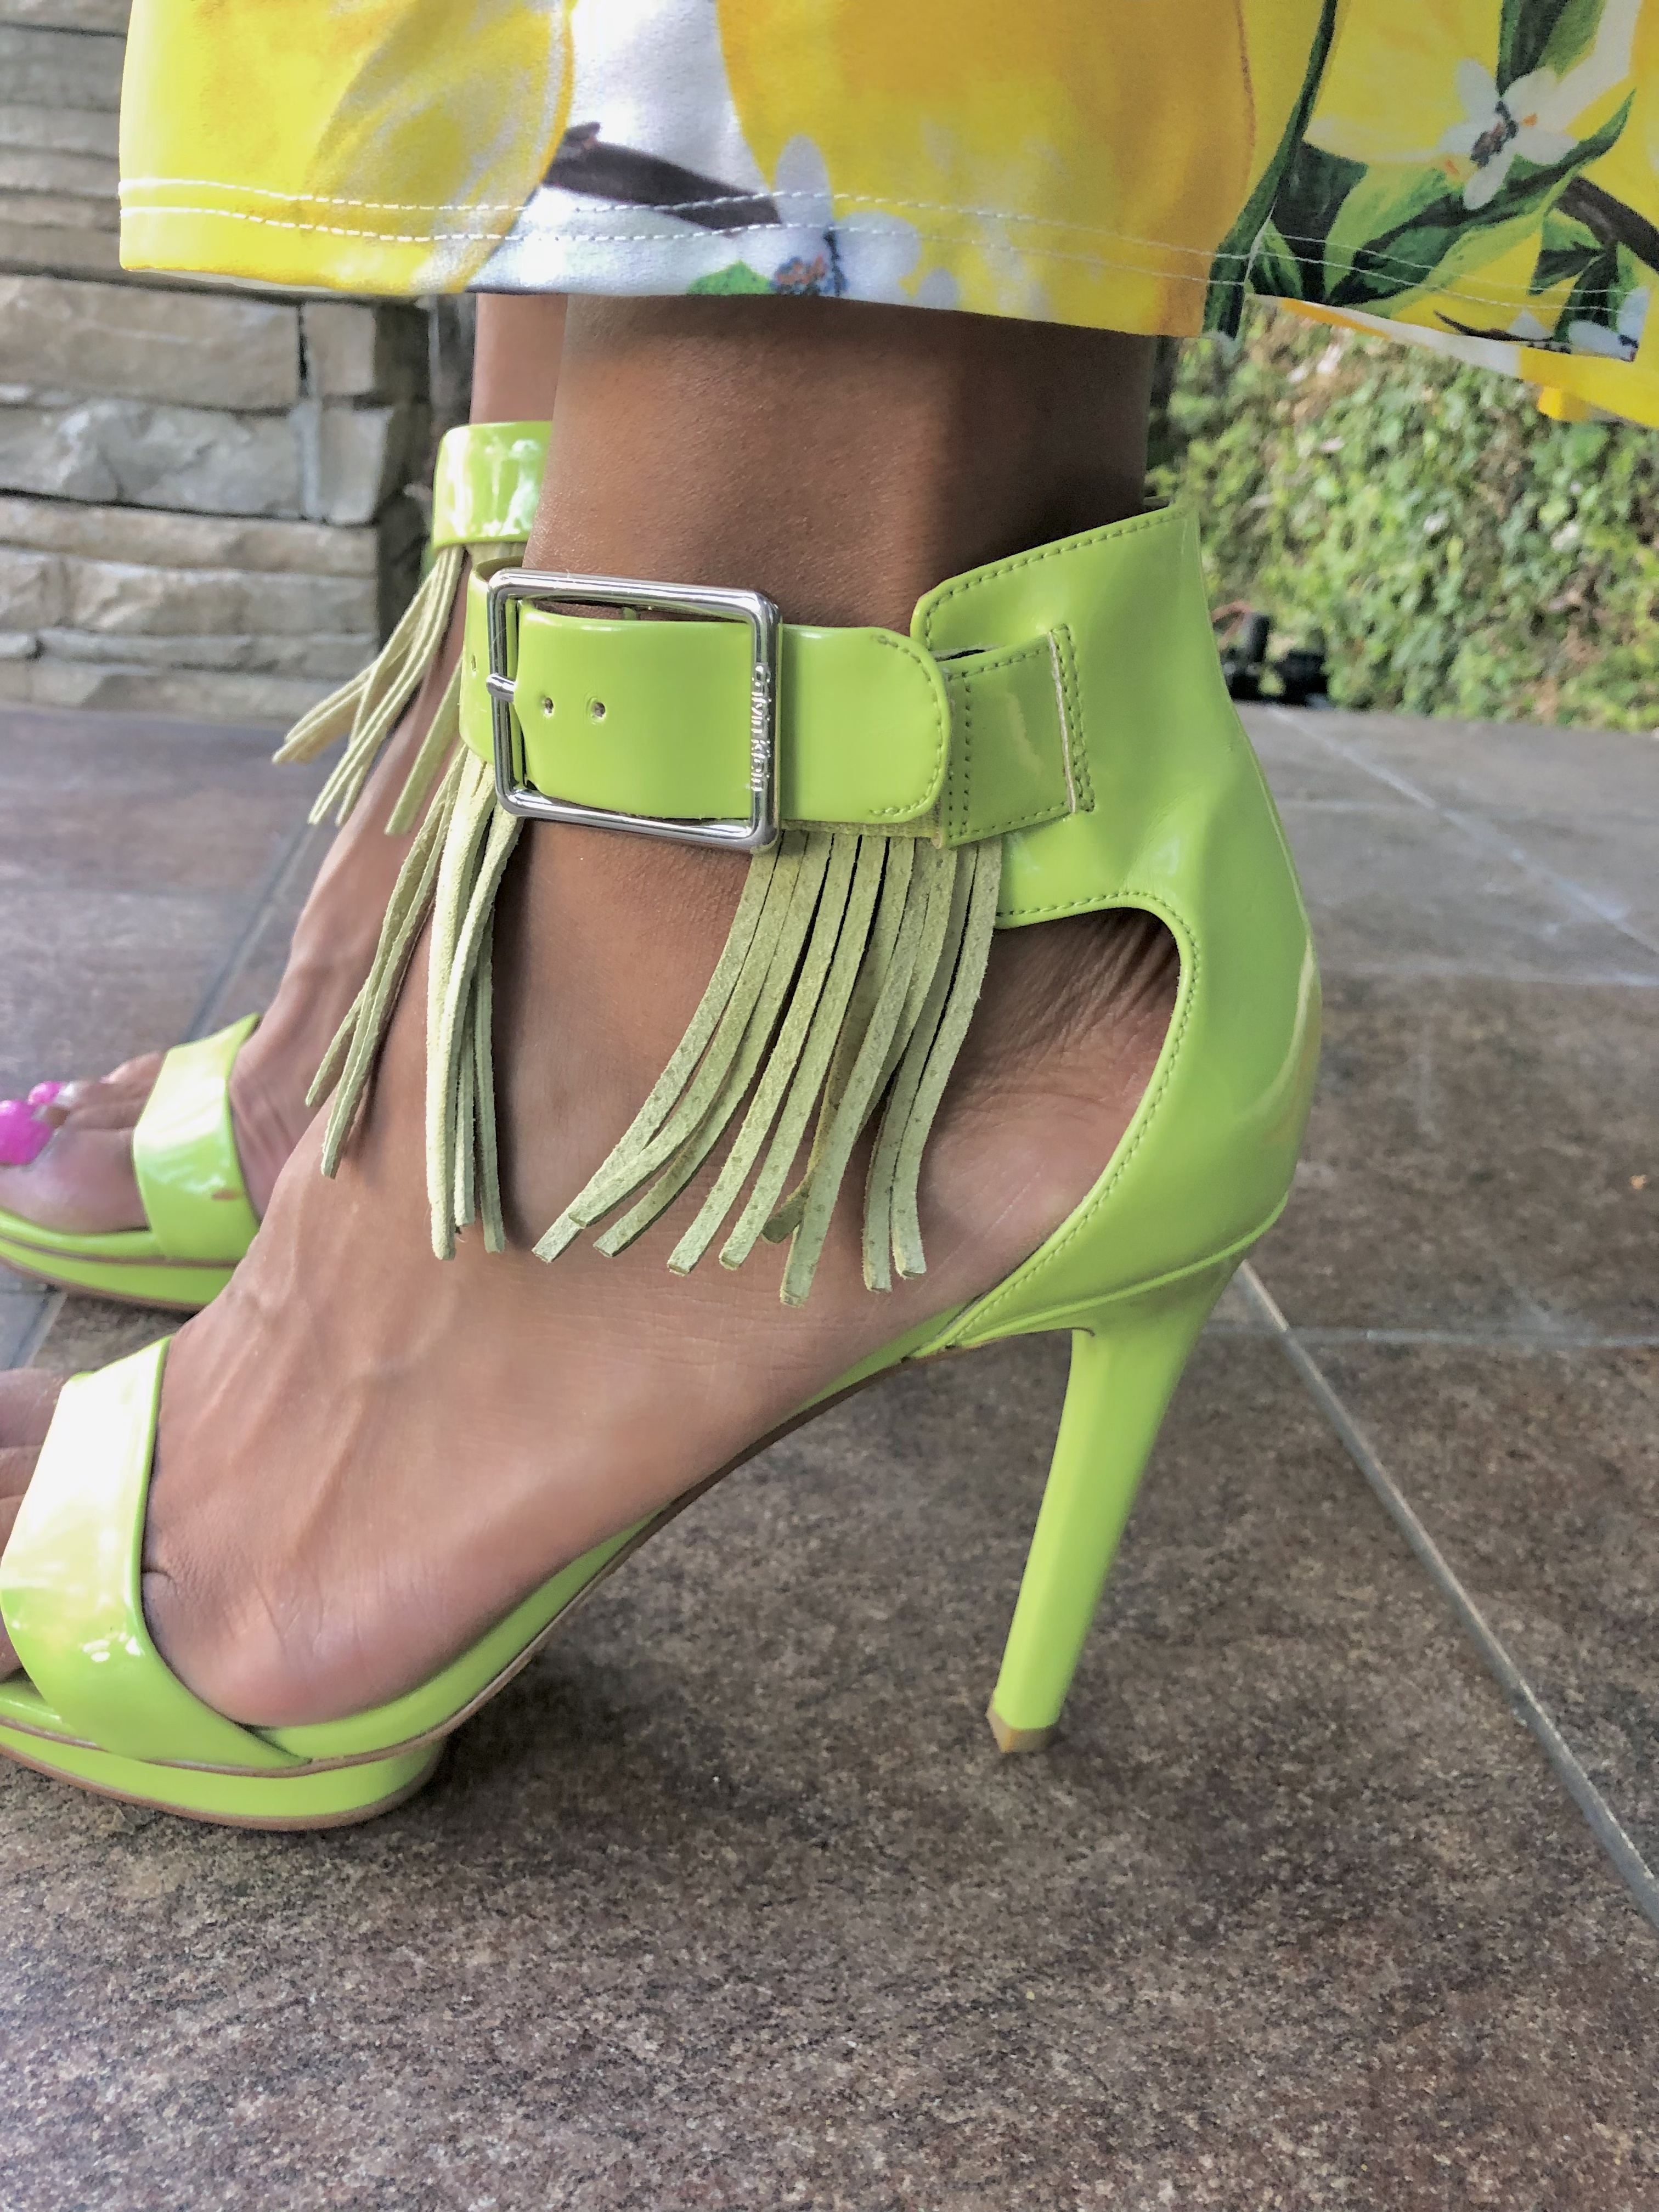
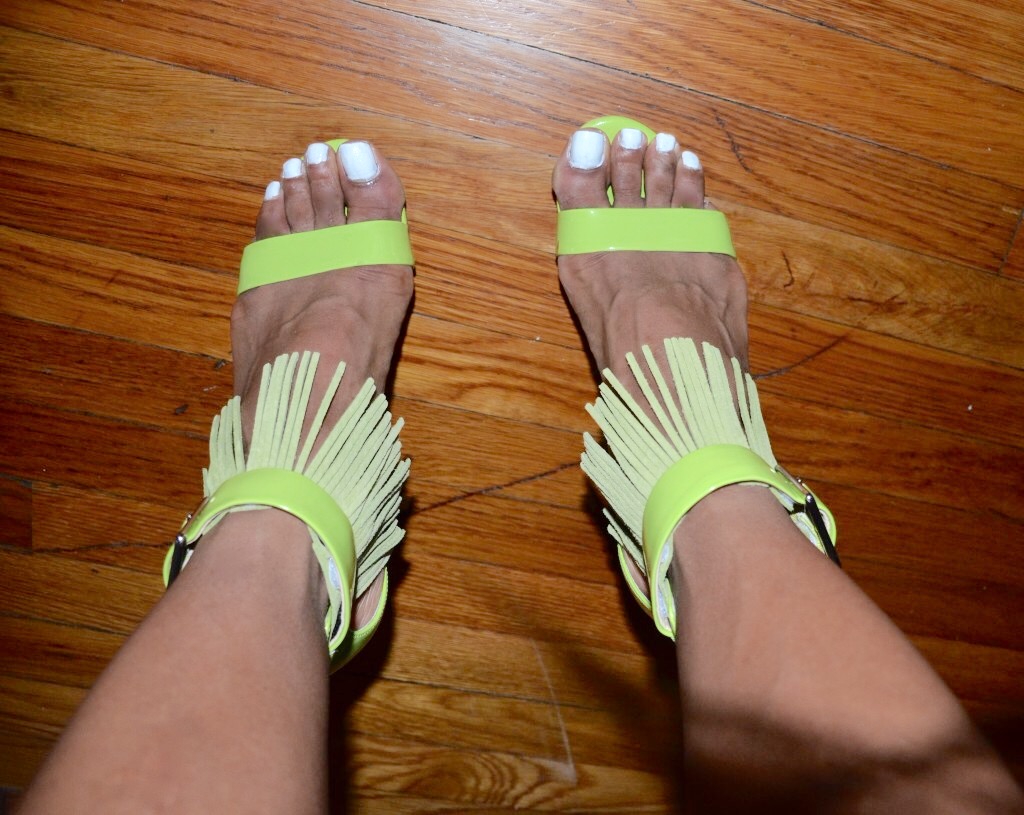
Fringe is definitely in! As it comes to fashion this season, you can find fringe on pretty much anything. This simple feature seems to add an extra layer of pizazz to shoes, clothing, handbags, etc. I especially like that extra element on the different shoes of the season. It makes the shoes seem extra special, but unfortunately also extra expensive. I, of course, thought to myself that this is something that I could tackle as a project. I gave it try and they turned out great. It was super easy to do and took me about 10 minutes total. Lots of compliments. Here’s what I did:
Materials
One pair of ankle strapped heels with at least one inch band. (Mine are from Calvin Klein).
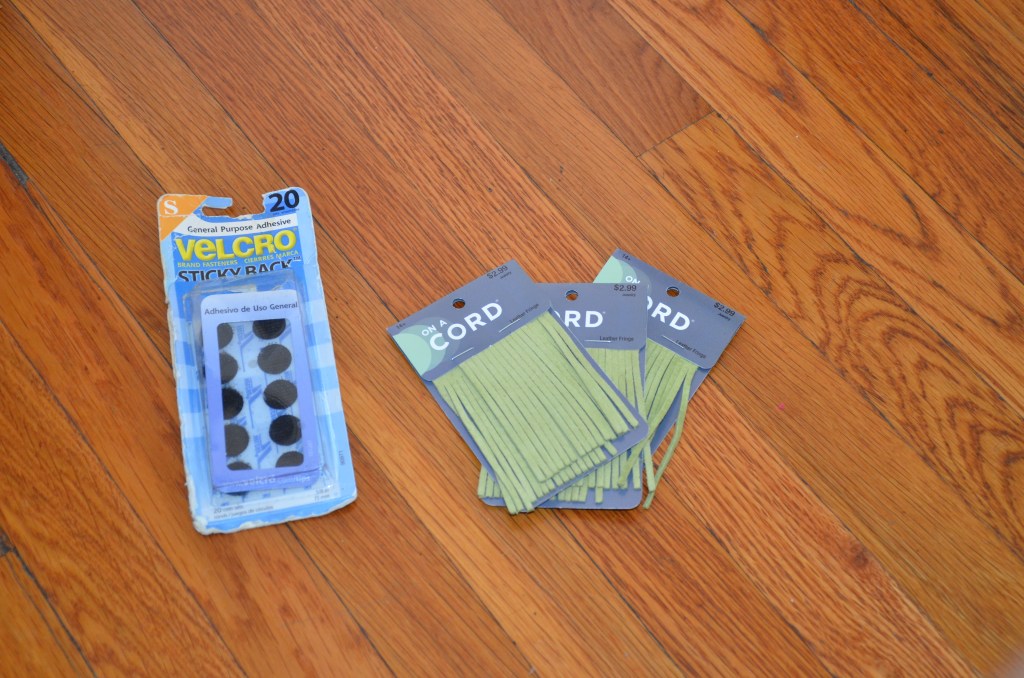
Leather Fringe Sheets (I bought mine from Hobby Lobby)
Velcro coins/stickers , smaller diameter than width of ankle band (also from Hobby Lobby or Jo-anns)
Fabric shears
Fabric tape measure
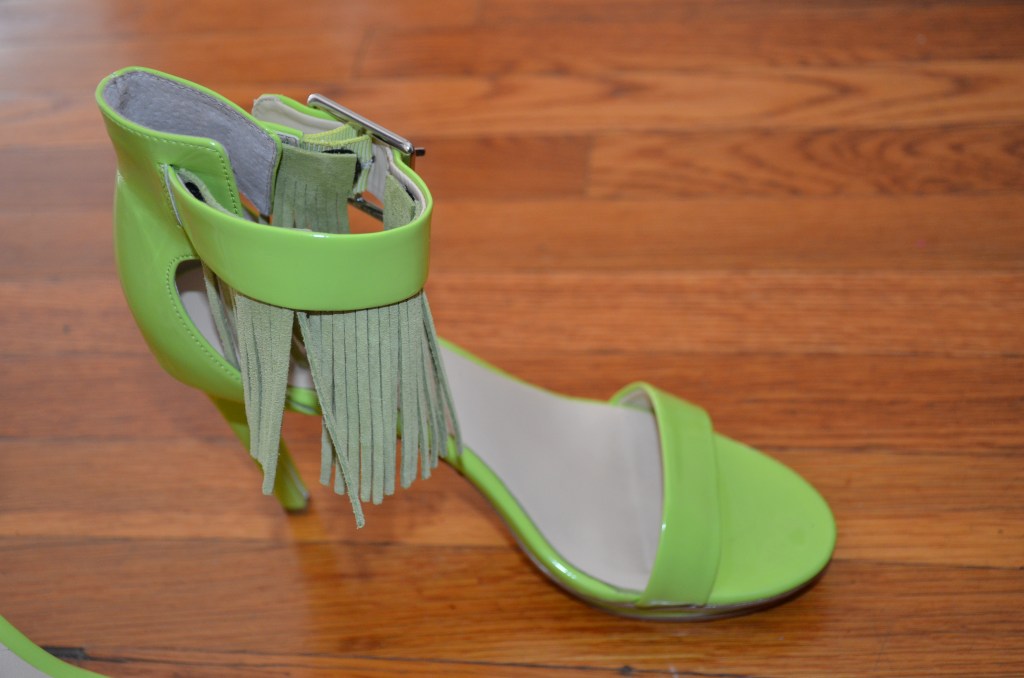
completed DIY ring heels
Instructions
Take your super cute heels and measure the ankle band where you plan to apply the fringe. (Make sure you buy enough fringe to cover the entire area). When measuring, make sure to not measure the area that goes through the buckle (if you have one) since you can not add fringe here. Cut your fringe to match the measurements on each side of the band (buckle and unbuckled side)
Apply the soft side of the velcro stickers to the back of the ankle band. This way if you want to remove the fringe you may still wear your shoes comfortably. Place the opposite piece of the velcor sticker onto the leather fringe making sure that the stickers will match when you place the fringe onto the shoes.
Apply your fringe onto shoe with the velcro stickers.
Let the shoes sit overnight to maximize the velcro adhesive. Your shoes are now super fabulous and ready to rock. Nobody will know you made your own shoes and saved yourself hundreds of dollars as well.
I’m sure it comes as no surprise that I love a good charcuterie board. Charcuterie has been my go to snack when I entertain others or sometimes just myself for years. This now popular fancy French delicacy has always appealed to me. Charcuterie simply consist of a snack board with cooked or processed meats together with a variety of supporting food items. If I’m making a charcuterie board for myself, I technically make something on the line of a cheese board and skip the meat. As a fan of French cheese, I stuff my face with a variety of my favorite dairy products with delicious nuts, vegetables, fruits and my favorite snacks. I usually then pair my enticing bites with some rosé and I’m in my happy place.
Charcuterie boards have been around since the fifteenth century. The reason I believe charcuteries have been able to stand the test of time is their simplicity and style. During the Middle Ages charcuterie shop owners would place their finest cured meats and cuisine together in stylized arrangements of food, which became a significant part of French culinary culture. When a charcuterie board is made correctly it becomes a personalized edible work of art. I adore mixing all the colors, flavors and textures together. The French are known for art and museums, so charcuterie is a great representation of that savoir-faire.
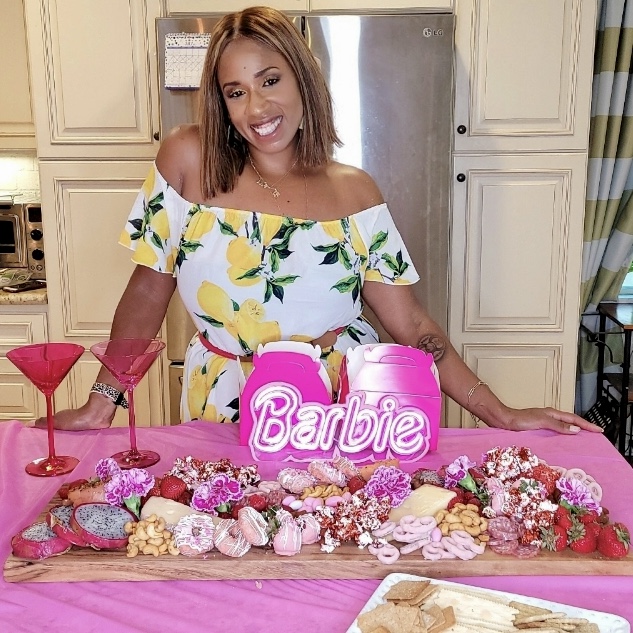
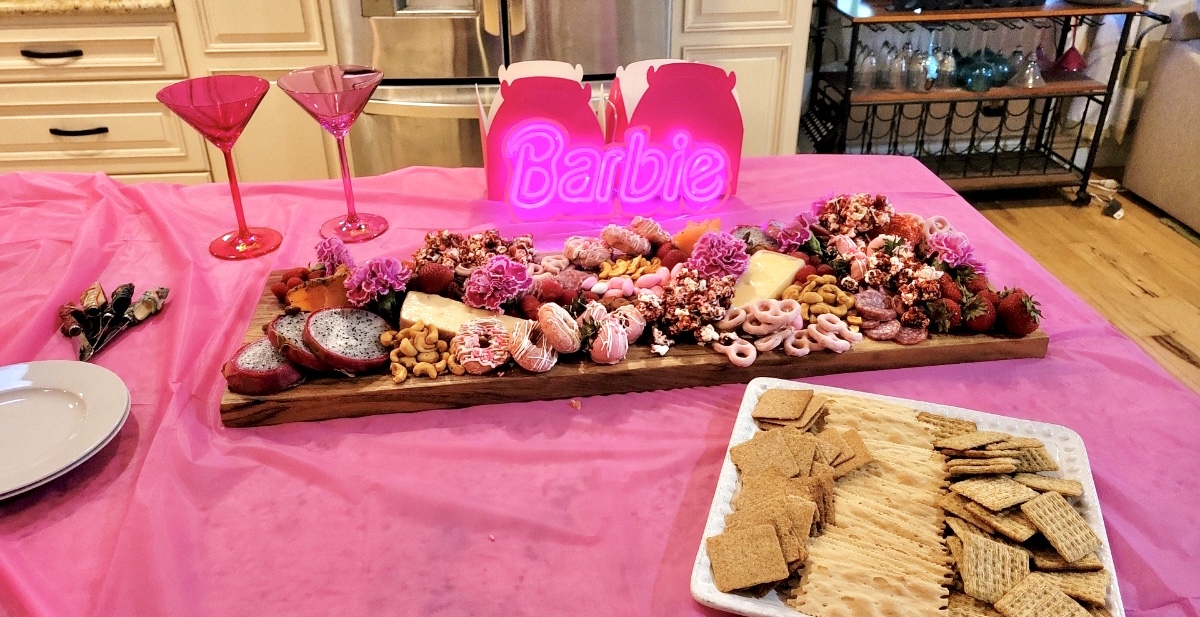
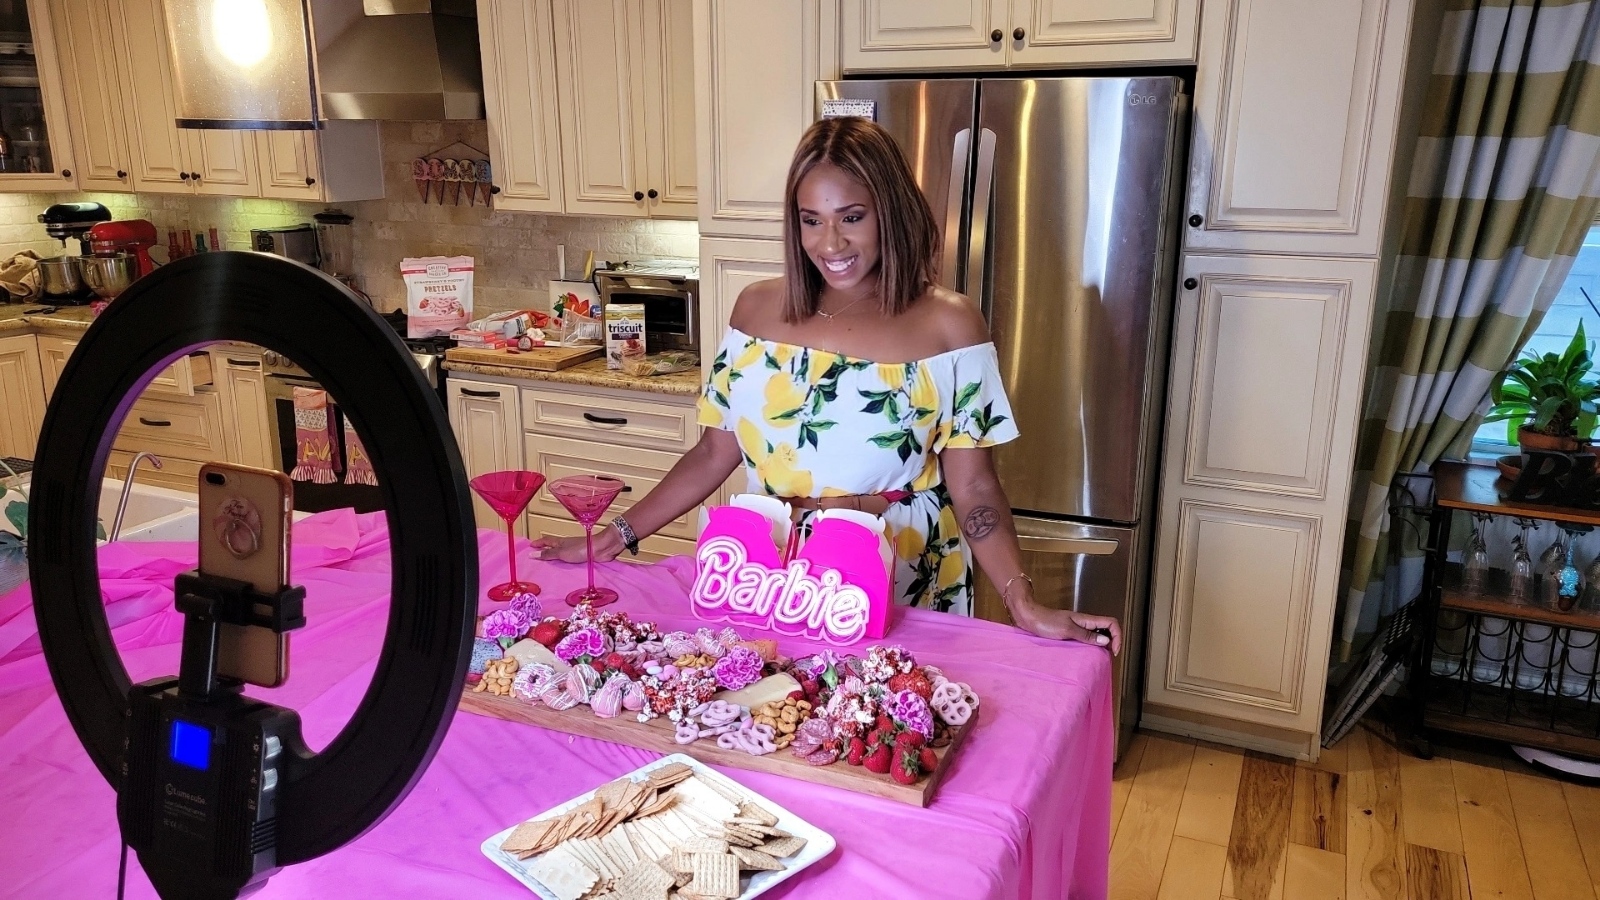
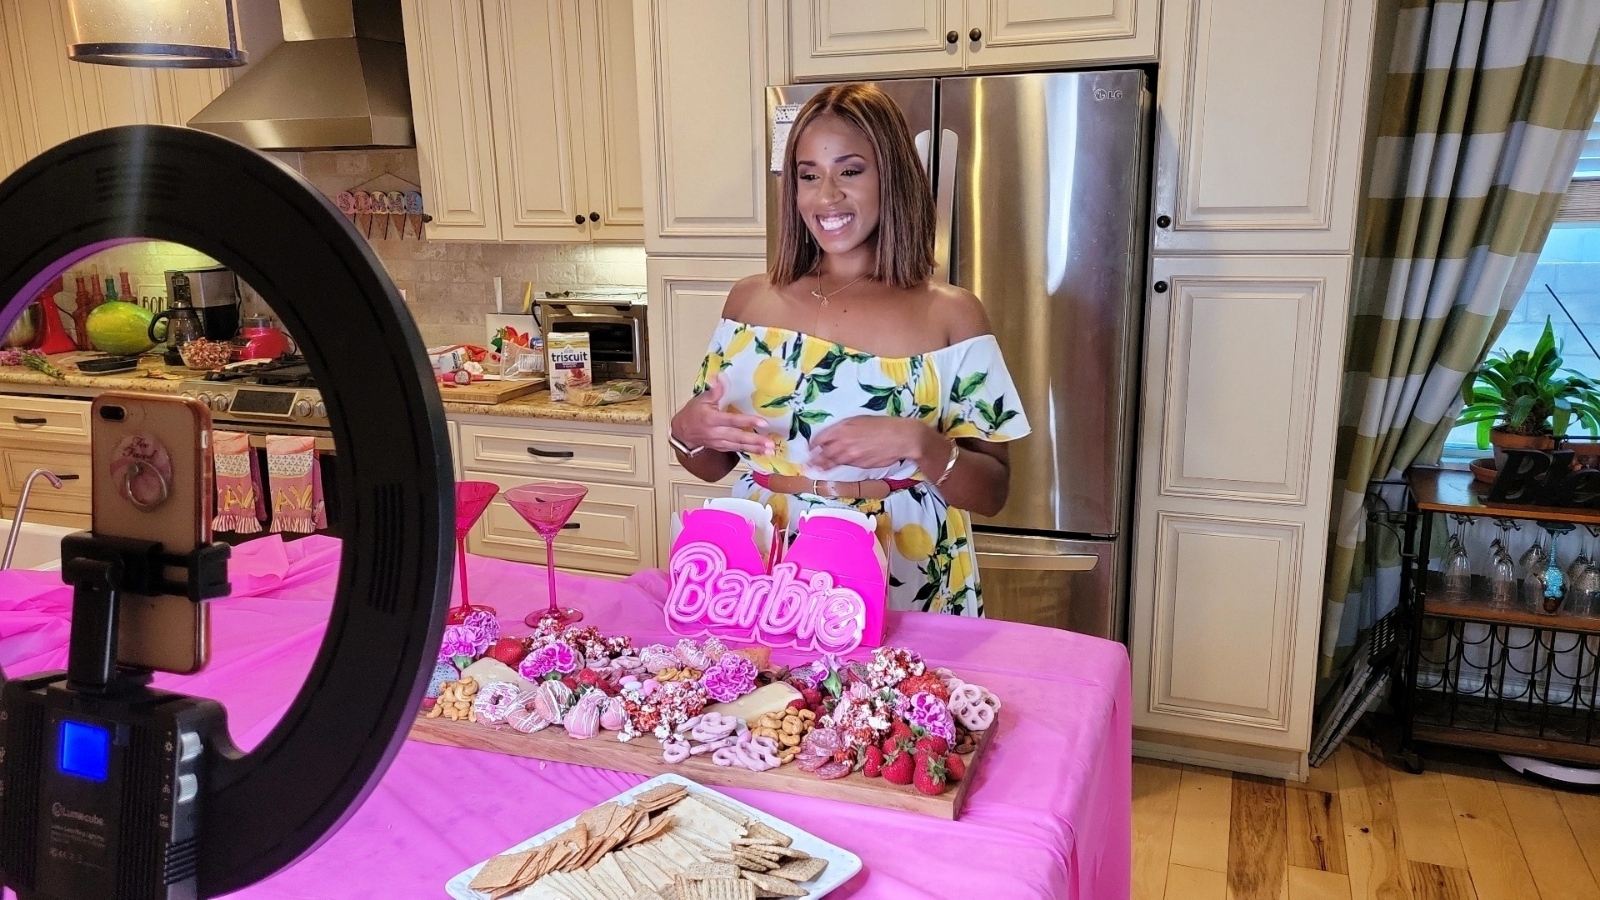
Still on a high from the release of Barbie the Movie, Parisian Barbie thought it would be a wonderful idea to create a Barbie themed charcuterie board. This plenary pink picking platter is great for pre-gaming before heading to the movie theater. It is full of flavorful food and is fast and easy to put together. I made my Barbie charcuterie board with all my favorite things including some scrumptious Barbie Popcorn. I even packed some snacks to go with me to watch the movie.
I decided to share instructions on how easy it is to make a Barbie or any type of charcuterie board below.
Also keep scrolling below for a SPECIAL TREAT!
Barbie Board
How to make a Barbie charcuterie board:
Start off with a large, fabulous board. Need help finding a board for your charcuterie? Grab an acacia wood cutting board from your local kitchen supply store or try an upgraded customized board for even more pizzazz.
Add your pink proteins to your board. I chose some small salami with deep pink colors and smoked salmon in rosettes.
Add your pink themed cheeses to your board. At my local grocery store I was able find some merlot infused and raspberry infused deluxe cheddar cheese. At my local grocery store I was also able to find some strawberry goat cheese. I then decided to roll the goat cheese log in ground freeze dried strawberries for even more pink color and flavor.
Add your fresh fruits. It’s summer so I used some fresh in season pink hued strawberries and raspberries. I dipped some of my strawberries in pink candy melts (the same ones I used for my Barbie Popcorn) for more variety. I also sliced up some dragon fruit I bought at a specialty grocery store. Dragon fruit peel is a bright pink and provides a great pop of color.
Add your favorite pink pickings (snacks). I added a variety of nuts including flavored almonds, pink/ white Jordan almonds and cashews. I also added some pink strawberry yogurt coated pretzels, mini pink strawberry donuts and of course, Barbie Popcorn.
Add your favorite florals. I found some bright fuchsia colored carnations to cut and place on my board. Fresh flowers just add another layer of color and texture to the board and provide a completely finished look.
Serve with your favorite crackers or toasted bread and beverages.
As you can see from my other posts and my personalized charcuterie board (pictured), I love quality handcrafted gifts and products. As a small business owner, I also love to promote other small businesses and their products. This summer I have teamed up with Unique Markets to GIVEAWAY tickets to their upcoming summer markets, so my friends and followers can score some amazing finds.
Please head to my latest Instagram post below to see CONTEST details and how to ENTER.
I have been preparing for this moment for quite some time. I first heard there was going to be a Barbie movie headed to the cinema sometime last year. Honestly, I didn’t have to adjust my mind for the movie as I am already Parisian Barbie in my head. My closet and my home is already full of pink decor. I even recently updated my wine bar last year to official Barbie stemware. As the movie approached what I needed to assemble was my Barbie ensemble.
Parisian Barbie has been busy with so much Barbie activity going on with the anticipation of the movie. A few months ago the World of Barbie was definitely a wonderful experience and so was the outfit.
Barbie the Movie is even more magical. I cannot wait to see Issa Rae and all the other Barbie characters on the big screen. I am ready for the show with my Barbie Popcorn and my complete outfit. My dress and accoutrements are giving all the Parisian doll vibes possible.
Please see my GRWM (Get Ready With Me) video and outfit details below
I am the self proclaimed Parisian Barbie. I happily gave myself this title because I thoroughly enjoy most things French, super girly and colored bright pink. I didn’t realize how much stuff that I accumulated full of that rose hue. I love pink because it’s such a lively and joyful color. I can’t help but smile on the inside when I see the color pink.
In my World of Barbie post, I explained my connection and adoration for Barbie. The Christie Barbie, a black Barbie, as a child gave me the aspiration to succeed in anything I wanted. Barbie’s fashion also was something to aspire for. Barbie is anything she wants to be and she absolutely owns everything! Barbie remains a huge influence on my daily transcendence and taste.
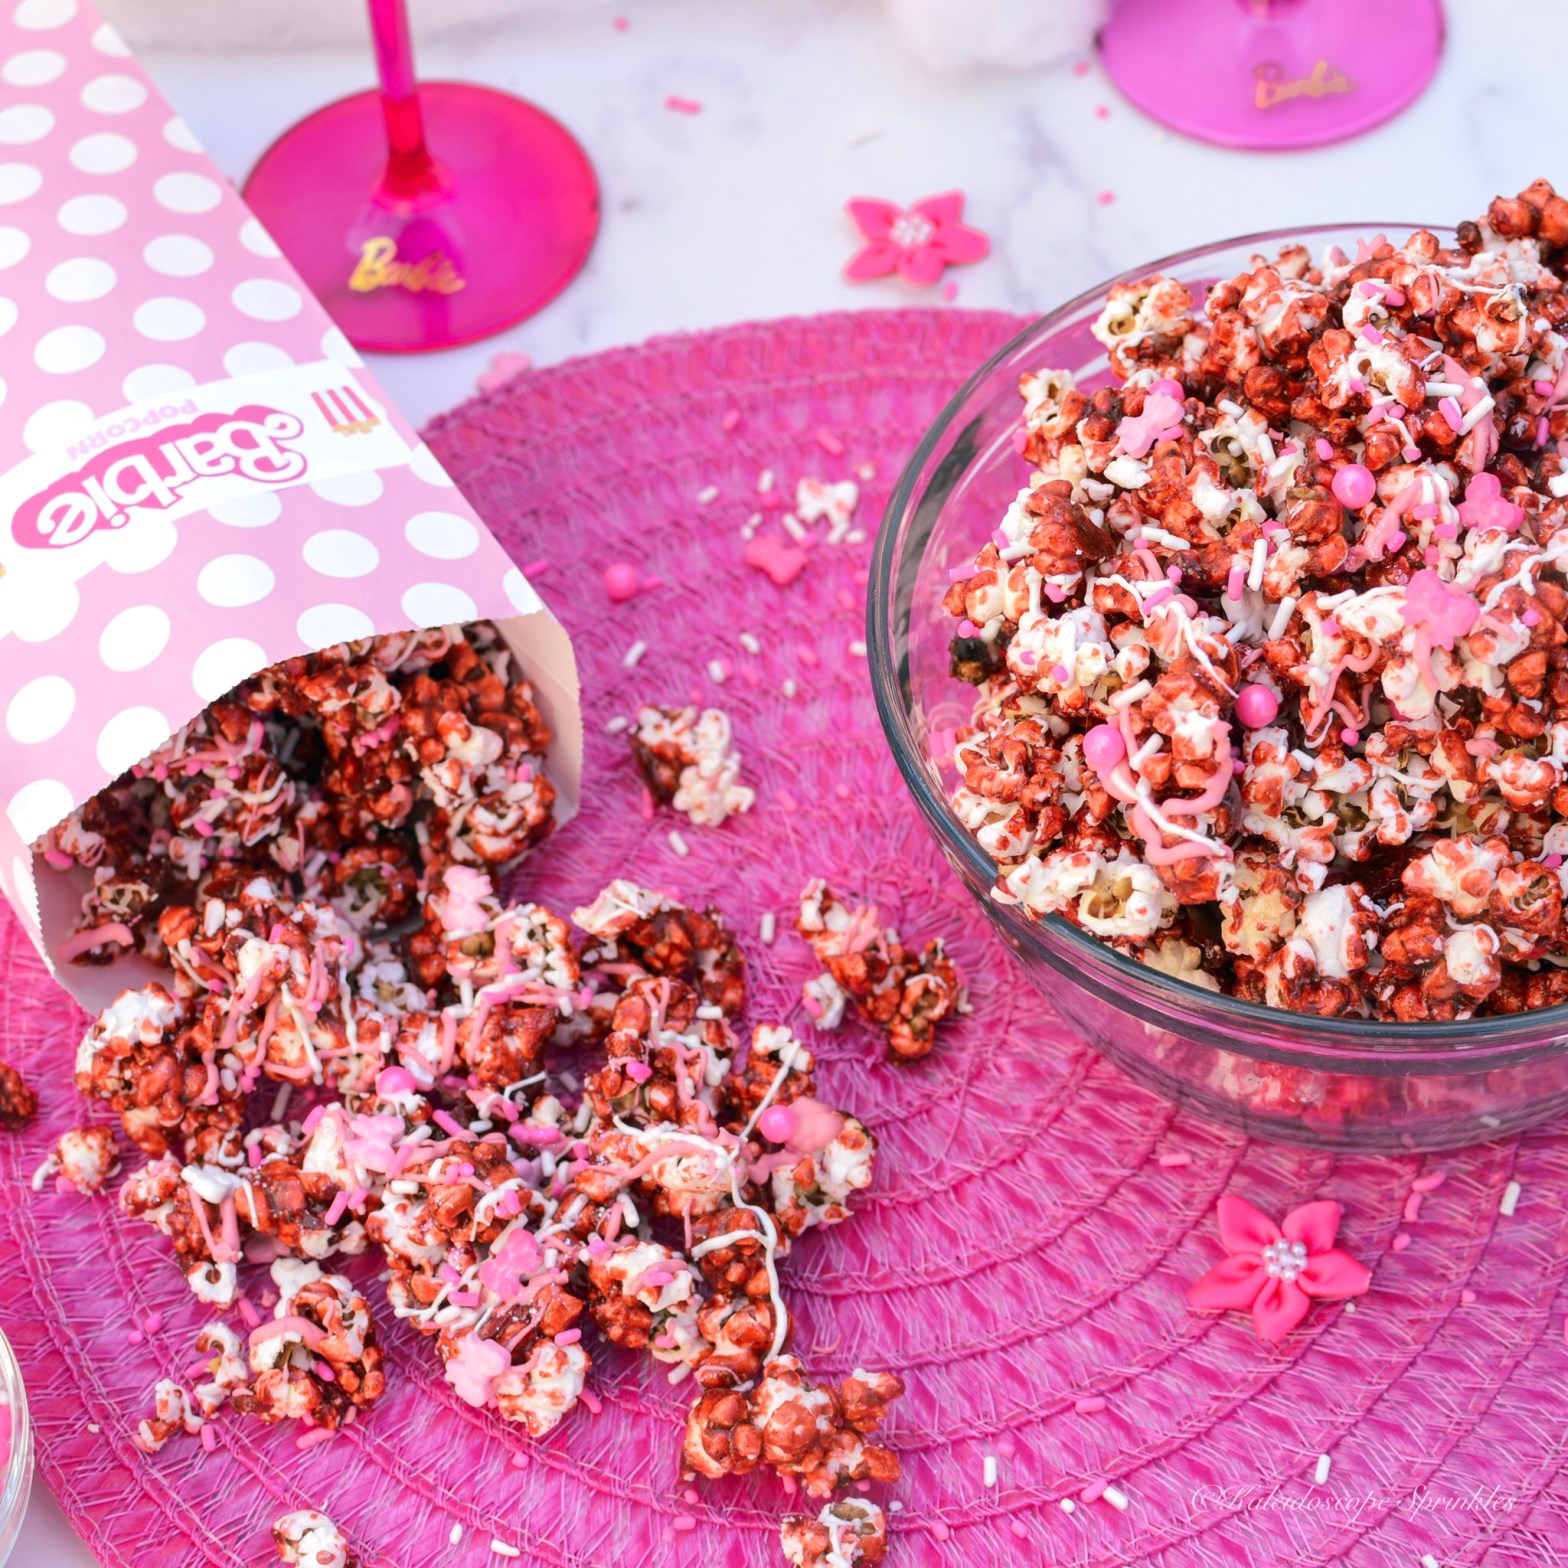
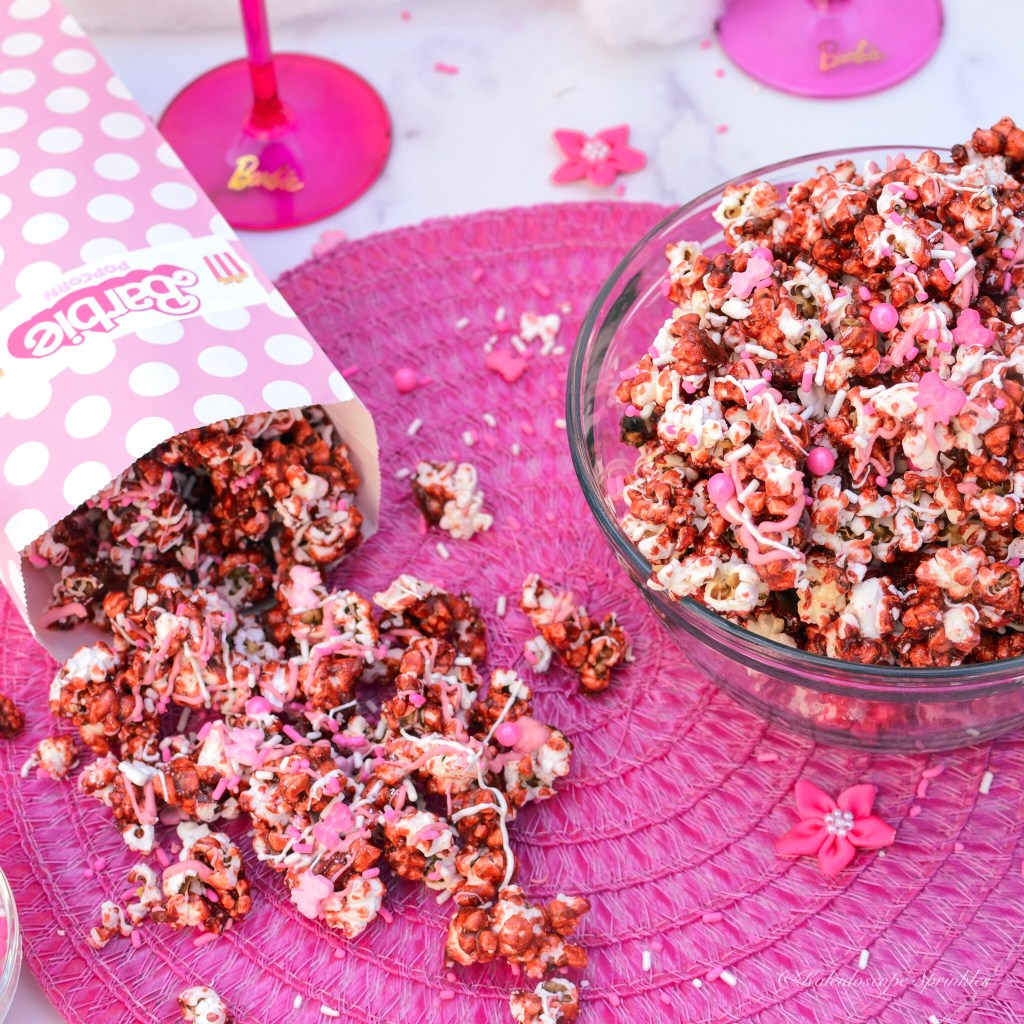
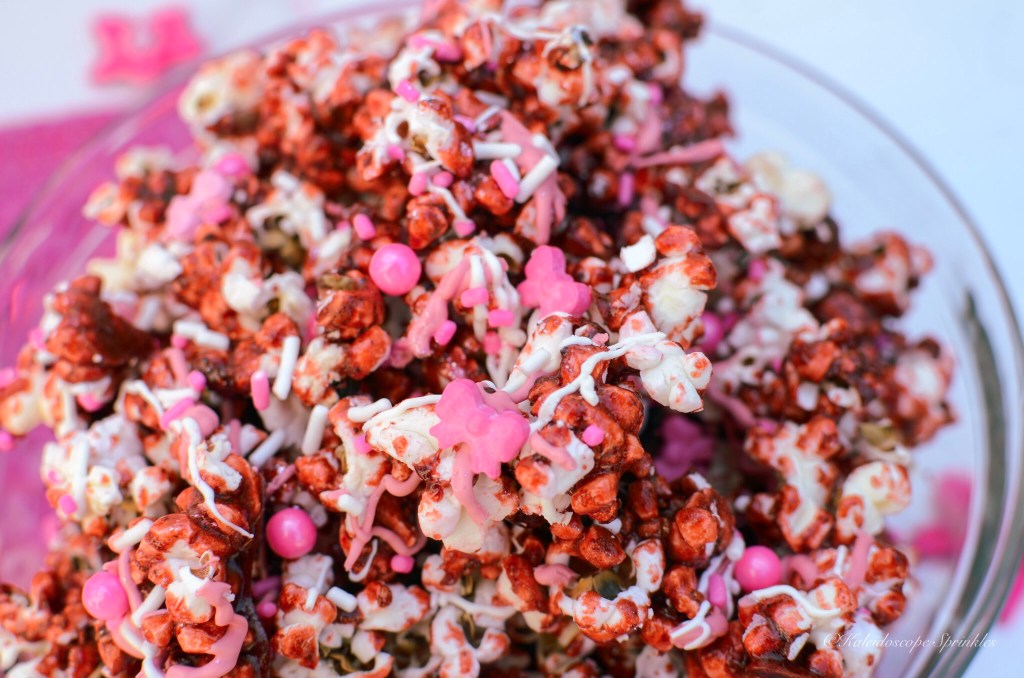
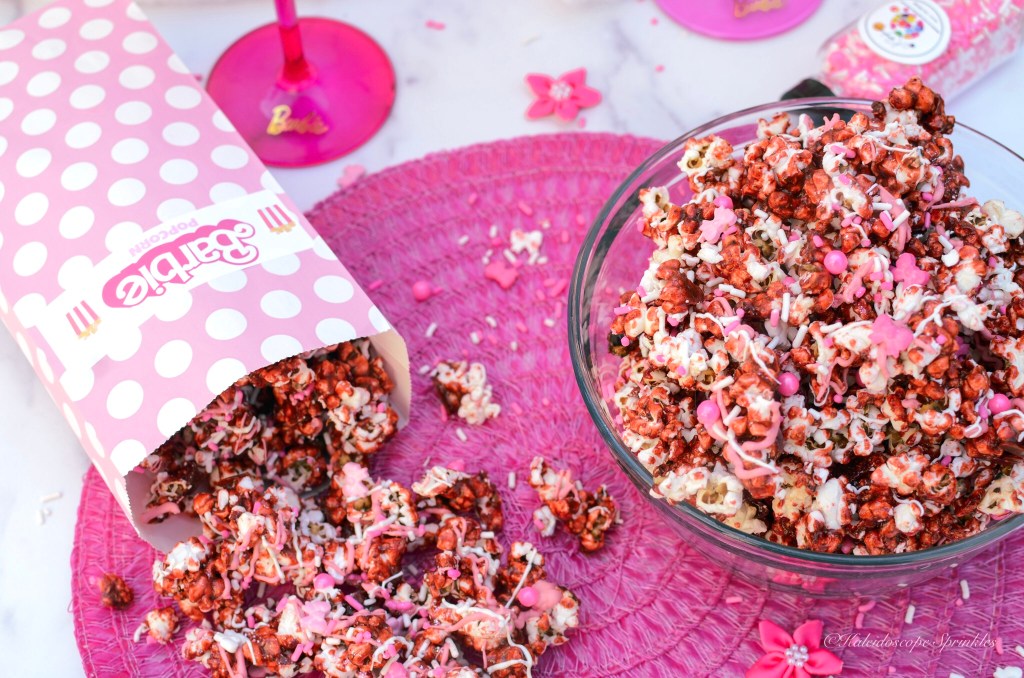
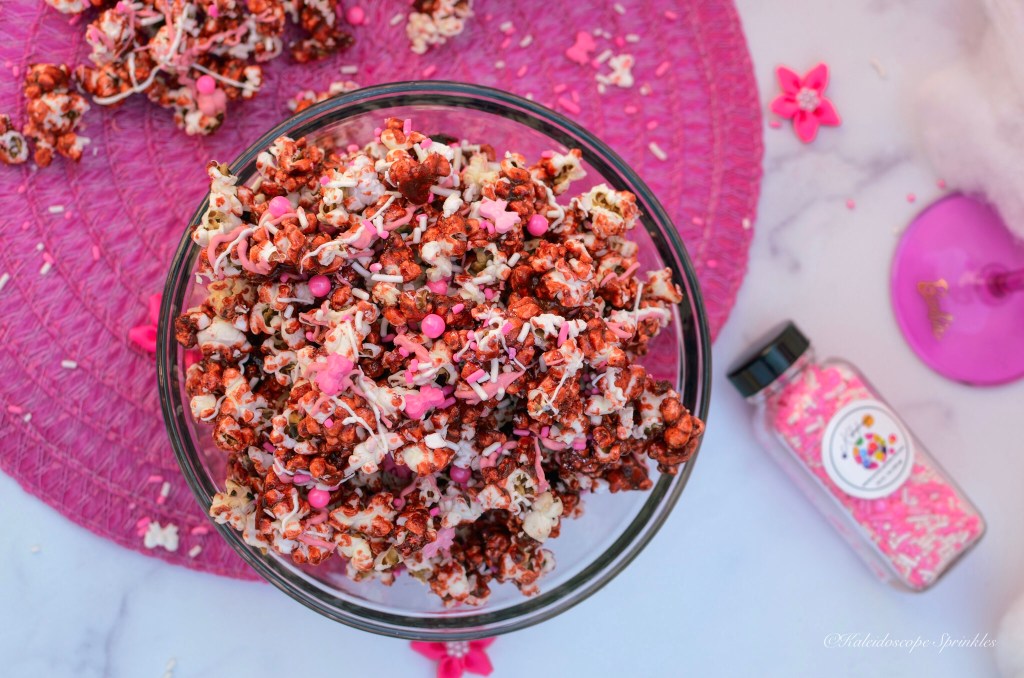
The anticipation of the Barbie Movie has me eagerly excited for more pink and plastic. I have already planned my ensemble for my personal movie premiere from head to toe. I couldn’t just show up to the official Barbie Movie as Parisian Barbie with just an outfit. I had to take this special day one cute little tip top step further. I decided to make own special Barbie popcorn to match the feature film as well as my fashion.
Barbie popcorn is a very tasty snack and is covered with magenta raspberry caramel. The colorful corn is then topped with flamingo pink and white candy melts for even more pink protrusion. If that wasn’t enough I added a custom Perfectly Pink Sprinkle Mix from Kaleidoscope Sprinkles with even more Barbie behavior. I loved how the popcorn came out when I finished. It’s definitely thee snack for Barbie, myself and everyone else to enjoy.
Please see my Barbie Popcorn recipe below. I hope you get a chance to make some for yourself for your Barbie movie celebration.
See the complete video and recipe below
Ingredients
1 cup popcorn kernels, 6 quarts popped popcorn
1 cup (8 ounces) unsalted butter
1 1/2 cups granulated sugar
1.25 oz (½ cup finely grounded) freeze dried raspberries (or strawberries)
½ cup light corn syrup
1 tsp. baking soda
1 tsp. kosher salt
Pink and white candy melts, for decoration (optional)
Pop popcorn kernels using your style preference. ( I used my StirCrazy popper but stovetop works as well)
Preheat oven to 250-degrees F.
Add popped popcorn to a large bowl and set aside.
For the caramel: Place the freeze dried raspberries in a food processor and grind into a course powder.
In a large saucepan, add butter, granulated sugar, raspberries and corn syrup. Stir ingredients together on medium heat until butter has melted. Allow caramel to boil 5 minutes without stirring. Remove from heat.
Carefully stir in salt and baking soda.
Pour mixture over popcorn and fold to coat and combine. Divide popcorn onto two large baking sheets and spread evenly into single layers on sheets. Bake at 250 F for 30 minutes, rotating pan and mixing popcorn halfway.
Allow popcorn to cool completely. Use your hands and break up popcorn kernels.
Drizzle candy melts on top. Immediately sprinkle pink sprinkles on top along with pink edible glitter.
Break apart popcorn again. Serve right away or store in airtight containers for up to one week.
Happy National Ice Cream Day! Here we are in the middle of July and Los Angeles is finally starting to feel like summertime. This week has been extra warm and I have been throughly enjoying basking in the sun. Ice cream is a great way to cool down during this time of the year, when the hot days are consecutive and a break is needed. I honestly though eat as much ice cream as you would think.
Let me be clear, I enjoy that creamy confection that is gobbled up by the gallons by millions of fans. My favorite flavor of ice cream is actually cookies n cream to be clear, it’s just not featured much on my palate . This may come off as bougie, but I try not to eat ice cream here in the US because is just not that good. US ice cream, if not premium quality, is usually filled with chemicals and unknown substances that I dare not know. When it comes to food we all know fresh is best, so I try and save my ice cream experiences for overseas.
Last month while I was in Belize enjoying my birthday vacation, I decided not only to enjoy some ice cream but to make some as well. I actually made ice cream out of bananas, also known as ‘nice cream.’ This idea came to me while in Belize after receiving too many ripe bananas from our lodging accommodations to eat for breakfast. The kitchen where I stayed was equipped with a blender, so I tossed the bananas in with some previously purchased coffee creamer. After letting the nice cream freeze for a few hours, dessert was done. The nice cream came out delicious and tasted just like frozen banana pudding. The only thing missing were some Kaleidoscope Sprinkles to make it pop.
This was my first time making nice cream, but I definitely will be enjoying this recipe again this summer. If you’re looking for another cool treat to enjoy this summer I suggest giving this simple enjoyable recipe a try. It’s super light, refreshing and so easy to make.
See recipe and ice cream from all over the world below.
Banana Pudding Nice Cream
Ingredients
5-6 medium ripe bananas
¼ cup of Vanilla Cannoli flavor or your favorite coffee creamer
Happy Bastille Day! July 14th marks Fête nationale française or The French National Day. This day serves as an important moment in French Revolution history. This day is a major celebration for France along as other countries and is filled with much pomp and circumstance. I avoid Paris and most of Europe during the summer months, so I’ve never had the opportunity to experience this holiday in person.
This year I am not letting my distance from France stop me from representing for Bastille Day. I was able to find some events happening throughout the LA area via Frenchly that are serving fares la fête for said occasion. I also discovered that Beverly Hills’ sister city is Cannes, France (who knew?).
I could not head out into these LA streets for Bastille without a little French flare. French fashion is about confidence, tailoring and clean aesthetics. This red, white and blue ensemble stands for my Parisian style with a dip of LA flare.
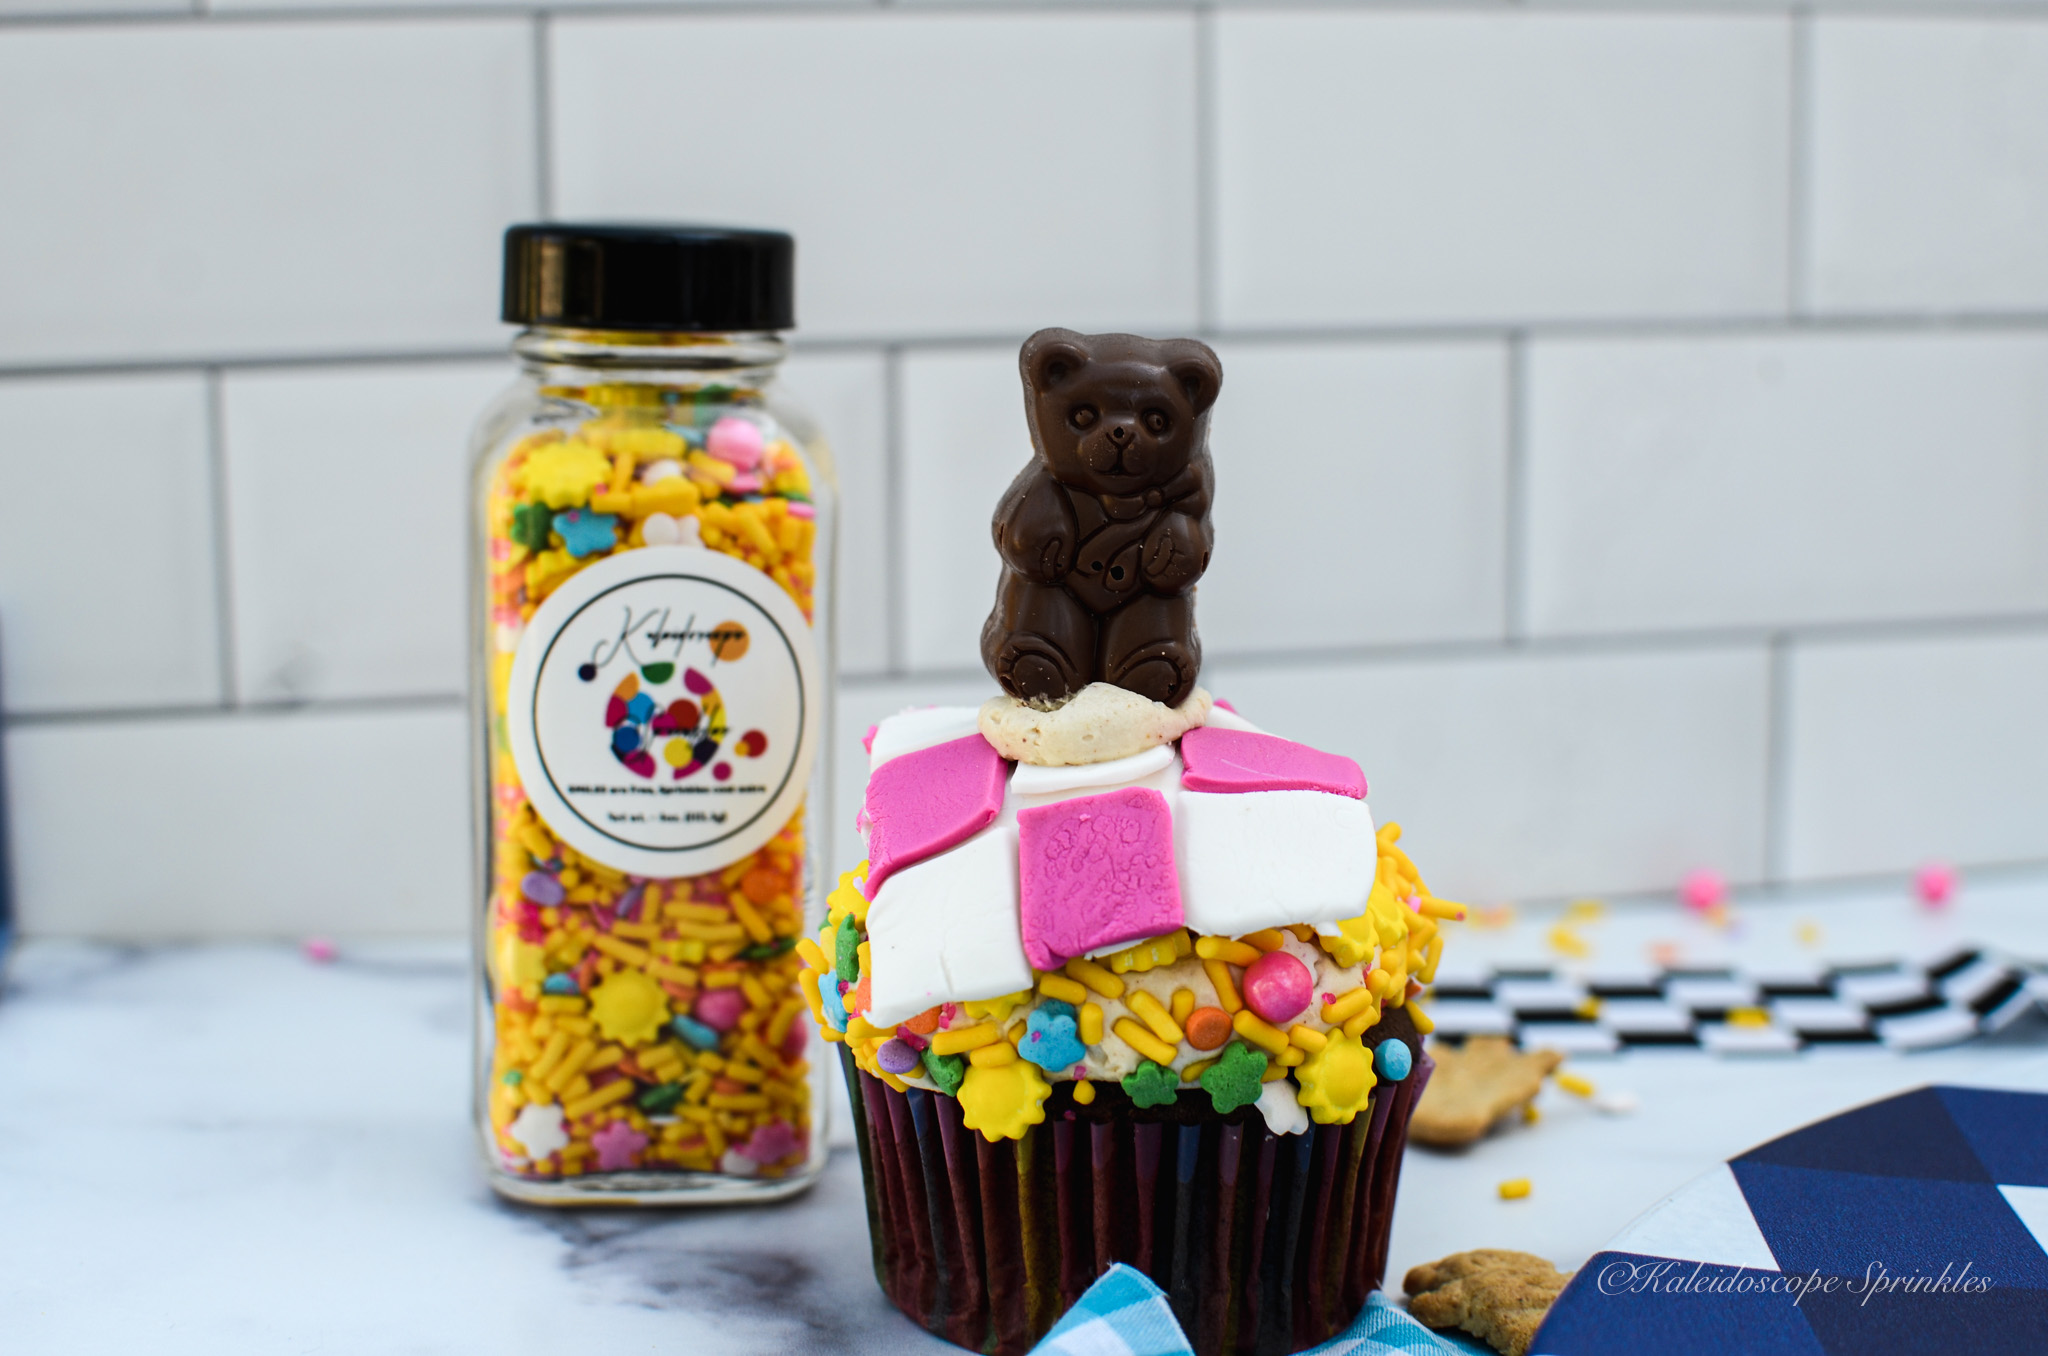
“If you go out in the woods today, you’re sure of a big surprise.” As a child, I was exposed to a variety of music. From classical music to gospel music, I had the opportunity to listen and learn from a plethora of genres. I still remember the first time I heard the song Teddy Bear’s Picnic. My favorite version is a classic rendition sung by Anne Murray. The idea of children’s stuffed animals from all over the globe coming together in the forest for a feast fascinated me. Every kid dreams of their toys having their own reality and coming to life. The thought became even more “realistic” to me at the age of 6 after watching a Teddy Bear Picnic cartoon movie.
As an adult, I strive to serve and heal my inner child. Every year that I remain on this earth, I further discover the important connection of music and my happiness. Teddy Bear’s Picnic still holds a special place in my heart, because it allows my imagination to blossom and explore youthful expression. This idea and adolescent admiration is clearly very important to many others, since there is a national holiday to celebrate. Today is unofficially National Teddy Bear Picnic Day.
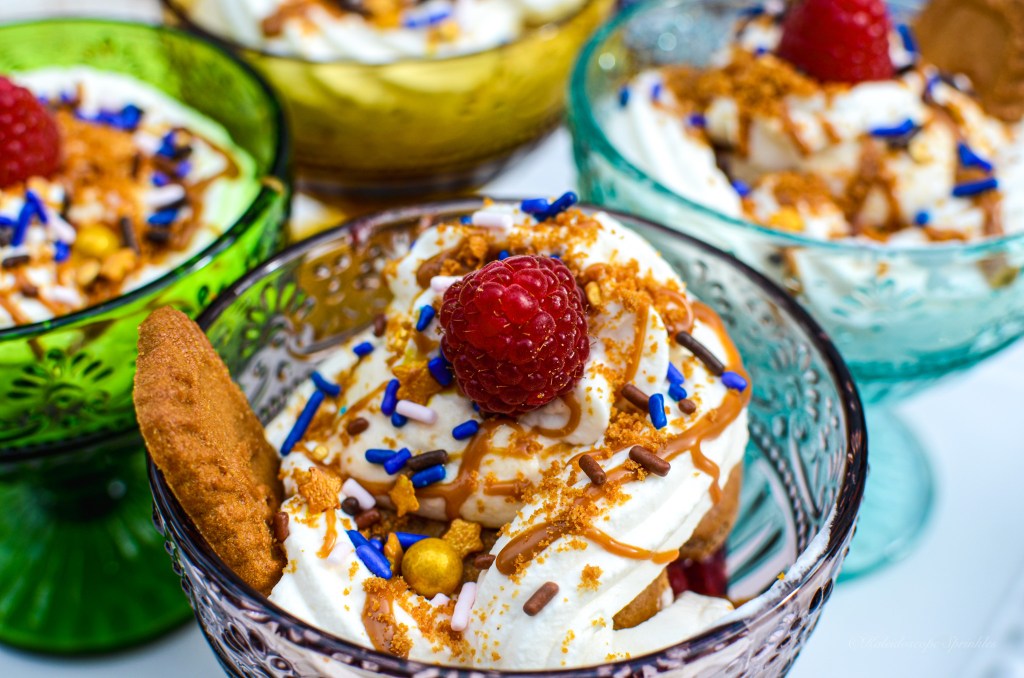
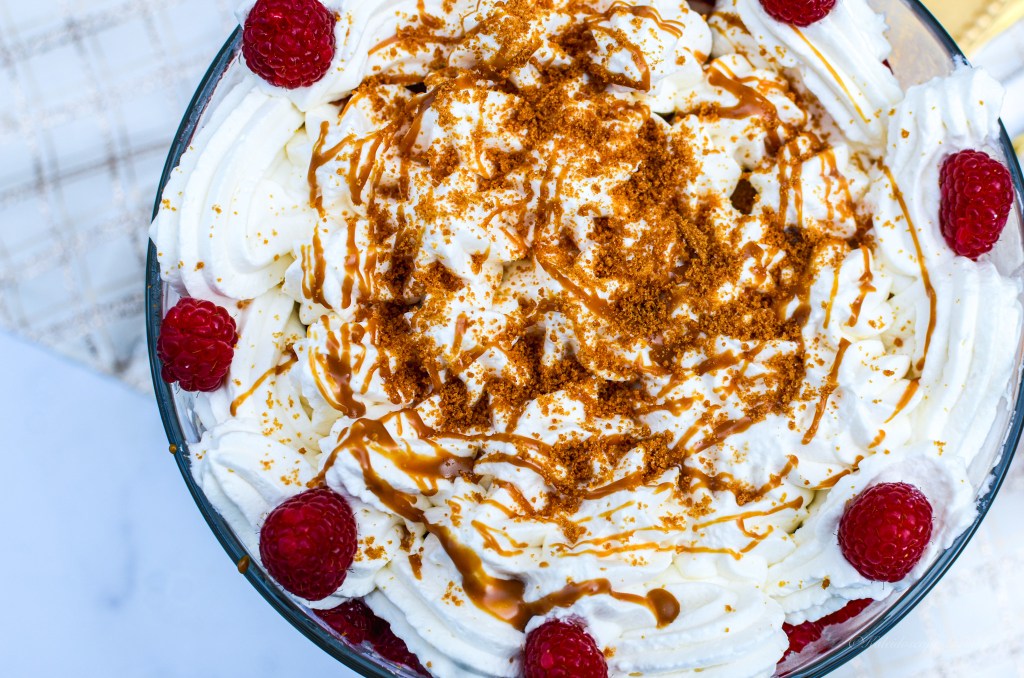
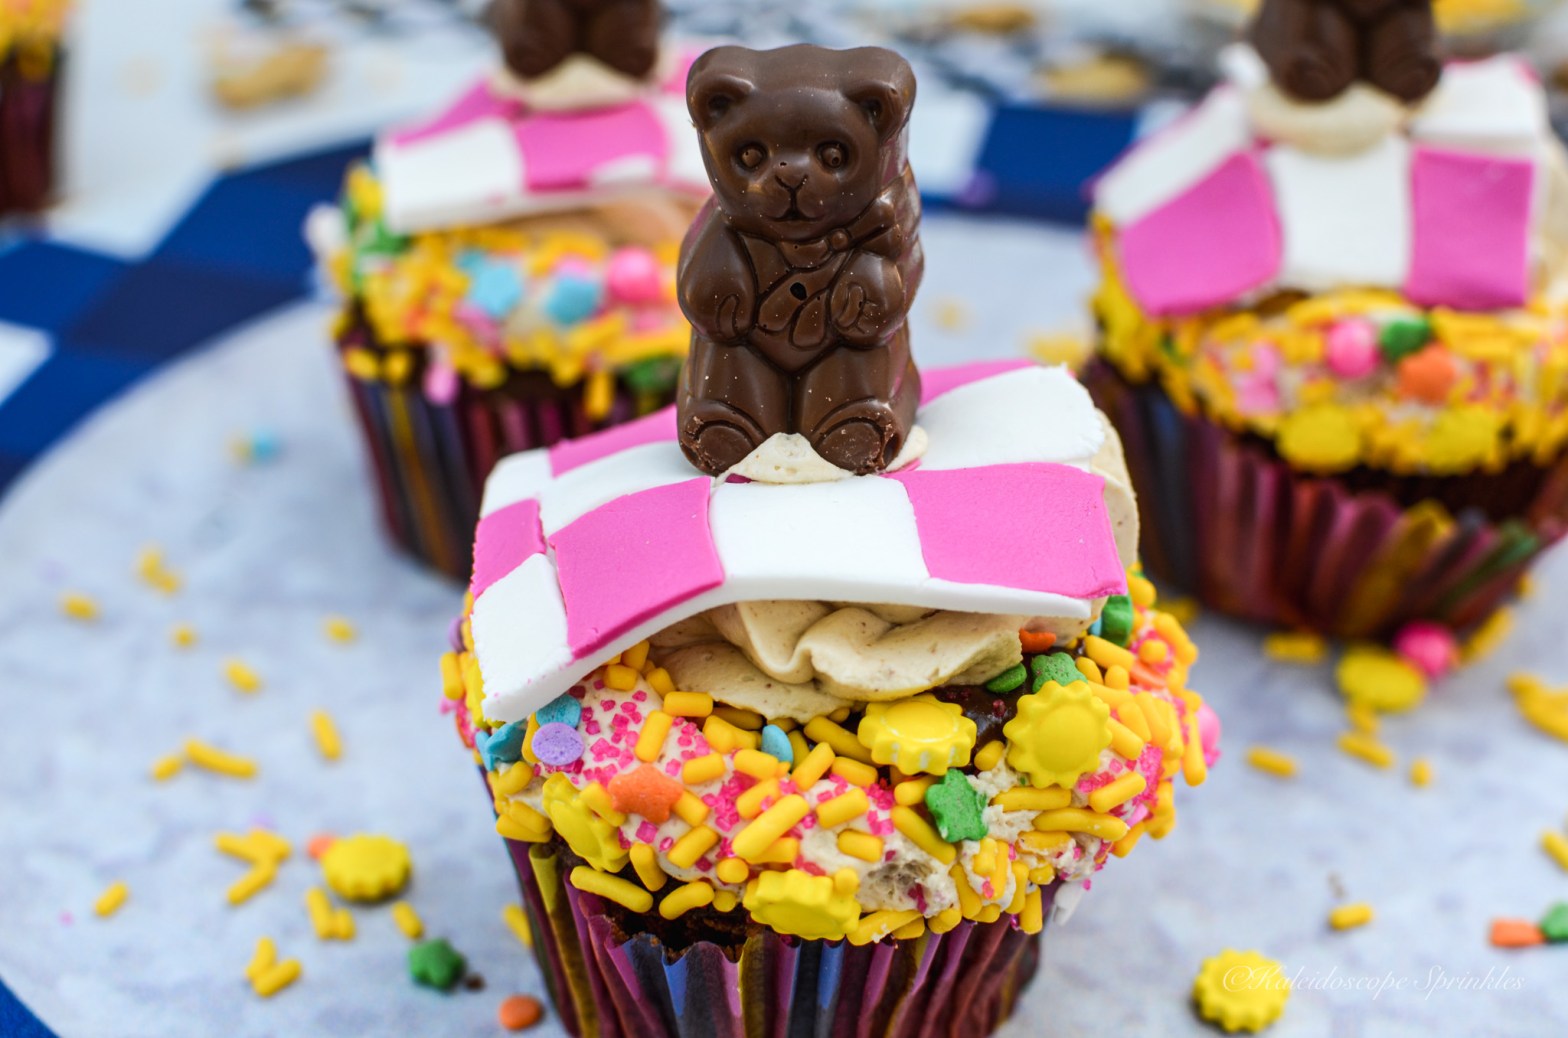
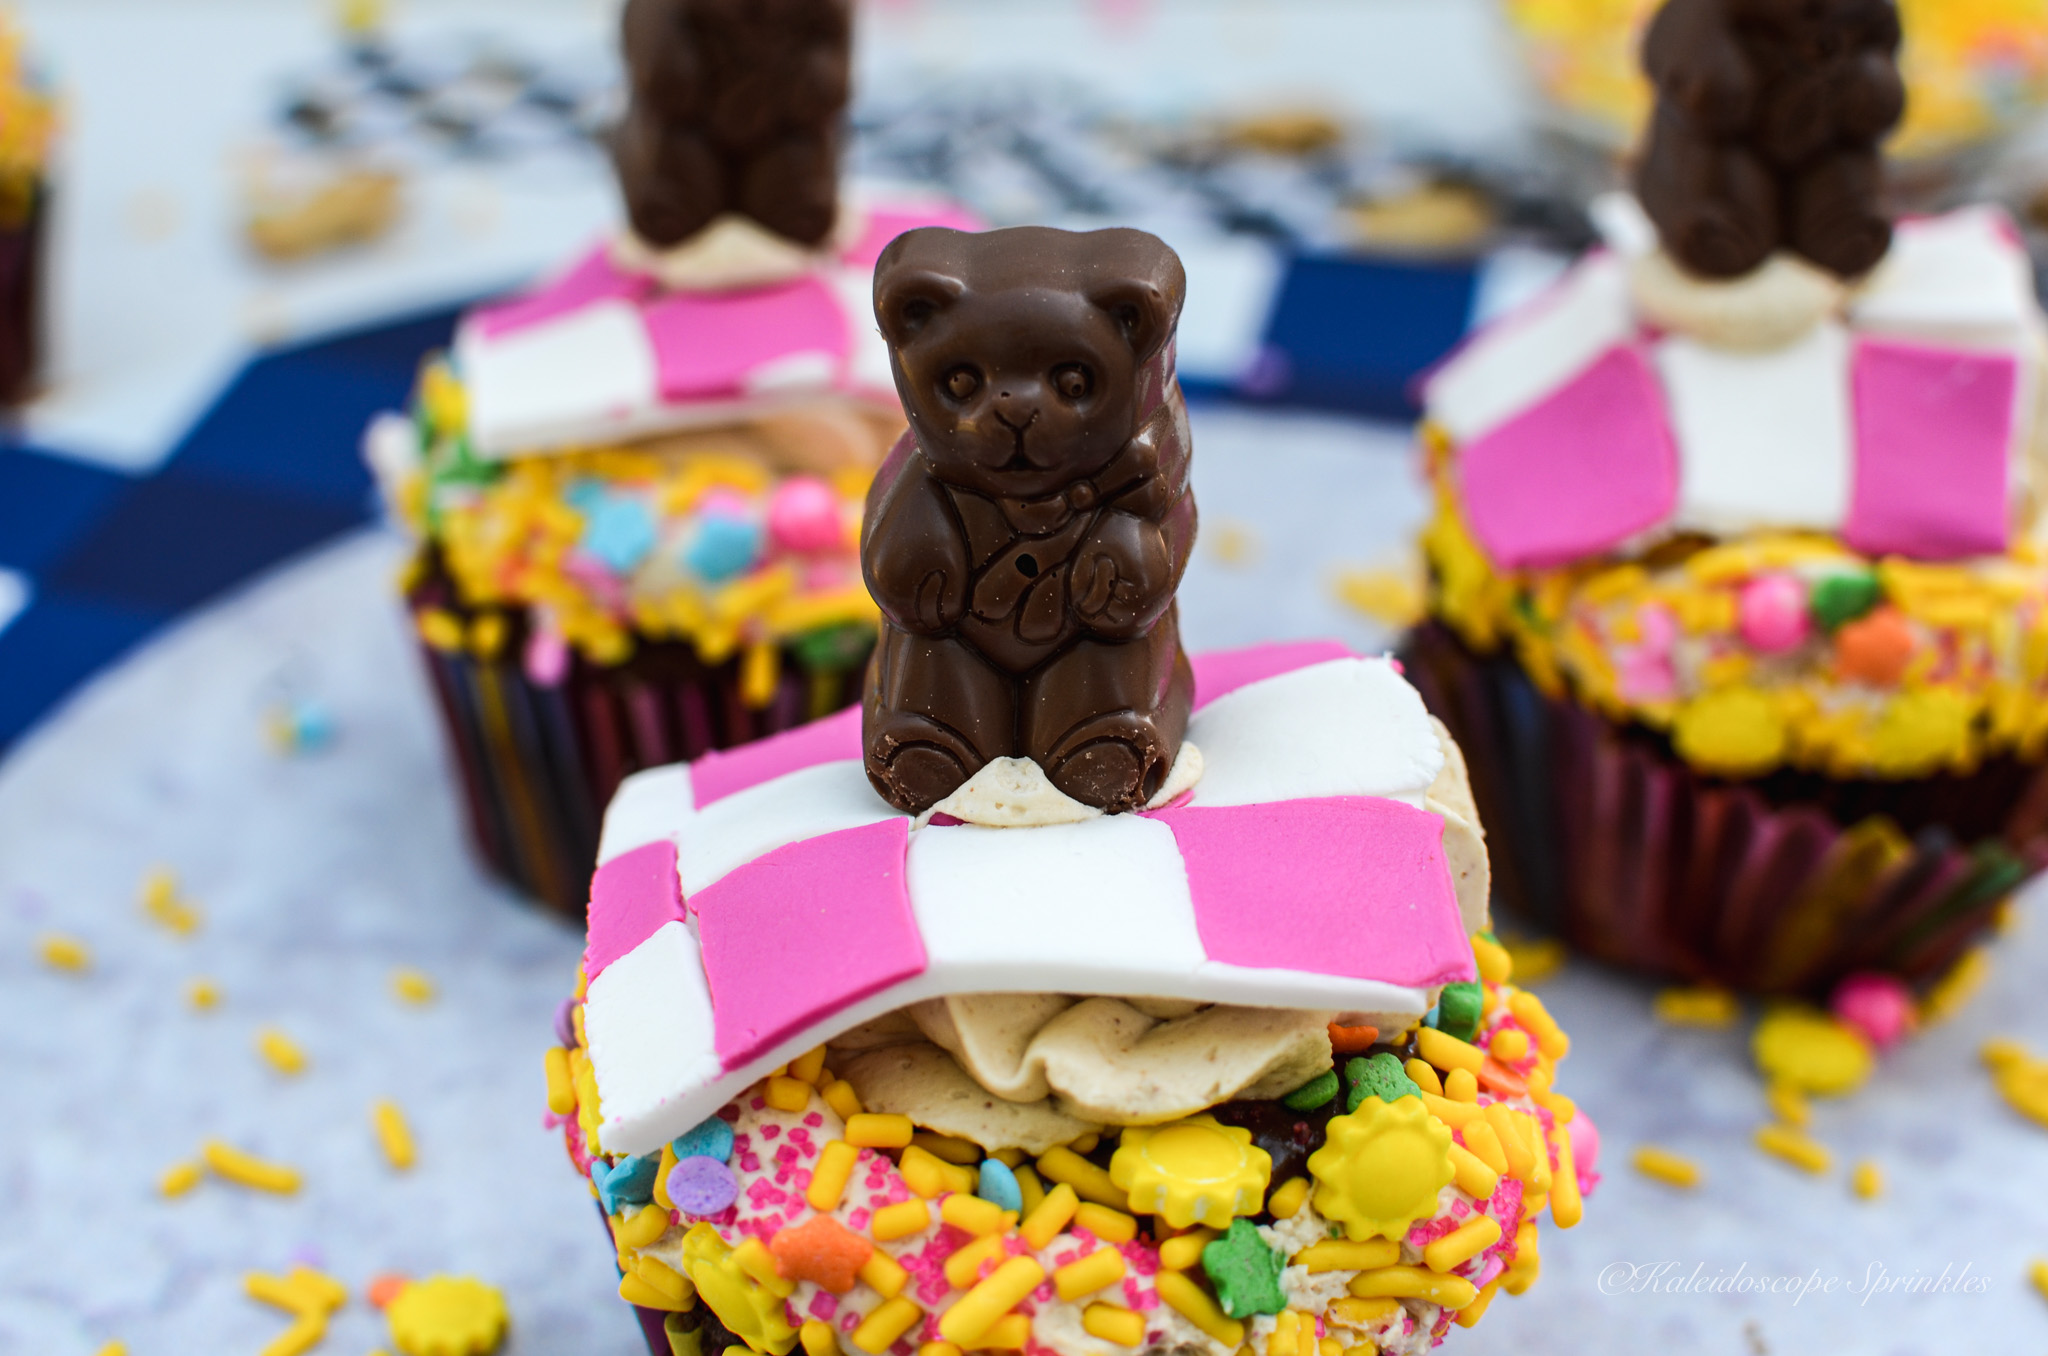
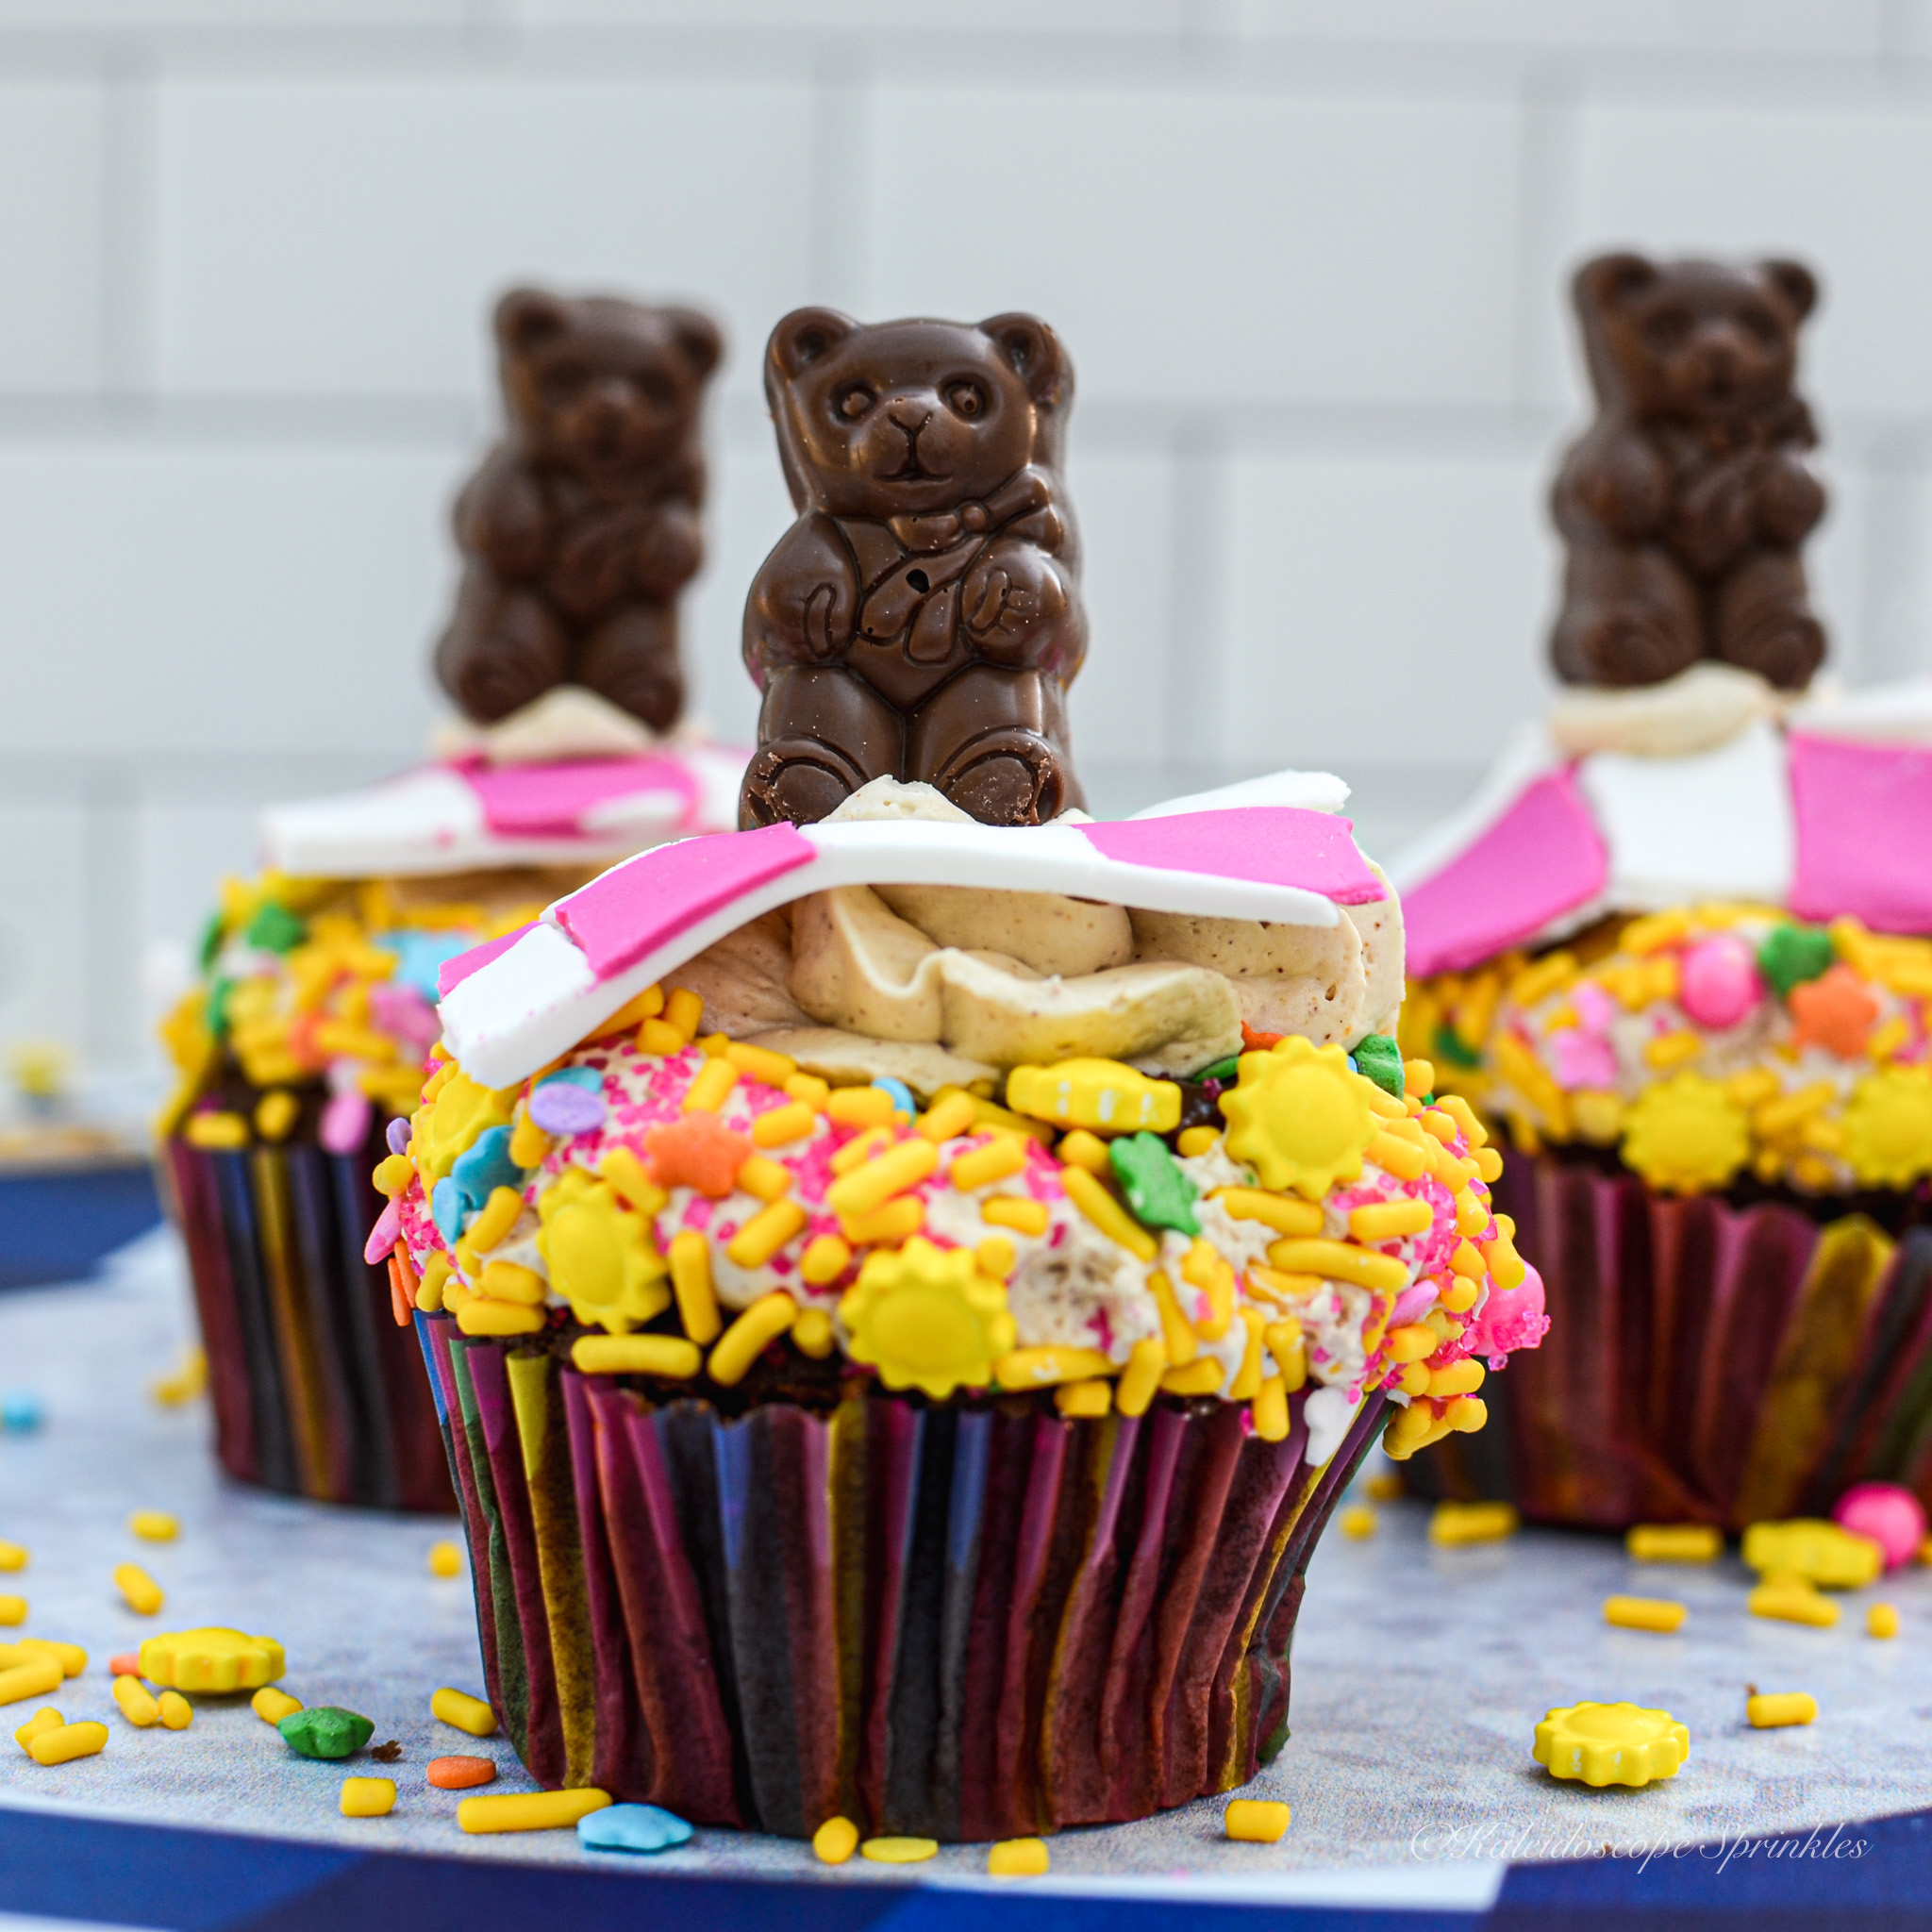
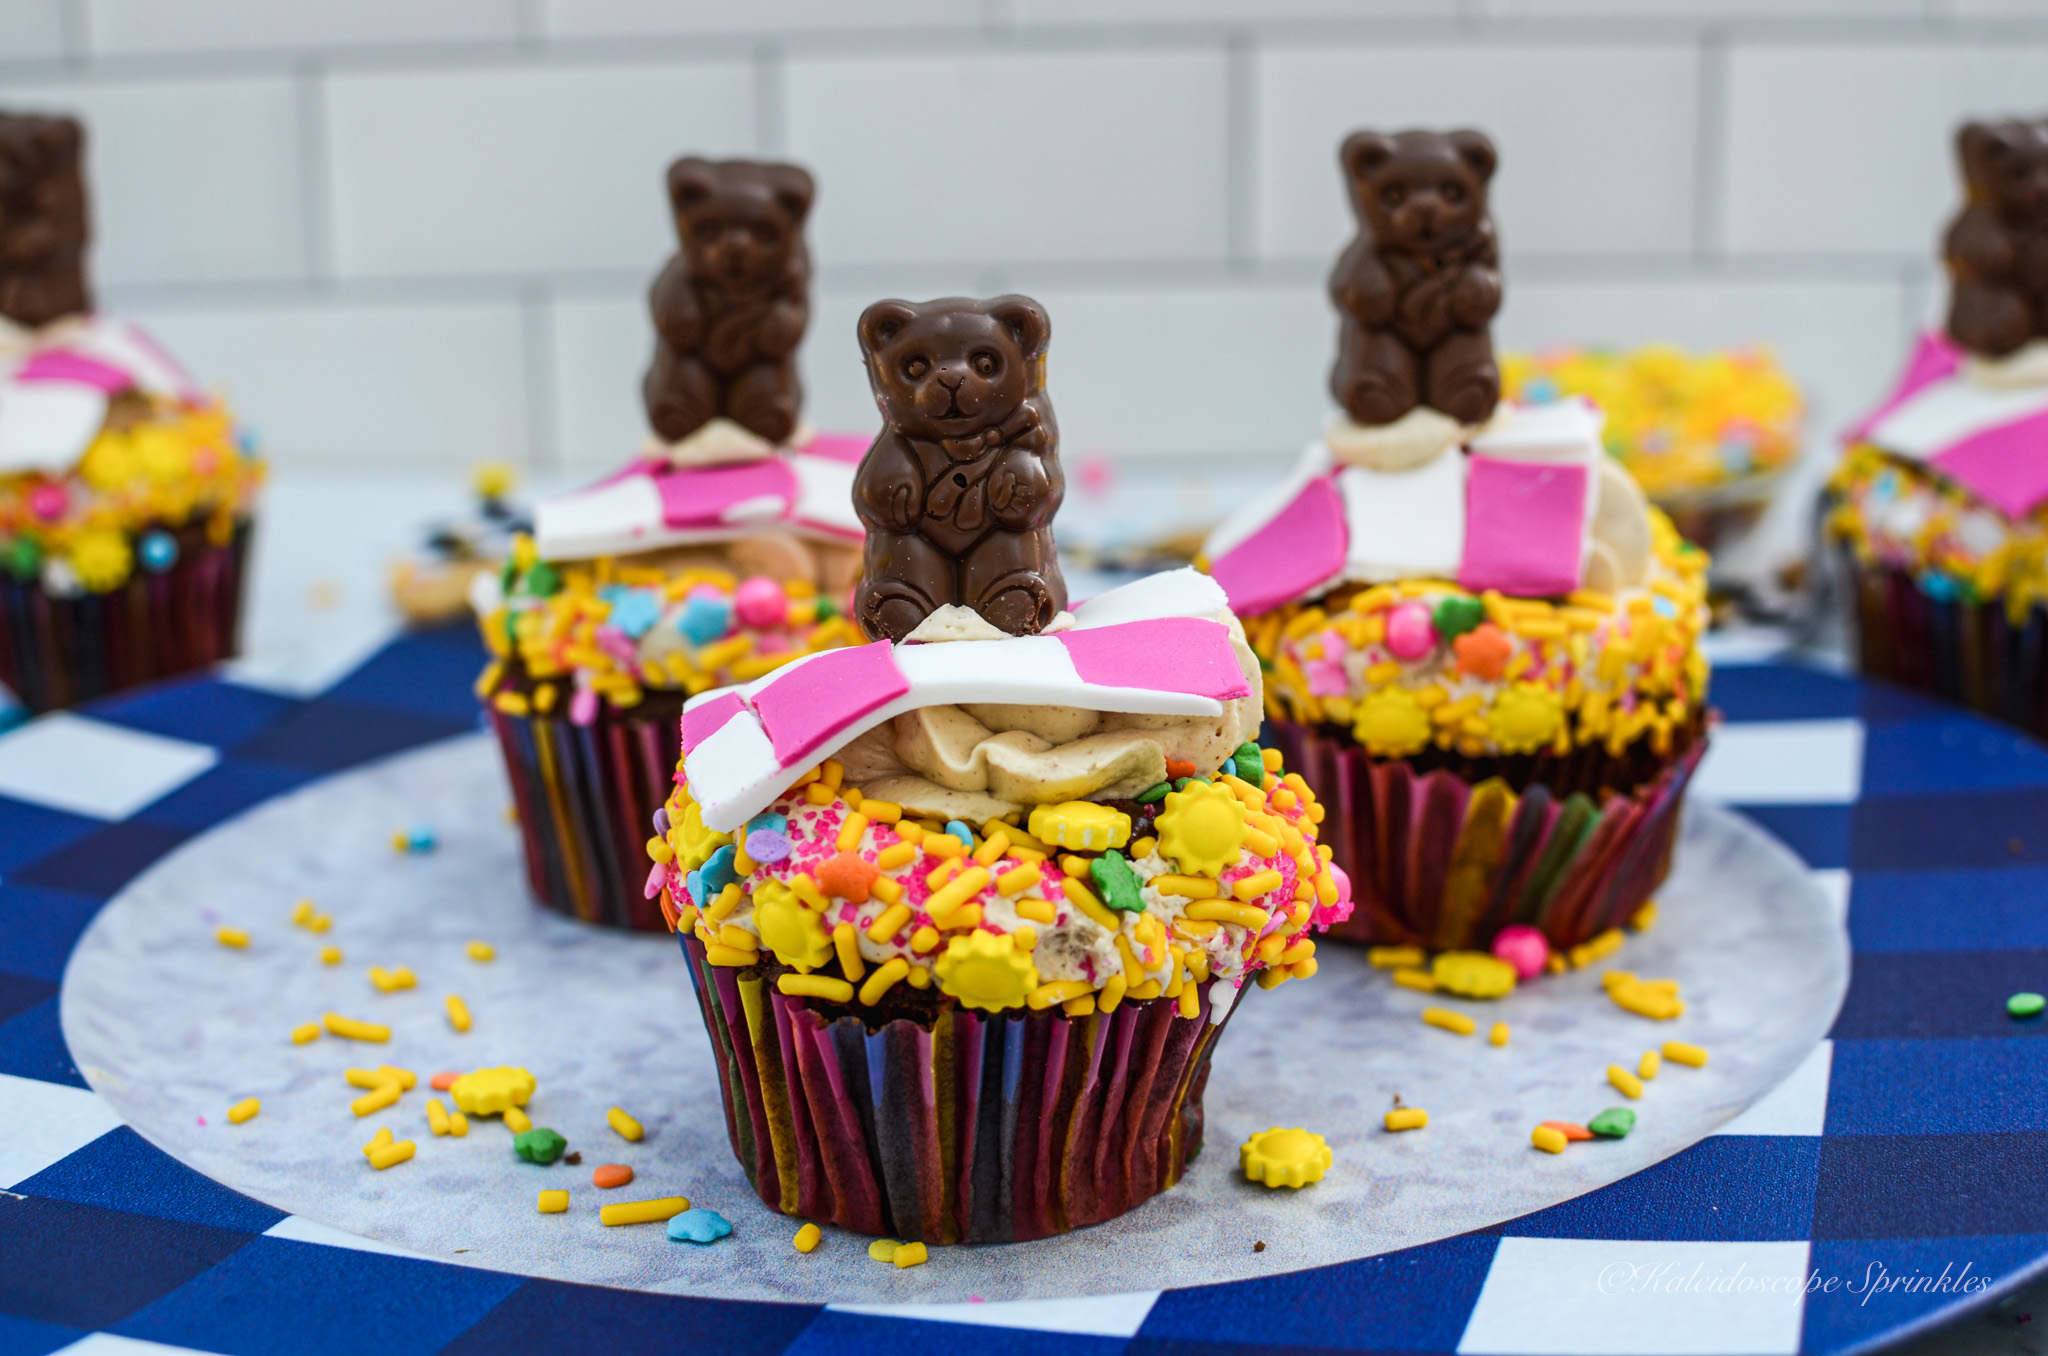
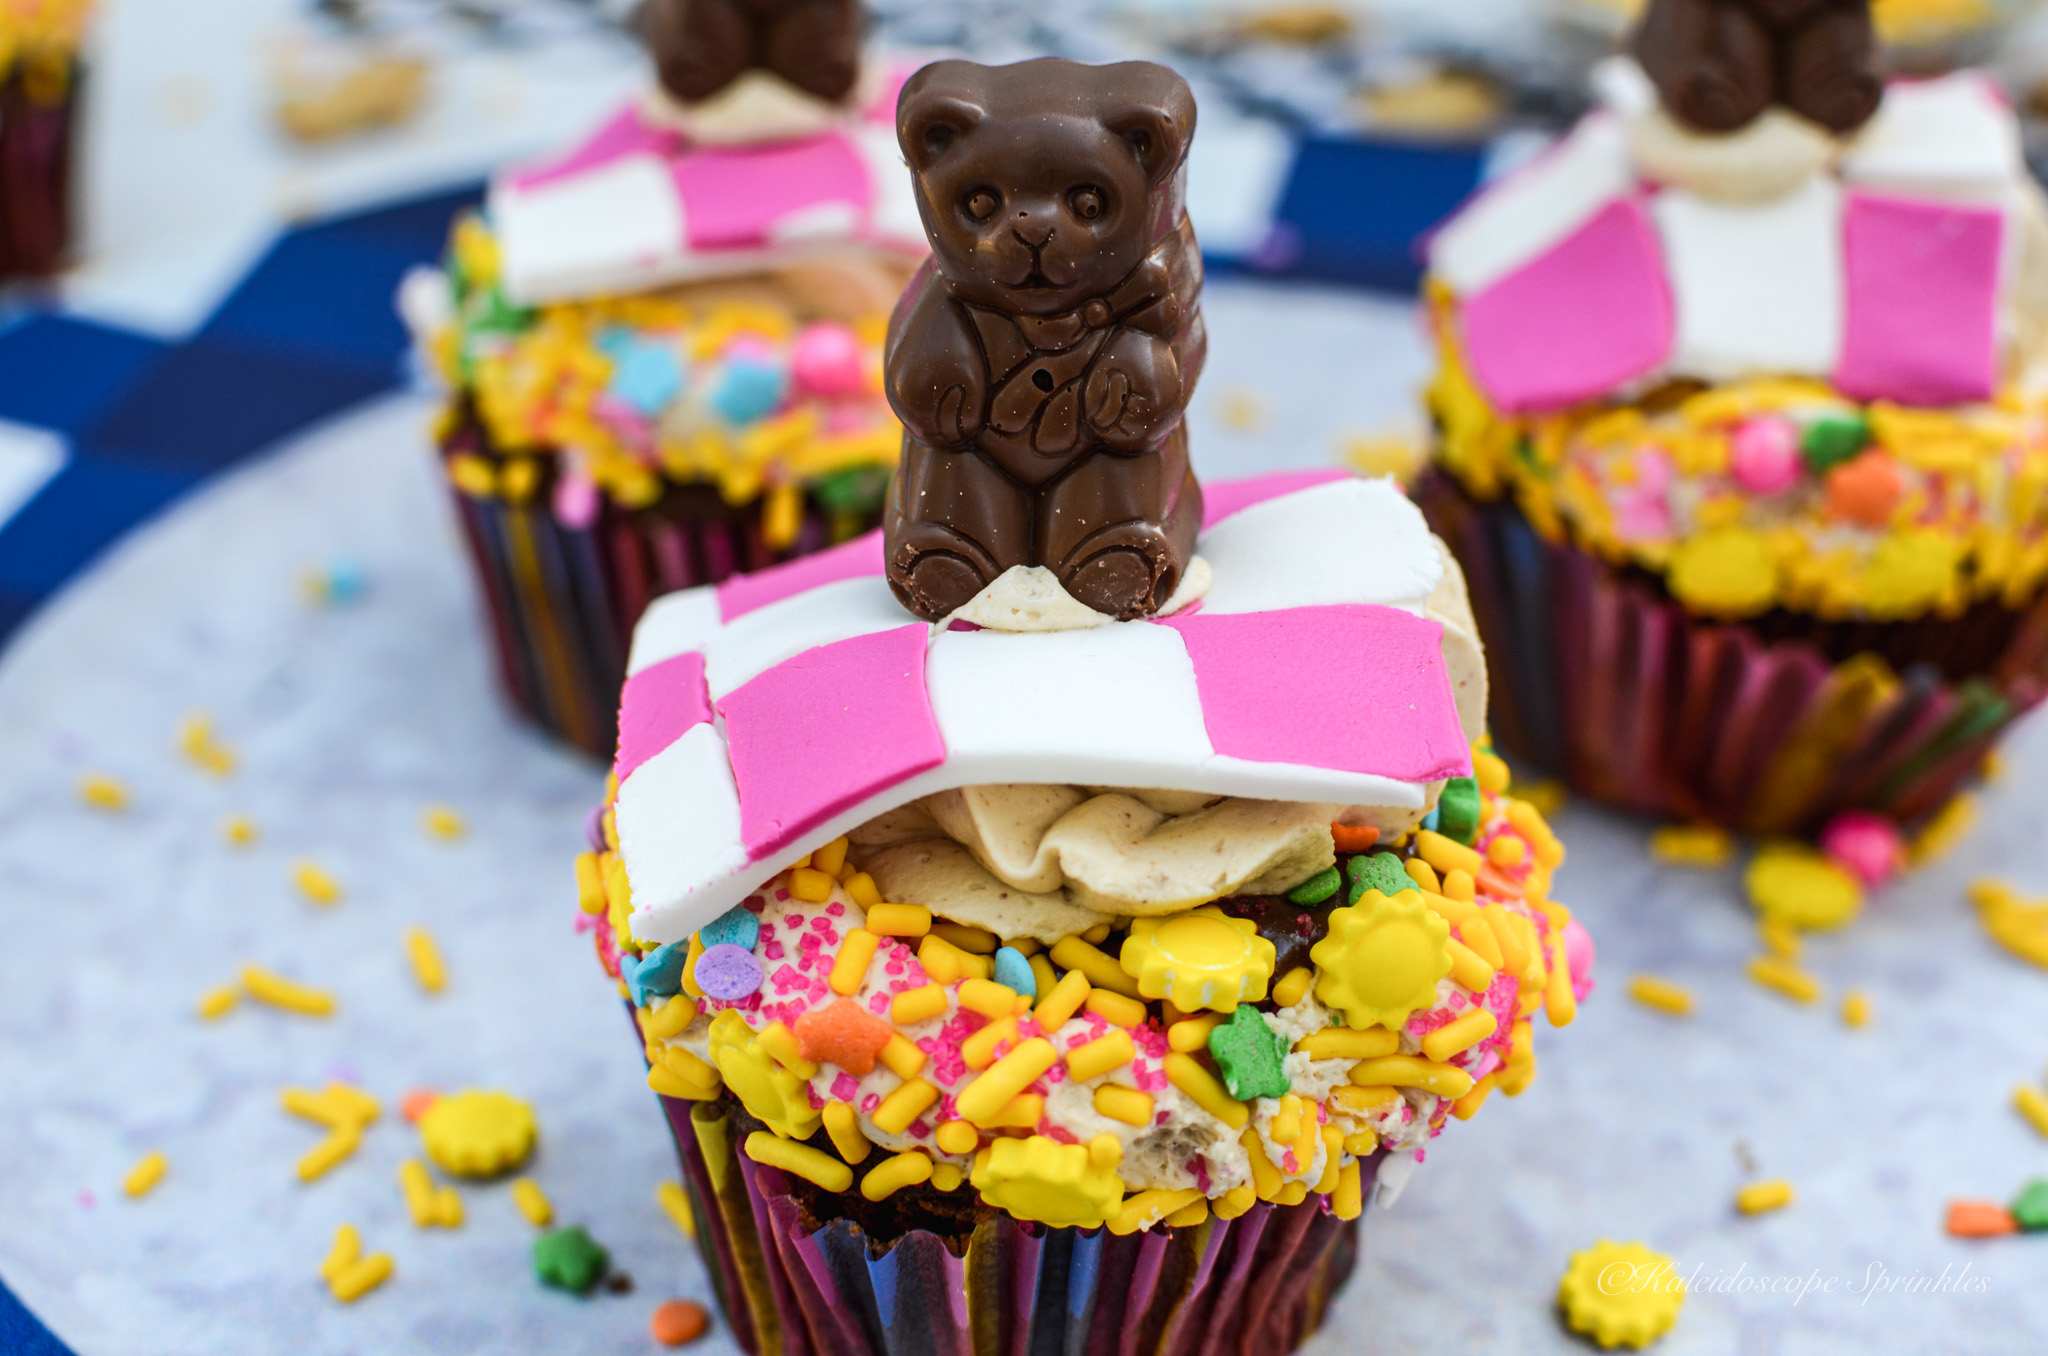
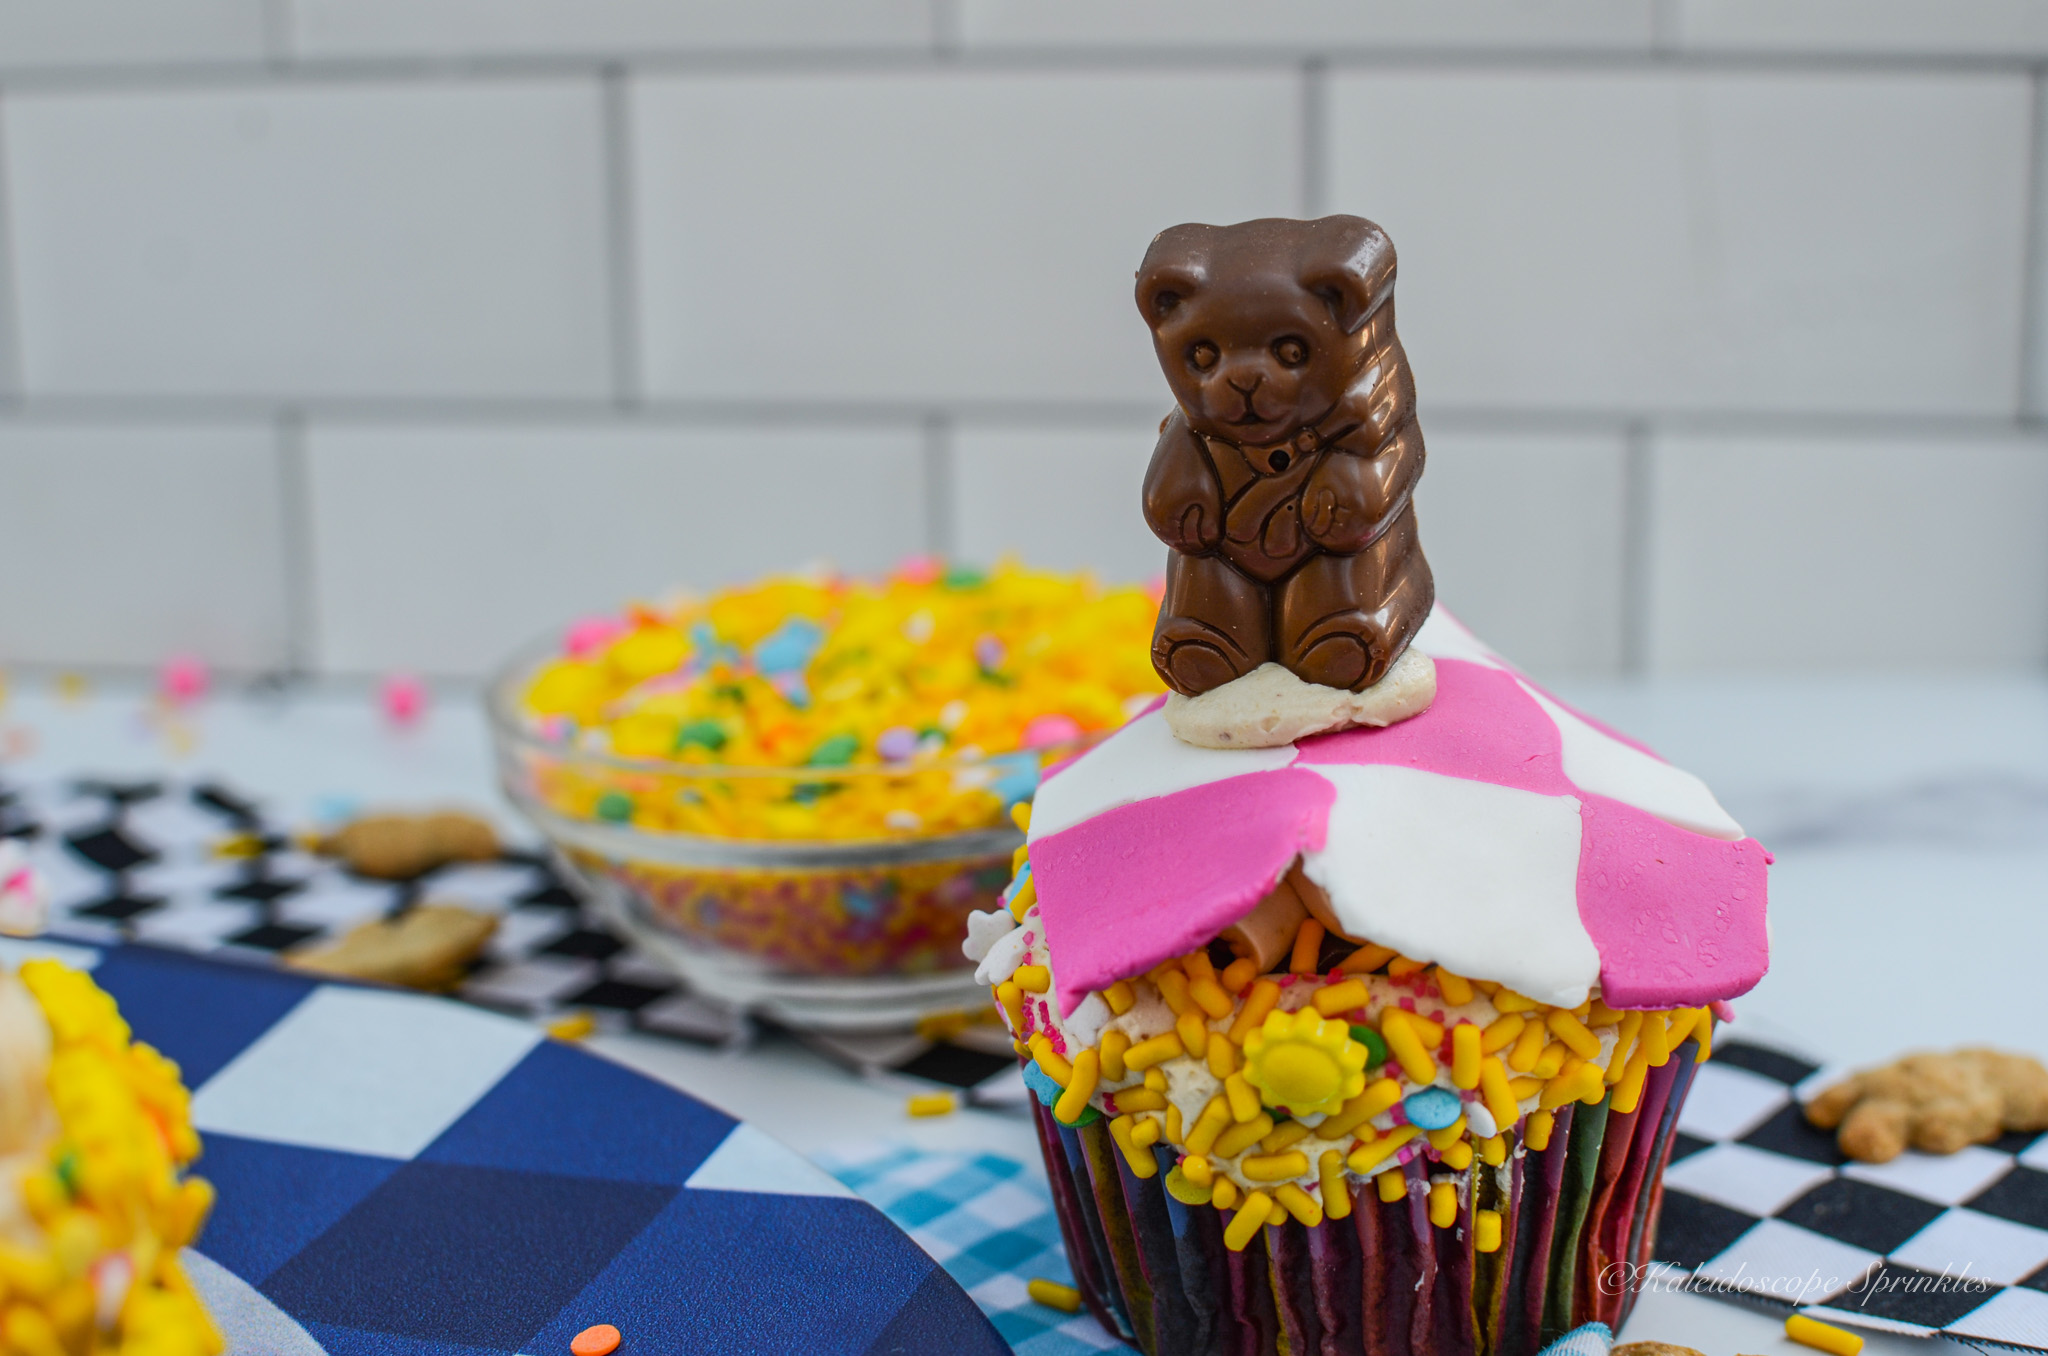
This year I finally remembered to mark this day on my calendar, so I could join in on the fun. There’s no better way to commemorate today’s holiday than with teddy bears and food. I decided to make some delicious Teddy Bear Picnic cupcakes.
These scrumptious treats are perfect to take to the park or eat at home. These cupcakes are as rich as the love between a child and their teddy bear. They are indulgent chocolatey cupcakes that are filled with a smooth, creamy peanut butter dulce de leche ganache. The cutie cakes are then topped with a peanut buttercream. They are further decorated with Kaleidoscope Sprinkles Eternal Sunshine Sprinkle Mix and chocolate peanut butter teddy bears.
I truly enjoyed making these cupcakes for today. I hope you get a chance to enjoy Teddy Bear Picnic Day with your loved ones. Save this recipe to make and share with your friends and family. That is what today is all about.
Chocolate peanut butter candies, for decoration (optional)
*for those with a peanut allergy, you can easily substitute almond flour for the same measurements. If using almond flour, I would add ½ tsp. of almond extract to your buttercream for more flavor.
Directions
Make the ganache:
For the Ganache, using a double boiler on low/ medium heat, add chocolate chips and dulce de leche. Once chocolate begins to melt slowly stir in heavy cream and peanut butter powder. Continue to stir everything together until shiny and smooth. Remove ganache from heat and place in the refrigerator. Allow ganache to cool.
For the cupcakes:
Place cupcake liners in cupcake pan. In a medium sized bowl, combine together flour, cocoa powder, baking powder and salt. Set aside. Using a stand mixture, cream butter and sugar in a large bowl for approximately 10 minutes. Add eggs one at a time to the creamed mixture. Add vanilla extract.
Add ⅓ of the flour mixture. Mix until combined. Add half of the buttercream. Repeat this process, beginning and ending with flour. Add reheated coffee to the mixture. Mix until completely combined, be careful not to over mix.
Using ice cream scoop place batter into muffin tins. Bake at 350 degrees for 18-20 minutes or until tester comes out clean. Place on baking rack. Let cupcakes cool completely.
For buttercream, in a large bowl, or stand mixer, whisk together butter. Slowly add confectioner’s sugar using mixer on low speed until frosting is smooth. Add heavy cream. Add peanut butter powder. Add vanilla extract. Add salt. Whisk frosting on medium-high speed until everything is combined and frosting is light and fluffy.
Once cupcakes have completely cooled, using rounded part of pipping tip cut center out of cupcakes. Spoon or pipe ganache into the center of each cupcake. Pipe buttercream frosting on top of each cupcake.
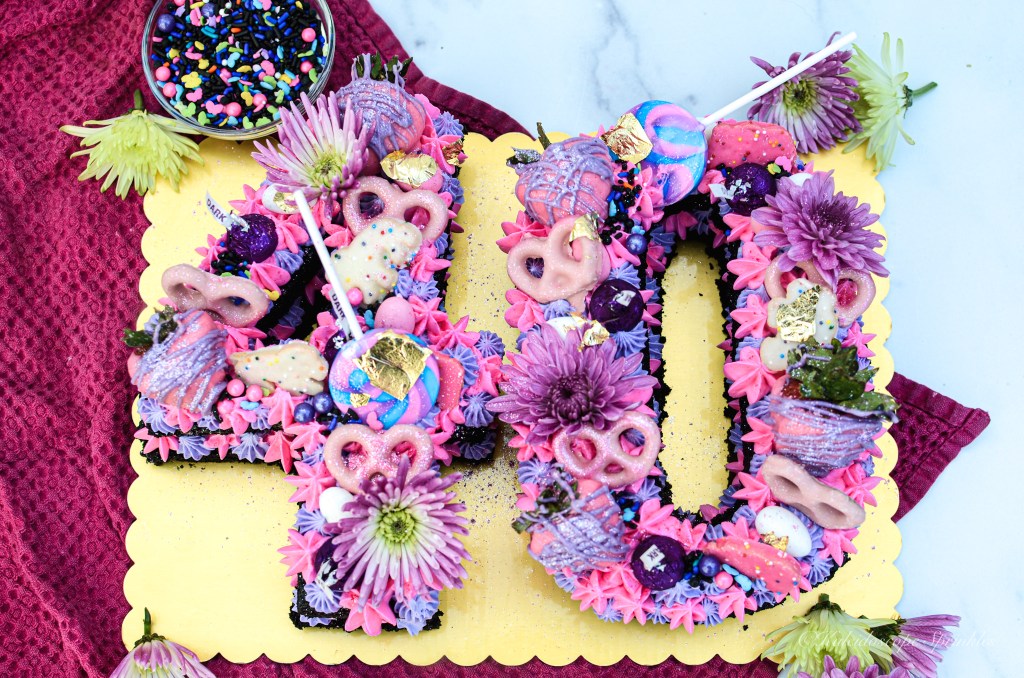
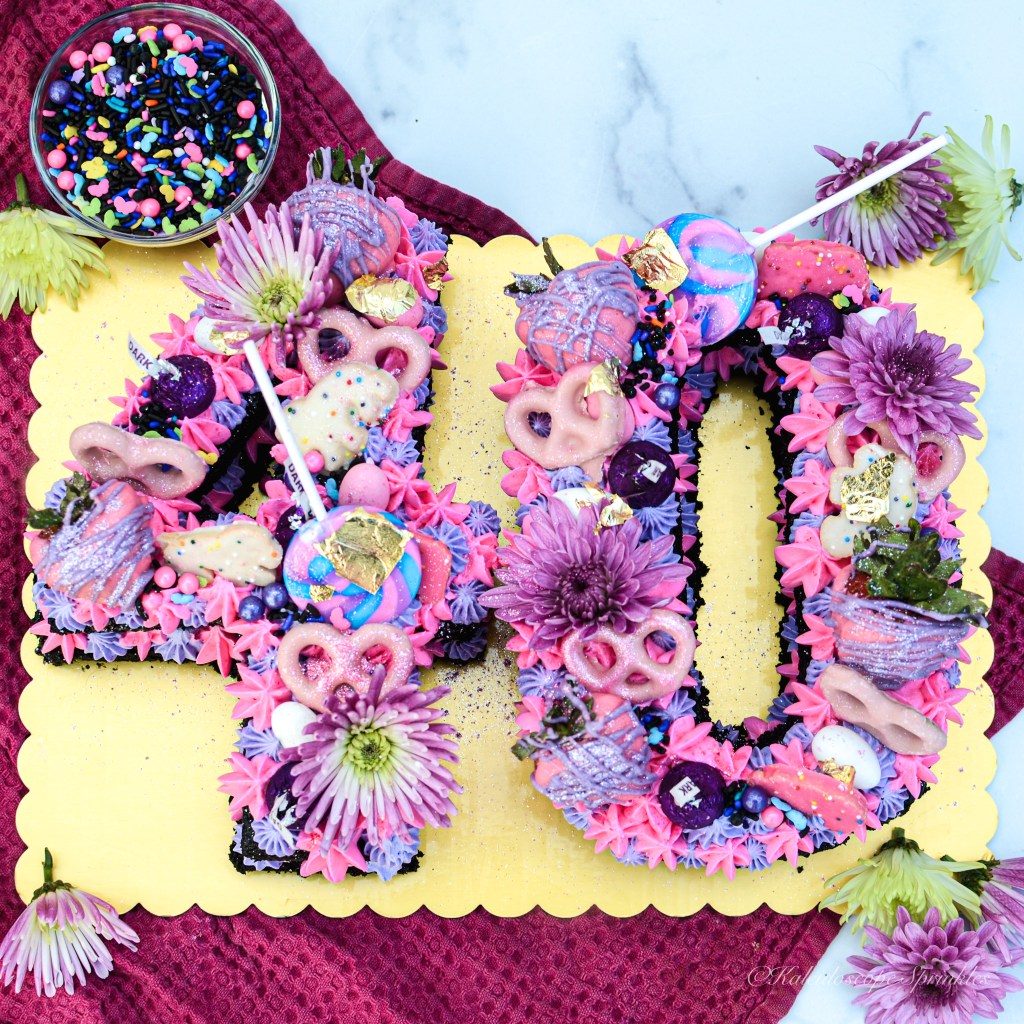
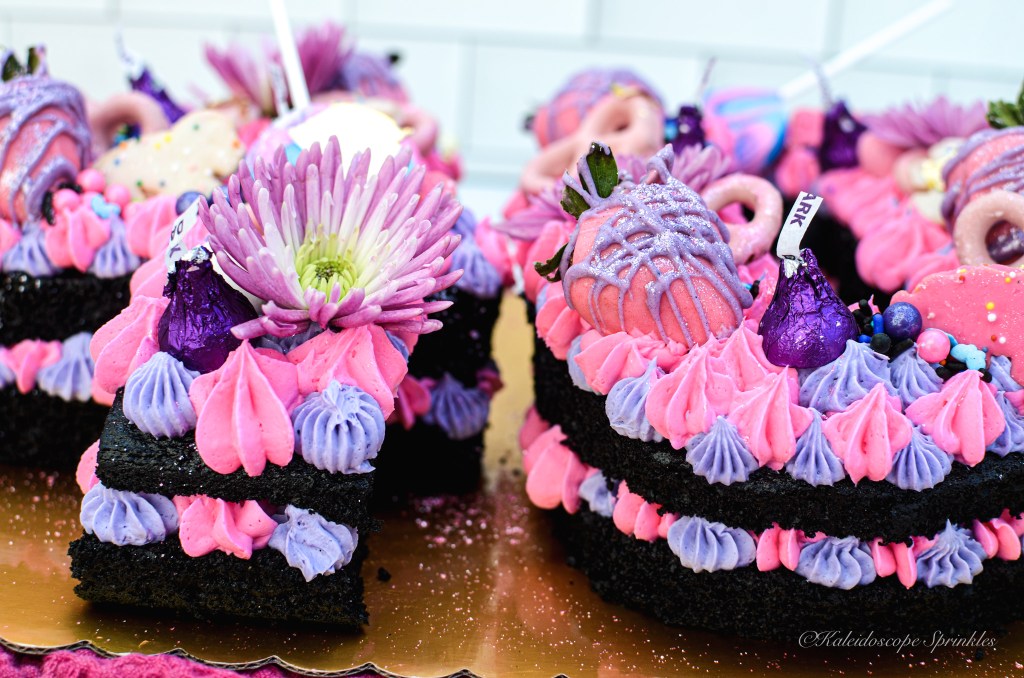
The month of June has finally and fabulously come to an end. This year, I started the month of June in a new country. I had an amazing time celebrating my fortieth birthday in Belize. Belize was relaxing, adventurous and full of incredible food. I then returned home and recreated my classic Black Power Brookies for Juneteenth to keep the party going.
Before I left for my birthday trip I was still celebrating on the mainland. I, of course, made my own 40th birthday cake for my photo shoot. (See my previous post.) Although I wanted to partake in a slice of my own cake. I decided to place my cake in my freezer for later, since I had some swimsuits to fit into. Not only did I decide to put my cake in the freezer, but I also had the idea to freeze the leftover cake pieces as well. I never agreed with the idea of wasted cake.
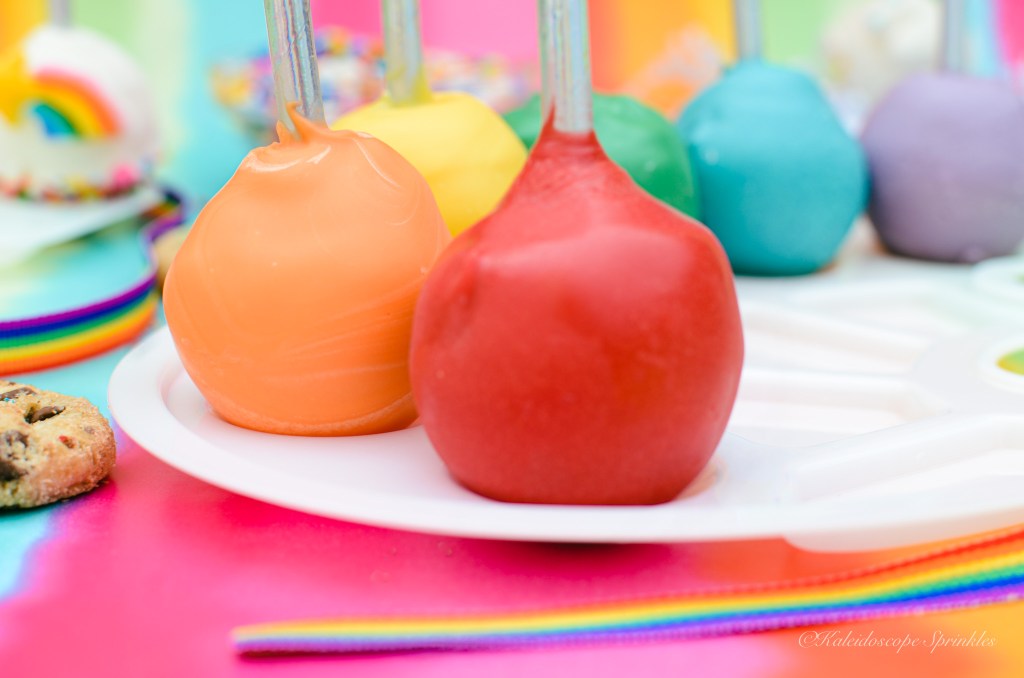
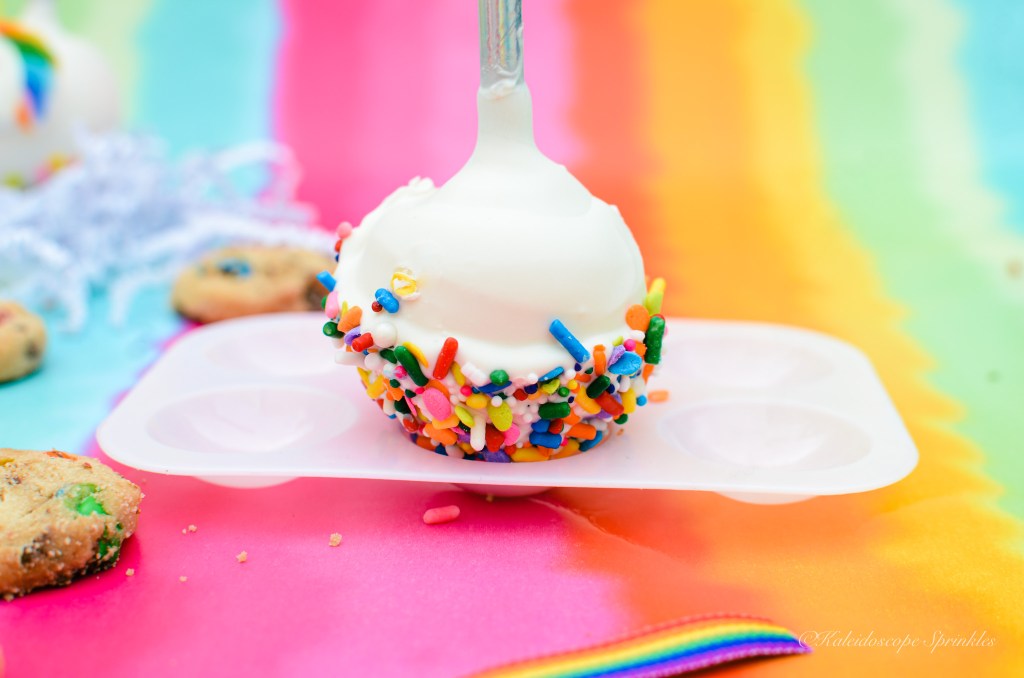
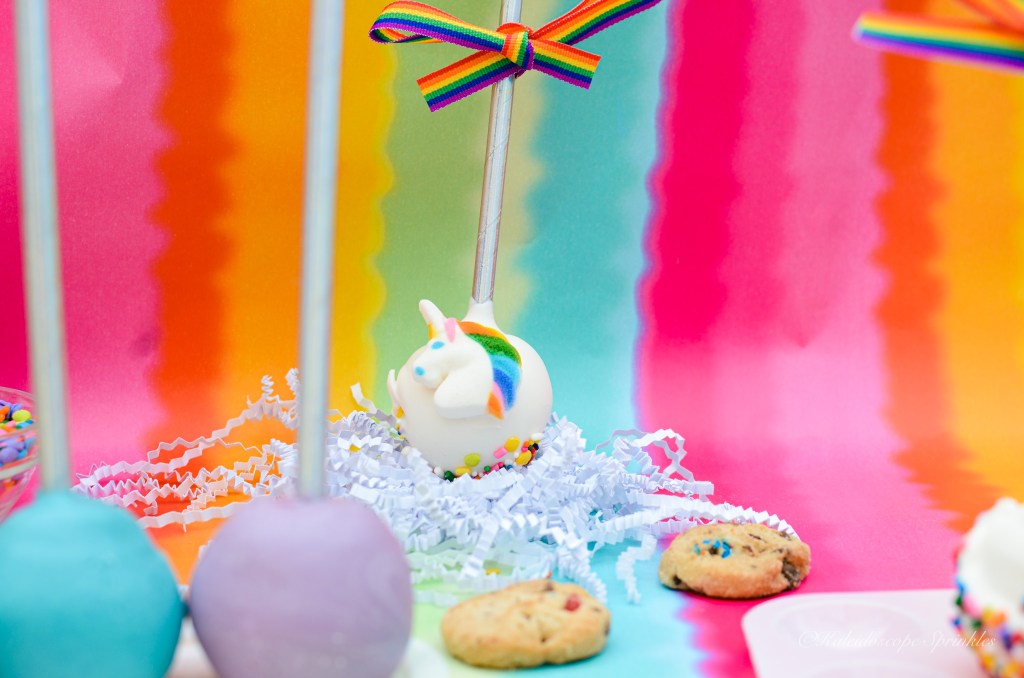
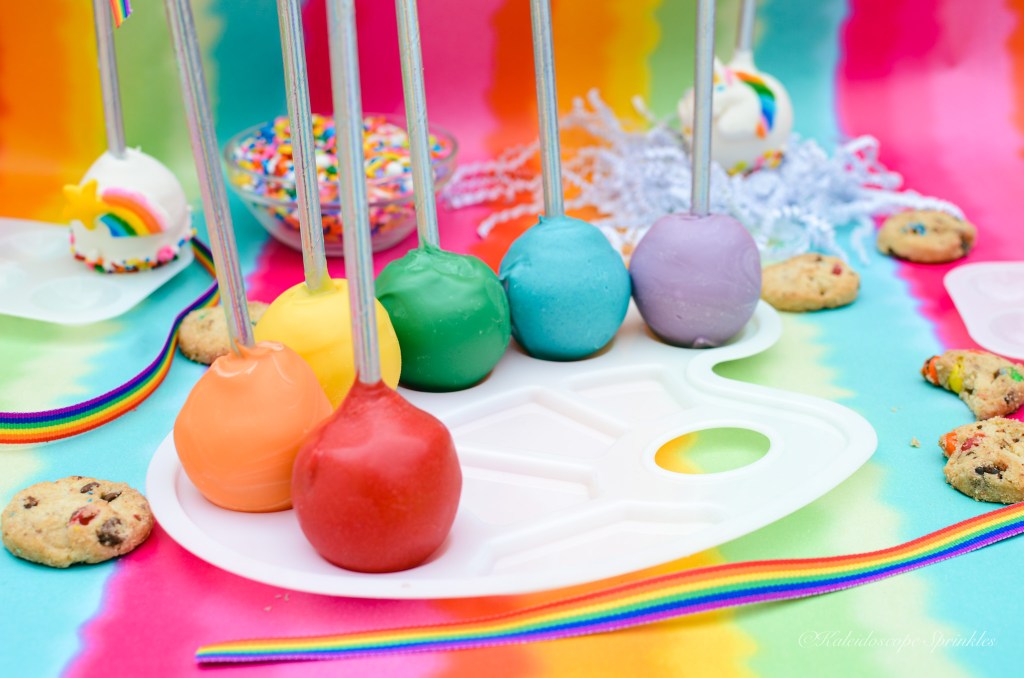
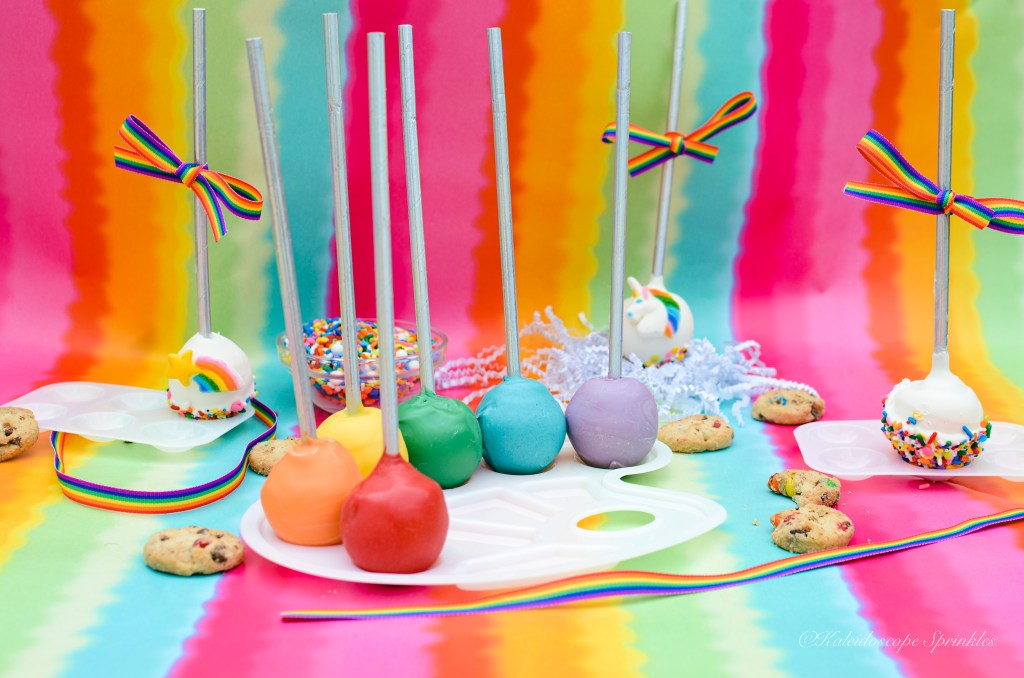
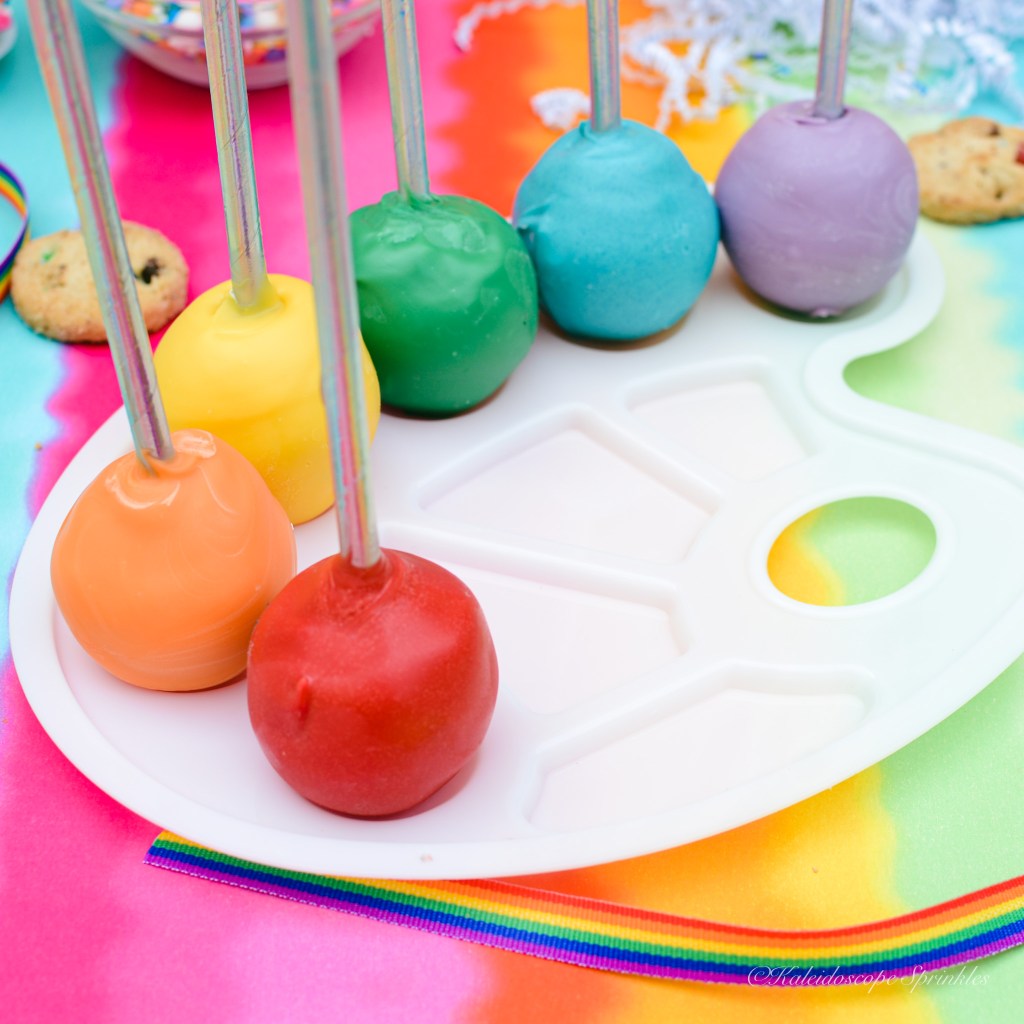
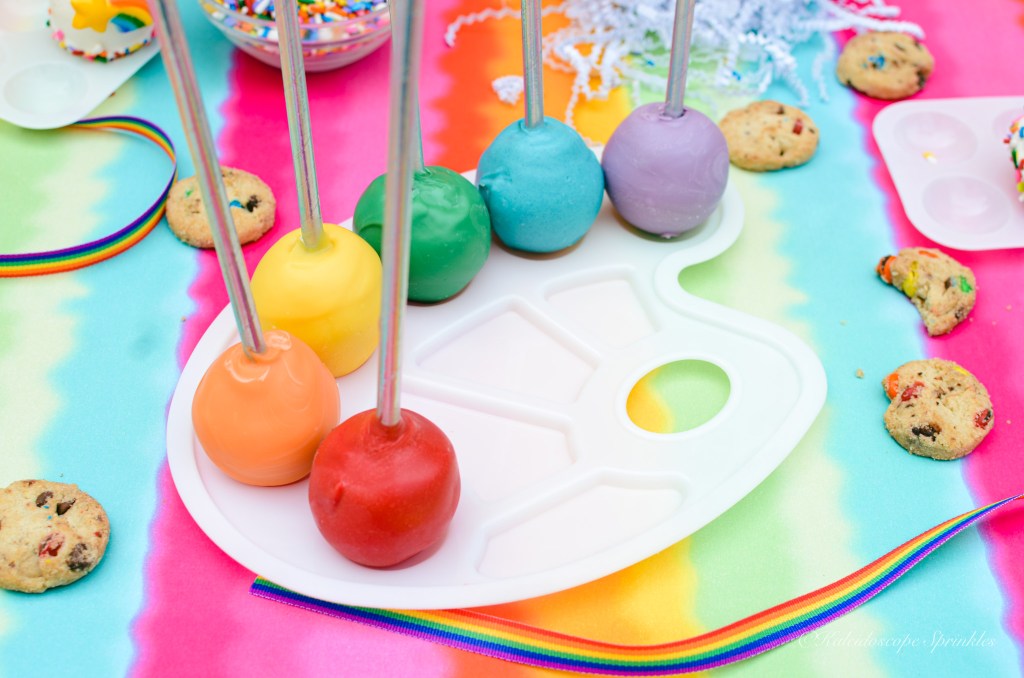
When I returned from my Belizean escapade, I unpacked my suitcase and some cake from my freezer. I came up with an idea on how to use the leftover cake while on vacation, so I was ready to get back to work when I returned. In celebration of Pride and Black Music Month I settled on the idea of colorful cake pops in artistic representation.
These Over the Rainbow Cake Pops were made with love and full of color. I added even more color by using Kaleidoscope Sprinkles The Wizz Sprinkle Mix to decorate as well. We all deserve to celebrate love, respect and the colorful songs we each share in our hearts.
See my Over the Rainbow Cake Pops video and photos below.
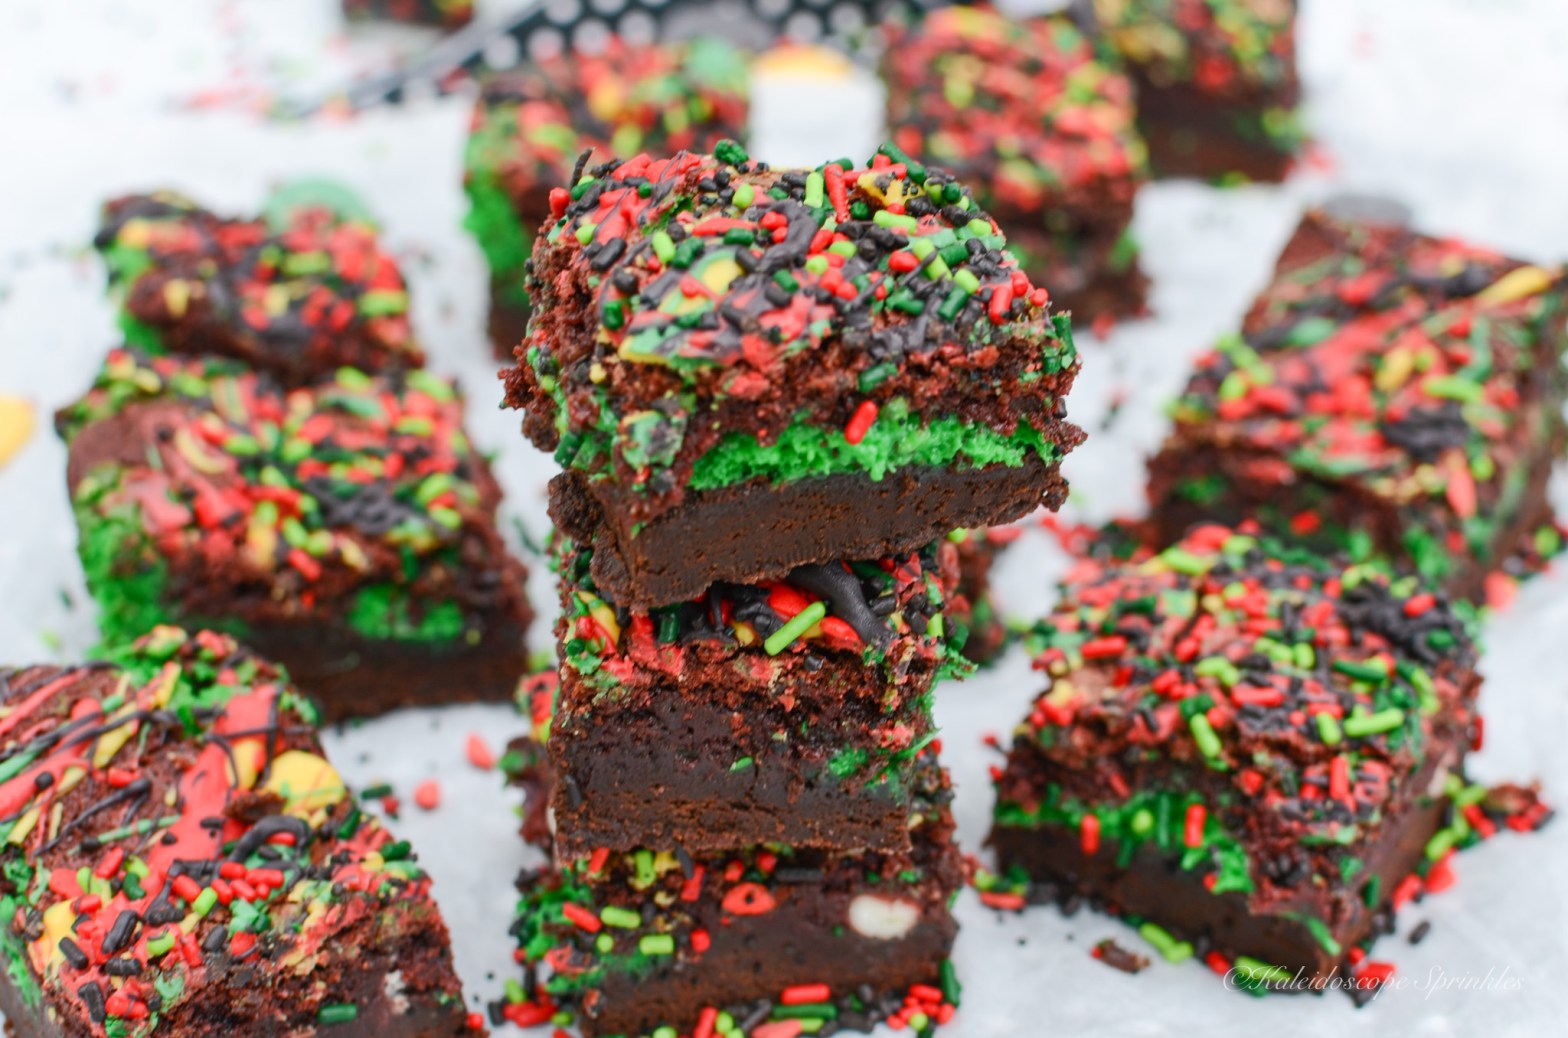
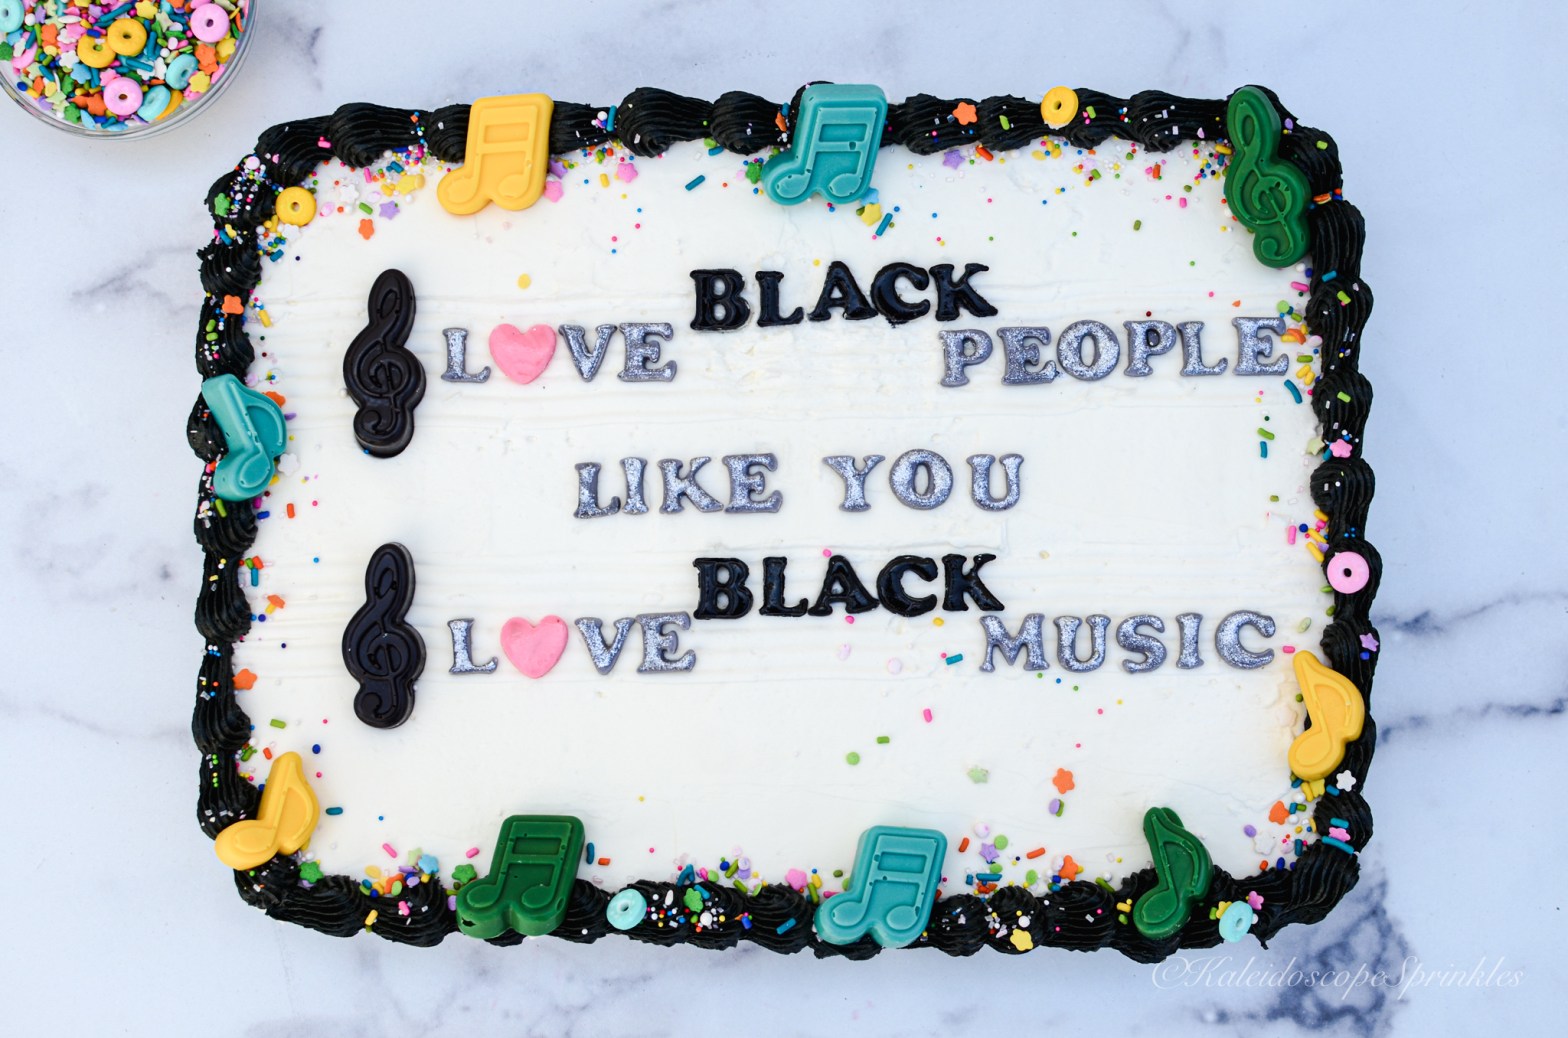
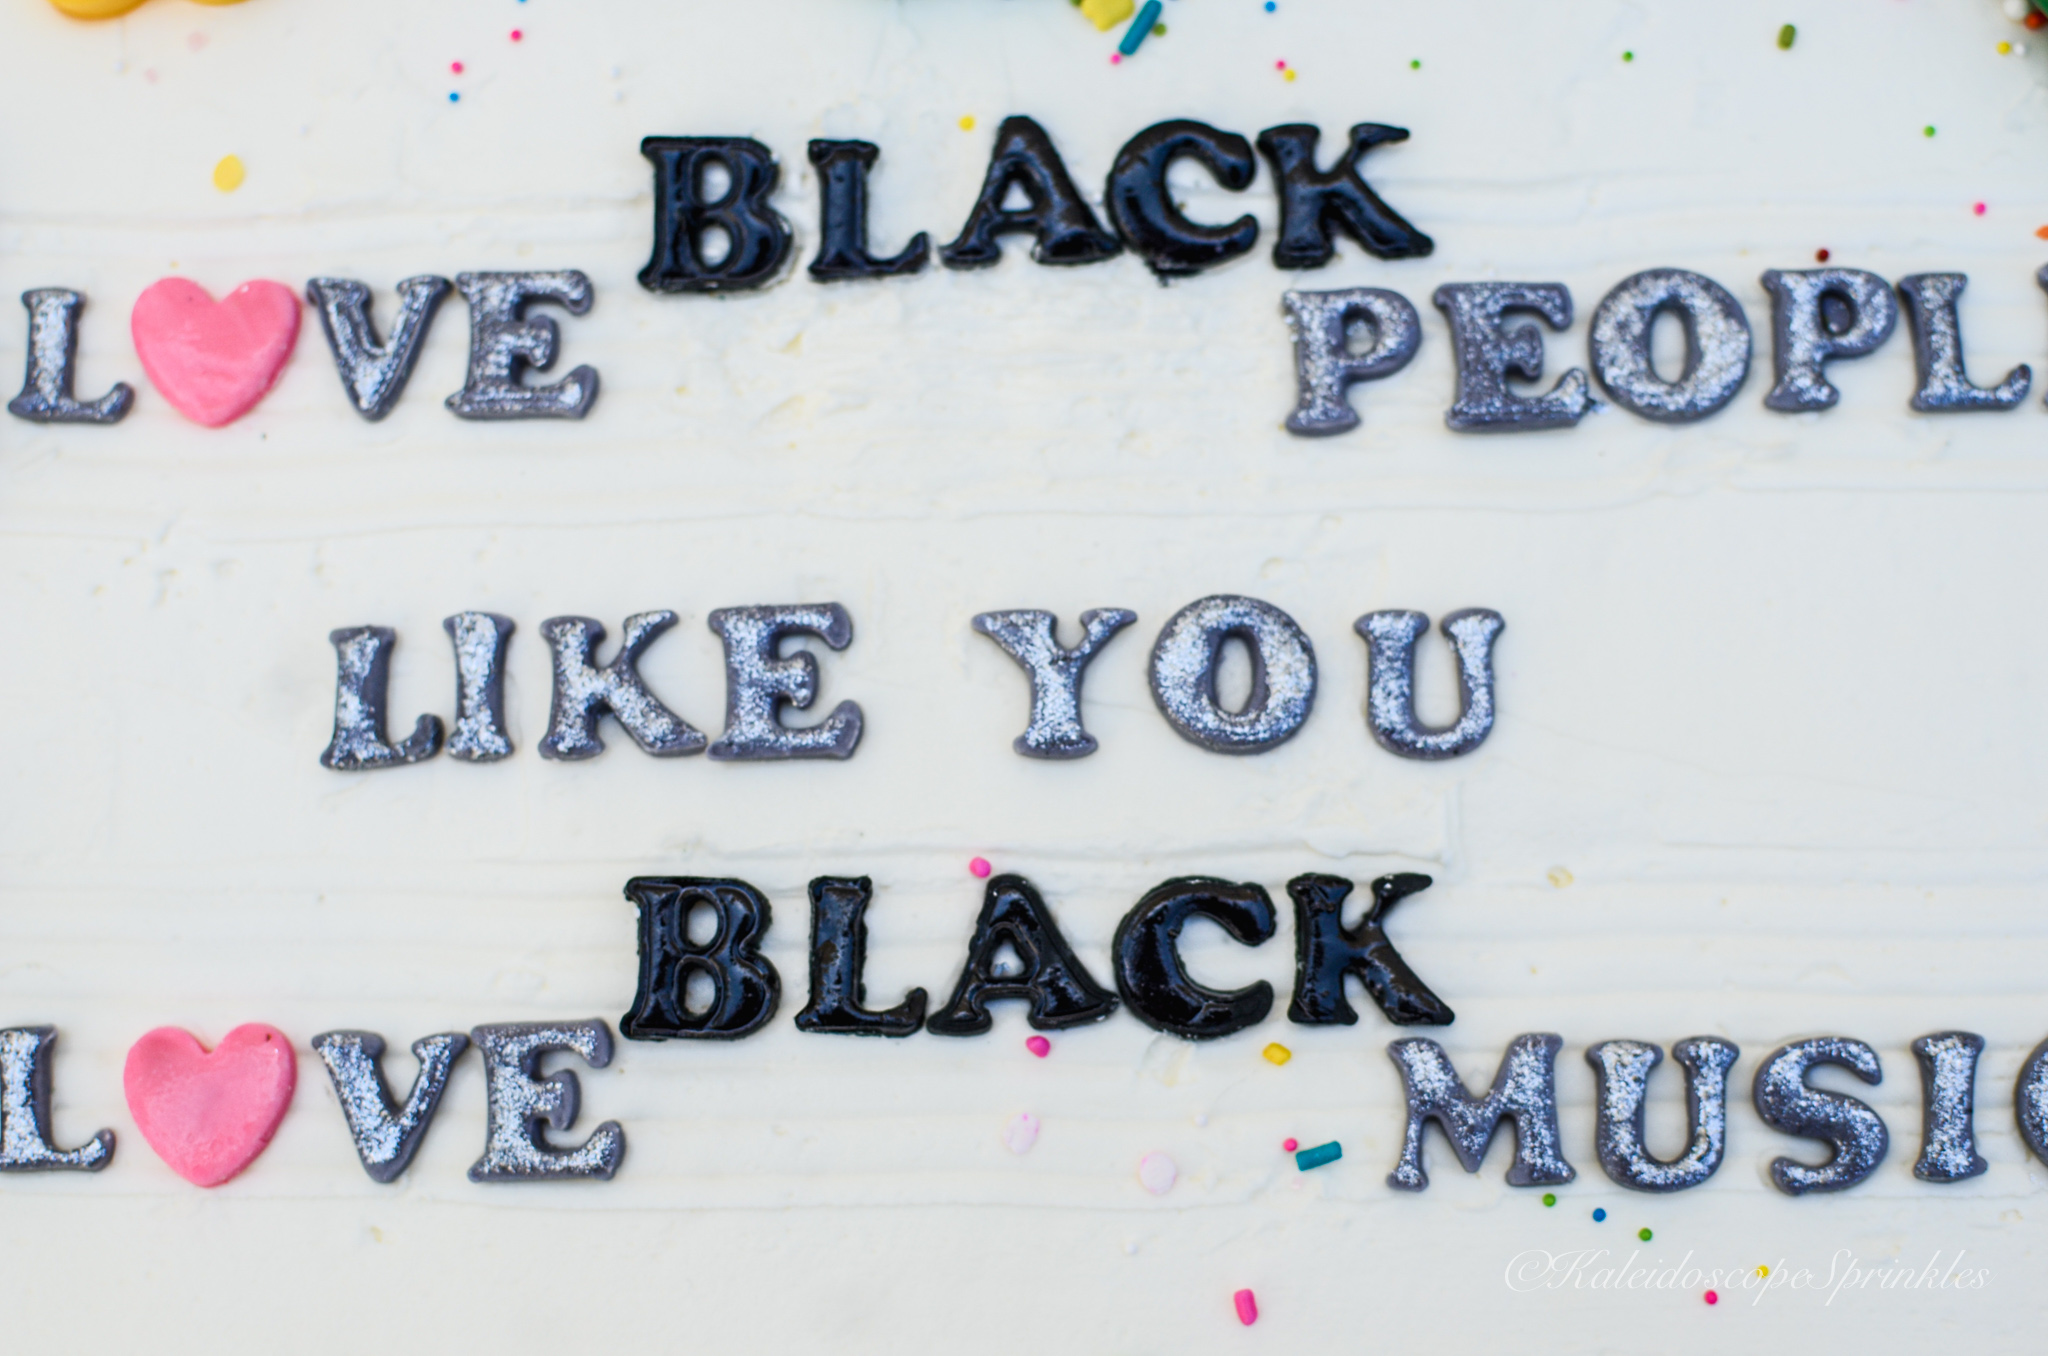
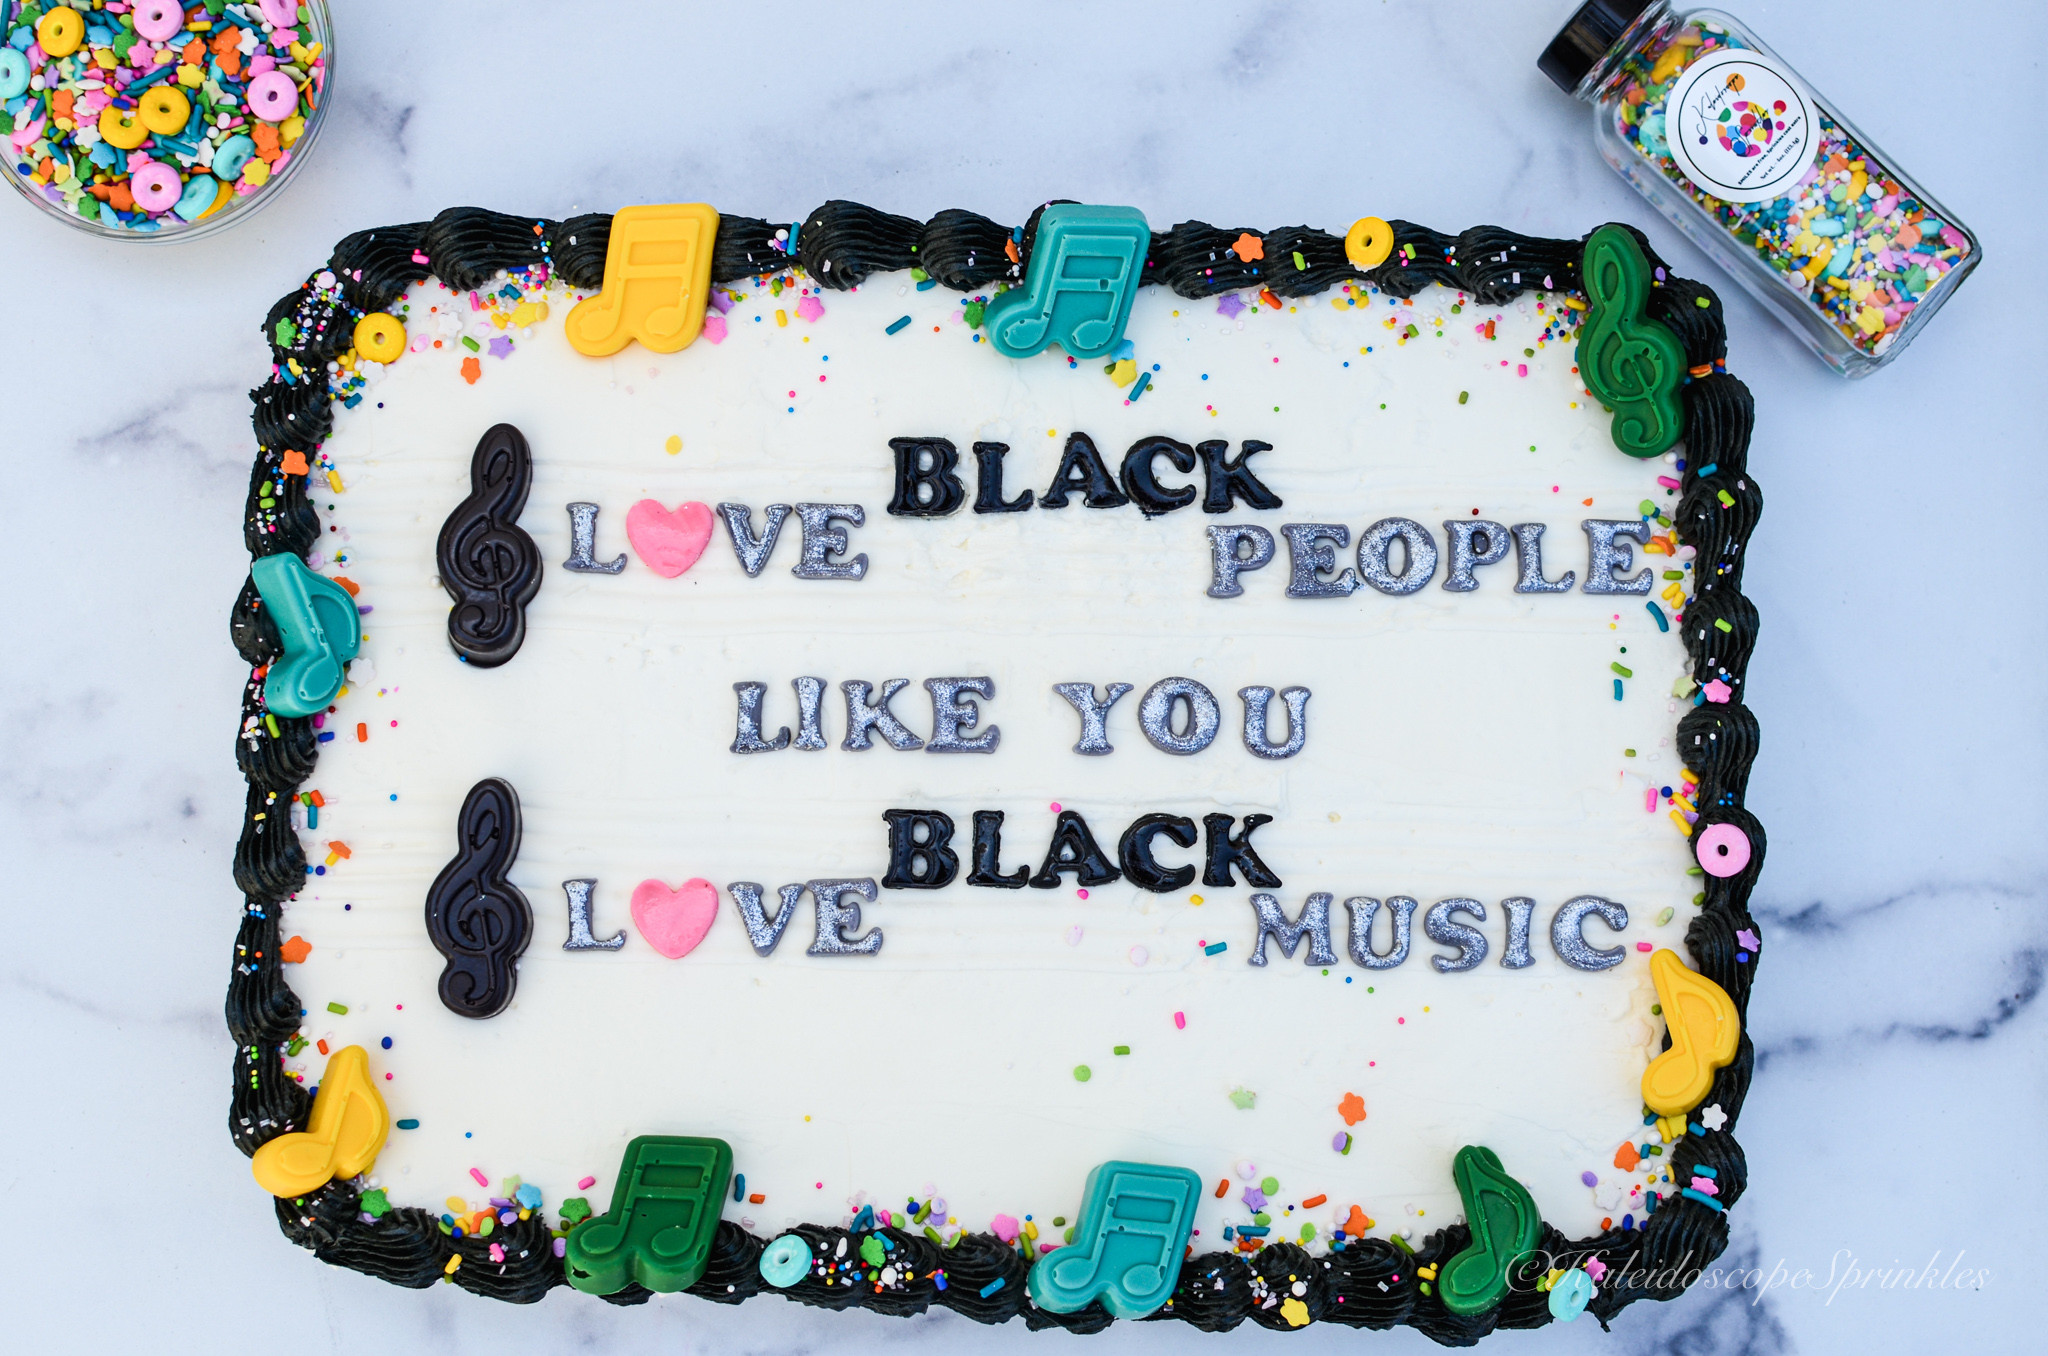
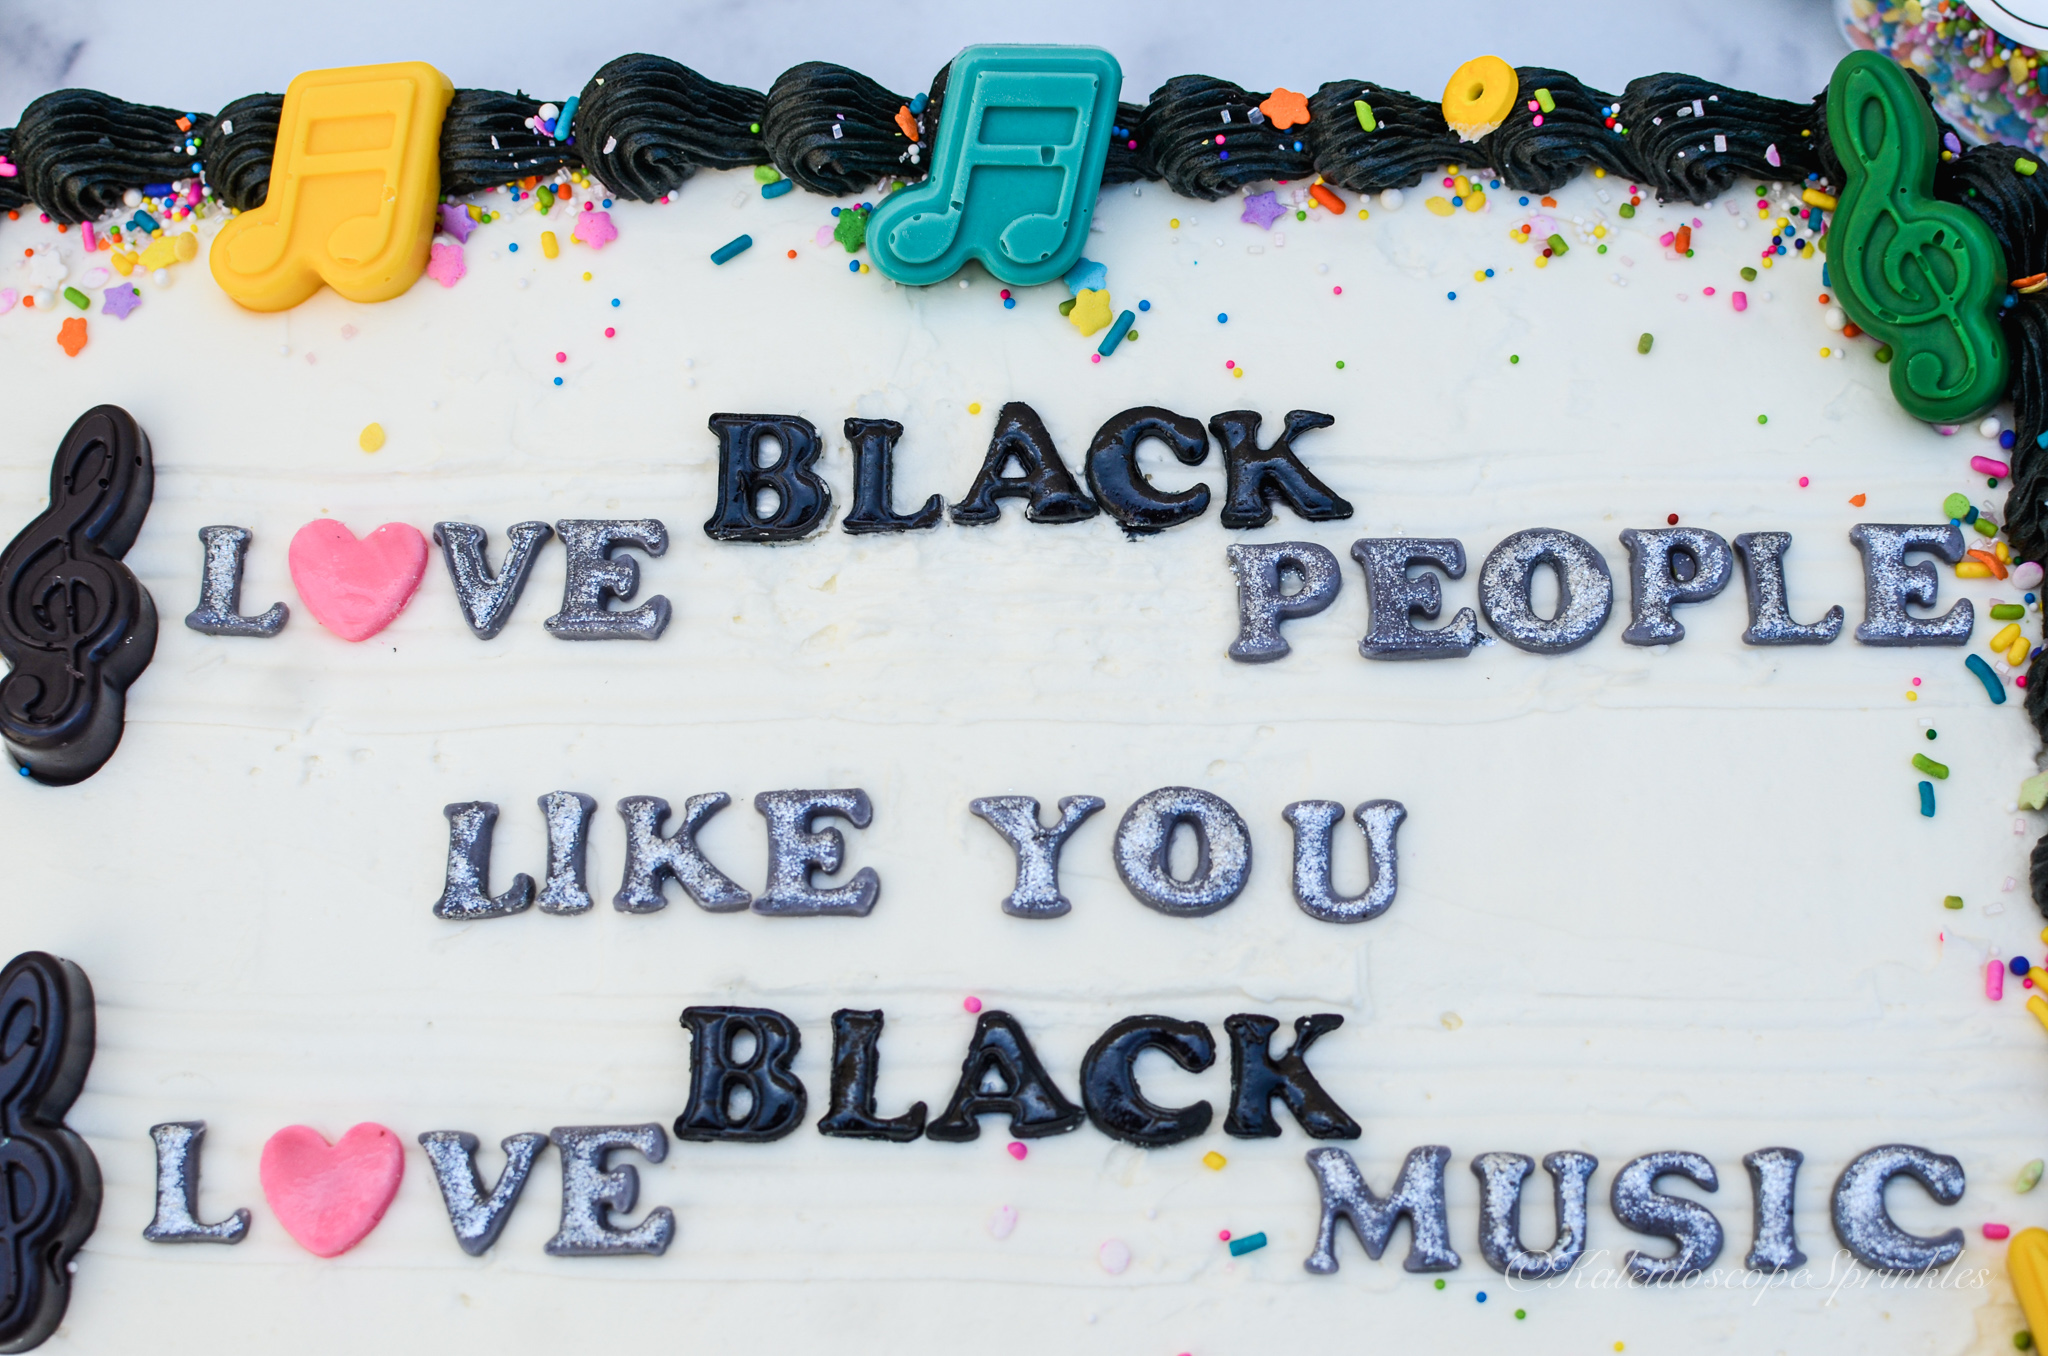
The month of June is a special time within the Black community. It is a time where we get to celebrate the amazing musical accomplishments that have contributed to every genre and aspect of music. This year, this last month in spring has served a greater purpose for the Black Community. As we continue to march and protest for equality, I thought it would be wonderful to showcase coming together in unity with a dessert.
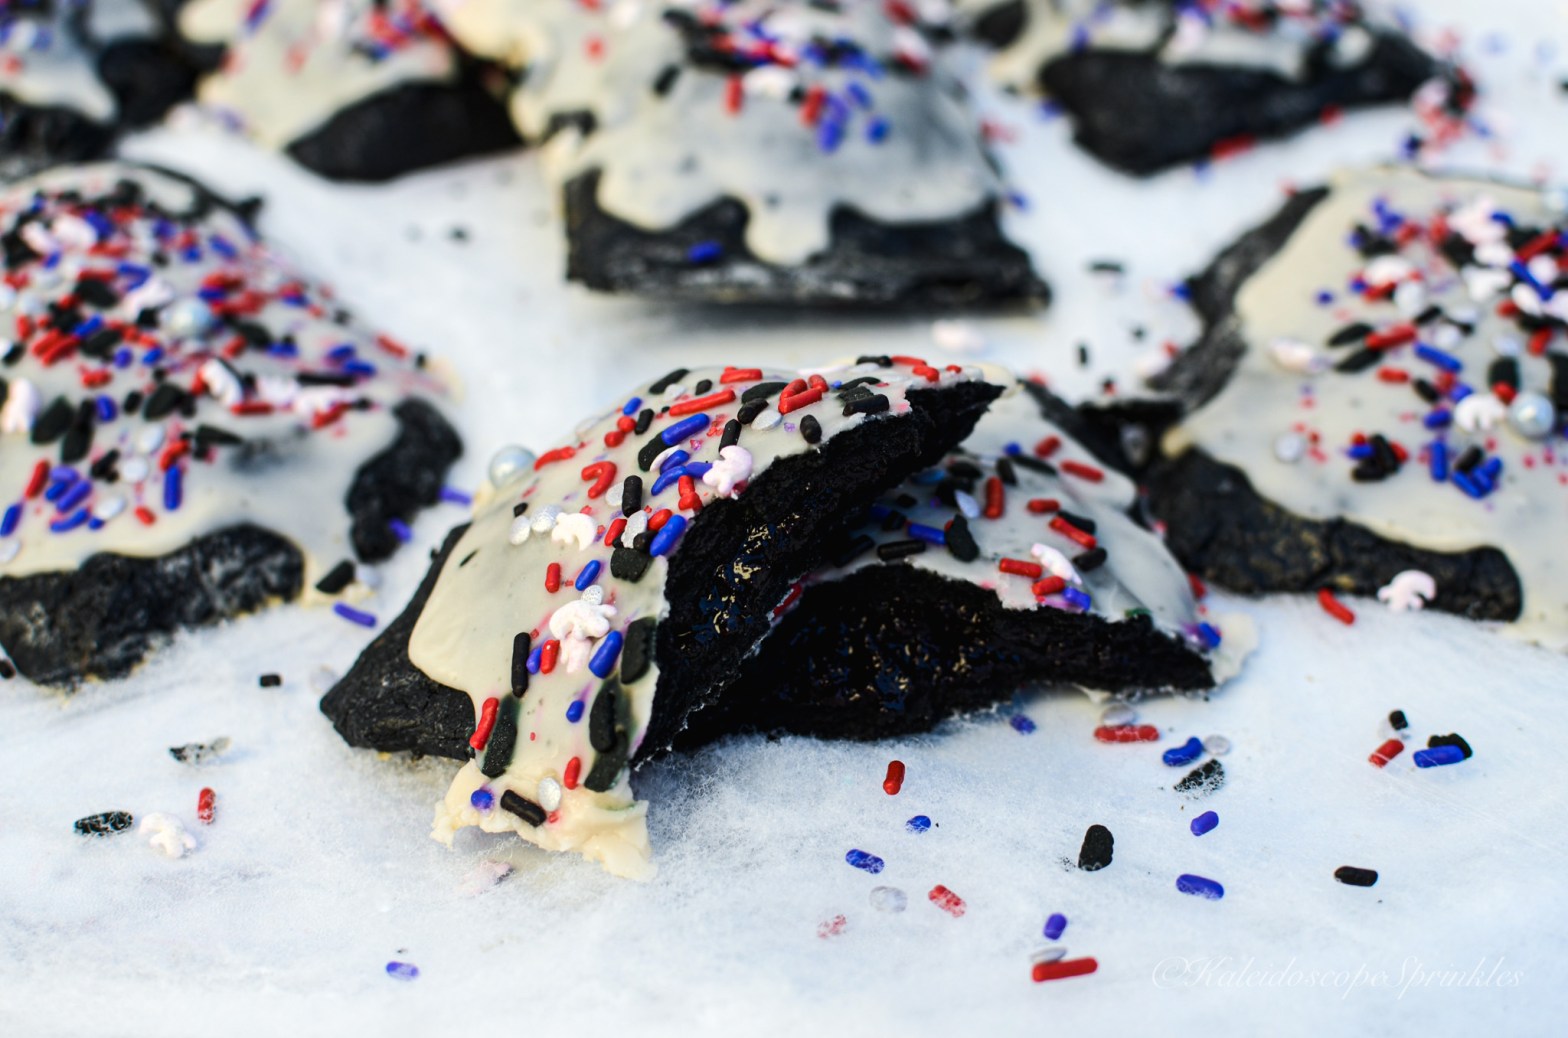
This dessert combines the flavors of our history with red velvet, cream cheese and chocolate while also displaying the proud colors of the Pan-African flag. This brookie is a rich as our heritage! I hope you take the opportunity to try this delicious confection and while savoring every bite, think about all the great things Blacks have done and continue to do for this country.
*This recipe was updated this year with even more pizzazz. My Black Power Brookies were the inspiration to my small business sprinkles empire I started in 2020, Kaleidoscope Sprinkles. I thought it was time to upgrade those old photos with an updated Sprinkle Mix. I made this original brookie recipe, but then decided to decorate them with Kaleidoscope Sprinkle’s Black Power Sprinkle Mix. This was best way to cherish and celebrate Juneteenth this year.
Please see the complete recipe video and upgraded photos below.
Enjoy!
Black Power Brookies step by step video
Black Power Brookies
Cream cheese filling
Filling
8 oz cream cheese, room temp.
1 cup confectioners sugar
1 egg
2 tbsp. greek yogurt
1 tsp. vanilla extract
Green food coloring gel, for color (optional)
Brownies
Melting chocolate over double-boiler
6 tbsp, unsalted butter
4 ounces of semisweet chocolate, roughly chopped
1/2 cup unsweetened cocoa powder
3/4 cup all-purpose flour
1/4 tsp. kosher salt
1 cup of sugar
2 large eggs
2 tsp. vanilla extract.
Black food coloring gel or 1tbsp. of activated charcoal, for color (optional)
Red Velvet Cookies
Red velvet cookie dough
1/2 cup of butter, room temp.
1/4 cup plus 2 tbsp. of brown sugar
2 tbsp of sugar
1 egg
1 tbsp. of milk ( I used almond milk)
1 tsp. of vanilla extract
½ tsp. white vinegar
3/4 all purpose flour
2 tbsp. of unsweetened cocoa powder
1 tsp. of baking soda
1/2 tsp. of kosher salt
1/2 cup of chocolate chips (White or ruby chocolate)
Red food coloring gel, for color (optional)
Yellow, Green, Red and Black candy melts, for decorating (optional)
1. In a large bowl, add all the ingredients for the filling.
2. Using a hand mixer on low speed, combine all the ingredients until mixed.
3. Add green food coloring, increase the hand mixer to full speed and whip cream cheese filling until completely smooth.
4. Set aside filling and place bowl in the refrigerator and allow it to set.
5. Preheat oven to 350F. Line a 9” x 9” square baking pan with butter and parchment paper, allowing 2 inch overhang for handles.
6. Place butter and chopped up chocolate in a heatproof bowl over double boiler (a pan of simmering water); stir until butter and chocolate has melted. Let cool slightly.
7. In a medium bowl, whisk together flour, cocoa powder, baking powder and salt until combined. Set aside.
8. Using stand mixer, whisk together sugar, eggs, and vanilla in the bowl. Mix on medium speed for about 4 minutes until eggs are pale, approximately 4 minutes.
9. Reduce mixer speed to low, slowly add the chocolate mixture, flour mixture and black food color gel. Slowly mix until well combined.
10. Pour batter into prepared pan; spread evenly with a spatula.
11. Using same medium bowl, begin to prepare red velvet cookies mixture by whisking together flour, cocoa powder, baking soda, and salt. Set aside.
12. Using stand mixer, combine the butter, brown sugar, sugar, vanilla extract, vinegar and red food coloring. Beat at medium speed until creamy and smooth. Add egg and milk.
13. Turn mixer down to low, Gradually beat in the flour mixture, mixing until just combined.
14. Carefully stir in the chocolate chips.
15. Take cream cheese mixture out of the refrigerator and spread evenly over the brownie mixture.
16. Drop cookie mixture over cream cheese mixture and smooth evenly with spatula.
17. Place pan in the oven and bake for 40-45 minutes until brookies are set.
18. Place brookies on a cooling rack and allow brookies to cool to room temperature.
19. Decorate cooled brownies with melted candy melts and Sprinkle Mix.
20. Chill brookies for at least an hour but preferably overnight.
21. Cut brookies into 16 squares, devour and enjoy!!
Here we are already in the sixth month of this year. I promise you it was February last month. It is now the mid point of 2023 and I am a whole decade older. I honestly feel amazing at forty. I have just returned from my celebratory birthday trip to the Caribbean. I feel even more dazzling right now because my skin is extra glowy and melanated from the Belizean sun. I am now back in Los Angeles and the sun has almost disappeared. June gloom is definitely upon us, but that will not stop my happiness.
June not only marks the middle of the year and the beginning of summer. It also represents the second half of gemini season, Pride month and Black Music Month. This year I decided to celebrate my continued 40th birthday extravaganza and month six with a musical. This past weekend I saw the Broadway musical sensation, Six, in Hollywood. This live entertainment opportunity came right on time. The Six musical is filled with great songs and colorful costumes.
I decided to wear a dress in the color of the year, Magenta, for said occasion. The overcast June days helped me pick out this stylish cut out sweater dress to put on. I am entering a new decade even more happy and healthy. I made a lifestyle change to be in the best mental and physical shape of my life. This curvaceous dress is definitely showing off all the work I have been putting in and I’m living for it.
Another decade, another slay! I know the typical misconception is that women lie about their age. Well, surely not this one because I am elated to celebrate my 40th birthday today. I can honestly say that I am full of joy and truly blessed to be here for another momental season. As a little girl,I had other thoughts and ideas of where I would be at this age, but I wouldn’t change a thing about where I am.
I am grateful for every twist, turn, hill, valley and path my life has taken me. I can say I’m excited to see what this new decade will bring. Every decade seems to get better, so why not enjoy a new one? My thirties brought me a new city, my first home purchase, new jobs and career opportunities. I have been able to travel to more than 30 countries in my thirties and do things I only dreamed of. Most importantly my 30s brought me a closer relationship with God, a closer relationship with my family, mental and physical health with growth, peace and a true understanding of happiness.
This year I will of course be celebrating this majestic celebration in a new country. My BFF, Meisje (who is also turning 40 this year) and I decided to travel to Belize for relaxation and jubilation. Before I left, I wanted to start and share my birthday with everyone who continues to support me and who happens to be reading this. I love each and every one of you.
No one knows how much time they are given on this earth, but each day should be considered a blessing. I am also blessing you with a little fashion and food for my birthday. Check out the details below.
Cheers to 40. PEACE and LOVE.
Also shoutout to my amazing photographer, Brian Freeman. Would you believe it if I told you we went to high school together some 20+ years ago?
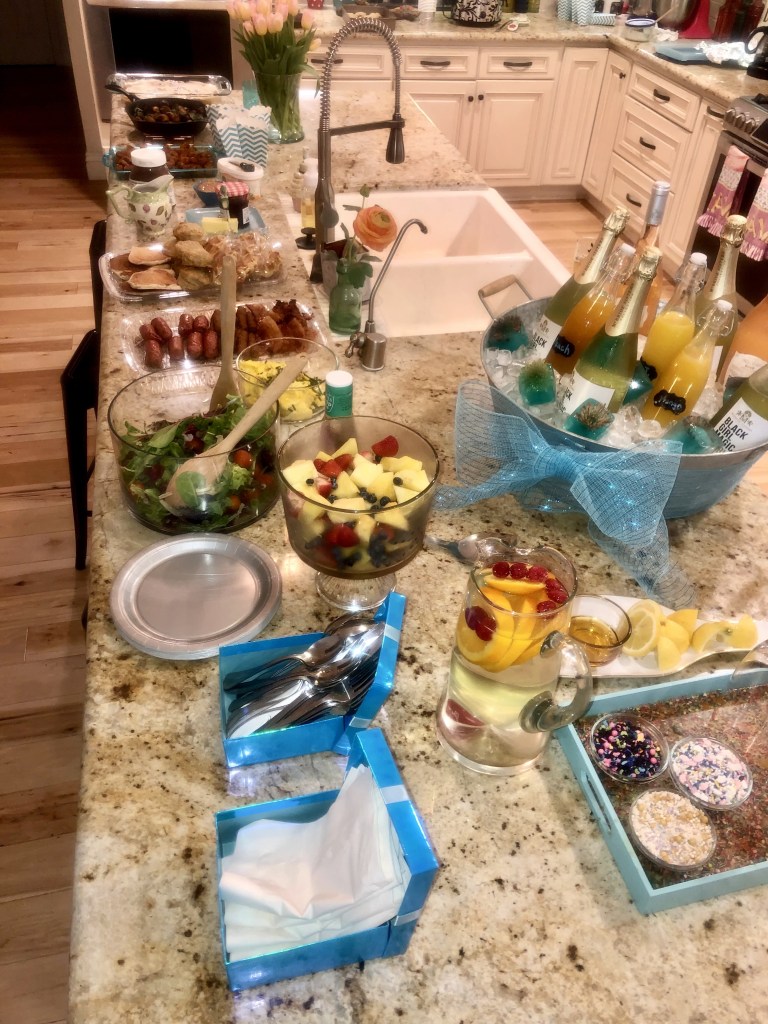
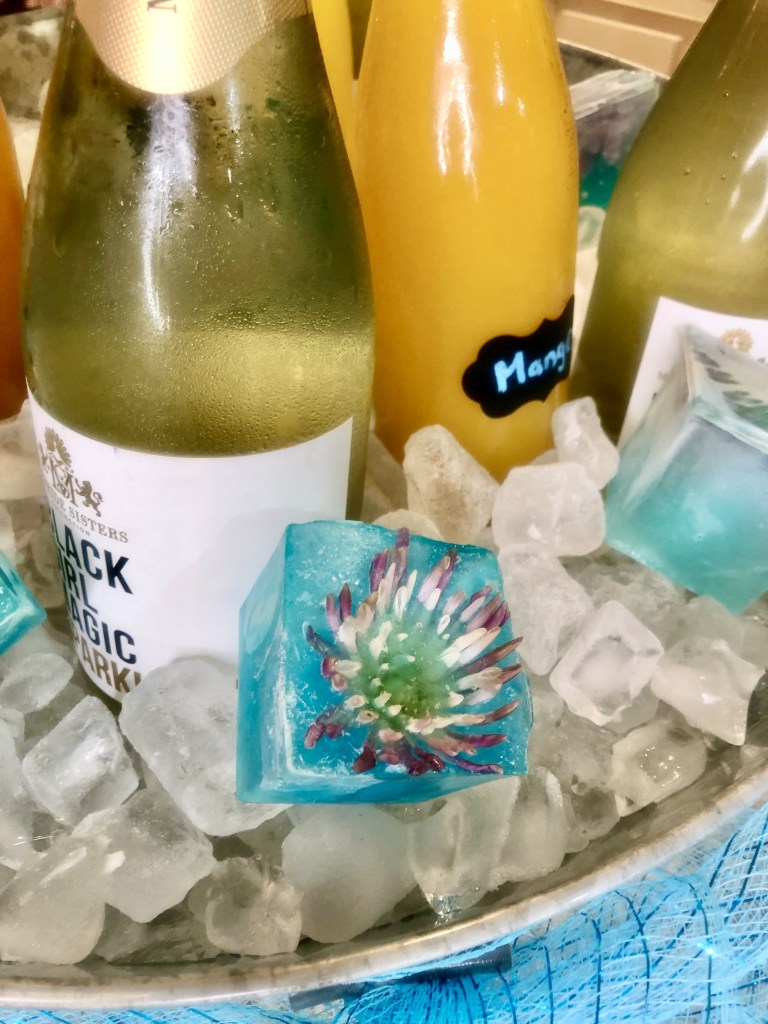
I love to consider myself the hostess with the mostest. I thoroughly enjoying having my friends/ family over my home and treating them like queens/ kings. It could be something as simple as a movie night or a bit more extravagant, like a New Year’s Eve party. It truly doesn’t matter, but I’m going to go all out and make sure the ambiance stays on point.
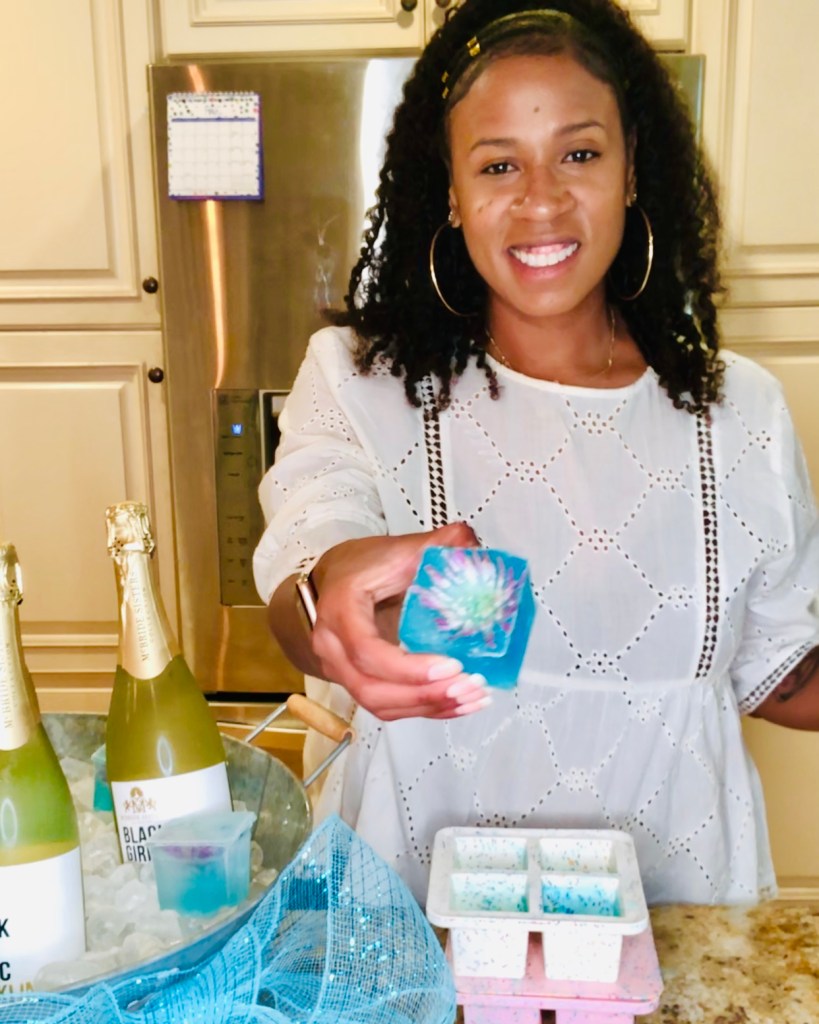
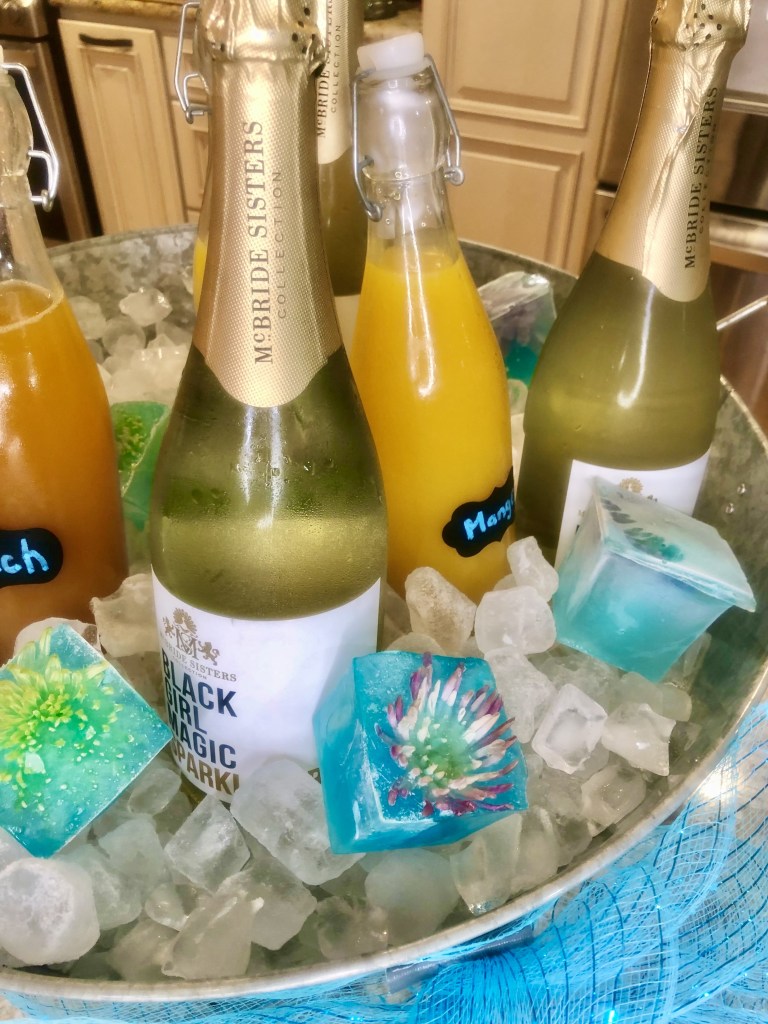
I recently had my friends from the United Kingdom in town for a visit. I decided one evening to host a little catch up with them at my house. I thought since my friends are from across the pond and are used to an English breakfast, I would serve an American breakfast/ brunch for dinner. I went for a ‘Breakfast at Tiffany’s’ theme, but added my flare of course.
I love to keep fresh flowers in my home. I had some old flowers on my kitchen counter that were past their prime. Before I threw them away, I got the idea to use the old flowers to upgrade my “Breakfast at Tamika’s” décor. I cut off some of the flowers and added them to my ice tray. I then added more flair by adding Kaleidoscope Sprinkles Cosmic Shimmers to the ice cubes. The ice cubes came out super classy and cute. I will definitely by recycling this idea and making more fancy ice cubes this summer.
I decided to share this cute and simple DIY with you, so you can kick your decorations up a notch as well.
See my video and step by step decorations below.
Snazzy ice cubes
Materials
Extra Large Ice cube tray. Purchased from Nordstrom. (purchase here)
Happy Cinco de Mayo! I was looking back at some of my recent previous bake recipes and realized that I never made anything for May fifth. As an Los Angeleno for almost a decade I am way past due for a Mexican inspired treat to celebrate today. We are all familiar with churros, fried ice cream and flan but I wanted to do something different with my kind of razzle dazzle in the recipe.
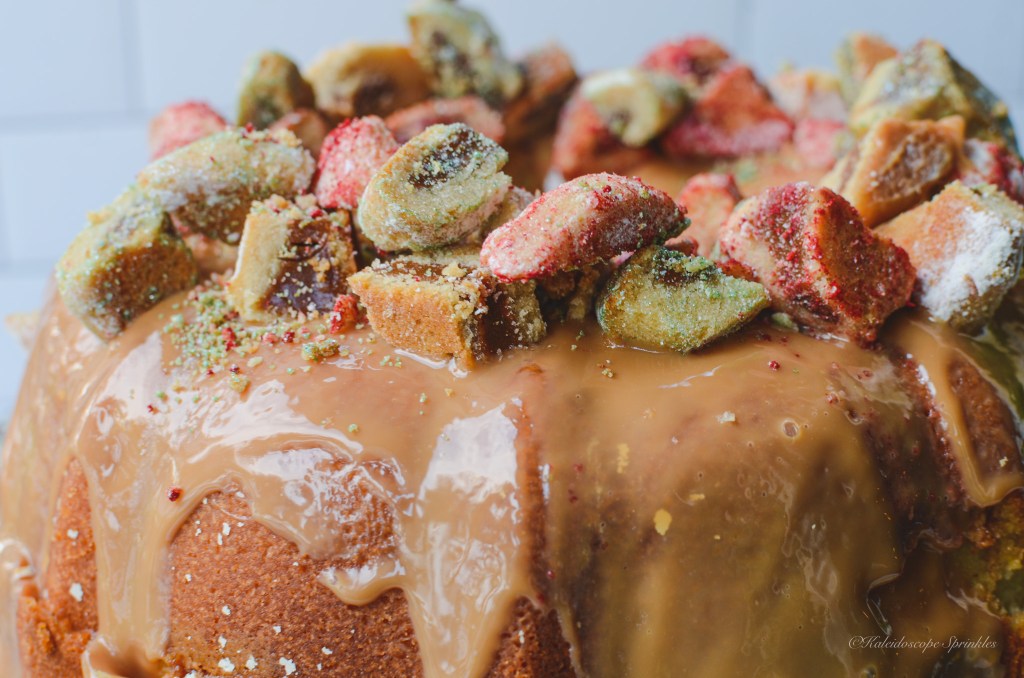
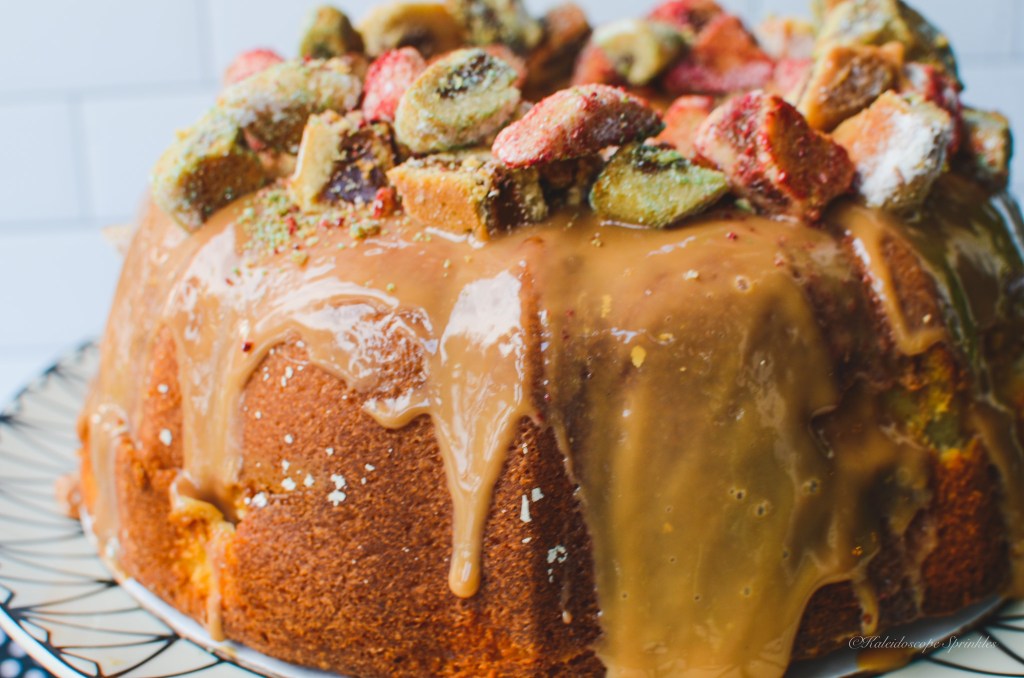
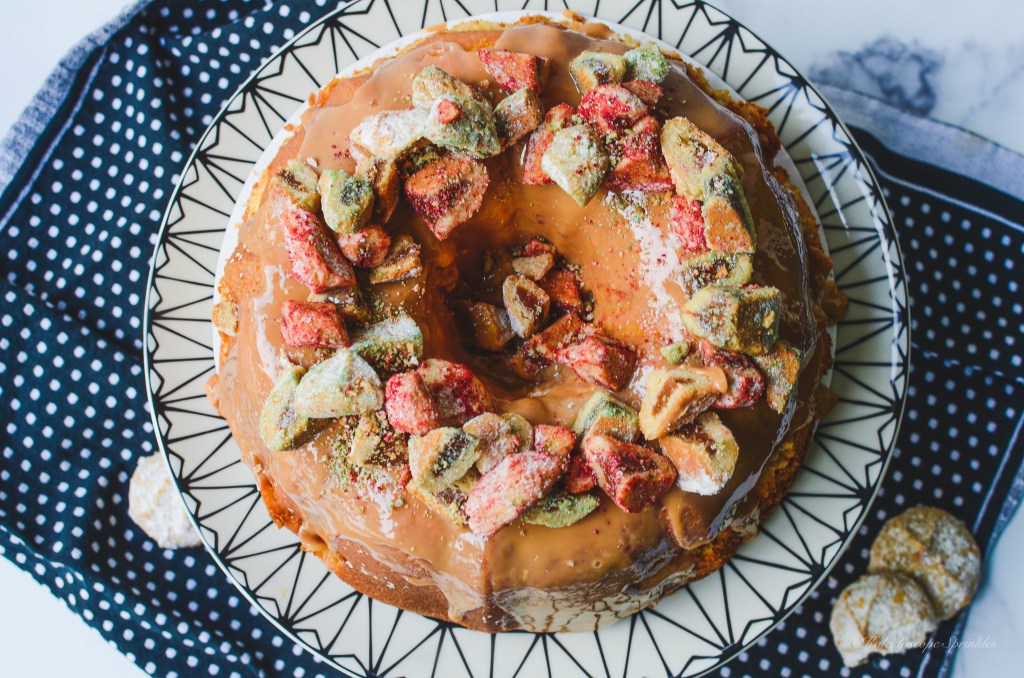
Last year I made some Dulce de Leche Bars for a spring afternoon tea. Dulce de leche is a popular type of caramel used in Latin dishes. I will admit that I used store bought dulce de leche in my recipe that I made last year out of convenience (pun intended). This year I decided that I wanted to make my own homemade dulce de leche. What better day to celebrate homemade canned caramel than Cinco de Mayo.
I had some extra buttermilk in my refrigerator after making my favorite red velvet cake and I wanted to put it to use. I thought the best utilization of both my homemade dulce de leche and buttermilk would be a scrumptious fresh pound cake. This simple yet indulgent cake came out just as I planned, perfect! The tangy buttermilk balanced well with the sweet caramel and the pound cake was not too heavy or too sweet. I added a little festive flavor to this cake by topping it with dulce de leche cookies covered in Kaleidoscope Sprinkle Cosmic Shimmers.
I decided to share this simply satisfying cake with you to make the next time you decide to celebrate Cinco de Mayo or just want some really good cake.
See the complete video and recipe below.
Dulce de Leche Buttermilk Pound Cake tutorial video
How do I make dulce de leche?
The best way I have found to make dulce de leche is on the stove top.
Remove labels from sweetened condensed milk cans. (Cook 2-3 cans at a time for more caramel).
Place cans into a large saucepan or dutch oven and cover with 1-2 inches of water.
Cover, turn heat on medium/high and allow water to boil, turn heat down to simmer and allow milk to cook for 4-4.5 hours.
Remove cans from heat and allow to cool completely
Tada you now have dulce de leche just like that!
Homemade dulce de leche
Dulce de Leche Buttermilk Pound Cake
Ingredients:
3 cups of all purpose flour
1 ½ tsp. baking powder
½ tsp. salt
1 ½ cups (3 sticks) unsalted butter, room temperature
2 ½ cups granulated sugar
5 large eggs, room temperature
2 cups buttermilk
1 tsp. vanilla extract
2- 8 oz. can homemade dulce de leche, room temperature.
Prepare bundt pan by greasing and flouring thoroughly.
In a medium size bowl, whisk together flour, baking powder and salt together until combined. Set aside.
Using an electric or hand mixer, on medium speed beat butter and sugar together until creamed and doubled in size, approximately 5 minutes. (Butter should be pale yellow and sugar almost dissolved).
Turn down speed to low/ medium and add eggs one at a time to the creamed mixture. Beat together until fully combined and no visible egg is seen.
Add vanilla extract to the buttermilk.
Turn mixer down to low speed. Beginning and ending with flour, slowly add ⅓ of the flour mixture to the creamed mixture. Add half of the buttermilk. Repeat with flour and buttermilk. Finish with last third of flour mixture. Slow mix until fully combined, be careful not to over mix.
Pour half of batter into bundt pan. Add one can of dulce de leche into center of bundt pan. Add the remainder of the cake batter to the bundt pan. Use spoon or butter knife to swirl caramel into cake batter.
Bake cake at 350F for 55-60 minutes until cake is gold brown and slightly jiggles to the touch.
Allow cake to completely cool to room temperature. Invert cake onto a cake board or cake pedestal.
Cover top of cake with other can of dulce de leche. Use spoon or butter knife to spend evenly over the cake. Cover dulce de leche cake with chopped and Cosmic Shimmered dulce de leche cookies.
As a child, my world was centered around Barbies. I looked forward to playing with dolls and creating different adventures every day. My cousin and I would play for hours and hours. For my birthday and the holidays I couldn’t wait to see what I would hopefully be adding to my colorful collection. I still remember as a kid one of my favorite gifts for Christmas was the Barbie motorhome and Splash Fountain Pool with working lights. One of my favorite things to do with my Barbies was also make new clothes for all their enterprises.
Barbies were so influential in my adolescence and continue to influence me today. By the age of 13 I transitioned from Barbies to more fashion, but the Barbie impact remained at the forefront. A few months ago I heard about the World of Barbie, an interactive, immersive experience for Barbie lovers of all ages. Once the World of Barbie was here in the Los Angeles I quickly purchased my tickets and got to planning my Barbie ensemble.
This past weekend I was finally able to participate in the World of Barbie and it was incredible. The experience brought back so many childhood memories. I loved all the interactive exhibits and as much Barbie pink as my heart could take.
Please see the highlights from my World of Barbie visit and Barbie OOTD inspiration below.
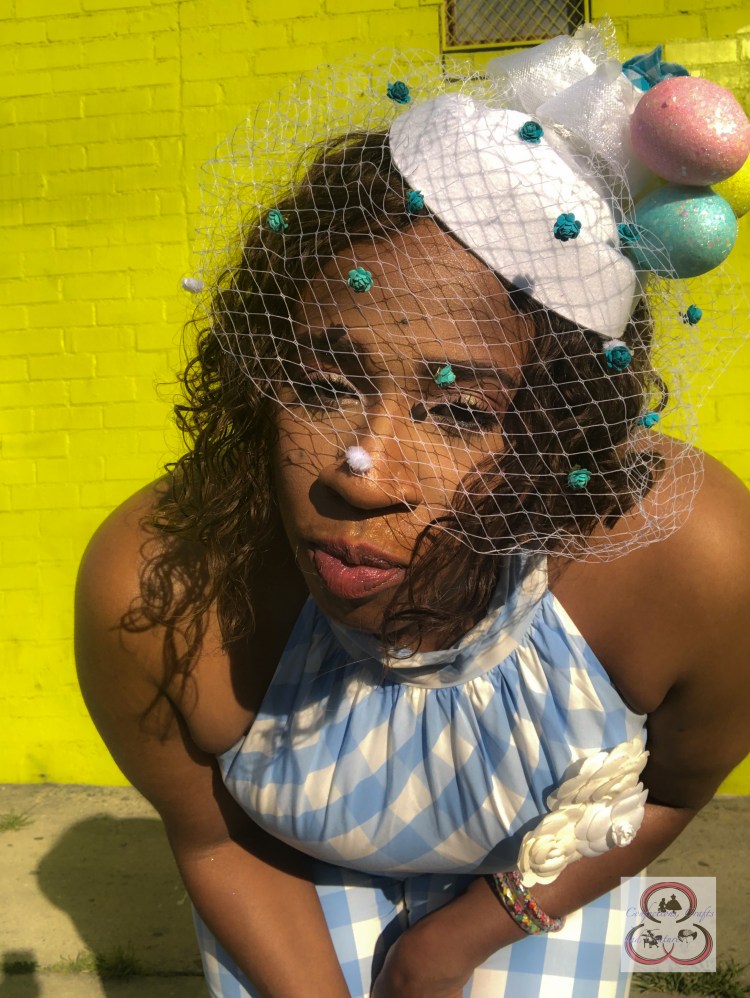
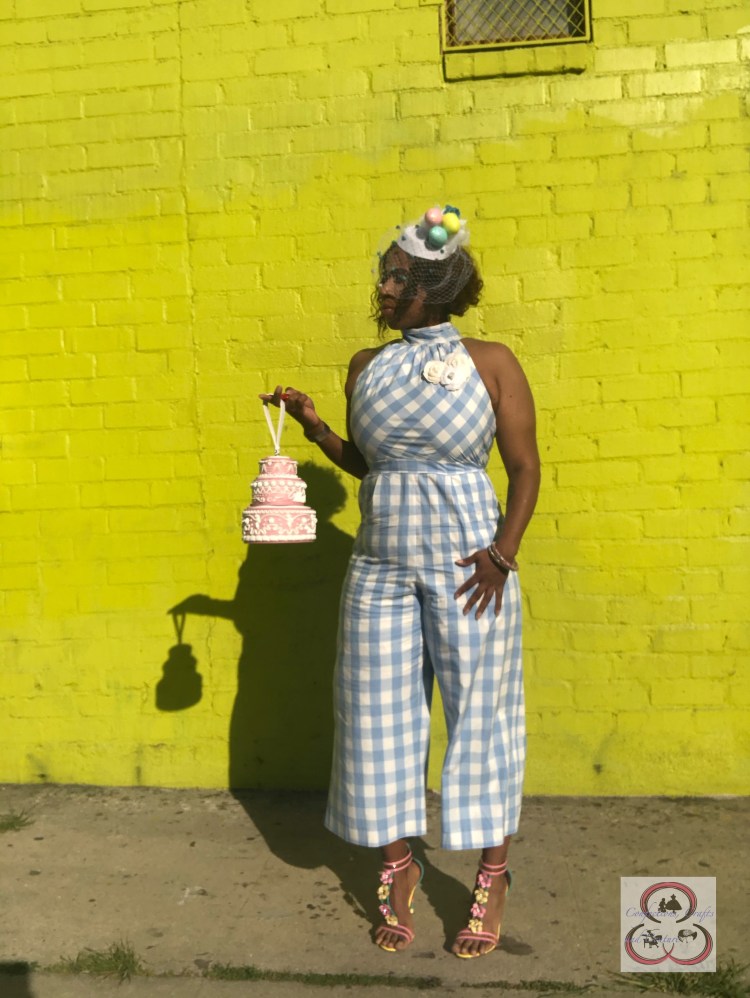
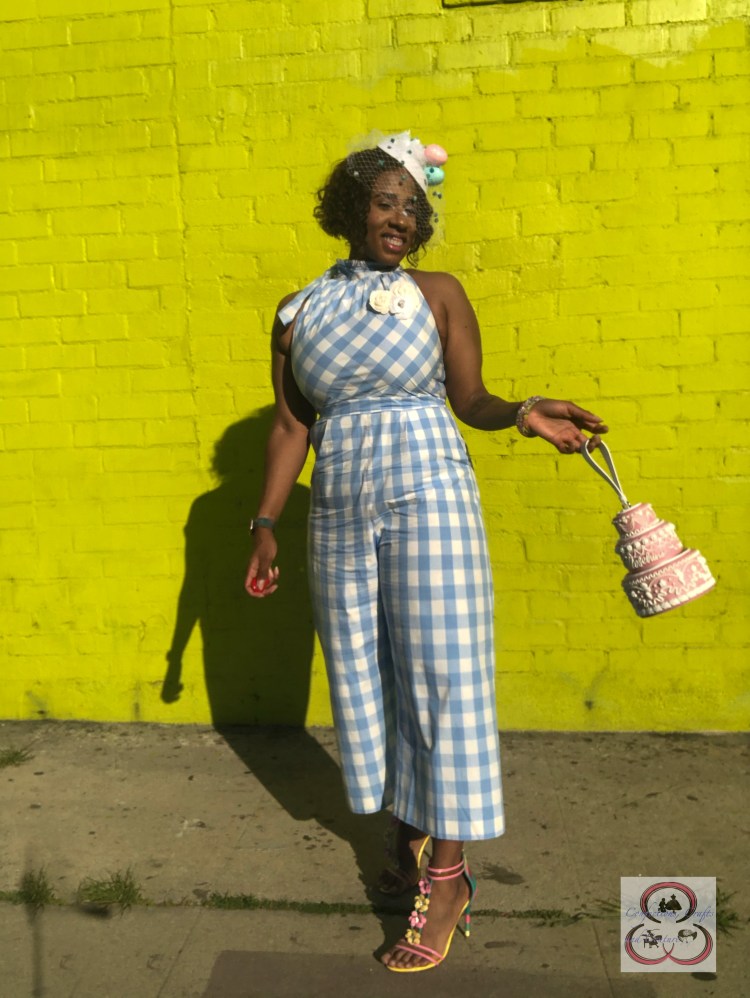
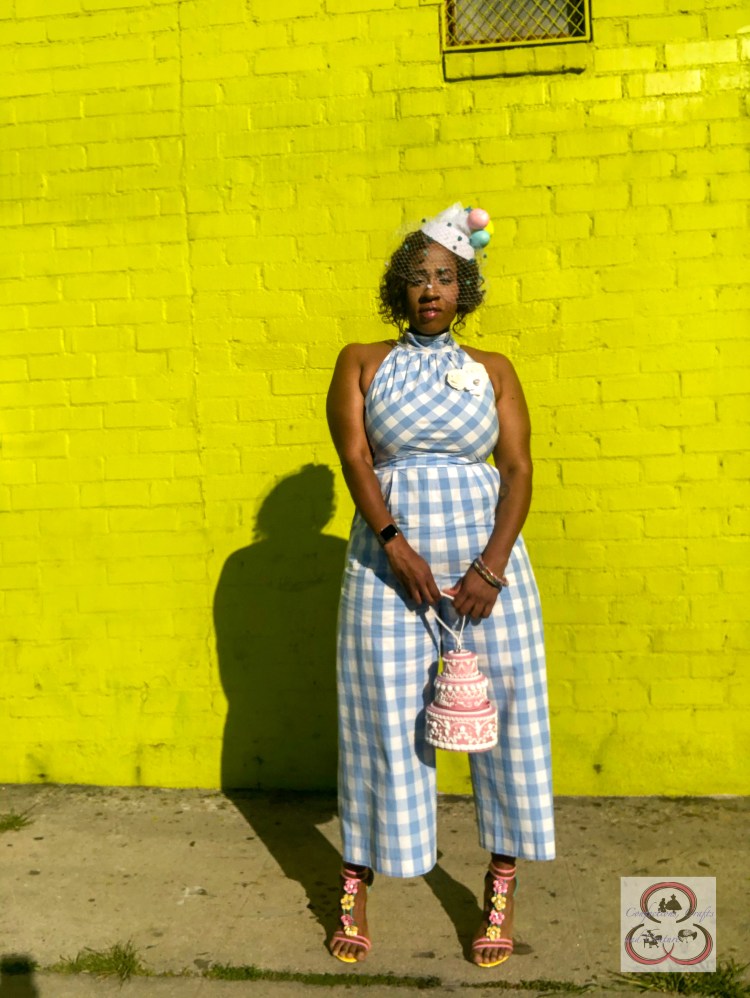
Here we are in our second annual quarantine Resurrection Sunday. Last year I honestly kept my pajamas on and enjoyed virtual service from the comfort of my couch. Although this year again I will still not able to attend church services in person, I decided to at least dress up. I bought this gingham jumpsuit over a year ago and sadly it still had the tags on it until this morning. (I’m trying to do better, I promise). This jumpsuit and my mother’s favorite fabric pattern inspired me to get into the Easter festive fashion spirit. I created my DIY Easter basket fascinator and I am quite pleased with the results. Since I didn’t get an Easter basket this year, I can at least look like one.
Spring has sprung upon us once again. This season is always filled with flowers and pastel decorations. This season to me always is represented by Easter or Resurrection Sunday as well. Lent the time before Easter/ Resurrection Sunday is the time to reflect inward and purge those things that cause our faith to waver. I always enjoy Easter Sunday because I feel that it is definitely a time to celebrate after a new awakening.
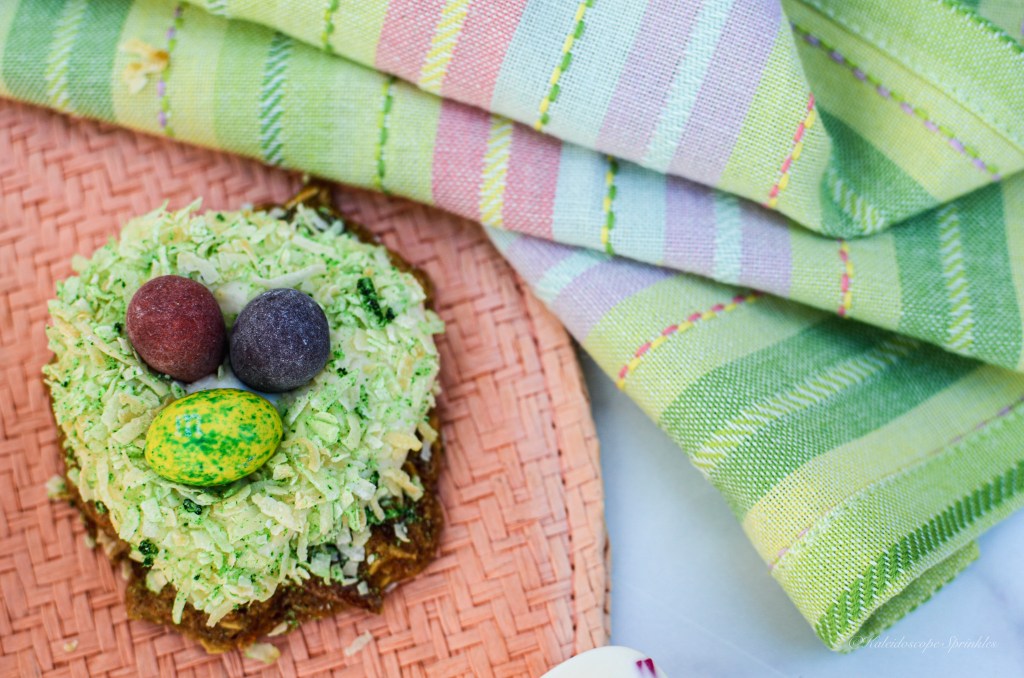
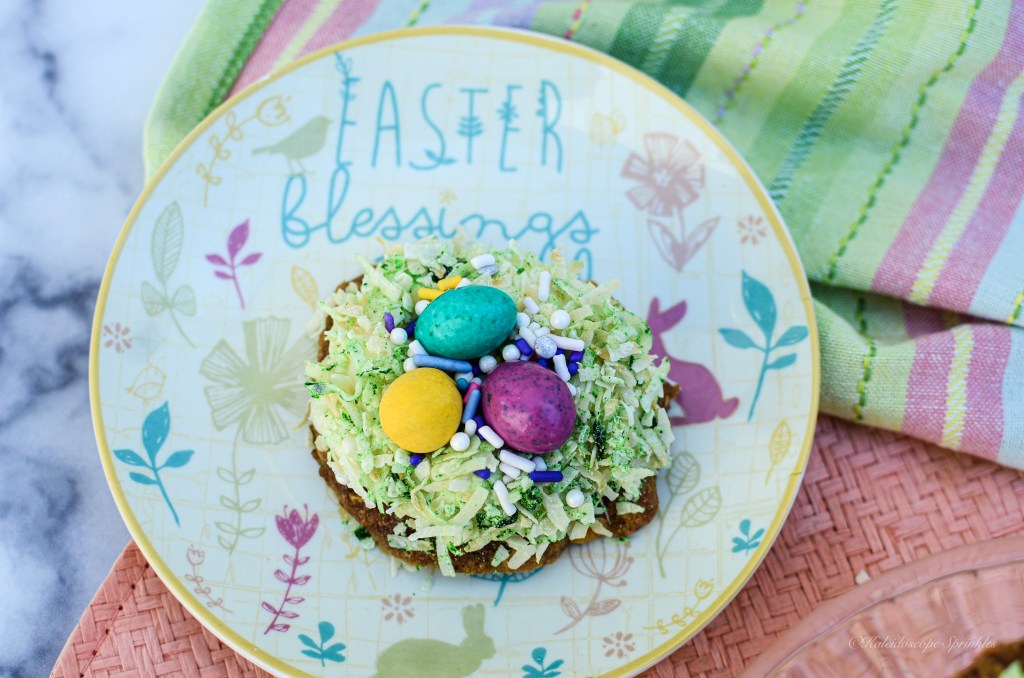
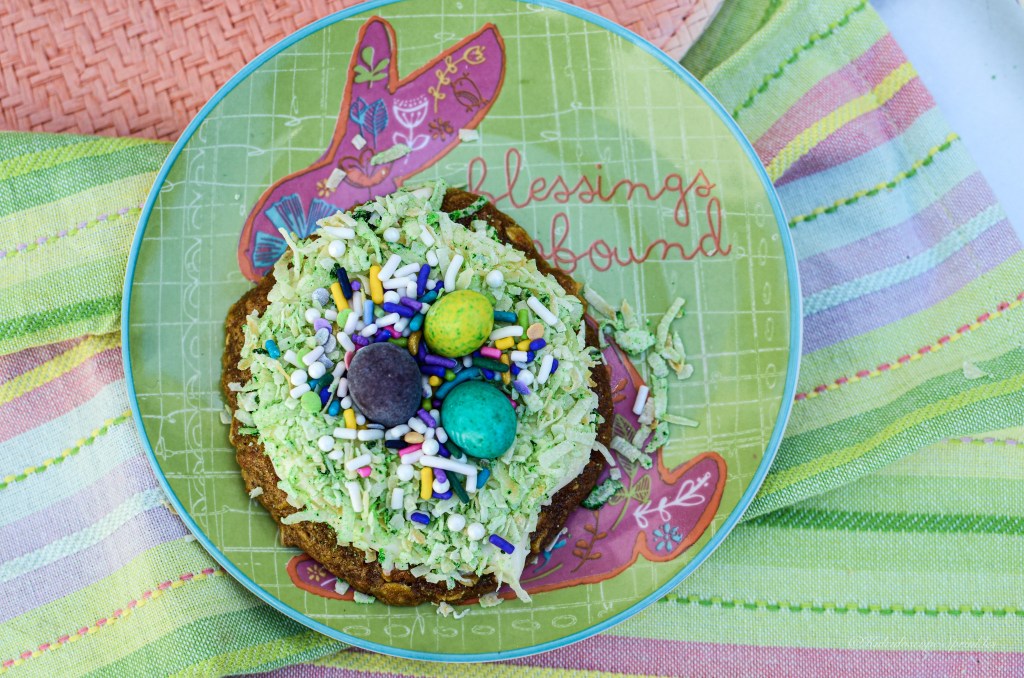
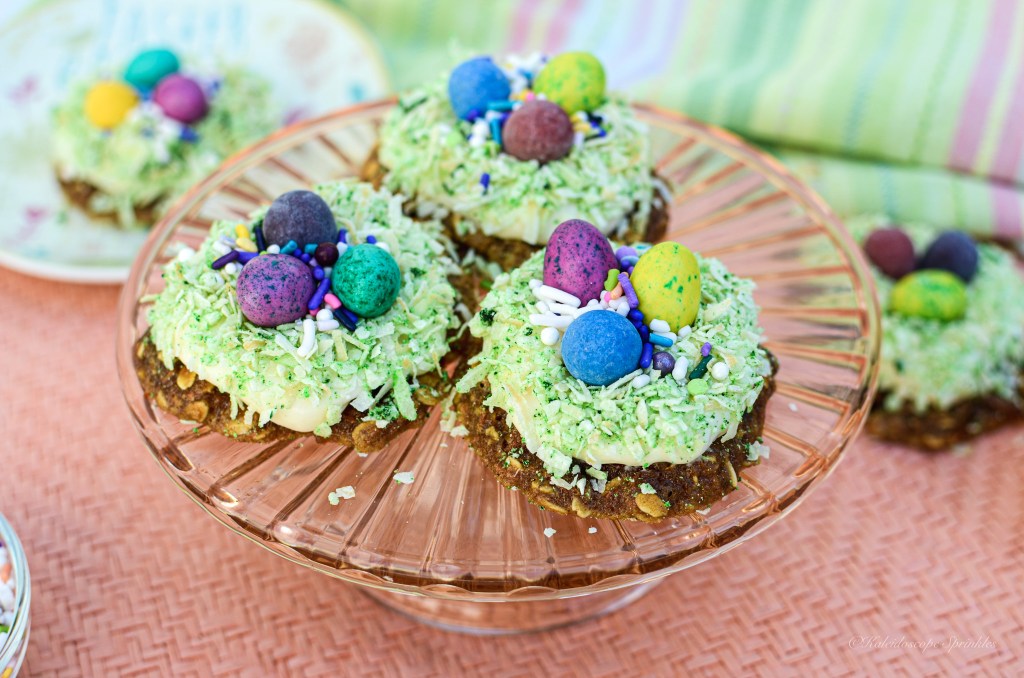
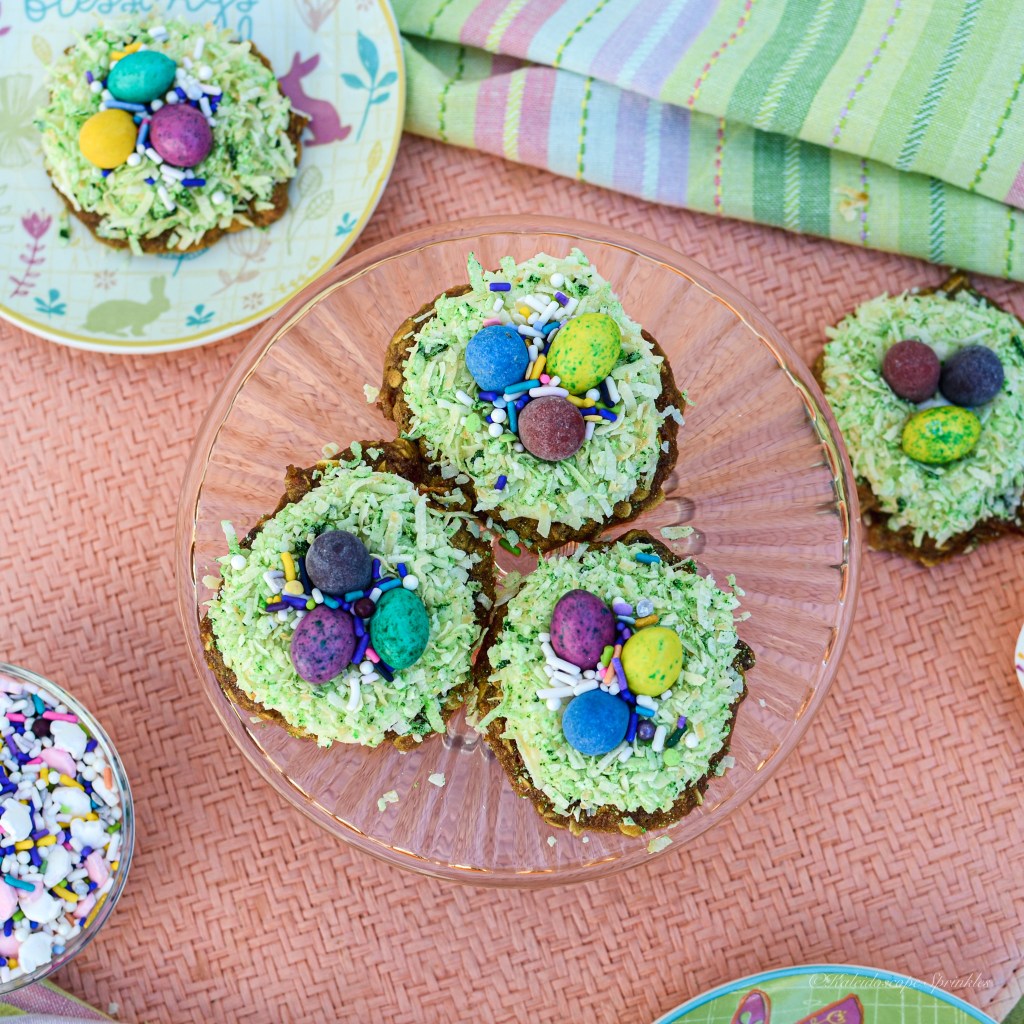
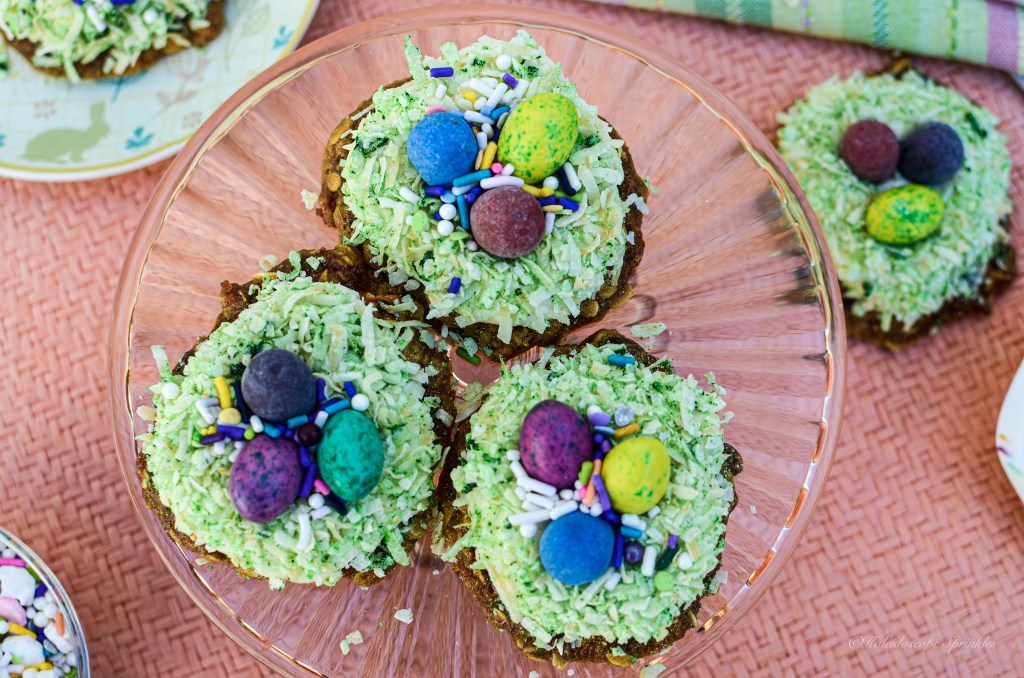
The best way I know how to celebrate is with a new recipe. In the previous years for Easter I have constructed a fabulous layered Carrot Cake. There is also my well known and favorite Carrot Cake Bread Pudding, which is a definitely a must try. This year I decided I wanted to make something a little more simpler. I wanted a recipe that represented Easter flavor and looks without all the steps, pomp and circumstance. I decided on some delicious Carrot Cake Cookies as my contribution to the holiday.
These super delectable cookies are easy to make and still have all the flavor of carrot cake in each bite. These cookies are hearty and somewhat healthy since they’re filled with carrots, oats, raisins and nuts. The tasty cookies are then topped with a smooth and tangy cream cheese frosting and decorated for said occasion with Kaleidoscope Sprinkles My Mama’s Biscuits Sprinkle Mix and candies. Definitely give these cookies a try if you’re looking for a way to switch things up for your Spring/ Easter celebration this year.
You can find the recipe and complete baking video below.
In a medium sized bowl, mix together flour, baking soda, salt, almond flour, cinnamon, ginger, nutmeg and cloves . Set aside.
In a large bowl, using a stand or hand mixer cream oil and brown sugar together. Beat on medium speed until the mixture resembles wet sand. Add egg to the mixture. Mix batter until fully combined but be careful not to over mix. Add vanilla extract. Add grated carrots and oats. Add the flour mixture. Fold in raisins and nuts until combined.
Using spoon or cookie scoop, place cookie dough onto parchment or silicone lined baking sheets. Bake cookies for 9-10 minutes until cookies are slightly firm to touch. Do not over bake to keep cookies chewy.
While cookies are baking, make cream cheese frosting. In a medium bowl, whisk cream cheese. Slowly add confectioner’s sugar using mixer on low speed until frosting is smooth. Add cream, vanilla extract and lemon zest. Whisk frosting on medium-high speed until combined and frosting is light and fluffy.
Once cookies have cooled completely, top each cookie with cream frosting. Add shredded coconut, sprinkles (optional) and candies (optional) to each cookie for decoration.
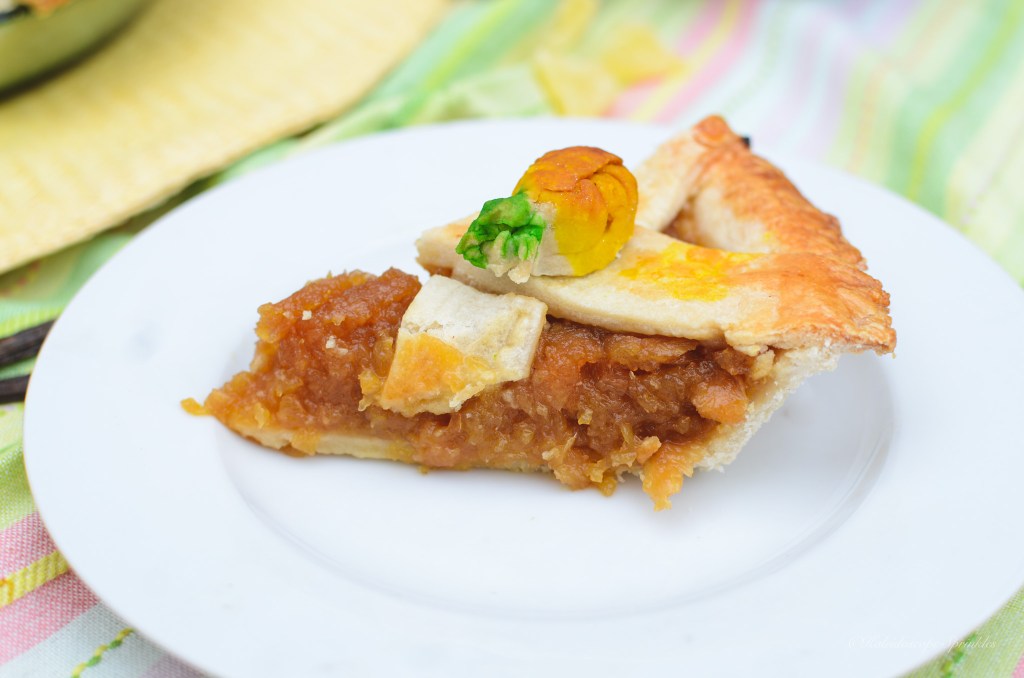
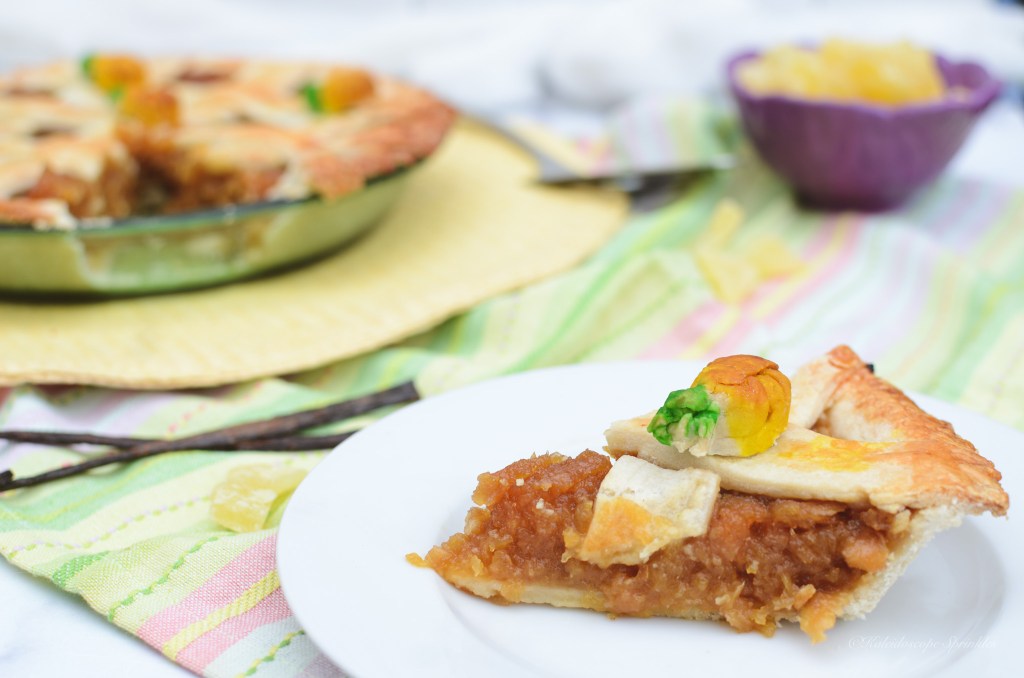
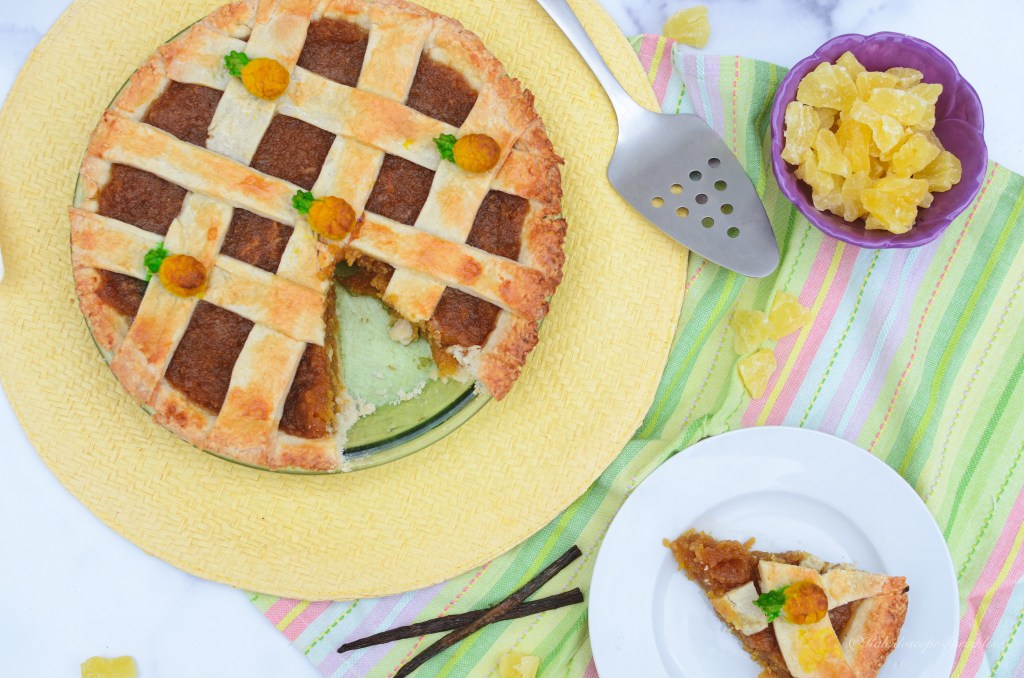
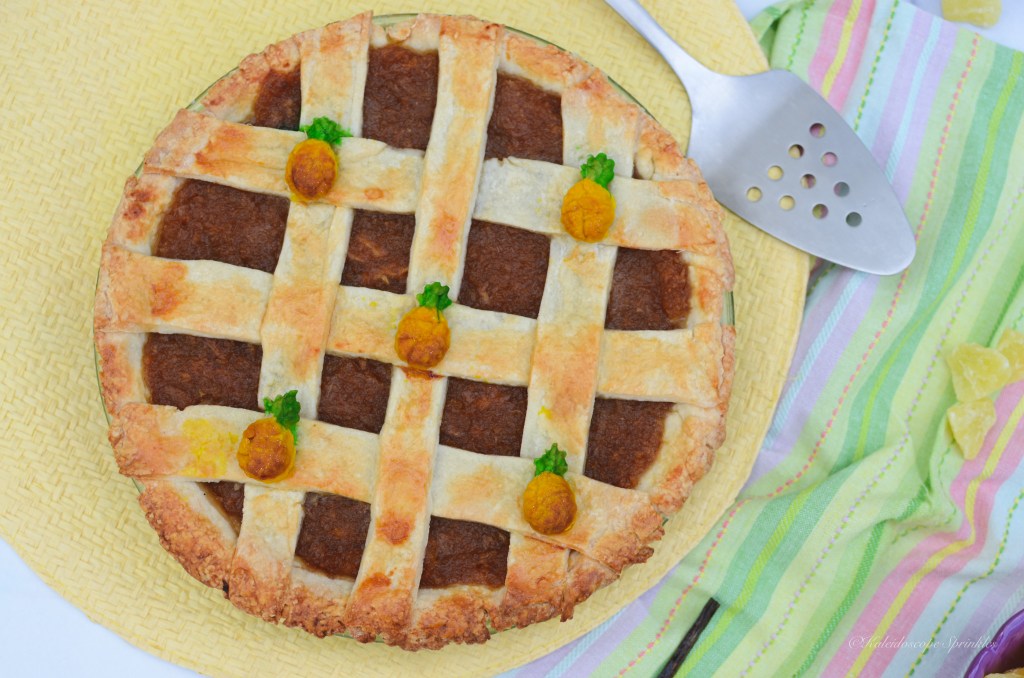
While I was visiting Singapore during the New Year I had to opportunity to experience some incredible foods. After reading Crazy Rich Asians before my trip, my expectations for Southeast Asian food was very high. After I ate my way through both Thailand and Singapore I was not disappointed one bit or bite. From the fresh produce, the Singapore Slings, tons of noodles, all the hawker stall restaurants and delish sweet treats, it was hard to pick my favorite food. One thing that definitely stood out to me on my palate and during my reading of Crazy Rich Asians were the pineapple tarts. These simple and yet sweetly satisfying treats were so memorable to my trip that I ate several during my stay and even brought some home with me.
After being back in the States, I tried to savor every pineapple tart I had and make them last as long as I could. My pineapple tart souvenirs lasted probably a good month before my supply ran empty. Thankfully my tastebuds remembered every bite, so I could recreate this delicious dish for myself and share with you. Instead of making tarts I decided to create a pie form. This pineapple pie was easier to make than tarts, but still had all the flavors I remembered in Singapore. I also thought that a pineapple pie would add a little western flare to the southeast Asian treat.
You can find the complete recipe and video below. Give this scrumptious and original tropical treat a try and let me know what what you think. I promise you won’t be disappointed.
Pineapple Pie
Pineapple Pie
Crust:
2 cups All- purpose flour
2 tbsp. granulated sugar
1 tsp of salt
¼ cup of melted coconut oil, cooled to room temp.
¼ cup of cold unsalted butter, cut into small cubes *
2 tbsp. of vodka
2-4 tbsp. of ice cold water
* (for vegan crust, use ¼ cup of vegetable shortening or vegan butter instead of regular butter
Pineapple filling:
1 large fresh pineapple (approx. 2.5lbs), peeled, cored and cut into small cubes
2 tbsp. of unsalted butter *for vegan pie, use vegan butter
Directions
For the crust:
In a food processor, mix together flour, sugar and salt. Add in coconut oil and butter to the flour and pulse the processor until mixture is texture of course wet sand. Next slowly add vodka and water until the dough comes together in a ball and peels off the side of the bowl. Take the dough out of the bowl and lightly knead dough into a smooth disc. Wrap dough in plastic wrap and chill in the refrigerator for at least 30 minutes.
While the dough is chilling, make the pineapple filling. In a large saucepan, stir together fresh and dried pineapple, brown sugar and water on low heat. Slowly cook down pineapple filling for about one hour until liquid is reduced by half and sticks to the back of the spoon. Once pineapple filling is thickened, add rum (optional), vanilla, salt and melted butter. Cook for an additional five minutes until sauce re-thickens and sticks to back of the spoon. Use an immersion blender and coarsely chop mixture. Take the filling off the heat and allow it cool completely to room temperature.
Preheat oven to 375F. Take dough out of the refrigerator. Let the dough rest for at least 20 minutes. Divide dough in half. Roll first half of dough out into a 10″ diameter circle about 1/8″ thick. Place the dough in a 9″ pie pan. Spread pineapple filing evenly into the pie dish. Roll out the second half of dough and gently place it on top of the pineapple filling. Seal up edges of pie dough. Cut slits into middle of pie to allow steam to escape. Brush with egg wash (or vegan milk) and sprinkle with turbinado sugar, optional. Bake pie for 25-30 minutes until crust is golden brown. Allow pie to cool to room temperature. Cut into pie and top with ice cream or whipped cream. Devour and enjoy!!
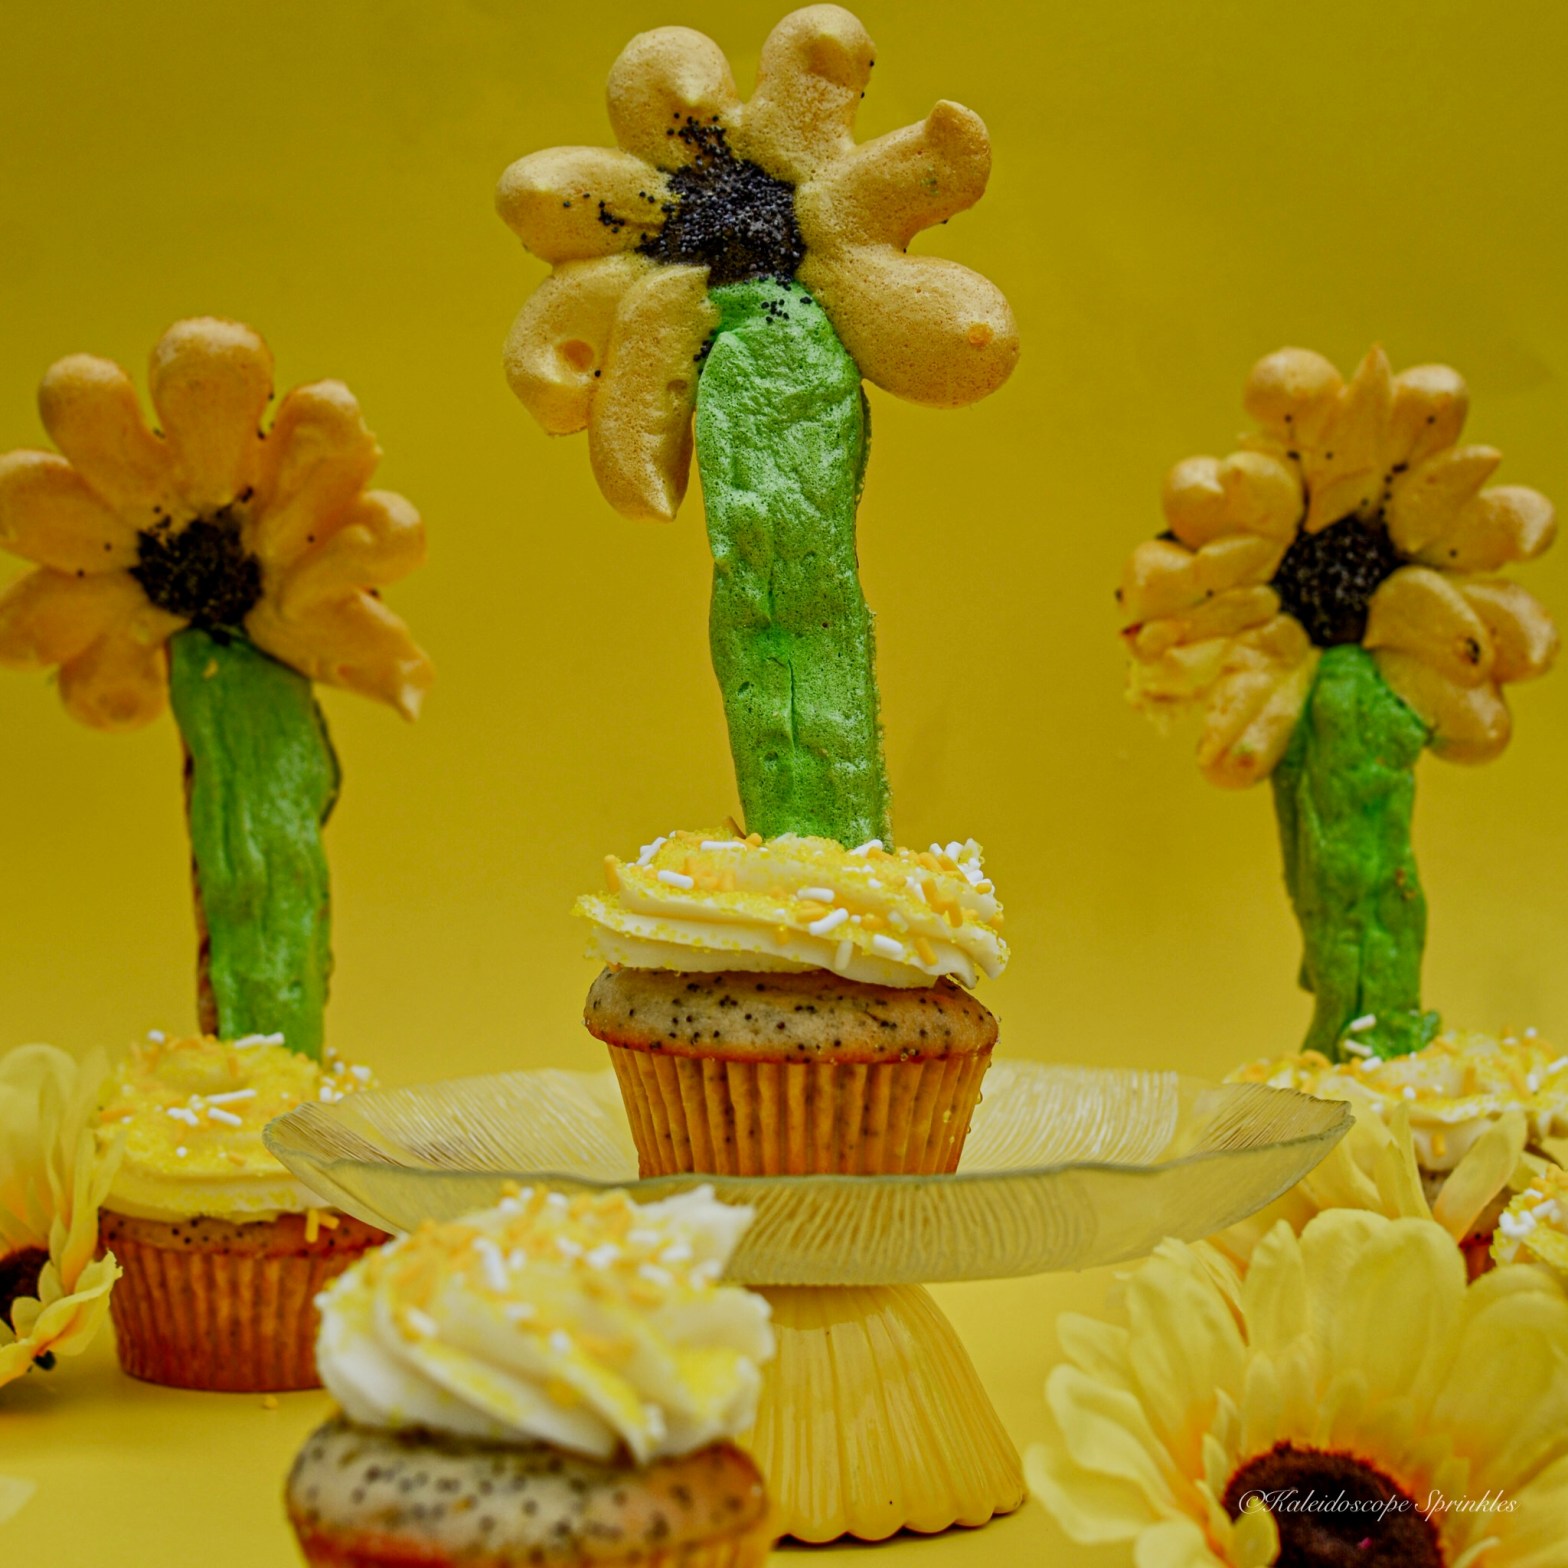
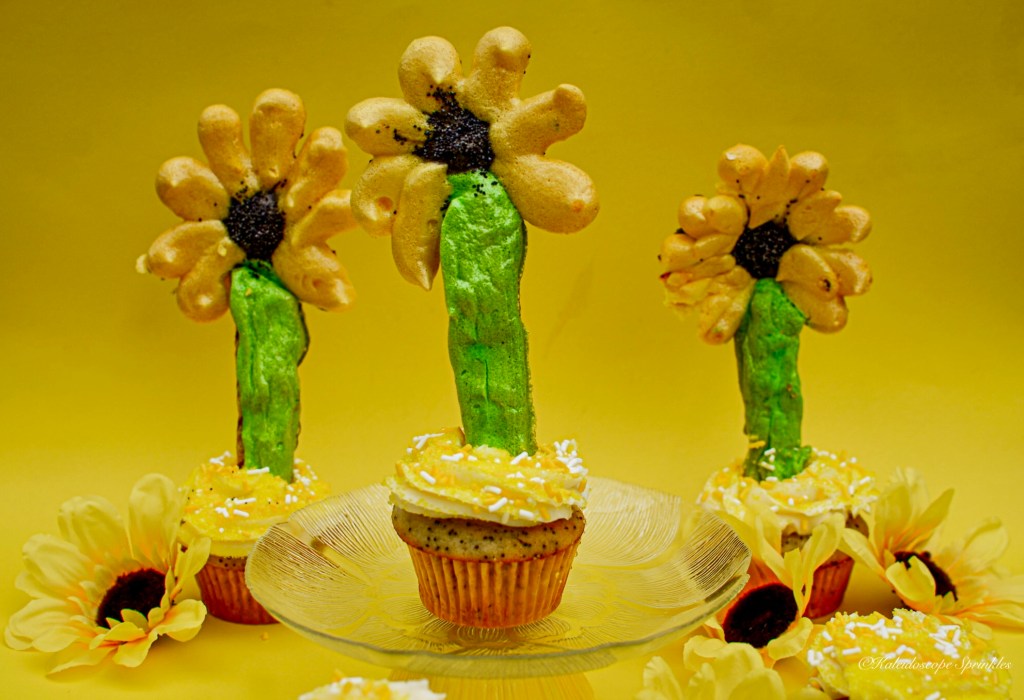
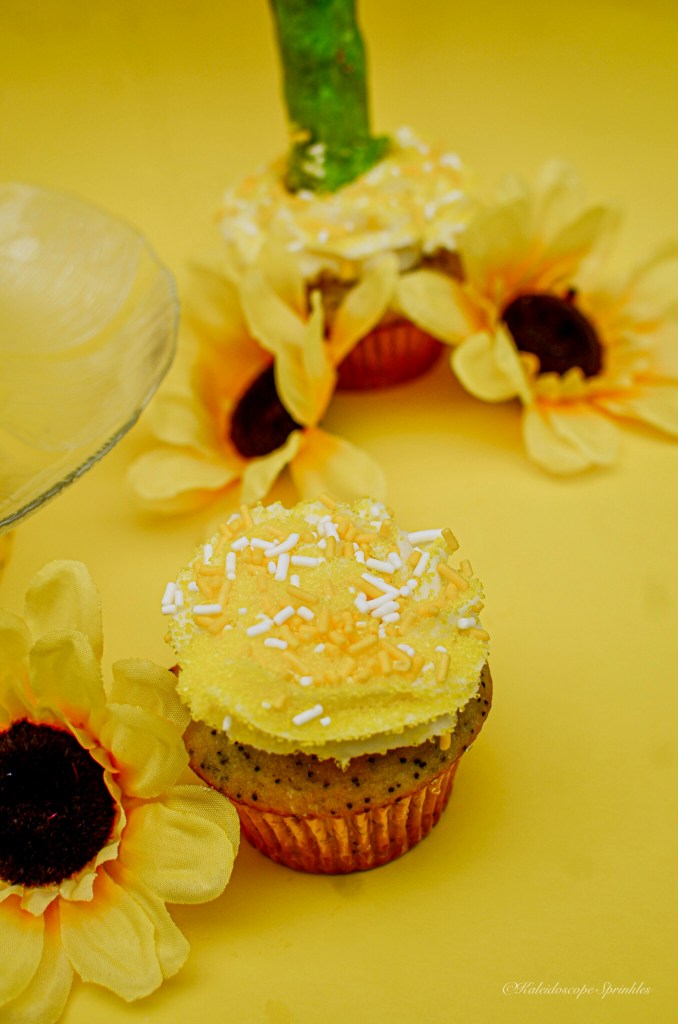
You know how the saying goes, “when life gives you lemons…”. Well instead of making lemonade or limoncello as I’ve done in the past, I decided to do things differently. With all this rain in Los Angeles my meyer lemon tree has been in full blossom and full of citrus. Every year I pick the delicious lemons off my tree and make some sort of sweet treat. (Check out my previous recipes for my Limonc”hello” and When Life Gives You Lemons Cake.) This year I wanted to use another famous saying to inspire my recipe. “April showers bring May flowers,” except now because of climate change LA showers are happening earlier than usual.
I love being surrounded by fresh or faux flowers. After spending six weeks in an arm sling and not being able to do what I love, bake, I was too ready to turn my oven back on. Blossoming after surgery and ready to see some sun inspired a new idea for use of my freshly picked lemons. I came up with the concept of lemon poppyseed cupcakes that look like sunflowers. Sunflowers represent vitality and adoration, so they were the perfect recipe to restart my post surgical baking journey. I decided to brighten up these Sunflower Cupcakes even more with Kaleidoscope Sprinkles Lemon flavored Sprinkle Mix. These Sunflower Cupcakes looked and tasted amazing in the end.
See how I created these lemony flower cupcake masterpieces below.
Sunflower Cupcakes
Makes 12 cupcakes
Ingredients
Cupcakes:
1 ¾ cup All-purpose flour
1 teaspoon baking powder
½ teaspoon baking soda
½ teaspoon Salt
2 tablespoons poppy seeds
½ cup of unsalted butter, room temperature
¾ cup granulated sugar
2 tbsp. of lemon zest (approximately zest of 4 large lemons)
¼ cup lemon juice freshly squeezed, equal to 4 large lemons
Yellow, green and black food coloring, for decoration (optional)
Pirouette wafer cookies or pretzel rods, for decoration (optional)
Directions
For cupcakes:
Preheat oven to 350F. Line cupcake tin with liners.
In a medium sized bowl whisk together flour, baking powder, baking soda, salt and poppyseeds. Whisk until all ingredients are combined and set bowl aside.
In a separate large bowl using either a stand or hand mixer cream together butter and granulated sugar until light and fluffy and doubled in sized. (Approximately 3-5 minutes). Add lemon juice and zest to the creamed mixture. Add eggs to mixture one at a time. Add sour cream or yogurt. Add flour mixture and stir until combined. Be careful not to over mix.
Using an ice cream scoop, place cupcake batter into cupcake tins. Bake cupcakes at 350F for approximately 20-22 minutes until tester comes out clean.
Allow cupcakes to completely cool.
While cupcakes are cooling make buttercream frosting and meringues.
For the buttercream frosting and sunflower meringues:
Using a hand mixer or whisk, in a heat proof bowl, whisk together the egg whites, sugar and cream of tartar.
Place the bowl over a double-boiler (saucepan of simmering water). Continue to gently whisk the mixture until it is hot to touch (130F on a candy thermometer).
Transfer the egg whites to the bowl of a stand mixer and, using the whisk attachment, whip the egg whites on medium- high speed until they have tripled in size and are thick and glossy and hold stiff peaks (like meringue).
Divide egg whites in half. Set one half aside in a large bowl for sunflower meringues.
Turn the mixer down to medium-low speed until the mixing bowl is cool to touch, approximately 3-5 minutes. Kick the mixer back up to medium-high speed and add the butter one piece at a time.
Stop the mixer every so often to scrape down the butter caught on the side of the bowl. Keep whisking buttercream until it comes together.
Once all the butter is incorporated and the frosting is light and fluffy, add your salt and fresh lemon juice. Set aside until ready to frost cupcakes.
With other half of meringues in the bowl fold in fresh lemon zest. Be careful not to knock out the air of meringues.
Turn oven down to 200F. Divide meringues into 3 small bowls. Fold in food coloring into each bowl.
Line cookie sheet with parchment paper. Pipe out meringues into sunflower shape (over Pirouette cookies, optional) on parchment paper. Sprinkle poppyseeds onto meringues.
Bake meringues for 45 minutes to one hour. Allow meringues to completely cool and harden.
Place buttercream into piping bag to decorate cupcakes. Frost cupcakes with buttercream. Top cupcakes with Sprinkle Mix and sunflower meringues.
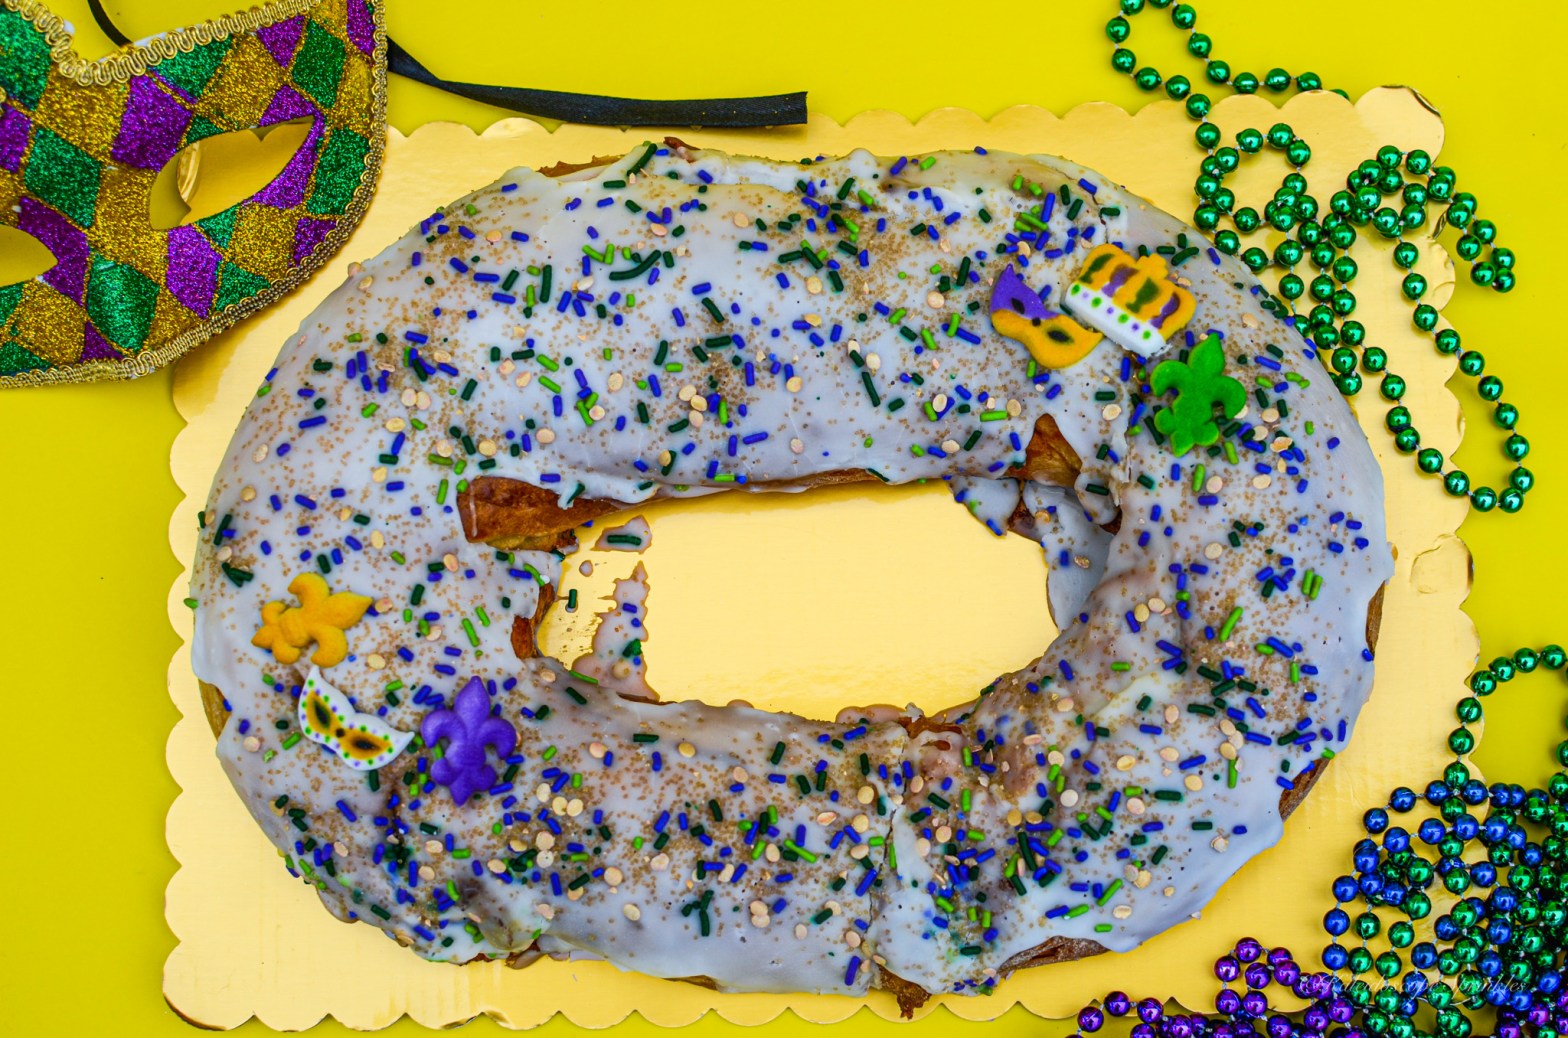
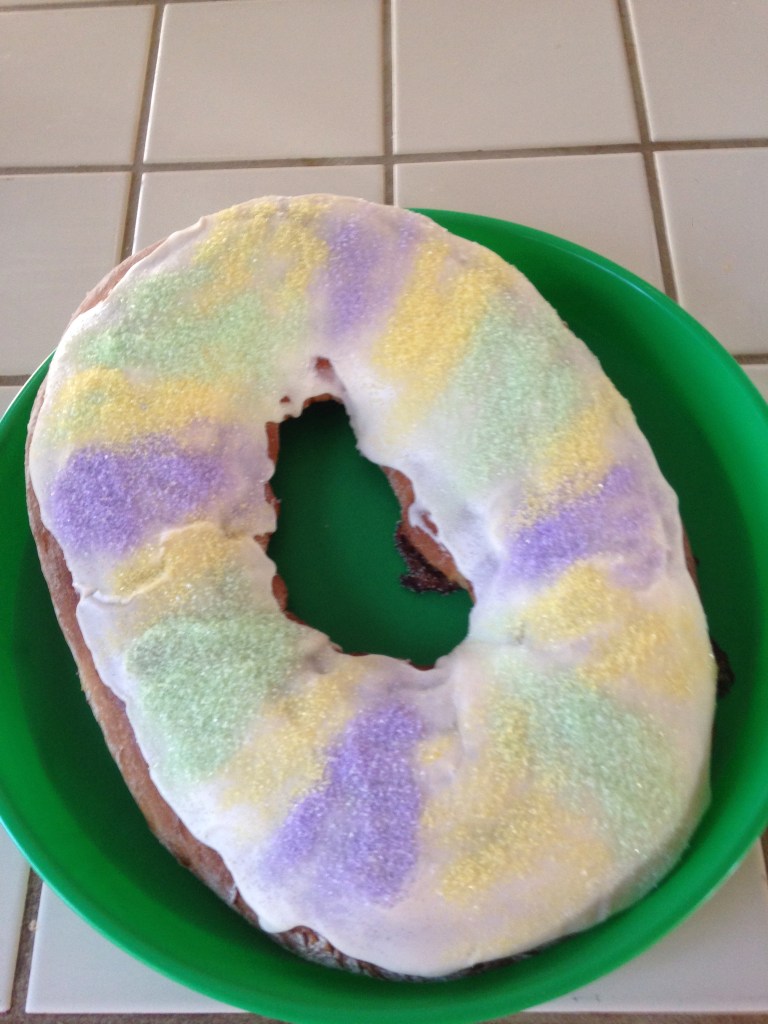
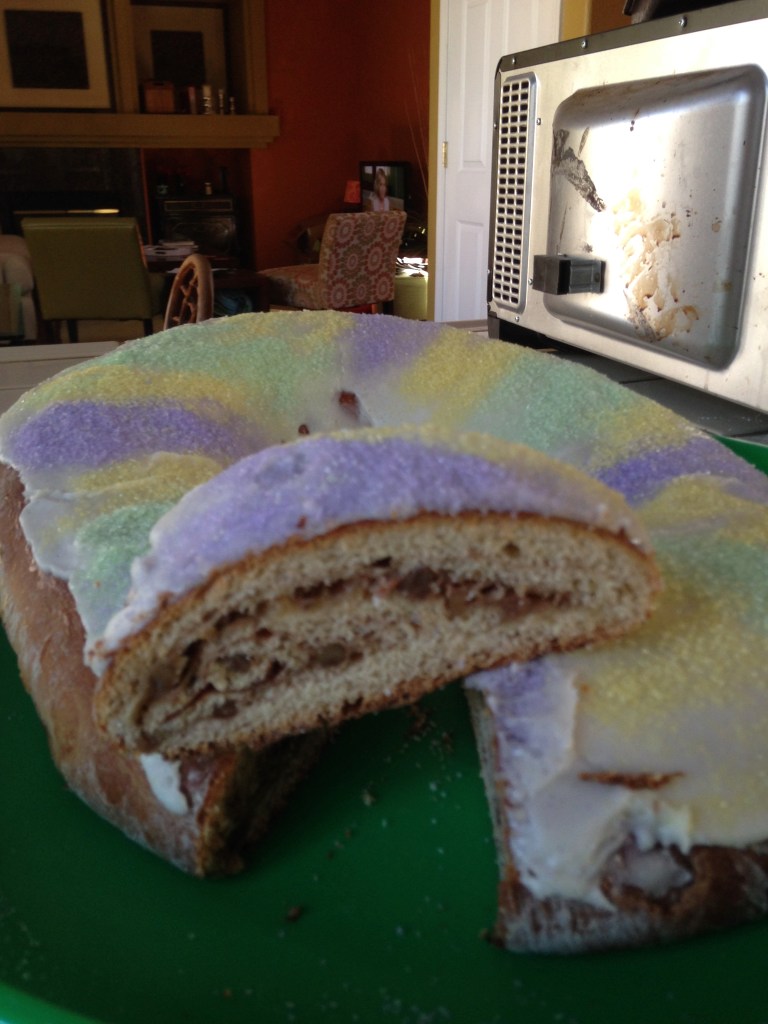
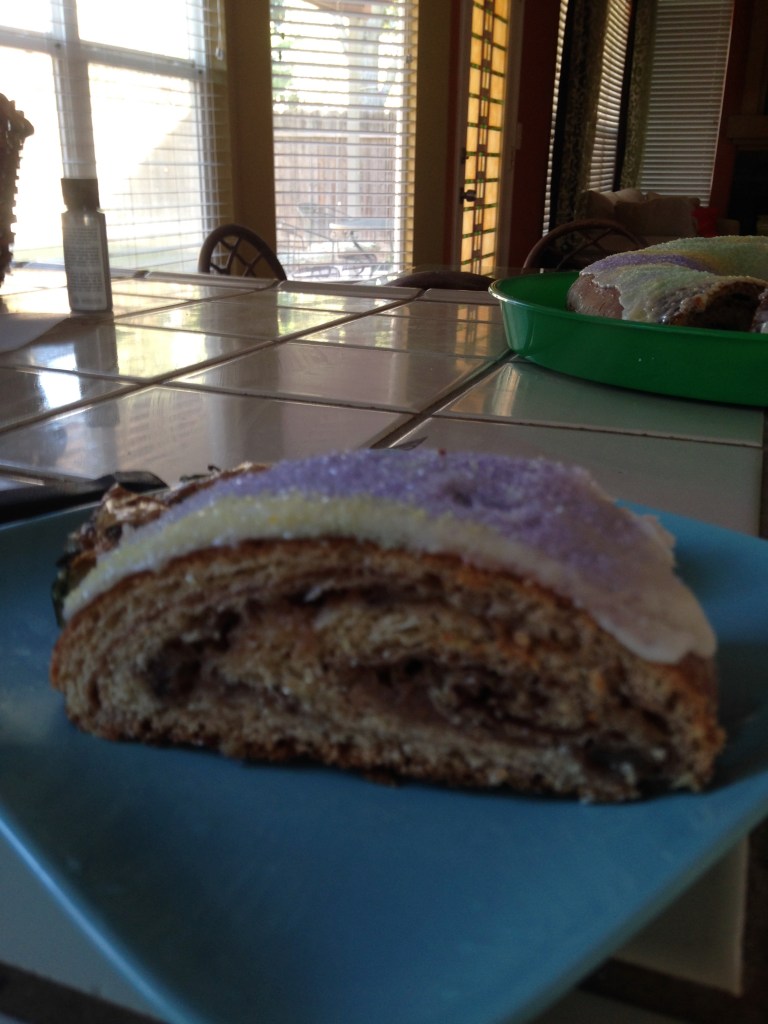
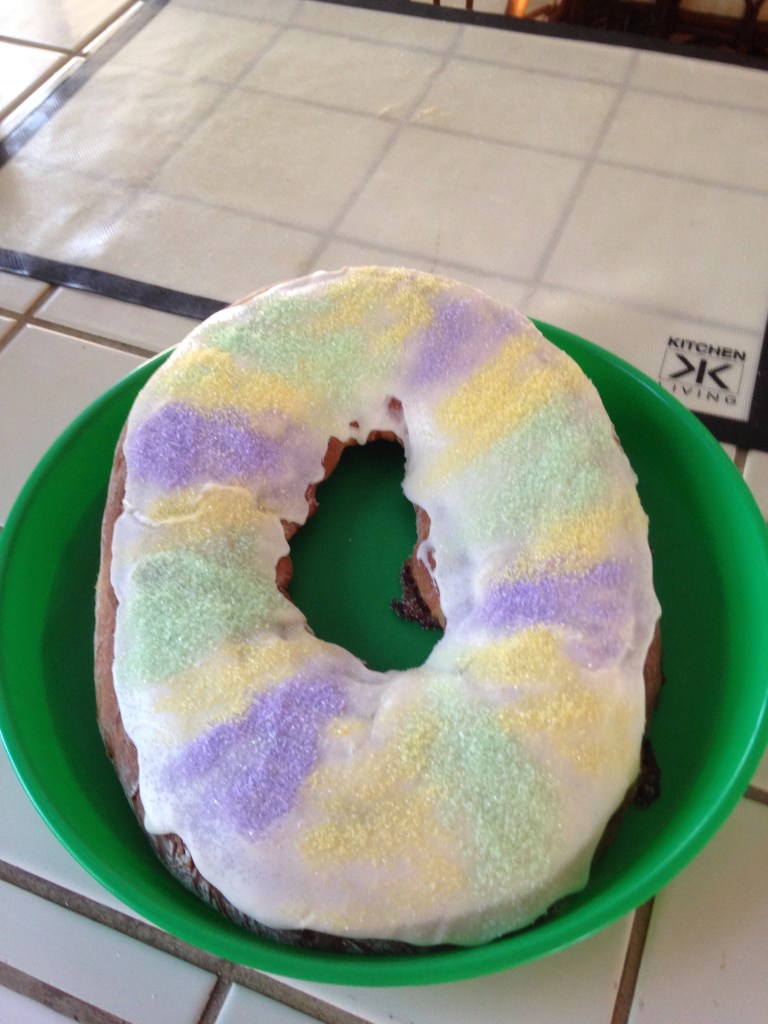
Today is officially the last day of Mardi Gras season. Even though I wasn’t able to visit New Orleans this year to celebrate, I had the opportunity to ritualize this occasion. Every season I, of course, make a King cake to share with my friends and family. (See my King cake recipe here). Other years, I have made some other Mardi Gras treats as well as thrown a party.
Mardi Gras season not only represents a time to eat good food and thoroughly rejoice, it also represents the beginning of Lent season. Lent season is a time of reflection and sacrifice prior to Resurrection Sunday. This year since I’m still in recovery from my surgery I decided to keep it low key but fashionable. I still haven’t decided on what I’m giving up this Lent season, but I’m definitely not sacrificing fashion.
I absolutely love New Orleans! I mean how could you not love a city full of such history, culture, music and amazing food? This is the birthplace of Jazz and the epicenter of melodic cuisine. I was fortunate enough to spend four years here during undergrad and I try to get back there as often as I can.
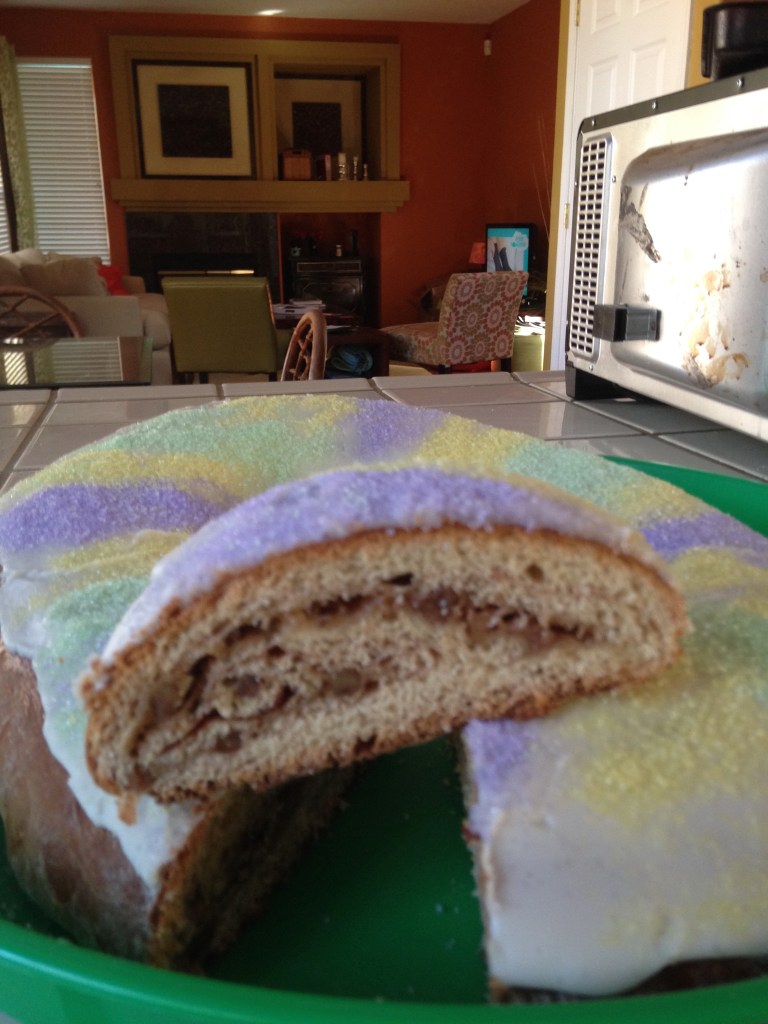
As I mentioned in my previous posts, New Orleans and Louisiana culture runs deep in my blood and spirit. Both sides of my families have roots in Louisiana so I don’t play when it comes to representing the authenticity of its traditions. Every year during Mardi Gras, whether I visit the boot shaped state or not, a King cake is an absolute must. The further I travel outside of Louisiana the harder it becomes to obtain one of these delicacies. I took my frustration and turned it into a recipe. I have been tweaking my King cake recipe over time to keep it fresh and also classic. Check out my King cake recipe below that comes with the options of two fillings: the customary cream cheese filling and also banana foster praline filling.
If you are frustrated in the ability of getting your Mardi Gras King Cake or have never had one, definitely give this recipe a try. Nothing beats a fresh King Cake! I guarantee you will not be disappointed.
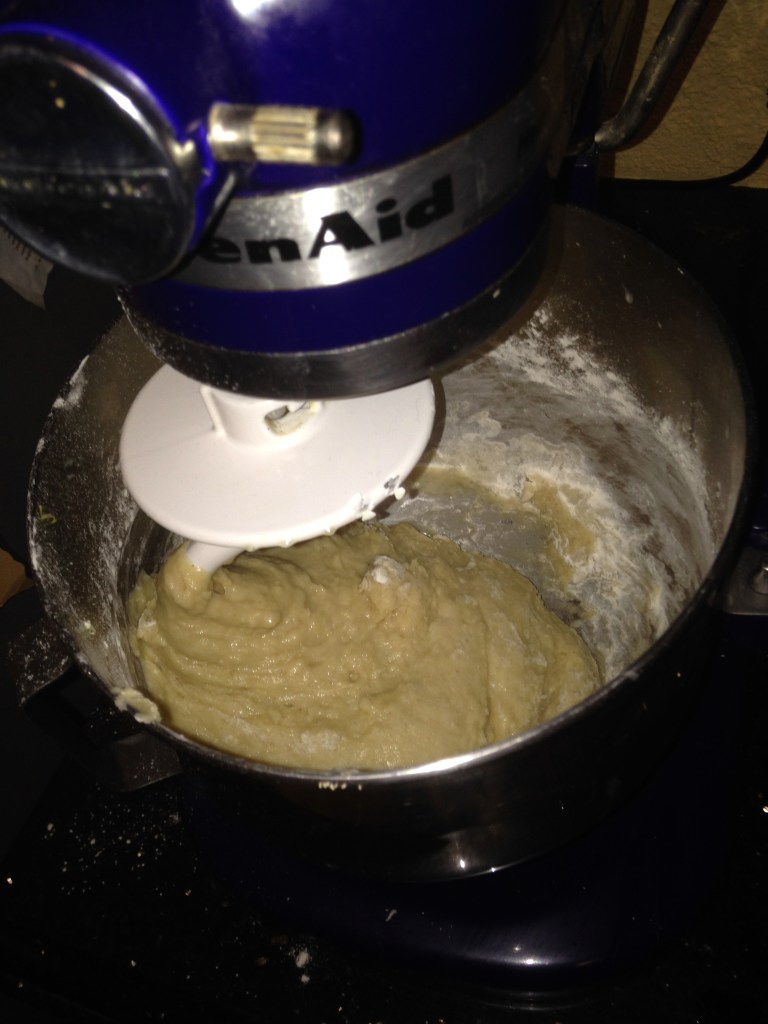
In a large bowl, dissolve yeast in warm water. Allow yeast to activate for at least 5 minutes. Using hand or stand mixer, add sugar, butter, milk, egg yolks, salt, lemon peel, nutmeg and 2 cups flour. Beat until smooth. Stir in enough remaining flour to form a soft dough (dough will be sticky and form around dough hook).
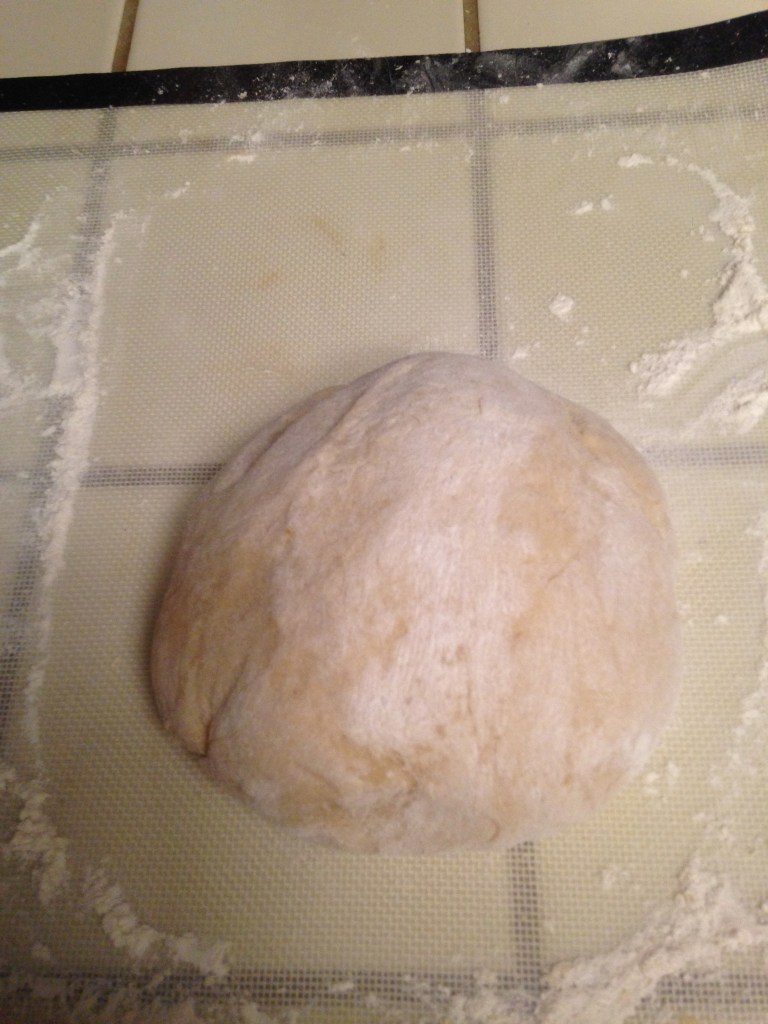
Turn onto a floured surface; knead until smooth and elastic, about 6-8 minutes. Place in a greased bowl, turning once to grease the top. Cover and proof/ let rise in a warm place until doubled in size, about 1 and a half hours.
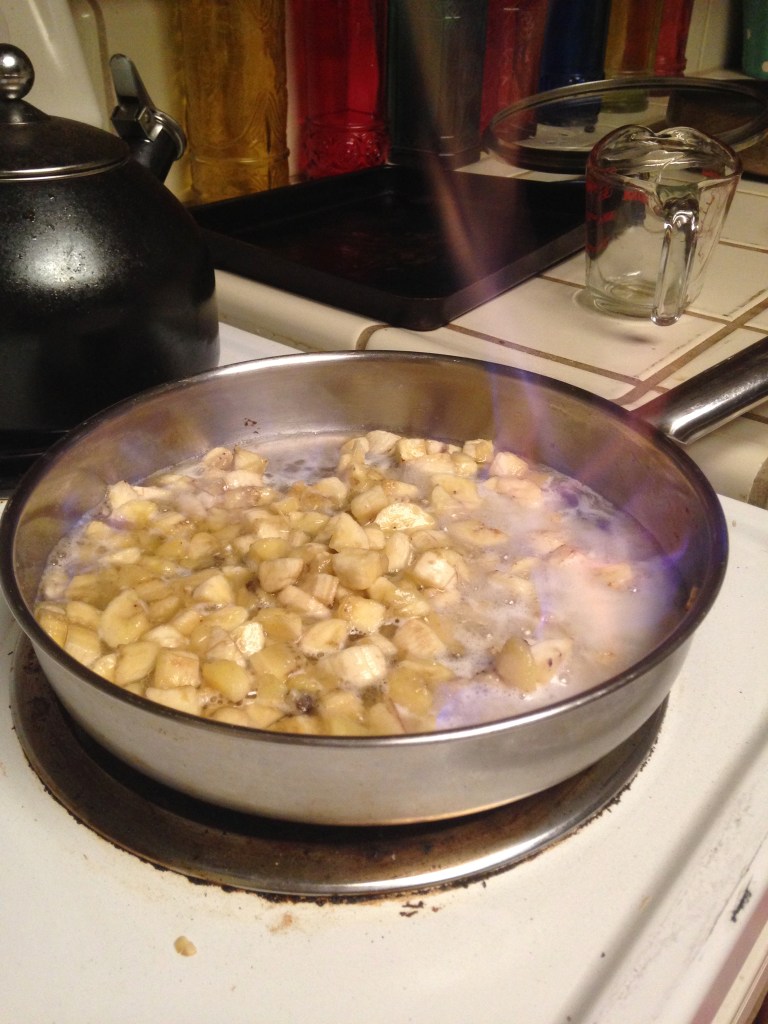
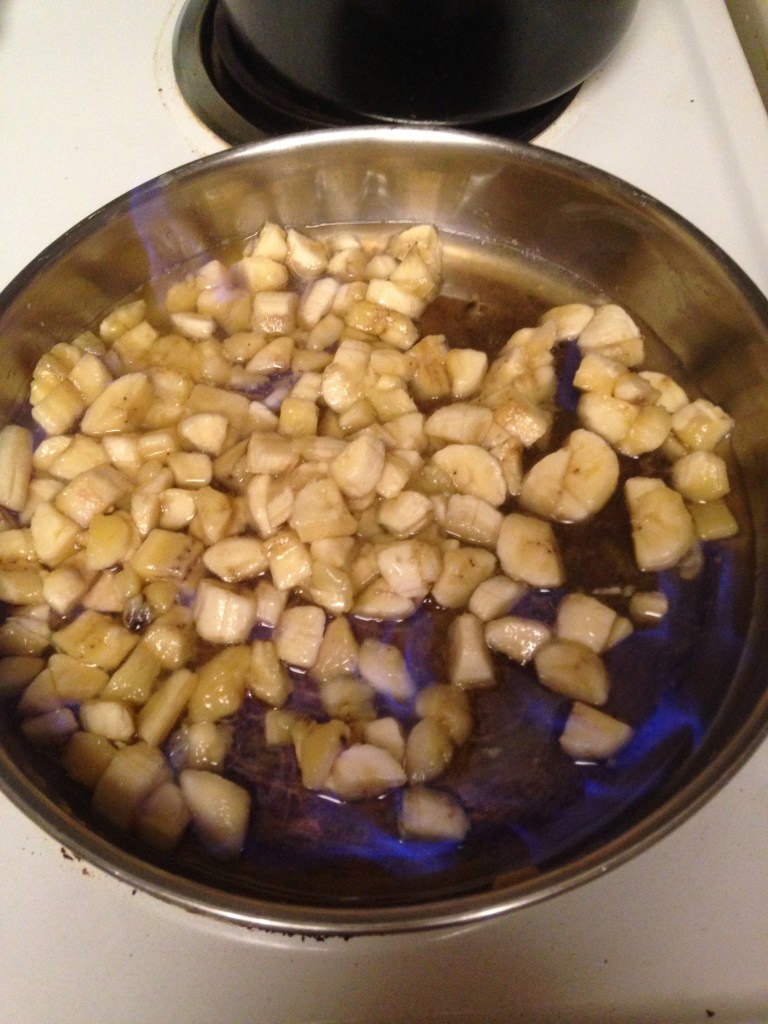
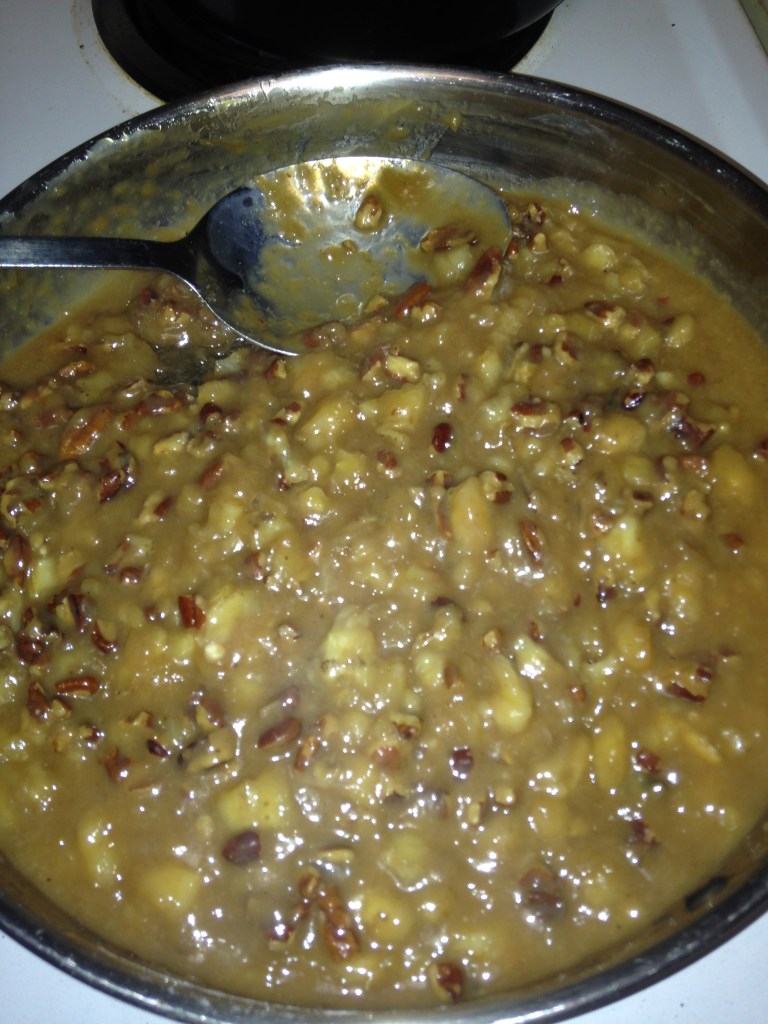
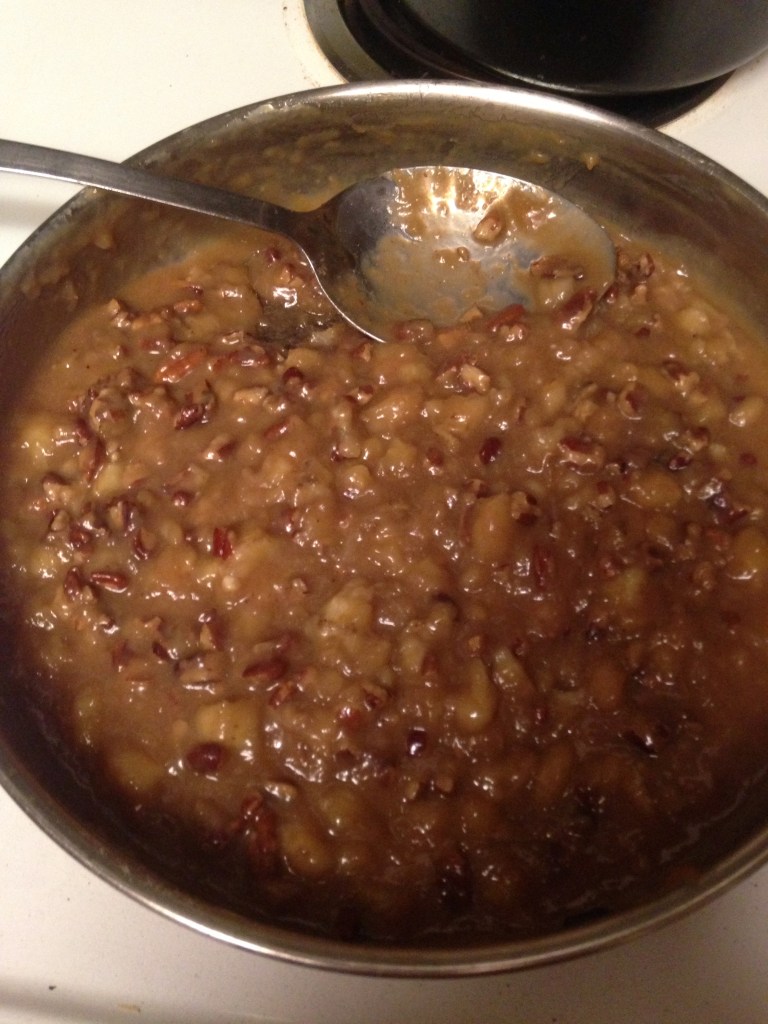
While dough is resting, make your filling. Cut up bananas into ½ inch cubes. In a large skillet cook bananas on medium heat until they began to soften. Turn heat down to low-medium heat. Remove pan from heat and add your bourbon or whiskey. Flambé bananas by lighting liquor on fire. Continue to cook until flame has extinguished. Whisk in flour. Cook until sauce begins to thicken. Add the prepared caramel and milk. Lightly stir together until caramel is incorporated and smooth. Allow filling to simmer for approximately 5 minutes until it tightens. Turn off heat and fold in pecans. Allow filling to completely cool. Set aside.
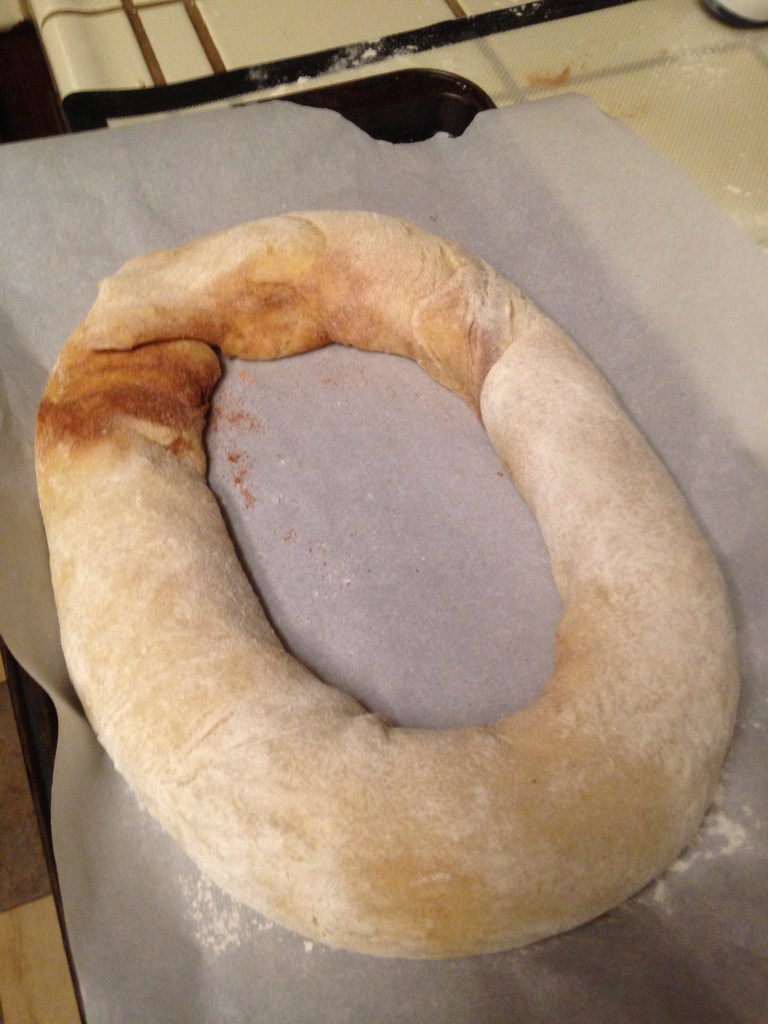
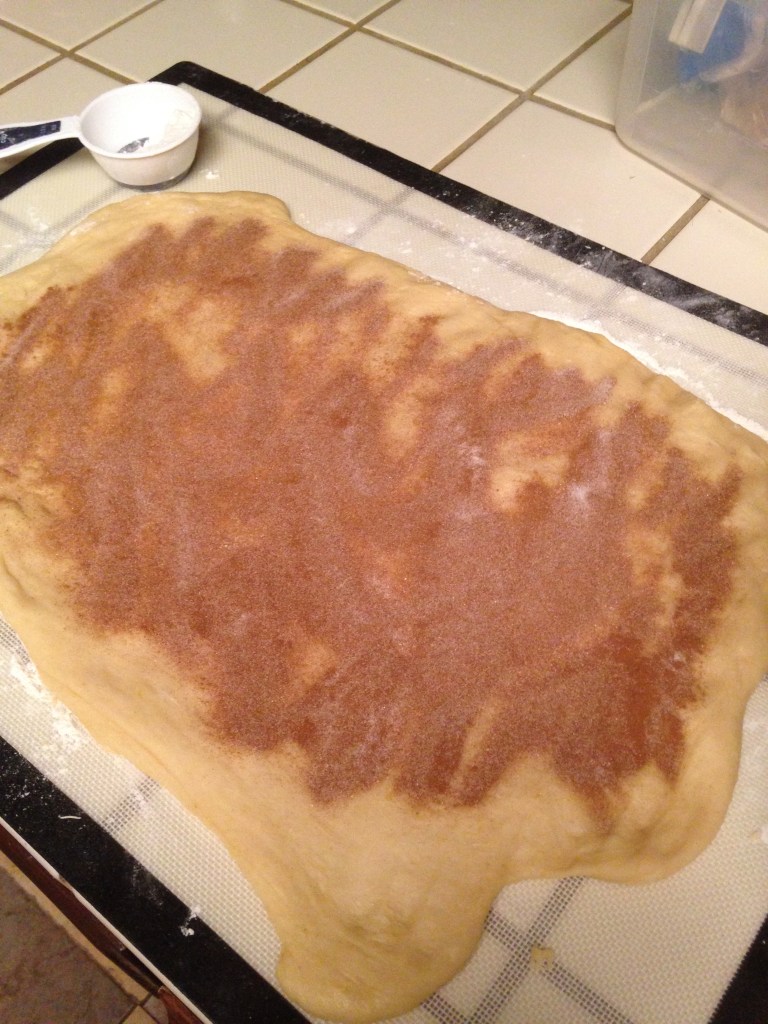
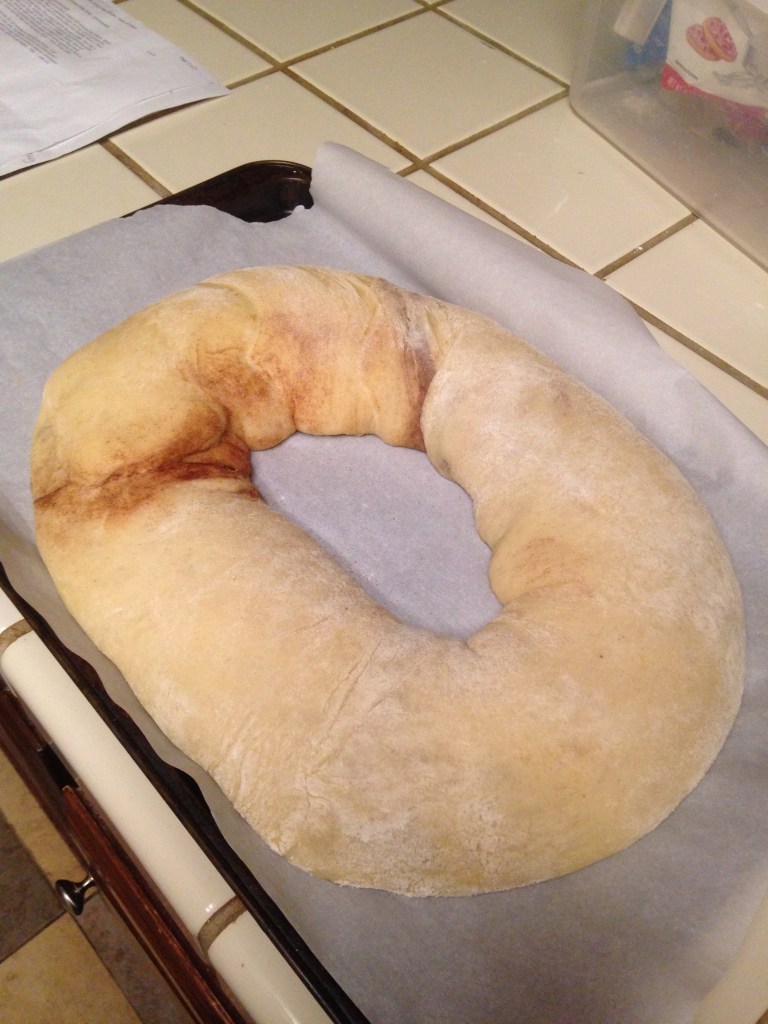
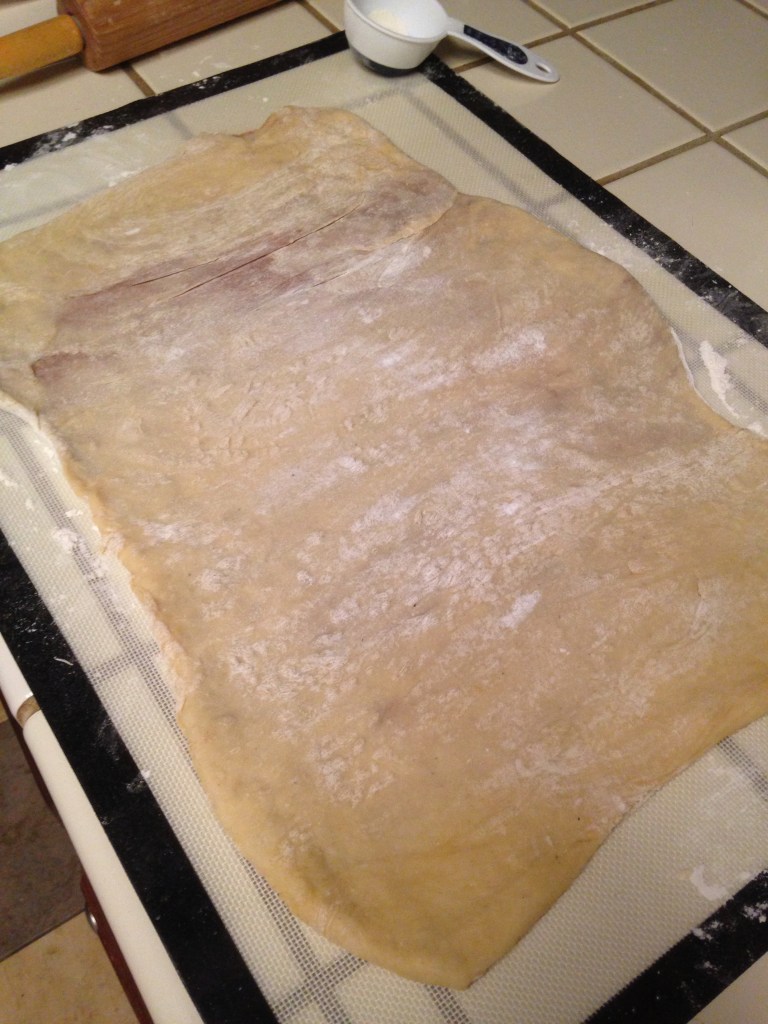
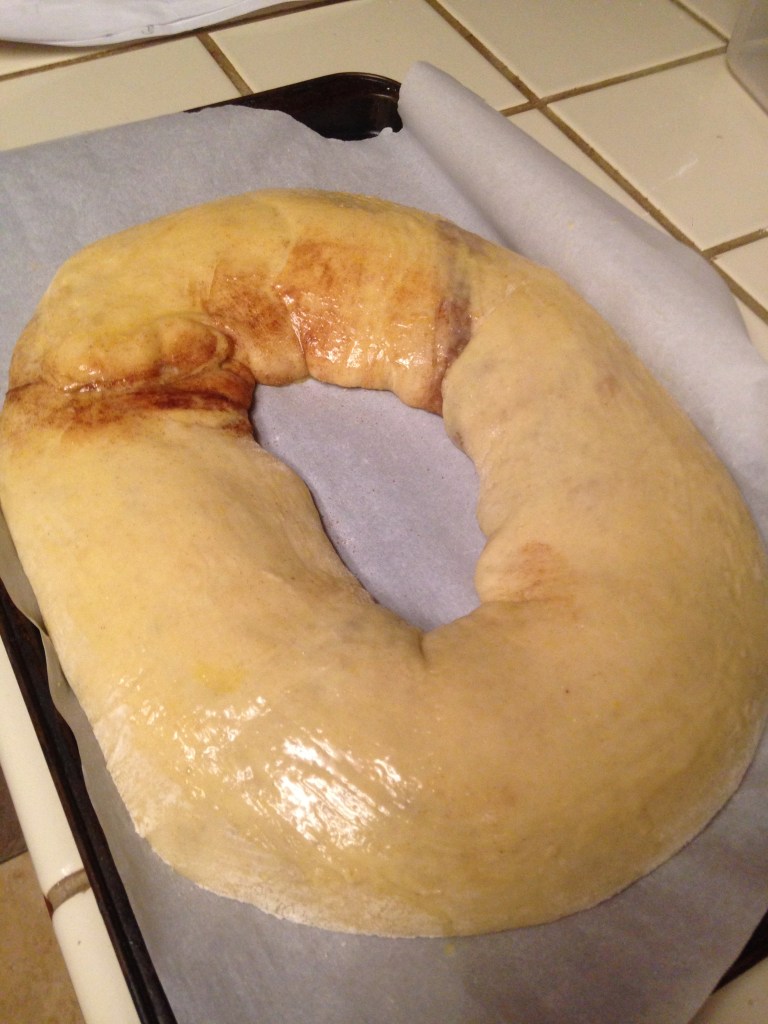
Punch dough down. Turn onto a lightly floured surface. Roll into a 16-in. x 10-in. rectangle. Combine cinnamon and brown sugar; sprinkle over dough over all of dough. Do not leave a border. Fold dough in thirds lengthwise (like a letter). Roll out dough again into a 16 x 10 inch rectangle. Place filling on top of dough, leaving a ½ inch edge. Roll up jelly-roll style, starting with a long side; pinch seam to seal. Place seam side down on a greased baking sheet; pinch ends together to form a ring. Cover and let rise until doubled, about 1 hour. Brush with beaten egg.
Bake at 375° for 25-30 minutes or until golden brown. Cool completely on a wire rack. For glaze, combine the confectioners’ sugar, lemon juice, vanilla extract, milk, salt and enough water to achieve desired consistency. (Glaze should be tacky glue consistency). Spread over cake. Sprinkle with Sprinkle Mix while glaze is still wet. Allow glaze to set.
Devour and Enjoy!!
*for optional cream cheese filling: In a medium size bowl whisk together cream cheese, confectioner’s sugar and egg whites on medium speed until smooth and fluffy. Set aside. Once cinnamon and brown sugar have been applied to dough and dough has been rolled out again into a 16 x10 inch rectangle, place cream cheese filling on top of dough. Smooth out cream cheese on top of dough evenly leaving a ½ inch border. Continue to roll up dough jelly-roll style. Continue remainder of directions above.
It’s a new day and a new year! The new year also brings to me a sense of rebirth and rejuvenation. For the past few years I have purposely been taking a trip at the end of the year to prepare my mind for the next year ahead. At the beginning of the year I’m not one to set resolutions for myself, but I definitely do set goals for myself.
I love the inquiry and enchantment that the new year brings. I usually spend the first few weeks of the year working on a vision board or writing in my journal. I have always felt like seeing my goals in real life is an important step in manifestation and accomplishment for the year. I honestly am not a big believer in horoscopes or wizardry, but I definitely do believe we create our own magic.
I thought I would use the allurement of the new year to create a fabulous new recipe. This recipe is based on the classic seven layer bars but even better with an extra layer of sparkle. I decided to add some pizzazz to the bars by topping them off with Kaleidoscope Sprinkles Tina Snow Sprinkle Mix. The sorcery of these bars is that they are super easy to make, delicious and disappear right before your eyes. Definitely save this recipe for now or later.
See the super delicious, easy recipe and step by step video below.
Preheat oven to 350F degrees. Spray a 9×13 inch baking pan with cooking spray or line with parchment paper and set aside.
Melt butter in a small saucepan or using the microwave in a small bowl. Remove the butter from heat and stir in graham cracker crumbs until throughly combined. Press evenly into the bottom of a 9×13 inch baking pan to form the crust.
Evenly sprinkle remaining ingredients one by one over the crust to form layers, beginning with the chocolate chips, followed by the butterscotch chips, coconut and walnuts. Pour the condensed milk evenly over the top, and spread with a rubber spatula to make sure it’s evenly distributed.
Scatter the sprinkle mix evenly on top of the bars.
Bake in preheated oven for 25-30 minutes until edges are golden brown and the middle is set.
Allow bars to completely cool to room temperature before slicing.
It’s December, which some consider “the most wonderful time of the year.” As you should already know my absolute favorite time of the year is fall. I do agree that December is wonderful for the celebration of our Lord and Savior and also for, Christmas cookies. Jesus will always be thee reason for the season, but there is nothing wrong with getting a little into the commercial spirit of Christmas.
I absolutely adore making Christmas cookies. I love to create simple yet satisfying warm bites of cookie goodness. I make many varieties of cookies throughout winter and pass them out to family, friends and coworkers. I try and make classic Christmas cookie staples like sugar cookies and gingerbread, but I also like creating new flavors as well.
This year I was inspired to make a brand new cookie recipe dedicated to the classic combination of chocolate and mint. These two flavors always remind me of this holiday season, so I felt that they should be celebrated in cookie form. I decided to create these chocolate mint cookies using crushed up classic peppermint and spearmint candies. I added even more minty flavor and Christmas spirit by using Kaleidoscope Sprinkles Candy Cane Slayin mint flavored Sprinkle Mix inside the cookie dough.
These Mint Condition Cookies turned out super delicious and easy to make. The tender cookies are rich with chocolate flavor but balanced well with soothing mint flavor. The cookies are not overly sweet, so they are a great pairing for hot chocolate or eggnog. They are also great to place on your buttercream board (See video below). Give these festive flavor bombs a try today. You can even make the dough ahead of time and refrigerate or freeze it for fresh cookies later.
See and save my recipe below.
Christmas buttercream board featuring Mint Condition Cookies
In a medium sized bowl mix together the flour, cocoa powder, tapioca flour or cornstarch, baking soda and salt. Set aside.
In a large separate bowl, using either hand or stand mixer, cream together butter and brown sugar. Cream mixture together until butter is lighter in color and doubled in size. Add egg. Add milk and vanilla extract. Mix until smooth and combined.
Add half of flour mixture to cream mixture and stir until incorporated. Add second half of flour mixture. Stir until incorporated.
Add white chocolate morsels, mint candies and sprinkle mix to batter. Slowly fold in until combined.
Cover cookie dough and refrigerate the dough at least one hour.
Preheat oven to 350F.
Line cookie sheets with parchment paper. Using cookie scoop or ice cream scoop, place cookie dough onto sheets about 1.5-2 inches apart. Bake for 12-15 minutes until cookies are firm to touch.
Remove cookies from oven and allow cookies to slightly cool.
A few weeks ago while I was scrolling on social media I came across a delicious recipe for a new kind of cinnamon rolls. In all my years of baking I had never thought to combine my favorite fall pie with my favorite brunch dish. The concept seemed so simple and yet sounded immaculate. I was super enthusiastic to make these new sinfully delicious autumn delights.
I decided out of consideration of my goddaughter’s food allergies and per request to make these cinnamon rolls completely vegan. I also wanted to challenge myself to make these vegan rolls just as good, if not better than regular cinnamon rolls. I wanted to make these rolls even more suited for fall, so I decided to decorate them with Kaleidoscope Sprinkles Mellow Leaves from Heaven Sprinkle Mix. (Although the Sprinkle Mix isn’t completely vegan it still made these rolls stand out in all the best ways.)
I must say after tasting these circumferential confections, I’ve had a taste of heaven. One bite of these warm wonders had my eyes rolling into the back of my head. The combination of the sweet potato filling and the tangy cream cheese glaze was on another level of satisfying. I honestly will say if I had to choose between a sweet potato pie or cinnamon rolls for Thanksgiving or any fall festival, I’m choosing the rolls!
Definitely save this recipe and give these rolls a try, you won’t regret it one ounce. You can find the complete recipe and step by step video below.
Ingredients
Rolls:
1 cup vegan cream (I used Country Crock brand)
4 tbsp. (¼ cup) vegan butter (I used Violife brand)
2 ¼ tsp. (1 packet) active dried yeast
¼ cup granulated sugar
3 cups all purpose flour
¼ tsp. salt
4tbsp. (¼ cup) vegan butter, melted (I used Violife brand)
½ cup light brown sugar, lightly packed
2 tbsp. cinnamon
Filling:
2 cups pureed sweet potatoes
½ cup brown sugar
2 tbsp. egg replacement (equivalent of 2 eggs. I used Bob’s Red Mill brand)
¼ cup water, for egg replacement
½ cup of vegan cream (I used Country Crock brand)
½ cup of plant based milk (I used almond milk)
½ tsp. cinnamon
1 tsp. nutmeg, fresh is best
¼ tsp. orange zest
¼ tsp. salt
1 tsp. vanilla extract
Glaze:
8oz. vegan cream cheese (I used Simple Truth brand)
2-3 tbsp. plant based cream ( I used Country Crock brand)
In a large saucepan on low heat, warm up cream, butter and yeast. Stir together and allow to heat up until lukewarm. Remove mixture from heat and allow the yeast to bloom.
In a separate medium bowl mix flour and salt together. Using a stand mixer with dough hook attachment, add cream mixture and sugar together on medium speed. Turn hook speed down to low and slowly add 3 cups of flour mix until flour is incorporated. Continue mixer on low speed until dough is easy to handle and comes off the side of the bowl. Remove dough from mixer and knead dough on lightly floured surface for 5 to 10 minutes. Place dough in well-greased bowl, cover and let rise until doubled in size, usually 1 to 1 1/2 hours.
While dough is proofing, make sweet potato pie filling. In a medium sized bowl mix together sweet potatoes and brown sugar using hand mixer. In a small bowl stir together egg replacement and water and allow to rest for one minute. Add egg replacer to sweet potatoes and mix on medium speed. Add remaining ingredients of vegan cream, milk, cinnamon, nutmeg, orange and salt. Mix on medium speed until all ingredients are combined. Set aside.
When dough has doubled in size, punch down dough. Roll out on a floured surface into a 12 by 18-inch rectangle. Spread melted butter all over dough using pastry brush. Sprinkle brown sugar and cinnamon evenly over buttered dough. Cut dough into 12 slices.
Using pastry brush or spoon, spread sweet potato pie filling over each slice of dough. Roll up dough slices and place into buttered dish. Cover rolls with kitchen towel and allow to proof again for another 30 minutes.
Preheat oven to 350F degrees.
Bake rolls for about 25-30 minutes or until nicely browned.
While cinnamon rolls are baking, make glaze. In a small bowl whisk together vegan cream cheese, vegan cream, vanilla and confectioners sugar. Continue to mix together until all the ingredients are combined and glaze is smooth. Spread over slightly cooled rolls.
A few nights ago I had the opportunity to return to the LA Opera for another fantastic performance. In September, when I was in Paris I stayed in the Ópera district again, but unfortunately I didn’t get a chance to go. The last time I went to the opera was for my birthday to see the well known, Aida. That experience was incredible as expected with the music, the costumes and overall atmosphere.
This time around I went to LA Opera to see, Omar. This spectacular performance is based on the true story written by Omar Ibn Said. Omar was a Senegalese Muslim man who was captured and enslaved. He was able to write his autobiography in Arabic that detailed his entire journey of his life. He unfortunately died an enslaved man, but the beauty of his unwavering faith and strength continues on as his legacy in the opera. Omar was an incredible production. What I most enjoyed was seeing all the melanin on stage and behind the scenes. The conductor was even a Black man. I also thoroughly enjoyed the colorful costume ensembles of the entire cast. I highly recommend that you go see this performance. It is an incredible story to see sung and portrayed with passion and heart.
For this evening, I decided to wear one of my favorite thrift finds from years past. I actually first wore this sultry sweater dress the first time I went to the LA Opera in 2013. I decided to rebirth this frock this year since I was finally able to fit it again. I love thrifting and I decided to share the details of this dress and some helpful hints below.
Try to avoid thrift shopping at chain thrift stores. The prices are usually higher and the merchandise has been picked through by the employees.
Shop for classic pieces for your wardrobe not things that are “in fashion.” This will keep your finds more sustainable and you’ll get more use out of your pieces.
Find clothes that are made with quality fabrics. That means natural or heavier fabrics.
Look for clothes with older labels, but have not been worn down.
Remember fashion repeats every 30 years. Just because your thrift find doesn’t seem fashionable now, doesn’t mean it won’t be later.
Buy clothes that fit your personal style. If something unique catches your eye then buy.
When shopping wear undergarments you don’t mind being exposed (ie. sports bra/ biker shorts), so you may try on clothes before you buy.
It’s Halloween, that time of the year where celebrating, costumes and candy are on full display. I have explained already in previous posts, that when growing up Halloween was not really emphasized. I can probably count on one hand how many times I remember dressing up on Halloween and trick or treating. October to me always represented the first full month of fall, which was reason to celebrate enough.
As an adult I have come to appreciate Halloween a bit more. I enjoy being creative and being able to relive favorite childhood characters via costumes. Living in Los Angeles for the past few years, Halloween has risen to another level. Angelenos take Halloween very seriously and I’m not just talking about the clothing.
This year I wanted to take my Halloween celebrating up another tier with my confections. After indulging in way too much candy I wanted to enjoy something sweet and unique. I came up with an idea to make a treat that I could not only enjoy Halloween night but also the next morning after my party hangover.
Check out these delicious Shock Tarts also known as Halloween breakfast pastries. These flavorful, flaky pastries are filled with a fresh, fruity and delicious filling. These tarts are then covered in a sweet glaze and decorated with Kaleidoscope Sprinkles DRAKE-ula Sprinkle Mix for even more flavor. This recipe is super easy to make and bake. Definitely give this recipe a try today or save it for another celebration. I will surely be enjoying these Shock Tarts this evening while passing out candy to the kiddies.
You can find the complete recipe and step by step video below.
HAPPY HALLOWEEN!!
Makes 8-10 pastries
Ingredients
Filling:
2 cups (16oz.) frozen mixed berries
1 cup (8oz.) fresh berries of your choice, I used blueberries
½ cup four fruits preserves
½ cup granulated sugar
Juice of whole lemon, approximately 2 tsp.
1 tbsp. vanilla lemongrass tea or any tea you prefer, (optional)
Crust:
2 cups all-purpose flour
2 tbsp. granulated sugar
2 tbsp. activated charcoal
½ tsp. salt
1 stick (½ cup) cold unsalted butter, cut into small pieces
¼ cup (4 tbsp.) vegetable shortening or coconut oil
For the filling: In a large saucepan add frozen berries, fresh berries, preserves, sugar, lemon juice and tea. Stir all ingredients together and allow to simmer on low-medium heat. Cover filling and allow sauce to reduce by half, approximately 15-20 minutes. Once sauce has reduced. remove filling from heat and allow to cool to room temperature. Once filling has cooled blend ingredients together using immersion or stand mixer. Once well blended, pass filling through a kitchen strainer to remove seeds and tea leaves. Set aside.
For the dough: Use food processor and pulse flour, sugar, charcoal and salt in a food processor to combine. Add butter and vegetable shortening. Pulse until mixture resembles coarse sand. With machine running, add yolk, vodka and ice water, and process until dough just comes together. (It should not take longer than 30 seconds.)
Shape dough into a disk, and wrap in plastic. Refrigerate dough for at least 30 minutes. (You may refrigerate overnight)
When ready to make pastries: Preheat oven to 350F. Take dough out of refrigerator. Divide dough in half. On a flour surface roll out half of dough into a rectangle. The dough should be 1/8 to 1/4 inches thick. Cut symmetrical rectangles into your dough using pizza cutter (you can also use cookie or biscuit cutters). Place bottom side of pastry onto cookie sheet. Place rounded spoonful of filling in the center of pastry dough. Pat filling down. Make sure to leave approximately a 1/2 inch border around the dough. Roll out remainder of dough into same rectangle. Cut rectangle into similar sizes as previous. Place top side of pastry on filling. Press top and bottom of pastry together. Use a finger or fork to crease the seams together. Repeat process until all your dough is filled. Brush egg white on top of pastry. Use fork and poke holes on top of pastry for steam.
Bake for 20-22 or until golden brown. Allow to cool completely
While tarts are cooling make glaze.
In a small bowl, whisk together confectioners sugar, vanilla, salt and milk. Mix until glaze is smooth. (Glaze should be thick enough to coat back of spoon). Using a knife of off-set spatula, glaze completely cooled pastries. Top with Kaleidoscope Sprinkles DRAKE-ula Sprinkle Mix. Allow glaze to harden.
I have explained before that I get baking recipes and inspiration from everywhere. Usually, most of my ideas come to me in my dreams when my mind is free to roam in candyland. During this season, the shorter days and longer nights give me more time for more enticing inceptions. I also get concepts from remixing other recipes that I have or others have already created.
A few weeks ago, I was having a conversation via social media about fall recipes. One of my social media friends was discussing these popular pumpkin cheesecake cookies. She, being a fan of these favored fall cookies, suggested that they might taste better if they were sweet potato based. Although I had heard of these cookies before, I had never actually tried them. That was enough incentive for me to get started on experimenting on a new autumn treat.
I started out by buying and trying the original pumpkin cheesecake cookies. The cookies were pretty satisfying. They were soft and filled with notes of pumpkin and spices. The cookies had morsels of white chocolate that represented the cheesecake flavor. After a few cookies, I knew exactly how I was going to make my version even better tasting. Not only was going to make some delicious sweet potato cookies, but I would accompany these cookies with some ice cream. This was not going to be an ordinary ice cream but an extraordinary sweet potato ice cream filled with cream cookie butter and cinnamon cookie bits.
The sweet potato cheesecake cookies and sweet potato cookie butter (no churn) ice cream were very easy to make and turned out better than I imagined. This may sound biased, but these were probably the best ice cream sandwiches I treated to myself to. The cookies were perfectly soft and flavored. The ice cream was not overly sweet and complimented the cookies perfectly. The ice cream sandwiches were even more magical as they were decorated with Kaleidoscope Sprinkles new fall Sprinkle Mix, Mellow Leaves from Heaven.
Definitely give both of these easy recipes a try this season. Both are great for indulging, cooking with kids in the kitchen and/ or impressing family/ friends.
Both recipes and step by step video can be found below.
Ingredients
Sweet Potato Cookie Butter (No churn) Ice Cream:
1 pint (16 fl. oz.) of heavy cream, keep very cold
1 can (14 oz.) sweetened condensed milk
1 cup pureed sweet potato
1 tsp. vanilla extract
½ tsp. ground cinnamon
1 tsp. nutmeg (fresh is best)
¼ tsp. orange zest
½ cup cinnamon cookies, crushed into bite sized pieces.
Start by making the ice cream. In a medium sized bowl, using a spatula mix together sweet potato, vanilla, cinnamon, nutmeg, and orange zest until mooth. Set mixture aside.
In a large bowl, using a hand or stand mixer add heavy cream. Whip heavy cream until it doubles in size and soft peaks form.
Add sweet potato mixture to heavy cream. Using spatula, lightly fold sweet potato mixture into heavy cream until completely combined. Be sure not to over mix or cream will deflate and ice cream won’t be airy.
Place ice cream mixture into a loaf pan. Cover ice cream with plastic wrap and place in freezer overnight to harden.
To make cookies:
In a medium sized bowl, combine flour, salt, baking soda, cinnamon, nutmeg and orange zest. Set flour mixture aside.
In a large separate bowl, using either hand or stand mixer, cream together butter and brown sugar. Cream butter and sugar together until butter is pale yellow and doubled in size. Add sweet potato. Add eggs one at a time. Mix until smooth. Add vanilla extract. Add half of flour mixture to cream mixture and stir until incorporated. Add second half of flour mixture. Stir until incorporated. Add white chocolate chips and cheesecake bites (optional) to batter. Slowly fold in until combined.
Cover dough with plastic wrap and place cookie dough in refrigerator for 30 minutes to overnight.
Once ready to bake cookies, remove dough from refrigerator for at least 20-30 minutes before baking.
Preheat oven to 350F.
Line cookie sheets with parchment paper. Using cookie scoop or ice cream scoop, place cookie dough onto sheets about 1.5-2 inches apart. Bake for 12-15 minutes until cookies are slightly golden and firm to touch. Remove from oven and allow cookies to cool completely to room temperature.
Remove ice cream from freezer. Use ice cream scoop to place ice cream on top of cookies. Cover ice cream with additional cookies.
*For pureed sweet potatoes: Preheat oven to 400F. Clean and dry 3-4 medium/ large sweet potatoes. Using a cookie sheet, bake sweet potatoes until fork tender (approximately 30-35 minutes.) Remove from oven and allow sweet potatoes to complete cool. Remove skins from sweet potatoes. Place sweet potatoes in large bowl and use immersion blender./ or counter blender to puree. Blend sweet potatoes until texture slightly chunkier than baby food.
It’s here, it’s finally here! Well technically its not, but I have already made the transition in my mind, so fall is here. I am already overloaded on thoughts of apple picking, hay rides, pumpkin spice everything and comfort clothing. My morning coffee has been switched from my usual creme bruleé creamer to pumpkin spice since September 1st. I can never get enough of this season. I love that I get to repeat this fabulous fall sensation every year, like it’s Groundhog Day. I have been concocting some new pumpkin and fall-filled recipes since last year. There is something about those warm fall spices that keeps me motivated.
As a child, one of my favorite fall activities I have mentioned previously was a visit to Apple Hill. This magical apple orchard was my fall timestamp every year. It served as a pinnacle moment of the season for me because of all the wonderful foods that I was able to savor. Fresh apples off the tree, fresh warm cider, homemade apple butter, and of course the apple donuts. I looked forward to the cinnamon crusted fried fritters and cake donuts at the start of Labor Day weekend. Even though I haven’t visited Apple Hill in several years the memorable donuts still inspire my fall recipes. (Check out my recipe for Apple Cider Donut Bread Pudding with Caramel Glaze.)
Every year I still look forward to all the spectacular fall treats, but now I try to opt for healthier yet flavorful options. The last few years, I have made some delicious autumn apple recipes. (Check out my recipe for Sparkling Cider Cake and The Perfect Fall Cupcakes). This year I made a decision to switch it up and make some delicious pumpkin baked donuts reminiscent of all my favorite fall flavors. Check out my recipe for my Pumpkin Patch Donuts which are in oozing with pumpkin flavor and covered with Kaleidoscope Sprinkles Orange Jevarius Sprinkle Mix for more fall color pop.
See the complete recipe and step by step video below.
Store bought caramels for pumpkin stems, for decorating (optional)
Green fondant for pumpkin leaves and vines, for decorating (optional)
Directions
Preheat the oven to 350F. Lightly grease donut pans.
In a medium separate bowl, mix together pumpkin puree, milk, vanilla extract, beaten egg and lemon juice and stir until just combined. Set Aside.
In a large bowl whisk together flour, baking powder, superfine sugar, nutmeg, pumpkin pie spice and salt. Add cubed butter using a fork or potato masher to press butter into flour mixture, until combined and it resembles course sand.
Add wet mixture to dry mixture. Mix slowly until dough is combined, smooth and thick. Be careful not to over mix.
Use a piping bag or spoon to fill each donut cup about half full, making sure the center area is clear of dough. Bake donuts 6-10 minutes until they are done and spring back when touched.
Let donuts completely cool to room temperature.
While donuts are baking, make the glaze. In a medium sized bowl whisk together pumpkin puree, pumpkin creamer, pumpkin pie spice, salt and confectioners sugar until smooth and completely combined. (Glaze should be thick and coat the back of a spoon.)
Use spoon to drizzle donuts with or dip donuts into the glaze. Cover with sprinkles and use caramels and fondant to decorate.
It’s almost September, which means it’s almost time for my favorite time of year. You already know what I’m talking about, fall! We are currently in a time of season transition. I like to incorporate fall colors and themes into my end of the summer wardrobe to make the seasons click like my heels. This is the perfect time to reuse summer fashion staples, but put a fresh autumn spin on them.
A few months ago, one of my favorite cutout dresses sustained some water damage. I believe I’ve mentioned this before in my others posts, but I’m going to reiterate the fact that I love a good cutout dress. A dress with some simple missing fabric in the right spots can turn a bland frock into over the top. For someone who is curvy such as I, it’s a great way to accentuate the gifts God created. This brightly colored orange dress was now covered in random mildew stains. At first when I discovered the damage on my dress I was devastated. I washed it and soaked it, but I was not able to remove any of the mildew stains. I refused to give up on this dress and came up with another plan.
I absolutely adore this dress because it’s light, bright, it fits me wonderfully and it has pockets! I also didn’t mention the fact that this dress is made of 100% recycled materials. As an environmentalist, I could not let a few stains allow me to toss this perfectly wearable and fabulous frock. After evaluating the dress and the stains I was reminded of Jackson Pollock and a Rorschach inkblot test. With fall approaching on the horizon I became inspired and found a way to salvage and upgrade my dress with a unique abstract print, aka tie dye. I went to my neighborhood craft store and purchased a tie dye kit. Once I arrived home I prepped my dress and went to work.
The project was super simple to do and the results turned out amazing. Here’s how I recreated my new upcycled fall cutout dress.
Here we are in 2022 and 3 years into celebrating Kobe’s heavenly birthday. Kobe would be celebrating his 44th birthday this year. It still amazes me how much he accomplished in his short period on this earth. I strive daily to be the best version of myself and continue Kobe’s Mamba Mentality legacy.
As I expressed in my previous Kobe Day post, I have been celebrating August 24th as Kobe Day since 1996. I honestly celebrate daily by living my best life and striving to leave my own legacy. After Kobe’s death, I have been doing some deep self reflecting and trying to discover and implant my own legacy. I have been striving to be the best version of myself daily and have learned that the only way I feel accomplished is through love and creativity. My Mamba Mentality is to encourage others to love themselves first as well as others. Also my legacy is to strive to incite all forms of creativity in others. I believe that we are created to create and make this planet somehow better than we arrived.
I made this delicious Pineapple Right-Side up Cake for Kobe’s birthday cake. This four layer pineapple cake is filled with a delicious fresh pineapple filling and frosted with a tangy yet sweet cream cheese filling. I decorated this cake in stars representing every year that Kobe shined on this planet. The yellow stars serve as the first half, ‘#8’ of Mamba’s career. The purple stars of course serve as the second half of Kobe’s career, ‘#24.’ The five sparkly balls on top of the cake covered in Kaleidoscope Sprinkles Cosmic Shimmers, embody Kobe’s championships. I then covered the remaining top of the cake in Black Mamba Sprinkle Mix.
This Kobe Day I ask that you consider how do you love and how do you create to inspire? Also examine what do you want your legacy to be? Kobe has shown us that life is way too short to not live our daily legacies. Happy KOBE Day!
Complete recipe and decorating video below.
KOBE Day 2022 Pineapple Right-Side up Cake
Make two 8 or 9″ cakes, four 6″ cakes or 24 cupcakes.
In a medium sized mixing bowl mix together flour, baking powder and salt. Set aside
In a large bowl or using a stand mixer cream butter and sugar together. Beat on medium speed until the mixture is light and fluffy. Add eggs one at a time to the mixture. Add vanilla extract. Slowly add the flour mixture one third at a time, alternating with pineapple juice. After each addition, be sure to scrape the sides of the bowl. Mix batter until fully combined but be careful not to over mix.
Transfer batter to the cake pans and smooth batter evenly in the pans. Bake cakes for approximately 20-22 minutes until toothpick or cake tester comes out clean. Place cakes onto cake rack and allow to cool completely to room temperature.
While cake is baking make the pineapple filling and cream cheese frosting.
For pineapple filling: Add crushed pineapple and juice into a large saucepan. Add brown sugar, salt and ginger. Stir everything together and allow mixture to simmer on low-medium heat. Cook filling down until reduced by half and juice can coat back of spoon. Allow filling to cool to room temperature. Use hand mixer or food processor to blend mixture into smooth/ slightly chunky spreadable mixture. Set aside.
For cream cheese frosting. In a large bowl, or stand mixer, whisk together cream cheese and butter. Slowly add confectioner’s sugar using mixer on low speed until frosting is smooth. Add vanilla extract. Whisk frosting on medium-high speed until vanilla extract combined and frosting is light and fluffy.
Frost cakes with cream frosting. Decorate with fondant and Sprinkles.
I posted on my social media a few weeks ago that it is a known fact that fashion repeats itself every 30 years. That means that we are currently in a 90s fashion renaissance. I recently started re-watching A Different World in the mornings when I work out. This series has served as a great reference to all the fashion inspiration the 1990s brought us. The structured suits, oversized pants and jackets, belts, crop tops, biker shorts, bold prints, slip dresses, etc. I especially love all the color blocking in the 90s, (ie. Cross Colours) which is a reference to the 1960s mod fashion.
This summer I have been going hard on all the 1990s fashion since I was definitely too young to rock some attire properly. I decided to piece together one of my favorite thrift store finds with some other ensemble pieces to create this fabulous casual fashion outfit.
Summer is steadily winding down and finally coming to a close. As a lover of pumpkin spice and everything nice, I am ecstatic to see fall roll on through. Before we officially call it quits on summer, I had to address another important component of the season for me.
In the summer, the warm weather drives me and most people outside for activities. In the summer I especially love outdoor movies, picnics, brunches, barbecues, rooftop and day parties. The most important experiences of summer above all are the music festivals. Summer is simultaneous for music festival season and this year served as a rebirth for most major music venues. I was super excited after a two year hiatus to return to music festival season. Nothing beats (pun intended) being outside with fellow music lovers in warm weather dancing and vibing out.
In the summer there are many popular festivals across the globe. I appreciate that music festivals try and incorporate a variety of cuisines to suite different tastes. I have been to a few different festivals internationally and had the chance to enjoy food from the South to Singapore. Even though there is so much food to choose from at these fun-filled festivals, I never can seem to find the one thing I’m looking for.
Macarons are the missing piece to a perfect festival cuisine. These French invented cookies are super flavorful and colorful. These naturally light, gluten-free cookies would be the best accompaniment and contrast to all the heavy and probably greasy food that is consumed during the day. My summer sweet tooth has found ice cream, cupcakes, dessert empanadas, etc. to munch on in between music sets, but never macarons. Since I have not been able to find any of these French fantasies during music festivals, I decided to make my own to enjoy. I made the decision to make these macarons even more special by combining two desserts into one. These Music Festival Macarons are cotton candy flavored and chromatic. I took these cookies even further with flavor by decorating them with Kaleidoscope Sprinkles Cotton Candy flavored Sprinkle Mix.
This macaron recipe is the classic French style and is easy to make using a stand mixer and a kitchen scale. I absolutely loved how these macarons tasted and looked once they were finally completed.
You can find the complete recipe and step by step video below.
Music Festival Macarons, Step by Step video
Recipe adapted from La Cuisine Paris
Makes about 20-30 cookies
Ingredients
French Macarons:
90g ground almonds
75g egg whites
50g granulated sugar
135g confectioners sugar
¼ tsp. cream of tartar
1 tsp. cotton candy flavoring (I got mine from Michaels)
Buttercream:
½ cup (1 stick) unsalted butter, at room temperature
2 cups confectioners’ sugar
2 tbsp. heavy cream, at room temperature
½ tsp. vanilla extract
½. tsp. cotton candy flavoring
pinch salt
Cotton Candy flavored Sprinkle Mix, for decoration (optional)
Pink food coloring (optional)
Blue food coloring (optional)
Directions
Preheat oven to 160C or 320F.
For macarons: Sift the ground almonds into a medium mixing bowl. Set aside.
Measure out egg whites into clean mixing bowl. Using hand or stand mixer whisk attachment, start whipping egg whites on medium speed. Slowly start to add granulated sugar one spoonful at a time.
Gradually increase speed, slowly add the confectioners sugar one spoonful at a time. Continue to whisk egg whites until they form glossy stiff peaks and the sugar is dissolved. (Approximately 10-15 minutes). Add flavoring.
Carefully fold the ground almonds into the meringue one half at a time using a spatula. Be careful not to over mix.
Divide macaron mixture into two bowls. Add food coloring into each bowl. Carefully fold in coloring to the macaron mixture until even. Be careful not to over mix.
Put the mixture into a pastry bag. Place parchment paper on baking sheet. Pipe and form small even similar sized rounds on the parchment paper. Allow macarons to. rest on the counter for 15 minutes. Bake at 160C or 340F for approximately 12 minutes. Allow macarons to completely cool on cooling rack. Once completely cooled, remove from parchment paper. (Cookies should come off paper easily if cooked enough and completely cooled.)
While cookies are baking make buttercream frosting.
For frosting, in a medium bowl, or stand mixer, whisk butter until light and fluffy. Slowly add confectioner’s sugar using mixer on low speed until frosting is smooth. Add heavy cream. Add vanilla extract. Add cotton candy flavoring. Add salt. Add food coloring (optional). Whisk frosting on medium-high speed until combined and frosting is light and fluffy.
Pipe buttercream onto macarons and sandwich cookies together. Roll macarons in Cotton Candy flavored Sprinkle Mix.
Devour and Enjoy!
*to make sure stiff meringues form in your recipe, make sure all your utensils are completely fatless. Wipe everything down (mixing bowls and whisk) using a paper towel and white vinegar to remove any oil from baking supplies.
You can never have enough strawberry recipes, especially in the summertime. The berries are bountiful this time of year and I take advantage. This summer has been even hotter not by surprise, thanks to global warming. I thought that this would be a great opportunity to save the planet and scraps from our previous recipe to create something new.
The last recipe that was posted was a scrumptious Strawberry Crunch Cake. This cake, although super delicious and worth the sacrifice, required turning the oven on. The oven was needed not only to bake the cake, but also to make the yummy strawberry crunchies to top the cake. The recipe for the cake made an abundance of strawberry crunchies and I refuse to let them go to waste.
I came up with the idea of using those crunchies to make a strawberry flavored, and also perfectly textured crust for a No-Bake Strawberry Cheesecake. This is not your basic strawberry cheesecake. This cheesecake doesn’t just have strawberry flavor in the crust, it also has strawberries in every ounce of the filling. This cake is light, creamy, tangy and tasteful. This haute recipe is super simple and doesn’t require turning the oven on during these continued hot days. I also made a vegan/ plant-based recipe if you want to make your cheesecake even lighter. I decorated the cheesecake using the same Kaleidoscope Sprinkles mix combination from the Strawberry Crunch Cake recipe. I love how the cheesecake turned out.
You can find both cheesecake recipes and the video below.
No-Bake Strawberry Cheesecake step by step
Use 8 or 9 inch springform pan for recipe
Ingredients
Strawberry filling:
2 cups heavy whipping cream, very cold
3- 8oz. packages of cream cheese, room temperature
2 tbsp. confectioners sugar
1 cup granulated sugar
¾ cup (approximately 2 oz.) freeze dried strawberries, ground to fine powder
Extra whipping cream and strawberries, for decorating (optional)
No-Bake Strawberry Cheesecake
Directions
For the crust: In a small bowl, mix together strawberry crunchies and butter until combined. Press strawberry crust in 8 or 9 inch springform pan. Use back of measuring cup to tightly pack crust into pan. Place crust in the refrigerator for 10-15 minutes and allow to set.
Make filling by placing very cold whipping cream into large bowl. Whip cream on medium speed for approximately 5 minutes until soft peaks form. Add confections sugar to whipped cream. Turn up speed to high and whip cream into sift peaks. Set heavy cream aside and place into refrigerator while you finish making remainder of the cream cheese filling.
Using another large bowl whip together cream cheese and granulated sugar on medium speed until smooth and creamy. Using a food processor, add freeze dried strawberries and grind into a fine powder. Add strawberry powder, gelatin, lemon juice and extracts. Whip on medium speed until cream cheese mixture is combined.
Take whipped cream out of the refrigerator. Using a rubber spatula, add half of the cream cheese mixture to the whipped cream and fold in gently until combined. Add the remaining half of the cream cheese mixture to the whipped cream. Continue to gently fold together until cream cheese mixture. is fully combined. Combine slowly as you don’t want to deflate all the air out the whipped cream.
Take crust out the refrigerator and spread filling onto the crust. Use spatula to smooth down the top of the cheesecake. Cover cheesecake tightly with plastic wrap or aluminum foil and refrigerate for at least 6-8 hours and up to 2 days. For best results, refrigerate overnight.
Once ready to serve, use paring/ small knife to loosen cheesecake from rim of springform pan. Cut cheesecake into desired slices.
Devour and Enjoy!
*For a plant based/ vegan recipe: Use vegan butter or coconut oil to make your strawberry crunchies, following the same directions. For cheesecake filling: use 2 cups of plant based cream, 3- 8oz containers of plant based cream cheese, 2 tbsp. confectioners sugar, 1/2 cup granulated sugar, ¾ cup (approximately 2 oz.) freeze dried strawberries, ground to fine powder, 1 tsp. vanilla extract, 2 tsp. lemon juice and one serving (I used 2 scoops of Orgain Strawberry & Cream powder) plant based strawberry flavored protein powder. Follow same directions above for filling. Refrigerate for at least 6-8 hours. Better if refrigerated overnight. Top with plant based whipped cream and fresh berries.
I have always appreciated the season of summer. Summer to me means annually indulging in fresh and abundant produce. From the fresh vegetables and array of fruits, I definitely keep my plate colorful during this time of the year. By now I’ve expressed my love for my favorite fruit, watermelon, several times. Although I love a good melon, it is not the only fruit that gets my attention.
Strawberries are in second place when it comes my favorite produce confessionals. I have always loved a good, sweet, ruby red, perfectly ripe strawberry. Strawberries, although small in stature stand out when it comes to fruit. When I was in elementary school, I wrote a short story on a strawberry character for an assignment. The point of the story was that this cute strawberry finally recognized and understood her uniqueness and wore her seeds on the outside proudly, unlike her other fruit friends. My teacher loved it and ate the story up (pun intended).
Strawberries are tasty on their own, fresh out the carton, but even better when baked. I have created several strawberry recipes because magic happens when these delicious berries are heated. From shortcakes, cupcakes, biscuits, cobblers and more, I usually find ways to incorporate strawberries. This summer, I decided to take on another recipe and make an exquisite Strawberry Crunch Cake. I have always enjoyed strawberry cake, but why not make it better with more texture and flavor. I made some homemade mouthwatering strawberry crunchies for the outside of the cake. I also decorated the cake using Kaleidoscope Sprinkles. I combined the AKA and DST Sprinkle Mixes to make the perfect strawberry blend of sprinkles. I wanted this cake to be bursting with strawberries, so I decorated the inside and outside of the cake. I love how the cake turned out. This Strawberry Crunch Cake is definitely tastefully and visually gratifying.
You can find the complete recipe and step by step video below.
Make the crunches first. Line two cookie sheets with parchment paper or a silicone baking mat. Set aside.
Using two small bowls, add ½ cup of flour to each bowl. Add ¼ cup of sugar to each bowl.
Using a food processor, add freeze dried strawberries and grind into a fine powder. Add powder to one of the small bowls for strawberries crunchies.
Stir both bowls well to combine. Add 4-5 tbsp of butter to bowl for the strawberry crunchies. Add 3 tbsp. of butter to the small bowl for the vanilla crunchies. Add vanilla extract.
Using fork, combine butter into each mixture until dough combines together and forms crumbles.
Lay each crumble evenly onto separate cookie sheets. Bake each of the crumbles for approximately 5-10 minutes until slightly golden brown.
Let each crumble cool completely on cookie sheets. Once cooled, break crumble into smaller bits using your hands (if needed).
Combine both flavored crunchies into one bowl and set aside. *
For the cake:
In a medium sized mixing bowl mix together 2 ½ cups flour, baking powder, and salt. Set aside.
Using a food processor or blender, beat strawberries (frozen work best) until pureed, consistency of baby food. Set aside.
In a large bowl add butter, sugar to the mixture and continue to mix until creamed together. Add eggs to mixer. Beat on medium speed until the mixture is fully combined. Add vanilla extract. Add strawberry flavor.** Slowly add the flour mixture one third at a time with half of buttermilk. Beginning and ending with flour mixture. Mix until fully combined but be careful not to over mix.
**(If you don’t plan to make cake strawberries for inside the cake. Add strawberry pureé to large bowl. Add additional ½ cup of flour to flour mixture. Slowly add the flour mixture one third at a time with half of buttermilk. Beginning and ending with flour mixture. Mix until fully combined but be careful not to over mix. Transfer batter to the bundt cake pan and smooth batter until even in the pan. Hit cake pan onto the counter a few times to knock out air bubbles. Bake cake for approximately 40-45 minutes until toothpick or cake tester comes out clean. )
To make cake strawberries:
Using medium bowl, add 2 cups of cake batter to bowl. Add strawberry purée, any remaining strawberry powder and red food coloring to bowl. Mix until combined. Fold in additional ½ cup of flour. Combine until batter is thoroughly mixed but not over mixed. Set aside.
In a small bowl, add 1 cup of cake batter to bowl. Add green food coloring. Mix until combined and desired color is achieved.
Using piping bag or small plastic bag, pipe green cake batter into strawberry cake pan. Place pan in freezer for 10 minutes to set cake batter. Once batter has set, spoon strawberry cake batter on top of green cake batter.
Bake strawberry cakes for approximately 8-10 mins. (Do not bake cakes completely). Allow cakes to cool in pan until slight above room temperature.
Add remaining strawberry cake batter to regular batter into large bowl. Fold batters together until combined.
Pour third of cake batter into bundt pan. Remove strawberry cakes from their pan. Place strawberry cakes upside down into the bundt cake pan. Cover cakes with the remaining batter. Bake cake for approximately 30- 35 mins. until all the cake has set and tester comes out clean.
While cake is baking make the glaze. In a medium sized bowl whisk together confectioners sugar, cream/ liqueur and salt until smooth. (Glaze should be thick enough to coat back of a spoon.)
Place cake onto cake rack and allow to cool completely. Invert cake onto cake plate or board. Spoon glaze onto cake.
* This strawberry crunchies recipe makes an abundance. You may use the additional crumbles on top of your ice cream or yogurt bowls. You may use them to make crunch muffins, donuts or a great topping for any fruit crumble. You may also eat them with fresh fruit for a light snack or dessert.
It’s Paris Fashion Week! You all know that I absolutely adore both Paris and fashion! Sadly, I have yet to attend Fashion Week in my favorite city. I would love to be invited and sit at a couture fashion show. It’s actually one of my lifetime goals that I am continually trying to bring to fruition. Fashion week for fall/winter season happens in the heat of summer, so the apparel must be governed accordingly.
This year since I was stuck stateside yet again for the shows, I decided to create Paris Fashion Week here in Los Angeles.
We have finally made it to the second half of 2022. Month number seven means we are in the full swing of summer. This season brings us the hottest and longest day of the year with Summer Solstice. All this sunshine provides more opportunities to be outside, show some skin and burn some calories. During this season you can usually find me in somebody’s pool or poolside with a drink in my hand.
I love a good summer drink. A lovely warm evening basking in my backyard with a drink in my hand is bliss. I love that summertime comes with its own cocktails. I am usually a “rosé all day” kinda gal, but this summer, I decided to add a little more flavor. July 10th is National Piña Colada Day, which serves as motivation for a new recipe.
I adore a good tropical cocktail. Last summer I actually discovered a new cocktail while I was perusing the aisles at BevMo. I purchased this Colada liqueur, threw it on some ice and had a wonderful evening swinging in my hammock. This year I wanted to try and use this liqueur to serve piña coladas in a new way. I took my classic cupcake and buttercream recipes and infused this delicious drink inside. I decorated these cupcakes using some fondant pineapples and Kaleidoscope Sprinkles. The cupcakes turned out sizzling and sensational.
You can find the complete recipe and decorating video below.
Preheat oven to 350F. Line cupcake tin with liners.
In a medium sized bowl whisk together flour, baking powder and salt. Whisk until all ingredients are combined and set bowl aside.
In a separate large bowl using either a stand or hand mixer cream together butter and granulated sugar until light and fluffy and doubled in sized. (Approximately 3-5 minutes). Add eggs to mixture one at a time. Add buttermilk and liqueur. Add flour mixture and stir until combined. Be careful not to over mix.
Using an ice cream scoop place cupcake batter into cupcake tins. Bake cupcakes at 350F for approximately 22-25 minutes until tester comes out clean.
Allow cupcakes to completely cool.
While cake is baking make the buttercream frosting. In a large bowl, or stand mixer, whisk together butter. Slowly add confectioner’s sugar using mixer on low speed until frosting is smooth. Add Colada liqueur. Add vanilla extract. Add salt. Whisk frosting on medium-high speed until vanilla extract combined and frosting is light and fluffy.
Juneteenth in the Black community historically has been a time for celebration. This special day has served as a community monument of freedom. For Black people in the US, Juneteenth has been a long standing tradition. I remember as a child going to parades, festivals, and of course celebrating with delicious dishes of food. This year marks the second year that Juneteenth has been recognized as a national holiday. Even though it took much longer than it should have, progress is still progress. What better way to keep the party going than with great music and a delicious dessert.
Not only do we celebrate the freedom of Blacks in June, but also the creativity of self expression through music. June also represents Black Music month. I must say 30 days is not nearly enough time to honor and appreciate the contributions of blacks to music. Music has always been a huge aspect of my life. I started playing piano as an adolescent. I then went on to play the clarinet, soprano and alto saxophone, which I still play. I also started writing and singing songs as a child and continue to do so currently. Music, especially Black music, has always been influential to every part of my life. I could not let this music fete or Juneteenth go on without a unique sweet.
In April while attending a music festival, I came across this stand out sweatshirt. The garment itself was quite bland, but what caught my eye was the message inscribed across the front. “Love Black people like you love Black music.” The message, so simple and yet so strong, spoke to me instantly. I knew at that moment that I wanted to continue to spread the words through my culinary arts. June represented the prime opportunity to pass on the message deliciously. I used Kaleidoscope Sprinkles new Sprinkle Mix, Donut-cha No No No Good and Cosmic Shimmers to decorate my amazing musical confections. I loved how the cake and cupcakes turned out.
You can find the complete recipe for the cake/ cupcakes and decorating video below.
Chocolate Cake decorating
Black Music Month cupcakes
Makes 13″ x 9″ cake or 24 cupcakes
Ingredients
Chocolate Cake: (adapted from Vintage Cakes Mississippi Mud Cupcakes recipe)
Preheat oven 350F. Grease and flour cake pan or line cupcake tins.
In a small bowl, whisk hot coffee into the cocoa powder. Set aside and allow to cool.
In a large bowl, whisk or sift together flour, sugar, baking powder, salt, and baking soda until combined. Fold in chocolate chips.
In a separate medium sized bowl, whisk together eggs, yogurt, milk, oil and vanilla extract. Add in cooled cocoa mixture.
Add wet ingredients into bowl with dry ingredients. Gently stir ingredients together until just combined. Be careful not to over mix.
Fold in crushed chocolate sandwich cookies.
Pour batter evenly into cake pan. Bake cake at 350F for 25-30 mins. (Until tester comes out clean). Allow cake to cool completely
While cake is baking make buttercream frosting.
For frosting, in a large bowl, or stand mixer, whisk butter until light and fluffy. Slowly add confectioner’s sugar using mixer on low speed until frosting is smooth. Add heavy cream. Add vanilla extract. Add salt. Whisk frosting on medium-high speed until combined and frosting is light and fluffy.
Frost cake once cooled with frosting. Decorate with Sprinkles and Cosmic Shimmers (optional) .
Happy June! I am always excited to welcome the sixth month of the year with open arms. June is the halfway point of the year and serves as a point of reflection. Not only does this month mark a pivotal point in the year, it is also filled with celebrations. Of course we have Pride Month, a celebration of love and acceptance for everyone. June also is historic for Black Music month, summer solstice and more birthdays.
I, of course, am a May gemini. Would you believe that both my best friends are also Geminis and their birthdays are a day apart? My best friend, George, celebrates his special day on the 16th of this month, so I decided to make something spectacular for him.
I predetermined that this cake should be as unique and incredible as my best friend. One night a few weeks ago, while comfortably in my REM cycle, an idea came to mind. I quickly woke up from my slumber and jotted down my brainstorm and went back to sleep. Once well rested and ready I got to work on my birthday cake design.
This past weekend was the perfect opportunity to make this fabulous Rainbow Birthday Cake. This spectrum confection was made with love and of course Kaleidoscope Sprinkles for decoration. The Wizz Sprinkle Mix was the perfect Pride accessory for this cake. I enjoyed every part of making this cake for my amazing friend, so I decided to share the fun and love.
You can find the cake recipe and step by step decorating video below.
Rainbow Birthday Cake decorating video
Vanilla Cake Recipe (Makes 2 8″ or 9″ cakes, 4 6″ cakes or 24 cupcakes)
In a medium sized mixing bowl mix together flour, baking powder and salt. Set aside
In a large bowl or using a stand mixer cream butter and sugar together. Beat on medium speed until the mixture is light and fluffy. Add eggs one at a time to the mixture. Add vanilla and almond extracts. Slowly add the flour mixture one third at a time, alternating with buttermilk. After each addition, be sure to scrape the sides of the bowl. Mix batter until fully combined but be careful not to over mix.
Divide cake batter evenly into six small bowls. Add food gel to each bowl and gently fold in color until evenly distributed.
Transfer batter to the cake pans and smooth batter evenly in the pans. Bake cakes for approximately 20-22 minutes until toothpick or cake tester comes out clean. Place cakes onto cake rack and allow to cool completely to room temperature.
While cake is baking make the buttercream frosting. In a large bowl, or stand mixer, whisk together butter. Slowly add confectioner’s sugar using mixer on low speed until frosting is smooth. Add heavy cream. Add vanilla extract. Add salt. Whisk frosting on medium-high speed until vanilla extract combined and frosting is light and fluffy.
Frost cakes once cooled with frosting. Decorate with Sprinkles and assorted candies.
Once again it’s May, which means it’s time for month long birthday celebrations. I have always believed that your birthday should be treated as a holiday. My birthday month promises to have lots of laughter, a parade (just kidding), gifts and delicious food. I, of course, also plan an amazing personal vacation to celebrate. Nothing is too outlandish when it comes to enjoying my special day.
This year before hopping on a flight to continue my birthday extravaganza, I decided to indulge in a fabulous birthday brunch. Brunch is my absolute favorite meal of the day. I’ve always enjoyed brunch because it allows you to partake in both sweet and savory dishes. Brunch also allows you to drink champagne in the middle of the day with any side eyes. As a gemini, I am always indecisive in choosing what I want to eat for brunch. I usually end up ordering both something salty and sweet with way too much food for me to eat.
Last month I had the opportunity to enjoy a delicious brunch in Palm Desert, CA. The atmosphere was lovely and full of belly laughs, as was my stomach. I, following my own traditions, ordered way too much food. I was able to enjoy my omelet and Bellinis that I ordered, but the head-sized cinnamon roll had to be taken to-go. Once my brunch digested and I was hungry and few hours later, I thoroughly enjoyed the tasty pastry.
I decided this year I would use my favorite meal as inspiration for a new birthday recipe. I took my traditional cinnamon roll recipe and upgraded it for celebratory purposes. I wanted my birthday brunch full of color and flavor just like me. I infused Kaleidoscope Sprinkles rainbow sprinkle mix, The Wizz, into the dough, so each bite of this cinnamon concoction would feel like a party. I also used the delicious pineapple Bellinis from my Palm Dessert meal to elevate the glaze for my Rainbow Rolls.
Check out this one of a kind recipe and video of Rainbow Rolls below. I guarantee it will have you celebrating any occasion with a smile.
In a large mixing bowl, dissolve yeast in warm water and allow it to set for at least five minutes until the mixture starts to bubble.
In a separate small bowl mix sugar, melted butter, salt and egg together. Add egg mixture to large bowl while yeast hook is going on medium speed.
Turn hook speed down to low and add 2 cups of flour and mix until flour is incorporated. Mix in remaining flour until dough is easy to handle and comes off the side of the bowl.
Knead dough on lightly floured surface for 5 to 10 minutes. Place in well-greased bowl, cover and let rise until doubled in size, usually 1 to 1 1/2 hours.
When doubled in size, punch down dough. Add sprinkle mix to bowl and fold sprinkles into the dough.
Roll out dough on a floured surface into a 15 by 9-inch rectangle.
Spread softened butter all over dough using pastry brush. Mix sugar and cinnamon and sprinkle over buttered dough. Beginning at the 15-inch side, role up dough and pinch edge together to seal.
Cut into 12 slices.
Place cinnamon roll slices close together in the pan and let rise until dough is doubled, about 45 minutes.
Preheat oven to 350 degrees. Bake for about 20-25 minutes or until nicely browned. Allow to cool.
While dough is proofing, in a medium sized bowl mix together cream cheese, juice, champagne, powdered sugar and vanilla.
Spread glaze over slightly cooled rolls. Cover with more sprinkles (optional).
Guess who’s back, me of course!! Today is Easter Sunday which means my fast from social media is over. I thought I’d come back with my outfit for today. This outfit was inspired by all the wonderful colors and blossoms of spring. Enjoy!!
It’s Spring! I love Spring because it always represents growth and beauty to me. First comes April showers then May flowers. As Miranda Priestly famously said from Devil Wears Prada, “Florals for Spring, groundbreaking.” Not only do flowers come with Spring, but also so do pastels, new love and afternoon teas.
I love a great tea time. Getting the chance to get all dolled up and eat cute little dainty foods is the bees knees. Not only do I love sipping on tea, but I love spilling some tea with my girlfriends as well. An afternoon tea is the quintessential female fellowship time. I’m not sure if its the warm relaxing drinks or the atmosphere, but its all about hones-TEA.
I thought that this year for Springtime I would create a delicious new teatime treat for the season. Since I usually enjoy a light herbal or fruit tea in the afternoon, I thought a decadent, buttery confection would be the perfect accompaniment. My inspiration for these Dulce de Leche Bars is from one of my favorite cookies made at a local bakery here in Los Angeles. I wanted all the taste without all the time consuming work in the original recipe. I then decided to decorate these fabulous bars for my tea with Kaleidoscope Sprinkles My Mama’s Biscuits Sprinkle Mix, which was also inspired by teatime.
Check out this easy recipe and step by step video below.
Preheat oven to 350F degrees. Butter and parchment paper bottom of 9 by 9″ baking pan.
In a medium mixing bowl whisk together flours, baking powder and salt. Set aside.
In the bowl of an electric stand mixer cream together butter with granulated sugar until blended. Scrape down mixing bowl. Add eggs one at a time. Scrape down mixing bowl again. Add vanilla, almond extracts and lemon zest. Add flour mixture to bowl. Mix cookie dough until just combined. Be careful not to over mix or dough will be tough.
Divide dough into thirds.
Spread two-thirds of mixture into prepared baking dish. To help even out the dough, I like to press evenly with greased hands (sprayed with non-stick cooking spray).
Bake in preheated oven for approximately 5 minutes until dough is warm and slightly baked
Using spatula place small dollops of dulce de leche on top of dough. Spread dulce de leche evenly onto top of dough using the spatula.
Using remaining thirds of cookie dough, cover top of dulce de leche.
I love some decent, decadent fall fashion! The rich, luxurious colors, the textured fabrics and layers just make styling and people watching much more enjoyable during this season.
During the fall season, I usually make my way to Paris in some kind of fashion (pun intended). I’ve explained before how this time of the year is even more magical in my favorite city in the world. This year however, I ended up traveling to Paris earlier in the year for Cowboy Carter. I had an amazing time in the City of Lights during the warmer season, but I ultimately missed seeing all the cooler weather French fashion.
Because of my missed opportunity to see Paris fashion first hand this season, I went online to explore more. From Dior, to Chanel, to YSL this season’s fashion truly caught my eye. Saint Lauren for their 2025 winter catalog brought back the feeling of the 1980s with the structured coats, exaggerated shoulders pads, accentuated waist and bright colors.
The entire YSL seasonal line is absolutely incredible, but one particular outfit caught my eye that I could not forget. This intricate structured lace bodysuit with color blocking chocolate pencil lace skirt. The $20,000 price tag for this outfit was way out of my price range, so I made the decision to recreate the fit for a more reasonable price and my personal style.
The entire DIY was super easy to complete and I loved how the look turned out.
Here’s what I did:
Materials
– Lace bodysuit – Lace pencil skirt – Rit synthetic dye; colors Chocolate Brown & Apricot Orange – Liquid dish detergent – Stainless steel large pot – Rubber gloves – Metal Tongs – Candy thermometer (optional) – Foil pans – Shoulder pads/ bra inserts (optional)
Directions
Make sure you have purchased a lace bodysuit and pencil skirt that is light colored and suitable for dye.
Pre-wash and clean clothing per fabric recommendations.
Fill large stainless steel pot with enough water to cover clothing while dying.
Follow synthetic dye package directions for Stove-top method dying: Heat water to 200F, add tbsp. of dish detergent to the water. Add clothing to water and continue to stir for designated time until clothing color desired is reached.
Use tongs to transfer clothing to foil pan and allow clothing to completely cool.
Rinse clothing with cool water until water runs clear.
Allow clothing to completely dry.
Ta-da!! Just like that you have fabulous DIY couture ensemble that looks Paris designer chic!
*Bonus: You can dye satin shoes (like in the video) using the same method, but proceed cautiously as shoes may change shape with heat.
They say “April showers bring May flowers,” but if the flowers are faux then you can have flowers year round. Earlier this year, I was on social media in one of my fashion groups and stumbled upon this super cute photo of some up-cycled jeans. In the picture, the jeans appeared to have sprouted gorgeous flowers from the legs filled with different varieties of flowers. Being the DIY fashionista that I am, I was instantly inspired and ready for my own personalized floral frock.
The inspirational post.
The up-cycled denim idea prompted me on a thrift store run throughout Los Angeles looking for the right cut of jeans to fit me properly and do this DIY justice. I perused several stores and racks of clothes. I ended up finding some suitable denim jeans in the men’s section of my least favorite thrift store, Goodwill. The jeans fit me correctly how I wanted in the legs, but the waist was too big. I knew that was something I could easily fix myself. I quickly paid my $10 for the jeans and set out on my next mission, the flowers.
Thankfully I already had this idea before the closing of Joann’s Fabrics. I was able to go to Joann’s during their store closing sale and find an assortment of flowers at a decent discount. I bought and brought my bunch of flowers home and got to work.
I was able to complete this no-sew easy up-cycle DIY fashion project in a few hours. The entire process was super easy and straight forward. I wore my flower jeans for the first time to the Black Boy Art Show and received so many compliments from both women and men. I felt like a piece of art myself while wearing my DIY floral jeans.
I love how everything came out and just had to share the project with you. See my step-by- step guide below.
Step by step guide on how to create your own fabulous pair of floral jeans.
If you purchased oversized jeans and need the waist to fit properly, take a piece of fabric rope or shoestring and cut it slightly larger than your waist.
Take your pair of jeans and cut a small hole on the inside of the waistband, close to the button closure on both sides of the zipper portion.
Take your safety pin and stick it in the one end of the rope or shoe string.
Thread your safety pin and rope/string through the small hole of your waistband until you reach the other side of the jeans and hole.
Pull rope/string through the other hole making sure not to lose the end of rope/ string by pulling too hard.
Once you have both ends of your rope/ string through the waistband remove the safety pin and tie knots on both sides to prevent rope/ string from being lost in the waistband of the jeans.
Put jeans on and take your fabric pen and place marks on your jeans where you want flowers dispersed down the pant leg. Remove jeans when you’re done. Set aside.
Take your faux flowers and remove all of them from their stems.
Use your wire cutter to remove excess plastic and wire off the back of the flowers, so they will lay as flat as possible.
Use your glue to place and secure rough velcro side to the back of the faux flowers.
Use the same glue to place and secure smooth side of velcro buttons on top of marked spots on the jean pant leg.
Once glue has dried, place your faux flowers on top of their designated velcro spots.
Ta-da!! Just like that you have fabulous one-of-a-kind DIY Flower Jeans to wear anytime.
*Bonus: The great thing about using velcro to secure the flowers on your jeans is that you can easily remove the flowers when you’re ready to wash your jeans or switch up your flowers for a different aesthetic.
It’s September, which means the end of summer is in sight. Summer of 2025 has been lovely and jammed packed with wonderful memories. My favorite season is right around the corner and I can’t wait. I’m ready for the days where I need to wear a light jacket in the crisp cool air. I’m excited for the changing color leaves, pumpkins everywhere, seasonal fall fashion, cozy comfortable evenings and most importantly the flavors of fall.
Fall flavors are filled with a dimension of warmth and feels like an internal hug. Whether it’s savory sage, pumpkin spice, caramel apple or other favorite autumn tastes I can’t seem to get enough throughout the season. Something about the essence of fall inspires me to create more favorable recipes.
Recently while I was at work, someone unexpectedly brought in a box of Granny Smith apples for people to take home. I quickly gathered up my dozen apples and started brainstorming what to make with them. It only took a few hours before I had the perfect recipe for my newly acquired produce. I quickly came home and got to work on my recipe.
These Brown Butter Apple Pecan Streusel Bars are an excellent representation of the fall flavors that I love. The warmth of the cinnamon and apples with the richness from the brown butter and pecans. I drizzled a maple syrup glaze on top for even more autumn aromatics. I also decided to add even more fall pizzazz with some fall sprinkles to decorate from Kaleidoscope Sprinkles. This recipe is super easy to make and will be a fall favorite for sure.
Save this recipe because once you make it, you’ll be coming back for more.
See the complete recipe and step-by-step video below.
In a medium saucepan, melt butter over medium-low heat. Butter will melt, then foam, then turn clear golden and finally start to turn brown and smell nutty. Stir butter frequently, scraping up any bits from the bottom as you do. Be sure to continue to keep your eye on it because it can burn very fast!
As soon as the butter takes on a nutty brown color, take pan off the heat and allow butter to cool to room temperature.
White butter is cooling, make the streusel. In a medium size bowl combine flour, butter, brown sugar, salt and pecans. Use a fork to press and combine ingredients until mixture resembles course sand. Once fully combined set bowl aside.
Using a large skillet, add apples and lemon juice. Cook apples on medium heat until apples soften and stop giving off liquid. Remove from heat and allow apples to completely cool.
Preheat oven to 350F.
In a medium sized bowl mix together the flour, baking soda, cinnamon and salt. Set aside.
In a large separate bowl, using either hand or stand mixer, cream together brown butter, brown sugar and granulated sugar. Cream together until mixture is airy and lighter in color. Add eggs one at a time. Mix until smooth. Add vanilla extract. Add half of flour mixture to cream mixture and stir gently until incorporated. Add second half of flour mixture. Stir gently until incorporated. Add in cooled apples. Slowly fold in until combined.
Line 9 x 13″ pan with parchment paper. Using spatula, place dough onto bottom of the pan. Press evenly into bottom of the pan. Place streusel on top and spread across evenly. Bake for 25-30 minutes until bars are slightly golden and set. Remove from oven and allow bar to cool completely to room temperature.
While bars are baking, make the glaze. In a small mixing bowl, whisk together maple syrup, lemon juice, salt, extract (optional) and confectioners sugar. Whisk until glaze is smooth, about one minute. Pour glaze onto cooled bars. Add sprinkles for decoration (optional).
I have explained this before and have also tried to demonstrate this through my blog posts as well, but I’m all for earth conservation and recycling. I am a firm believer in everyone needing to do their part no matter how big or small. Something as simple as throwing a piece of trash into the proper receptacle can make a difference in preserving what’s left of this planet.
I try to use this thought process and approach when styling clothes and accessories from my closet. Sometimes something that I’m no longer interested in wearing or styling a certain way can perhaps be recycled into something more fashionable and suitable for my taste. It is from this mindset that I have come up with some of my favorite fashion pieces in my closet.
After making the decision and purchase to attend the Cowboy Carter tour this year, I knew I wanted a couture look for my concert ensemble. I wanted my outfit selection for this special affair to be unique, but I also wanted to repurpose some items I already owned if possible. Once I decided on what I was going to wear, I figured out how to use some already owned pieces to enhance my vision.
I picked out my colorful iridescent cowboy hat from Coachella’s past that had been collecting dust and not in any recent use. I got an idea to use some old denim scraps in my possession to change the look of my hat. With a little time and ingenuity, I was able to up-cycle my outdated cowboy hat into something more suitable for Cowboy Carter. I feel like Beyonce would be proud of my upgrade and fashion forward selection for her show.
The overall process was pretty simple to do. Since it appears that the cowboy aesthetic is here to stay, I thought I show you what I did, so you can possibly upcycle your cowboy hat as well.
See my step by step instructions and DIY video below.
DIY Up-cycle Cowboy Hat video
Materials
Cowboy hat Denim fabric scraps (approximately 1/2 yard) 1 can primer spray paint 1 can metallic spray paint (color of your choice) 1 can of gloss sealant (optional) 1 bandana Scrap paper Pen Tape measure Fabric shears (scissors) Iron-on fusible interfacing (optional) E6000 multi-purpose glue Metal chain (optional) Jewelry pliers (optional)
Directions
Use piece of scrap paper and pen to trace size of hat brim and hole for head onto paper. Cut out to make pattern of hat.
Remove any additional pieces/ accessories from hat. In a well ventilated area, spray clean cowboy hat with primer paint. Allow paint to completely dry.
Once hat has dried from primer paint, spray paint hat metallic color using other spray paint. Use two coats of paint and allow to completely dry. Spray with gloss sealant and allow to completely dry (optional).
While hat is drying, take your hand made hat pattern and trace out cutout on bandana fabric and denim fabric.
On top of brim of hat, take glue to adhere denim fabric onto the brim.
Once denim is secured on the top of the hat, use iron-on fusible interfacing or glue to adhere bandana fabric to the underside of the brim of the hat.
Cut out strip of the remaining denim fabric and glue it around circumference of hat band/ crown of the hat.
Take your metal chain and measure circumference length of cowboy hat. Use jewelry pliers to attach your metal chain to outside brim of your hat securely.
All done. You see how easy that upcycle was. You now have a brand new updated cowboy hat to wear whenever you choose!
A few years ago, I was perusing one of my favorite online retailer’s end of the season clearance sale. It was during the fall which meant all the summer items that weren’t bought were significantly reduced in price. I just so happened to stumble upon these pants that I had my eye on for some time. These pants especially caught my eye because of their bell bottom shape, girly pink and purple colors with a unique international post card print. They were just my style, so I quickly put my correct size in my online shopping cart to purchase.
After I received the pants in the mail about a week later I was so ready to try them on. Being that I live in LA, I knew I could still get away with wearing them during our warm autumns or even save the pants for next summer season. I tried the pants on with great enthusiasm only to find out the pants were too small. The material had ZERO stretch and would not slide over my thick hips. The pants were not returnable to the store as a clearance item and I really liked them. I kept them determined to figure out how I could up-cycle them.
Fast forward to this year, I had already planned on attending the beach music festival called, Afro Nation, in July. I knew the pants would be perfect to wear to the festival with the right idea and upgrade. The concept for my new pants finally came to me after some creative clarity. I could take the pants and expand them by opening the seam and adding more material. Even better, I could add an intricate design with the right fabric accessories. I headed to Joann’s Fabrics before their final closing and got all the materials I needed for my project.
I was able to complete my Ribbon Corset Pants in a weekend. This DIY was pretty straight forward and easy to complete. I wore these pants on the first day of Afro Nation and received so many compliments on them. Here is what I did to finalize these DIY: Ribbon Corset Pants.
Materials
-Seam ripper -Fabric scissors -Iron on hem tape -Ribbon (I used 7/8″ thick, 21ft/ 6.4m long) -Grommets -Grommet kit -Hammer -Fabric pen/ marker -Iron -Tape measurer -Push pins
*-¾” to 1″ thick elastic – needle & thread
Directions
After purchasing pants you plan to upgrade you need to remove the outseam from both pant legs using your seam ripper. Remove seam half way down the leg until you get to the knee.
Once outseam has been removed from both pant legs you’re going to have to replace the hem on the sides. Use push pins to secure hem tape to raw edges. Use iron to adhere hem tape to your pant sides. Then remove push pins.
Now using your fabric maker and measuring tape, mark down the outseam where you want to place your grommets. Make sure grommets start at top of waistline.
Place grommet over marked spots on outseam and use grommet kit and hammer to secure grommet to the fabric. Repeat steps until all grommet spots have been completed. (If the fabric is too thick to secure grommet properly, pre cut a hold over mark on fabric to help grommet process.)
Once all grommets are in place, add ribbon to each side of outer pant leg in design pattern of your choice. Adjust ribbon on each side and tie in place to your fitting.
Ta-da!! Just like that you have fabulous one-of-a-kind Ribbon Corset Pants to wear to your liking.
* After wearing my pants to Afro Nation I realized that a more secure waistline is essential to keeping the pants on. This can easily be fixed by sewing on elastic to the top waistline of the outseam. All you need to do is measure the length of elastic needed for each side. Cut elastic to proper size and secure in place with pins. Sew (either hand sew or use a machine) to attach elastic to pants. Once in place, restring side of pants with ribbon.
It’s almost the end of June. As we enter the beginning of summer and near the end of Pride Month, as well as Black Music Month, I couldn’t go leaving it empty handed. This month was an extra special time to enjoy black music as I was able to travel to Paris to attend Cowboy Carter as well as Fete de la Musique.
If you’re not aware of what the later is, it’s an annual festival that takes place in Paris on June 21st annually to celebrate World Music Day. In the city you can find thousands of people dancing in the streets to various types of music for free. This celebration in the city of lights has been going on for decades and is very well known and attended. This June was certainly not one to be forgotten.
Before my international excursion I also had the opportunity to return to Los Angeles County Museum’s (LACMA) free Friday jazz nights. Free jazz Friday’s at one of LA’s most popular venues is a great event to attend and highlights the summer in the city. For two hours each week, there are jazz musicians that take the stage to entertain the locals and all those in attendance with great melodies and vibes. This month has been busy with travel and other fun activities, but I still made sure there was time to celebrate representation of both movements with a recipe.
I got the idea to make some sweet treats that I could easily transport to Friday jazz night at the LACMA, but also represent PRIDE and of course taste good! I thought cookie bars/ blondies would be the best option to take with me. I got the idea to upgrade the cookie bars even further when I found a pack of cream cheese in my refrigerator. I also decided to add some Kaleidoscope Sprinkles for even more flare and color.
All in all I must say these colorful blondies turned out looking and tasting pretty great. These Rainbow Blondies were super easy to whip together. I definitely will be making more of these throughout the summer and the rest of the year.
See the complete recipe and step by step video for my Rainbow Blondies below.
Rainbow Blondies
Ingredients
Blondies: 2 cups All-purpose flour
¼ cup oatmeal (I used instant oatmeal)
1 tsp. baking soda
½ tsp. salt
1 cup unsalted butter, room temperature
1 cup light brown sugar, packed
2 eggs, room temperature
1 tsp. vanilla extract
2 tbsp. milk (I used almond milk)
2 cups of white chocolate or funfetti chips
8 oz of mini milk chocolate M&M’s (plus some for top)
In medium sized bowl, use stand or hand mixture to cream together cheese, egg, confectioner’s sugars and vanilla extract. Mix together until completely combined and smooth.
(optional), In separate bowls evenly divide cream cheese filling. Add food coloring to each individual bowl. Once color is fully combined into filling set aside.
In a medium sized bowl mix together the flour, oatmeal, baking soda and salt. Set aside.
In a large separate bowl, using either hand or stand mixer, cream together butter and brown sugar. Add eggs one at a time. Mix until smooth. Add vanilla extract. Add half of flour mixture to cream mixture and stir until incorporated. Add second half of flour mixture. Stir until incorporated. Add milk. Add white chocolate chips, M&M’s and sprinkles to batter. Slowly fold in until combined.
Place cookie dough in the refrigerator to rest for at least 20 minutes.
Line 9 x 13″ pan with parchment paper. Using spatula, place half of cookie dough onto bottom of the pan. Press evenly into bottom of the pan. Spoon cream cheese filling onto the top of cough dough. Use knife to swirl cream cheese mixture evenly on top of cookie dough. Spoon the remaining cookie dough on top. Place additional M&M’s on top of dough. Bake for 30-35 minutes until blondies are slightly golden and cream cheese is set. Remove from oven and allow blondies to cool completely to room temperature.
It’s Super Bowl Sunday! Honestly I’m not a big fan of the NFL, but I do love a good competition. What I enjoy even more about the game are the creative commercials and of course, the halftime show. I know I’m not the only one who feels like this. There are so many people out there who enjoy more surrounding the game than the actually game itself. Not only is there amazing entertainment to enjoy besides the sport, but there is incredible food.
The Super Bowl is known for great snacks to accompany the game. There are of course wings, chili, sandwiches, chips and other incredible finger food to munch on. There is always so much scrumptious savory food to snack on, but as I’ve said before I’m a fan of sweets. While I’ve attended plenty of different football game watching parties in my past, they have all had one thing on common, a lack of delicious desserts.
This year a recipe popped up in my head a few days before game day and I thought it would be perfect for the celebration. These simple yet tasty pockets are filled with camaraderie and puns. The best parts about these treats are they are fruity, festive and can be made fresh before game time. You get to choose which filling to make as well, depending on who you anticipate will be “turning over” the ball. They’re even a bit nostalgic since the turnovers come out shaped like the paper footballs played with in school.
Check out my easy and impressive recipe for these Super Bowl Turnovers. They’re sure to be a hit that you won’t want to fumble.
See the recipe and step by step video below.
Super Bowl Turnovers
(Makes 18-32 servings)
Ingredients
Turnovers
8oz. frozen cherries, thawed (If you’re rooting for the Eagles)
8oz. frozen blueberries, thawed (If you’re rooting for the Chiefs)
1 cup of sugar, divided in half
Juice of fresh lemon, cut in half
1 tsp. vanilla extract, divided in half
½ tsp. almond extract, divided in half
Dash of cinnamon
2 tbsp. tapioca starch (or cornstarch), divided in half
In a small saucepan on medium heat, add your fruit of choice. Add sugar, lemon juice, vanilla extract, almond extract and cinnamon. Stir the ingredients together and allow filling to simmer. After a few minutes turn filling down to low heat and add your tapioca starch or corn starch. Continue to stir together and allow it come to a boil. Once filling has come to a boil and sauce has thickened, turn off the heat and transfer to a safe proof bowl. Allow filling to come to room temperature. Place filling in the refrigerator and allow to cool.
(Repeat steps for other fruit filling or double fruit recipe if only using one fruit.)
On a lightly floured surface unfold puff pastry sheet. Roll out puff pastry into 12″ x 12″ square. Cut puff pastry into 9 or 16 squares, depending on the size you want your turnovers. Take filling out of refrigerator. Place a small spoonful into the middle of each square. Fold over each square into a triangle and place onto a parchment paper lined cookie sheet. Press edges down with a fork to seal turnovers.
Repeat with second sheet of puff pastry.
Place turnover filled cookie sheet into the refrigerator for 20-30 minutes.
Preheat oven to 400F.
Take cookie sheet out of the oven. Egg wash each turnover using pastry brush. Place turnovers into the oven for 15-20 minutes until turnovers are golden brown. Allow turnovers to cool to room temperature.
While turnovers are baking, make the glaze. In a small bowl, mix together confectioner’s sugar, milk, vanilla extract and salt. Stir together until smooth.
Drizzle glaze over completely cooled turnovers and decorate with sprinkles (optional).
If you don’t know by now, travel inspires a great deal of my recipes. I recently returned to and from Puerto Vallarta, Mexico for some much needed rest and relaxation. This was second time visiting PV, but I was still full of much excitement throughout my trip. Puerto Vallarta is a gorgeous seaside town that just delivers so much beauty, culture and amazing food.
I got back from Puerto Vallarta just in time for Christmas season. The last time I was in PV I returned after the new year equipped with new recipe inspiration. After my previous PV excursion I came back loaded with fresh and authentic cocoa powder that I just had to do something with. This time around, I was inspired by the essence of Mexico for my new, original recipe.
This Christmas Cheesecake is full of flavor and richness just like the vibes and culture of Puerto Vallarta. I infused classic Mexican galletas (Spanish for cookies) for the cheesecake crust. I came up with the idea to use Mexican flavors and colors in this recipe by infusing in chocolate, cinnamon and pistachios. This rich and delectable Christmas Cheesecake is then covered in a cranberry and citrus glaze for even more holiday flavor.
This Christmas Cheesecake does require several steps and patience, but I promise the taste is worth it. It will become a classic holiday flavor and recipe from now on.
See the complete recipe and video below
Christmas Cheesecake
White Chocolate Pistachio Cheesecake with Cranberry Glaze
Ingredients
For the crust:
5oz of butter cookies
8oz (1 cup) of pistachios
6oz melted butter
For the cheesecake filling: 4-8oz. cream cheese, softened
½ cup of greek yogurt or sour cream
1 cup granulated sugar
3 large eggs, room temperature
8 oz melted white chocolate (not morsels)
2 tbsp. white chocolate liqueur (optional)
4 tbsp. pistachio butter
green food coloring, optional
For the cranberry glaze: 10oz fresh cranberries
1 cup of granulated sugar
Zest and juice of tangelo or tangerine
2-4 tbsp. water
cinnamon stick (optional)
Directions Preheat oven to 350F.
Make the crust by using food processor to grind cookies and pistachios to sand like texture. Slowly add melted better while food processor is in motion to evenly distribute butter. Crust should easily press together when ready.
Add crust to springform pan and press gently to the bottom and sides of pan using back of measure cup.
In a separate large bowl whisk together cream cheese, granulated sugar, egg and melted white chocolate. Add liqueur. Whisk until filling is creamy and fully combined.
In another medium sized bowl add third of cheesecake filling and pistachio butter. Whisk to until completely combined. Add food coloring if you choose. Mix until combined.
Smooth cream cheese mixture evenly over the crust. Add pistachio cheesecake filling on top. Use spatula to swirl two fillings together.
Bake cheesecake at 350F for 60 minutes. Turn off oven and continue to allow cheesecake to remain in oven until completely cool.
Remove from oven and cheesecake to cool to room temperature, then place in the refrigerator for a minimum of 8 hours.
While cheesecake is baking or cooling in the refrigerator make your cranberry glaze. In a medium sized saucepan cook cranberries, sugar, cinnamon, zest and juice at low-medium heat until cranberries soften and burst. Remove cinnamon stick and allow cranberries to cool. Sieve sauce to make smooth. Add water in needed to thin out sauce to right consistency.
Remove cheesecake from the fridge. Smooth glaze on top.
Fall is officially here. I’m not going to lie, I’m happy my favorite season is here but summer 2024 was a movie! I had an amazing time last season. I went to Bermuda Carnival and visited the island for the first time. I had a chance to also travel to Portugal for the first time for Afronation. I concluded summer 2024 with a visit to Paris for the Olympics. That adventure was full of memories I will never forget. Now that summer is complete, it’s time to unwind and enjoy autumn.
Last year this season I had a chance to visit Paris, which in my opinion is the best time to go. The air is crisp and the fashion is impeccable. I love to visit Paris in the fall because not only is it less crowded, but it’s the perfect weather for visiting museums and eating French pastries and treats. When it’s cold, it makes me want to remain inside and feast on delicious and rich delicacies. Paris is full of places to stop and indulge on fall specialties.
This year, I don’t think I’ll be making it back to Paris, so I thought I’d bring the Parisian food for fall here to me. I got the idea to make some super easy and simple pumpkin spice flavored palmiers. Palmiers are French cookies made of laminated dough. There are other international versions of this cookie in other countries as well. I decided to put my own spin on them by making them full of pumpkin spice flavor. I even decided to decorate them to look like little pumpkins as well using Kaleidoscope Sprinkles.
These Pumpkin Palmiers were so easy to make and turned out amazingly well. They are great to eat anytime of day; breakfast, snack or for dessert. They are also great to serve for all the seasonal parties coming up. Definitely check out the recipe below and make some pumpkin spice palmiers for yourself.
See the complete recipe and step-by-step video below.
Pumpkin Palmiers
(Makes about 3 dozen palmiers)
Pumpkin Palmiers
1 cup pure pumpkin purée ½ cup brown sugar, lightly packed 1 tbsp pumpkin pie spice* 1 egg yolk (save egg white for wash)
2 sheets of puff pastry, purchased from store (I used Pepperidge Farm brand)
Make the filling: In a small bowl, whisk together pumpkin purée, brown sugar, egg yolk and pumpkin pie spice. Set aside in the refrigerator.
Flour a surface and a rolling pin. Unfold defrosted puff pastry dough. Roll dough out to 10×14-inch rectangle. Spread pumpkin filling onto the dough, leaving a thin border on the edges. Working with one side at a time, tightly roll the two long sides of the dough toward each other until they meet in the middle. Carefully wrap the long tube of dough with plastic wrap and refrigerate for at least 30 minutes.
Place an oven rack in the center position. Preheat oven to 400F. Line a rimmed quarter-sheet pan or jelly roll pan with parchment.
Remove filled dough from the refrigerator and unwrap. Use a sharp chef’s knife to cut the dough in 1/2-inch slices and place them about 2 inches apart on the prepared pan. Brush with egg white and sprinkle with coarse sugar or Kaleidoscope Sprinkles. Bake 15-20 minutes until golden brown.
Let cool for 5-10 minutes on the pan on a rack before removing to a serving plate. Place Pocky sticks into palmiers for more pumpkin flare and flavor (optional).
The time has finally arrived. I have waited literally four years for this moment. The olympics has made it to my favorite city in the world and I am so very to celebrate. These next two weeks will be forever ingrained in my mind. I’m ready to see the world’s best athletes culminate and be surrounded by beautiful moments. Think of all the statutes in art and physical form together, united in one accord. What a magnificent time to be in the City of Lights.
I have been preparing for these two week in Paris for years. I made sure I wasn’t going to miss out on this lifetime event in my favorite city in the world. I was able to secure my trip and even some tickets to events after waiting patiently for some time. It’s well worth the wait because being at the Olympics in Paris is so deserving.
Now that Paris Olympics 2024 has made it to the main stage I am ready to celebrate not only in Paris, but with a new recipe. I can not let this moment pass by without a decadent, medal deserving, inspired delicacy with French inspiration. I used the French flag to inspire me to create some delicious no-churn ice cream. The fruity fresh ice cream is then placed in between fabulously olympic decorated cookies.
These Paris Olympic Ice Cream Cookies turned out fantastic. A gold metal is definitely deserved for this recipe.
Please see recipe and step by step video below.
Paris Olympics Ice Cream Sandwiches
For the Ice Cream:
1.2 oz (34g) freeze dried raspberries
1.2oz (34g) freeze dried blueberries
16oz (473mL) whipping cream, very chilled
14oz. (396g) sweetened condensed milk
1 fresh vanilla bean or 2 tsp (8.4g). of vanilla extract
For the Cookies:
2 cups (240g) all-purpose flour
¼ cup (28g) almond flour
1 tbsp. (8g) tapioca flour ( you can substitute cornstarch)
1 tsp. (4.8g) baking powder
½ tsp.(3g) salt
1 cup (227g) unsalted butter, at room temperature
1 cup (200g) granulated sugar
2 large eggs, room temperature
1 ½ tsp.(6.3g) vanilla extract
½ tsp. (2.1g) almond extract
1 tsp. (2g) lemon zest
Directions
For the ice cream:
Using a food processor, grind raspberries into fine ground powder. Place in a bowl and set aside. Repeat steps with the blueberries. Set aside.
In a large bowl, using a hand or stand mixer add heavy cream. Whip heavy cream on high speed until it doubles in size and soft peaks form.
Continue using hand or stand mixer on medium speed add in sweetened condensed milk. Whisk into heavy cream until completely combined. Add vanilla. Continue whisking until fully combined. Be sure not to over mix or cream will deflate and ice cream won’t be airy.
Use a spatula and divide ice cream into three bowls equally. Use spatula and fold raspberries into a bowl. In another bowl, fold in blueberries.
Use spatula to gently place ice cream into layers in loaf pan. Cover ice cream with plastic wrap and place in freezer for at least 4 hours, but preferably overnight to harden.
While the ice cream is in the freezer, make the cookies.
For the cookies:
Preheat oven to 350 degrees. Butter and parchment paper bottom of two 9 by 13″ baking pans.
In a medium mixing bowl whisk together flours, baking powder and salt. Set aside.
In the bowl of an electric stand mixer cream together butter with granulated sugar until blended. Scrape down mixing bowl. Add eggs one at a time. Scrape down mixing bowl again. Add vanilla, almond extract and lemon zest. Add flour mixture to bowl. Mix cookie dough until just combined. Be careful not to over mix or dough will be tough.
Divide cookie dough in half. Spread half of mixture into prepared 9×13 baking dish. Repeat with second half of dough and other baking pan. To help even it out, I like to press even with greased hands (sprayed with non-stick cooking spray).
Bake in preheated oven for approximately 14 -16 minutes until dough has puffed up slightly and is golden brown on the edges.
Let cookies cool completely on a wire rack until room temperature.
Once cookies have cooled. Cut cookie into 4-6 pieces from each baking pan.
Remove ice cream from freezer, cut ice cream out of loaf pan and place onto cookie slices. Place another decorated cookie slice on top of ice cream to make sandwich.