Rainbow Rolls

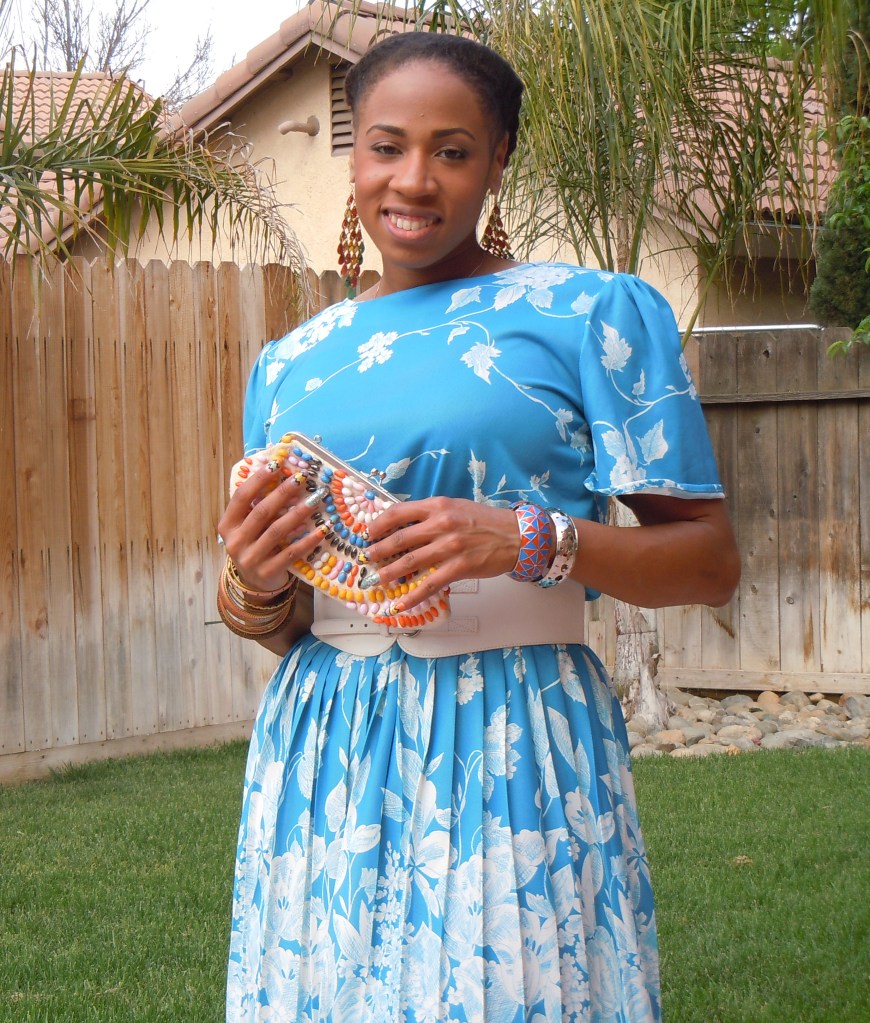
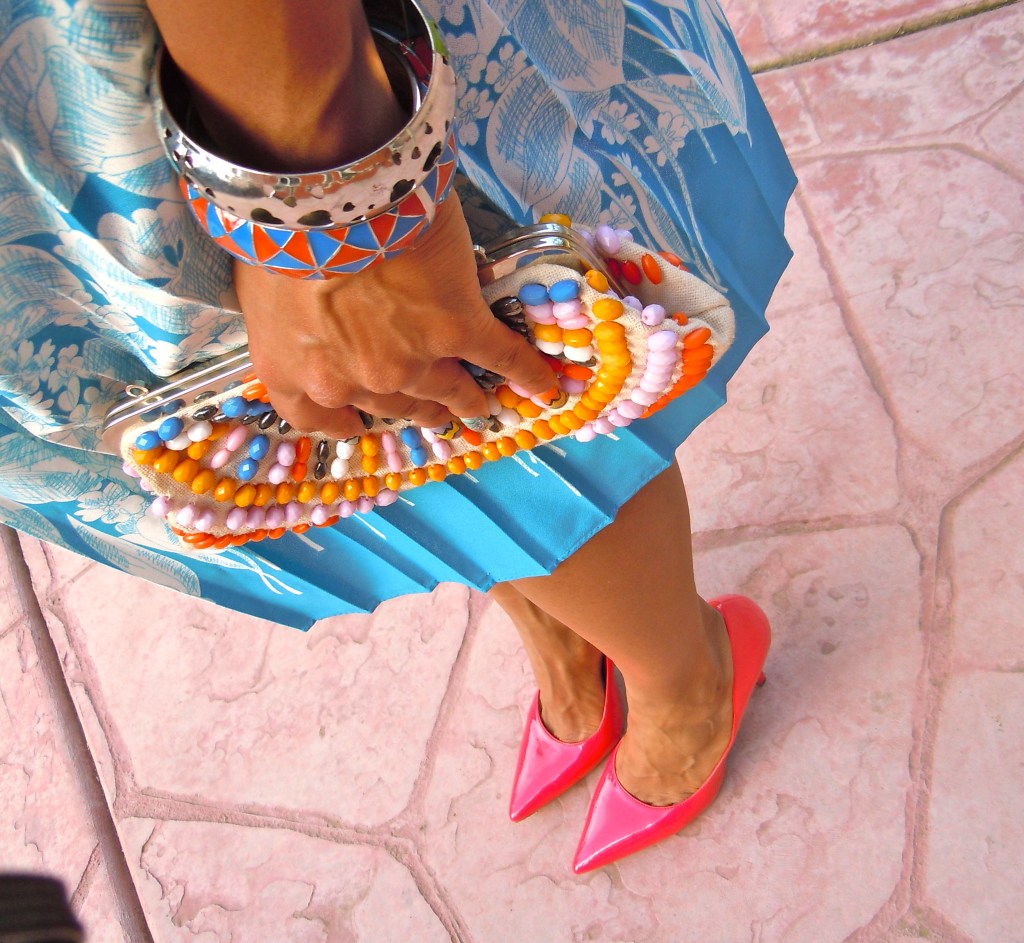
Once again it’s May, which means it’s time for month long birthday celebrations. I have always believed that your birthday should be treated as a holiday. My birthday month promises to have lots of laughter, a parade (just kidding), gifts and delicious food. I, of course, also plan an amazing personal vacation to celebrate. Nothing is too outlandish when it comes to enjoying my special day.

This year before hopping on a flight to continue my birthday extravaganza, I decided to indulge in a fabulous birthday brunch. Brunch is my absolute favorite meal of the day. I’ve always enjoyed brunch because it allows you to partake in both sweet and savory dishes. Brunch also allows you to drink champagne in the middle of the day with any side eyes. As a gemini, I am always indecisive in choosing what I want to eat for brunch. I usually end up ordering both something salty and sweet with way too much food for me to eat.

Last month I had the opportunity to enjoy a delicious brunch in Palm Desert, CA. The atmosphere was lovely and full of belly laughs, as was my stomach. I, following my own traditions, ordered way too much food. I was able to enjoy my omelet and Bellinis that I ordered, but the head-sized cinnamon roll had to be taken to-go. Once my brunch digested and I was hungry and few hours later, I thoroughly enjoyed the tasty pastry.

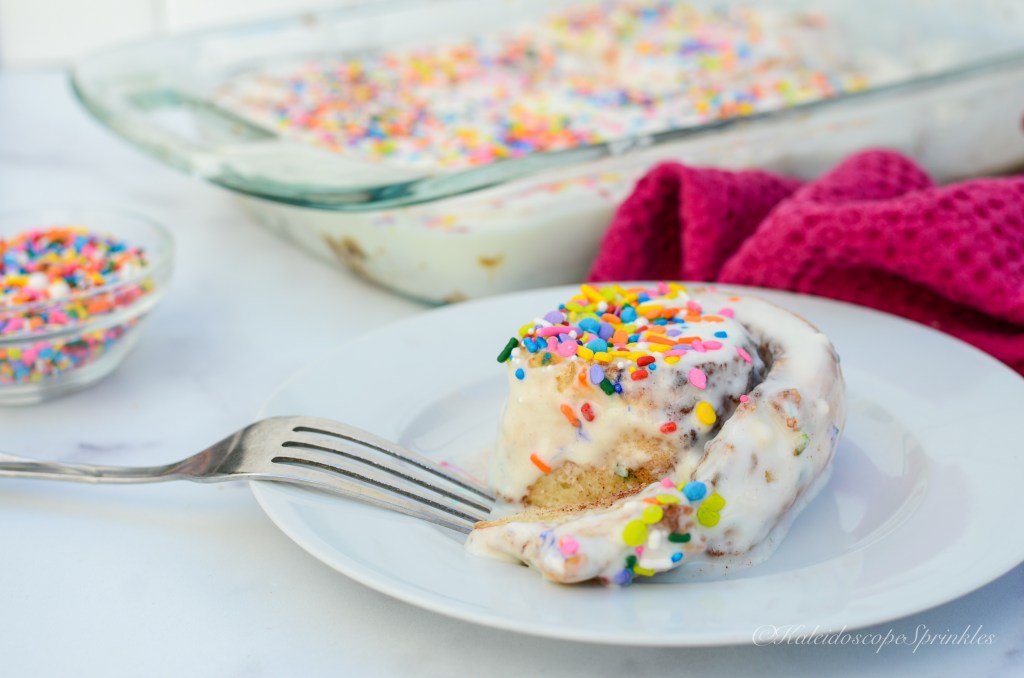
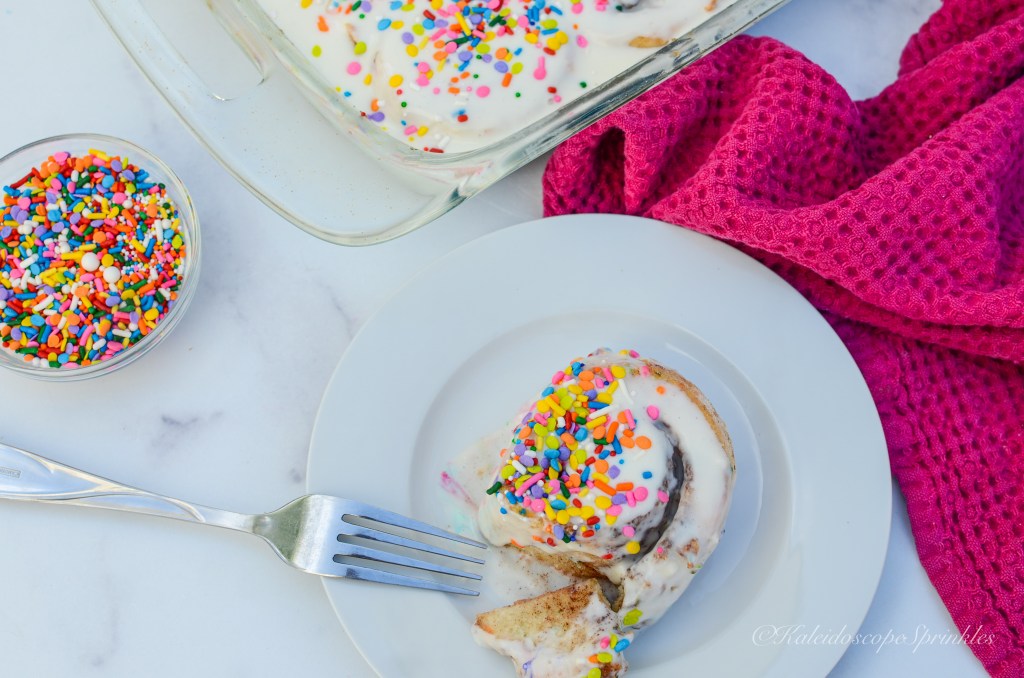
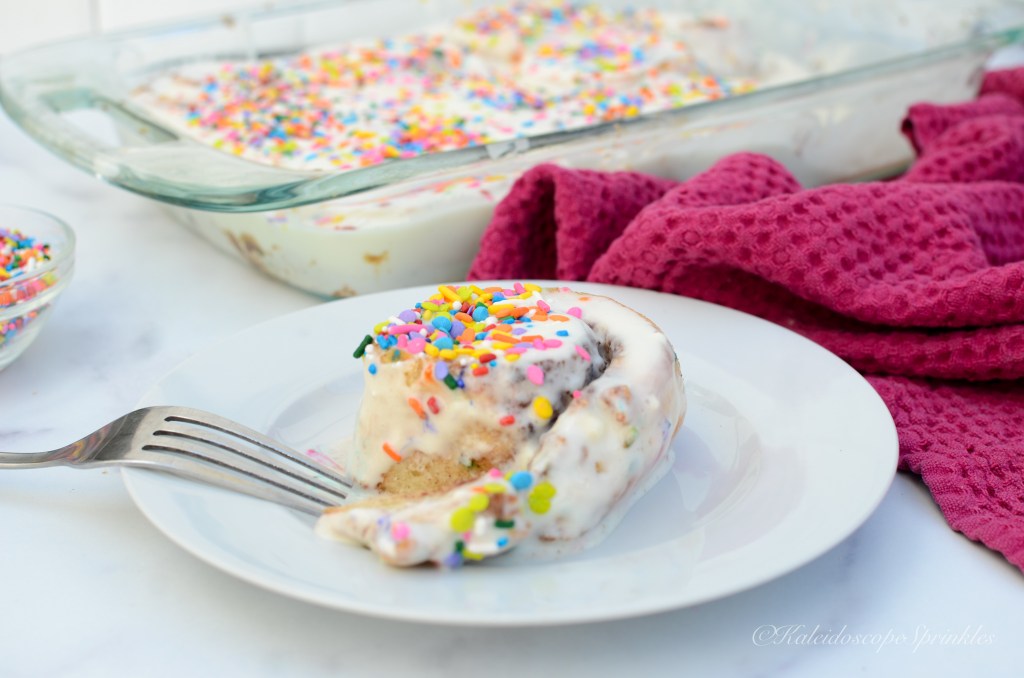
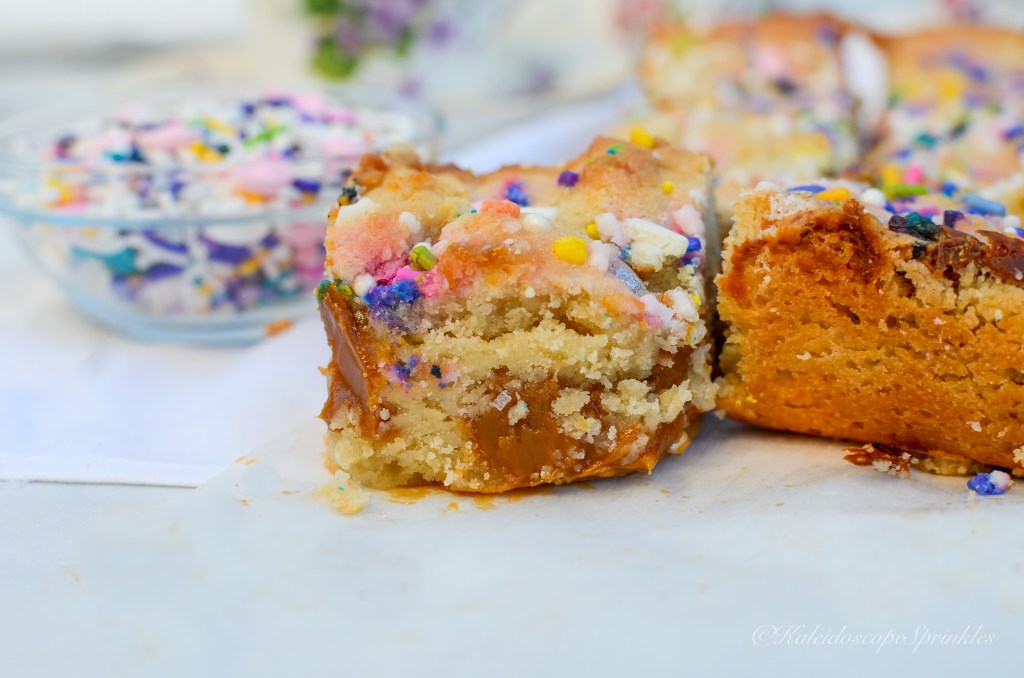
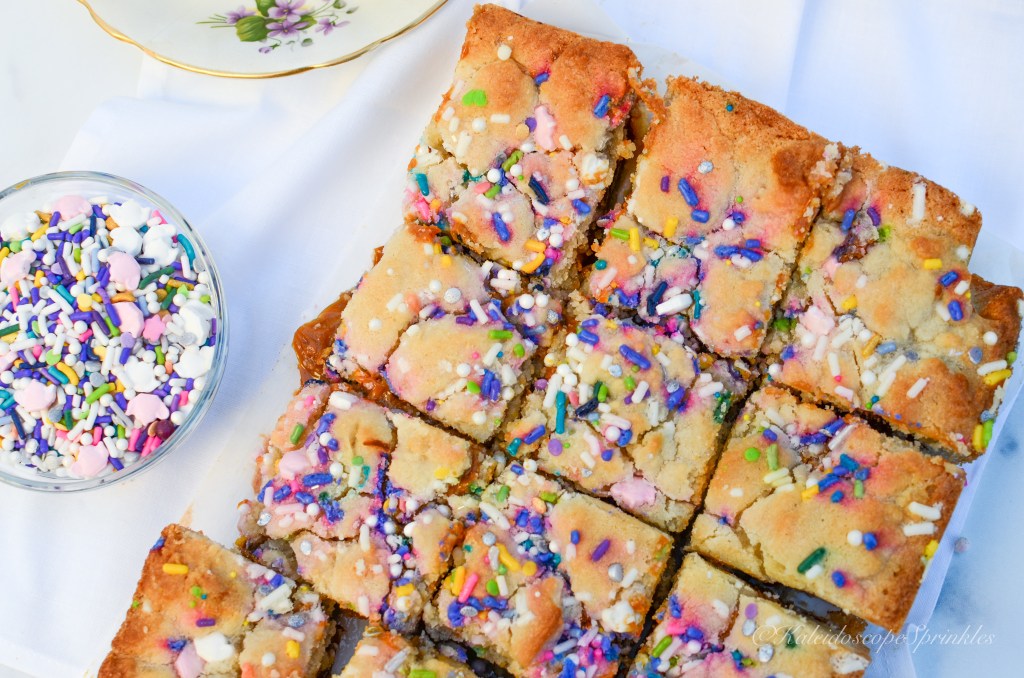
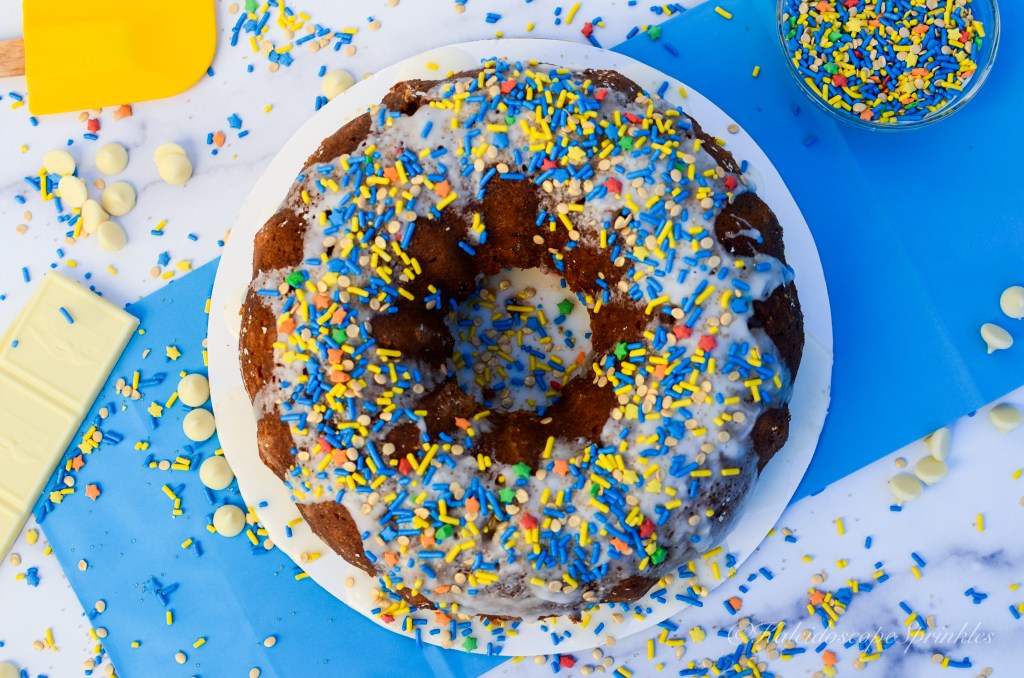
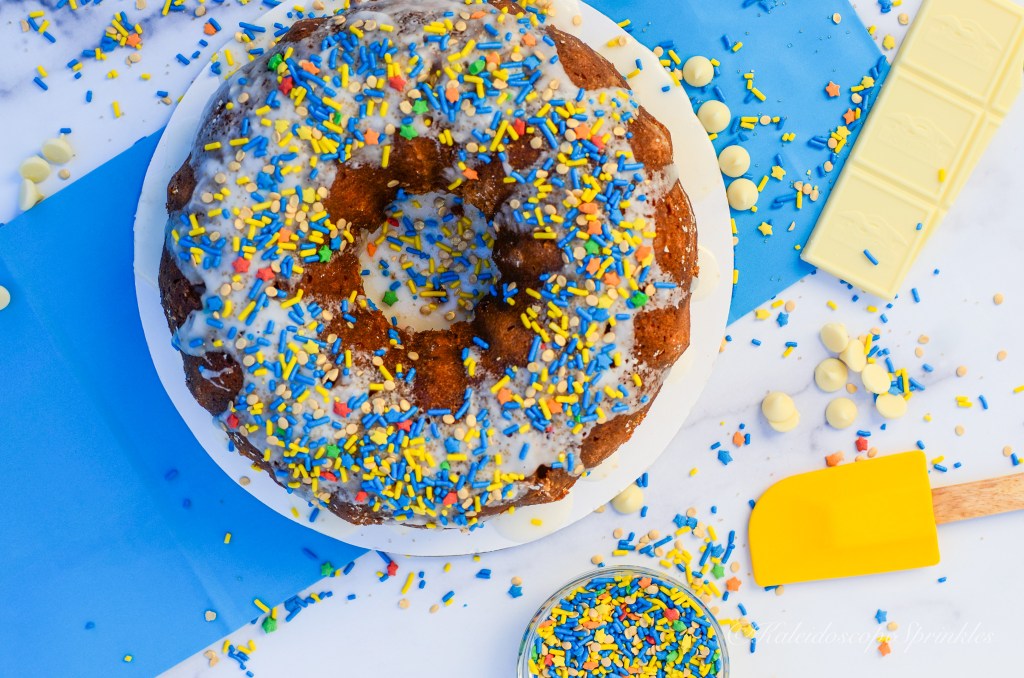
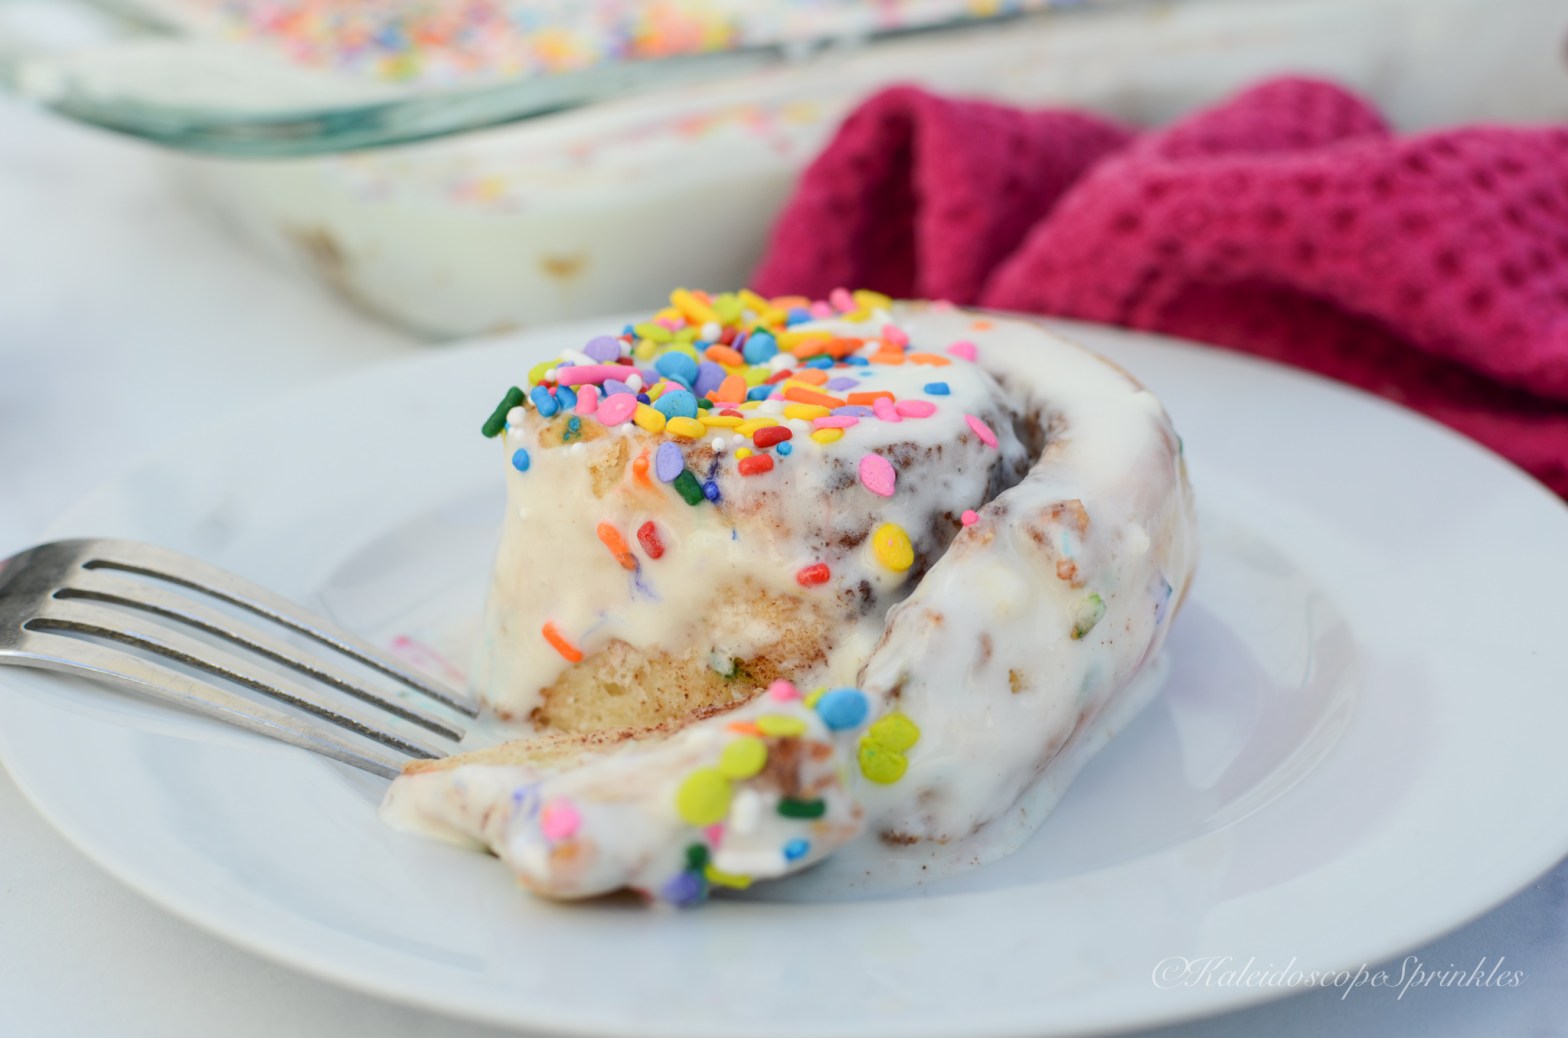
I decided this year I would use my favorite meal as inspiration for a new birthday recipe. I took my traditional cinnamon roll recipe and upgraded it for celebratory purposes. I wanted my birthday brunch full of color and flavor just like me. I infused Kaleidoscope Sprinkles rainbow sprinkle mix, The Wizz, into the dough, so each bite of this cinnamon concoction would feel like a party. I also used the delicious pineapple Bellinis from my Palm Dessert meal to elevate the glaze for my Rainbow Rolls.

Check out this one of a kind recipe and video of Rainbow Rolls below. I guarantee it will have you celebrating any occasion with a smile.

Step by Step Rainbow Rolls guide

Ingredients

Dough:

2- ¼ ounce package yeast

½ cup warm water (approximately 140F)

2 tbsp sugar

1/3 cup butter, melted

1 tsp salt

1 large egg, room temperature

3 1/2 to 4 cups all-purpose flour

¼ cup The Wizz Sprinkle Mix

Filling:

½ cup butter, softened

¾ cup likely packed brown sugar

2 tbsp ground cinnamon

Pineapple Bellini Glaze:

8oz package of cream cheese

2 tbsp pineapple juice

¼ cup champagne/ Prosecco

1 ½ cups powdered sugar

1 tsp vanilla extract

The Wizz Sprinkle Mix, for decorating (optional)

Directions

In a large mixing bowl, dissolve yeast in warm water and allow it to set for at least five minutes until the mixture starts to bubble.

In a separate small bowl mix sugar, melted butter, salt and egg together. Add egg mixture to large bowl while yeast hook is going on medium speed.

Turn hook speed down to low and add 2 cups of flour and mix until flour is incorporated. Mix in remaining flour until dough is easy to handle and comes off the side of the bowl.

Knead dough on lightly floured surface for 5 to 10 minutes. Place in well-greased bowl, cover and let rise until doubled in size, usually 1 to 1 1/2 hours.

When doubled in size, punch down dough. Add sprinkle mix to bowl and fold sprinkles into the dough.

Roll out dough on a floured surface into a 15 by 9-inch rectangle.

Spread softened butter all over dough using pastry brush. Mix sugar and cinnamon and sprinkle over buttered dough. Beginning at the 15-inch side, role up dough and pinch edge together to seal.

Cut into 12 slices.

Place cinnamon roll slices close together in the pan and let rise until dough is doubled, about 45 minutes.

Preheat oven to 350 degrees. Bake for about 20-25 minutes or until nicely browned. Allow to cool.

While dough is proofing, in a medium sized bowl mix together cream cheese, juice, champagne, powdered sugar and vanilla.

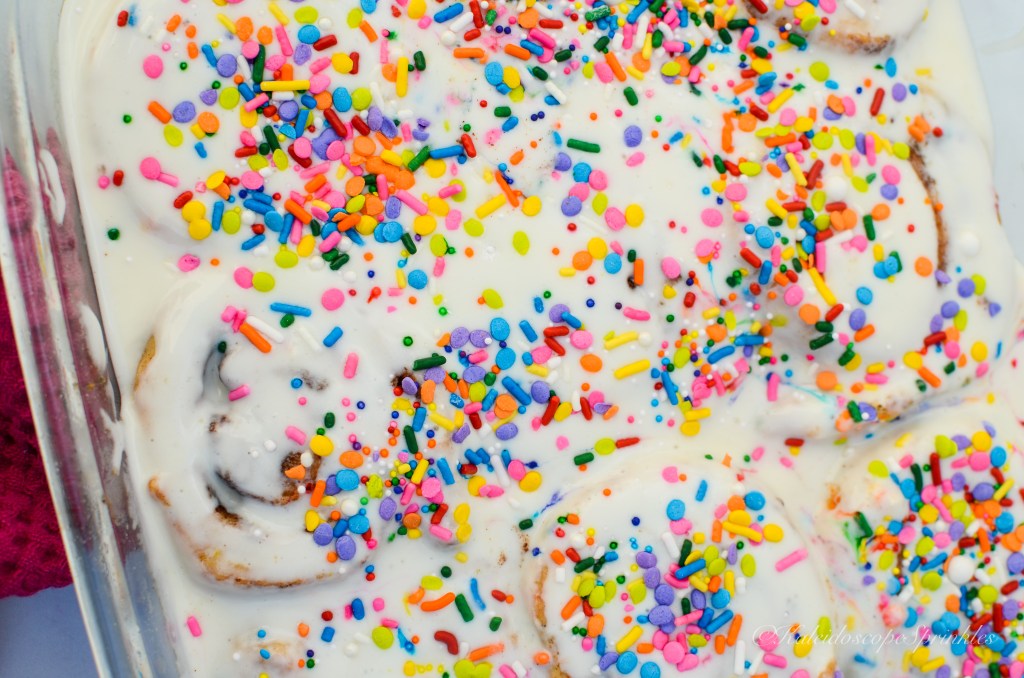
Spread glaze over slightly cooled rolls. Cover with more sprinkles (optional).

Devour and Enjoy!!

OOTD: Retro Resurrection Sunday

Easter Sunday Fashion

Original Blog Post: March 31, 2013


Guess who’s back, me of course!! Today is Easter Sunday which means my fast from social media is over. I thought I’d come back with my outfit for today. This outfit was inspired by all the wonderful colors and blossoms of spring. Enjoy!!


What I Wore

Dress- thirfted

Patent coral shoes- BCBG (find similar ones here)

White corset belt- The limited (find similar one here)

beaded clutch- Aldo accessories (find similar one here)

Earrings- World Market

Assorted bracelets and bangles- Charming Charlie and World Market

Dulce de Leche Bars

It’s Spring! I love Spring because it always represents growth and beauty to me. First comes April showers then May flowers. As Miranda Priestly famously said from Devil Wears Prada, “Florals for Spring, groundbreaking.” Not only do flowers come with Spring, but also so do pastels, new love and afternoon teas.

I love a great tea time. Getting the chance to get all dolled up and eat cute little dainty foods is the bees knees. Not only do I love sipping on tea, but I love spilling some tea with my girlfriends as well. An afternoon tea is the quintessential female fellowship time. I’m not sure if its the warm relaxing drinks or the atmosphere, but its all about hones-TEA.

I thought that this year for Springtime I would create a delicious new teatime treat for the season. Since I usually enjoy a light herbal or fruit tea in the afternoon, I thought a decadent, buttery confection would be the perfect accompaniment. My inspiration for these Dulce de Leche Bars is from one of my favorite cookies made at a local bakery here in Los Angeles. I wanted all the taste without all the time consuming work in the original recipe. I then decided to decorate these fabulous bars for my tea with Kaleidoscope Sprinkles My Mama’s Biscuits Sprinkle Mix, which was also inspired by teatime.

Check out this easy recipe and step by step video below.

Dulce de Leche Bars instruction video

Original recipe from National Sugar Cookie Day blog

Ingredients

Cookies:

2 cups all-purpose flour

¼ cup almond flour

1 tbsp. tapioca flour ( you can substitute cornstarch)

1 tsp. baking powder

½ tsp. salt

1 cup unsalted butter, at room temperature

1 cup granulated sugar

2 large eggs, room temperature

1 ½ tsp. vanilla extract

½ tsp. almond extract

1 tsp. lemon zest

Filling:

13oz. Dulce de Leche, (I used La Lechera)

Kaleidoscope Sprinkles My Mama’s Biscuits Sprinkle Mix

Directions

Preheat oven to 350F degrees. Butter and parchment paper bottom of 9 by 9″ baking pan.

In a medium mixing bowl whisk together flours, baking powder and salt. Set aside.

In the bowl of an electric stand mixer cream together butter with granulated sugar until blended. Scrape down mixing bowl. Add eggs one at a time. Scrape down mixing bowl again. Add vanilla, almond extracts and lemon zest. Add flour mixture to bowl. Mix cookie dough until just combined. Be careful not to over mix or dough will be tough.

Divide dough into thirds.

Spread two-thirds of mixture into prepared baking dish. To help even out the dough, I like to press evenly with greased hands (sprayed with non-stick cooking spray).

Bake in preheated oven for approximately 5 minutes until dough is warm and slightly baked

Using spatula place small dollops of dulce de leche on top of dough. Spread dulce de leche evenly onto top of dough using the spatula.

Using remaining thirds of cookie dough, cover top of dulce de leche.

Sprinkle My Mama’s Biscuits Sprinkle Mix evenly on top of cookie dough.

Bake cookie bars in the oven for approximately 25-30 minutes until dough has puffed up and is golden brown on the edges.

Let cookie bars cool completely on a wire rack until room temperature.

Cut bars evenly into 9-16 pieces depending on your preference.

Devour and enjoy!!

*you can make cookie dough in advance and keep in refrigerator for up to one week. Remove from refrigerator at least 30 minutes prior to use.

Make Love Not War Cake

Last month was a truly incredible month of appreciation and celebration of Black history. Besides learning more amazing information about the contributions of African Americans to this country, I was busy planning my absolutely unbelievable, once in a lifetime trip to Egypt. My 8 day/ 7 night trip to the origin of ancient civilization was a great culmination of pioneering Black culture and livelihood. I soaked up every ounce of ancient Black history that I could visiting museums, temples, booking Egyptology tours and shopping of course!

Before my amazing international excursion, I had to clean up my kitchen and dispose of some food. I had some produce that needed to be used before my trip in a few days. In my fruit bowl were some seriously ripe bananas. I thought about making a classic banana bread, but I decided that a celebratory trip required a celebratory send off cake. I pondered about what would complement this popular fruit for my cake. I decided to parallel the ripe tropical fruit with some mellow cocoa notes in the form of white chocolate. This cake put a huge smile on my face, so I decided to decorate with Kaleidoscope Sprinkles S Glee Rho Sprinkle Mix for even more celebration. The cake turned out perfect and was a great send off to my incredible trip.

After returning from my Egyptian excursion I had a greater appreciation for International travel and culture. I was looking forward to planning my next trip when things in Europe began to shift. Ukrainians were left with the heavy and gut wrenching decision of fleeing or fighting for their country. Blacks in the Ukraine were unfortunately experiencing racism at the borders trying to escape the war stricken country. This war further exposed the continued mistreatment of people of color no matter the circumstance. Racism doesn’t stop at wartime. War is fueled by hate, as is racism. In order to stop further conflicts across the world we cannot continue to allow the inequality of anyone.

It is no coincidence that this confection I made last month just so happened to be covered in glee and the colors blue and gold. This cake is all about the love and cultivation of crops and culture. A cake can turn out in so many flavors and tastes but basically is made of the same ingredients. The same stands true for humanity. We come in different colors and flavors, but are all created with the same things and made to love.

You can find the recipe for this Make Love Not War Cake below:

Finished baked cake
Its all about the glaze!

Ingredients

Cake:

2 cups all purpose flour

½ tsp. baking soda

½ tsp. salt

5 medium or 3 X-large very ripe bananas

½ cup vegetable oil

½ cup granulated sugar

3 large eggs

1 tsp. vanilla extract

1 cup of white chocolate chips

Glaze:

3 tbsp. white chocolate liqueur, I used Godiva brand

1 ½- 2 cups confectioners sugar

½ tsp. salt

S Glee Rho Sprinkle Mix for decoration, optional

Directions

Preheat oven to 350F. Grease and flour bundt pan.

In a medium sized mixing bowl mix together flour, baking soda, and salt. Set aside.

In a large bowl or using a stand mixer or hand mixer beat bananas until pureed, consistency of baby food. Add oil, sugar to the mixture and continue to mix until creamed together. Add eggs to mixer. Beat on medium speed until the mixture is fully combined. Add vanilla extract. Slowly add the flour mixture one half at a time. Mix until fully combined but be careful not to over mix. Fold in white chocolate chips.

Transfer batter to the cake pan and smooth batter until even in the pan. Hit cake pan onto the counter a few times to knock out air bubbles. Bake cake for approximately 40-45 minutes until toothpick or cake tester comes out clean.

While cake is baking make the glaze. In a medium sized bowl whisk together liqueur, confectioner’s sugar and salt until smooth. (Glaze should be thick enough to coat back of a spoon.)

Place cake onto cake rack and allow to cool completely. Invert cake onto cake plate or board. Pour glaze onto cake.

Cover cake with S Glee Rho Sprinkle Mix

Devour and Enjoy!

Bows Before Clothes

Original Post: February 6, 2013

I have been really into oversized sweaters/ jumpers lately. It is a really simple concept and outfit to assemble. Simply throw on an oversized sweater and some leggings and you’re done. Simple and yet so chic! A couple of weeks ago I was doing my normal Target stroll, when I came across some mens sweatshirts that were on sale. I quickly bought one and the wheels began to turn in my head. The fortunate and somewhat unfortunate (for my wallet) thing about my local Target, is that is located adjacent to a fabric store, yikes!! I went in and bought some fabric and came up with a super cute way to jazz up my basic sweatshirt. Enjoy!!

Materials

1. Cotton sweatshirt

2. 1/4 to 1/2 yards of fabric

3. fabric pen/ white eyeliner

4. Tape measure

5. Fabric shears

6. Needle/ Thread

7. Iron

8. Clothing pins

9. Sewing machine (optional)

Instructions

Hold sweatshirt in half, length-wise. Cut off collar and bottom hem off sweatshirt. Try sweatshirt on. Stretch collar to your desire. Remove sweatshirt. Lay sweatshirt flat. Take your tape measure, measure shirt from collar to bottom of shirt. Divide measurement by the number of bows you plan to place on your shirt, to determine the approximate size your your bows. (For my sweatshirt, I measured 24″ and wanted 6 bows; therefore each bow should be around 4″ long). Using your tape measure again, start from the middle of your sweatshirt and mark down your sweatshirt approximately the width you want your bows to be. (I wanted my bows to be approximately 5″ wide). Take your fabric shears and cut out the center portion of your sweatshirt.

Now is time you work on your bows

To learn how I constructed my bows, check out my tutorial from my post: (Make them booties POP!!)

Turn your sweatshirt inside out. Pin down your top bow. Pin down each side of the bow onto each side of the sweatshirt, making sure the top bow aligns with the collar. Repeat the same steps for the bottom bow, making sure the bottom bow aligns with the bottom hem. Take the remaining bows and place them evenly between the top and bottom bows. Pin down bows onto the sweatshirt. Sew down bows onto the sweatshirt. Turn sweatshirt, right-side out. Tada!! You have yourself a brand new original bow-utiful top

OOTD: Take a Bow

Original Post: February 8th, 2013

Outfit Details

1. DIY Bow-back jumper (details here)

2. Leopard print leggings

3. Shoes: Dolce Vita “Bella” Suede Platform Pump (purchase here) 

4. Clutch: Nine West (purchase simliar here)

5. Necklace: Macy’s

6. Earrings: Charming Charling (purchase similar here)

OOTD: All Black Everything (featuring my DIY bralet)

Original Post: January 28th, 2014

Outfit Details

DIY crystallized bralet: link here

Black sheer chiffon tunic; forever 21 (find similar one here)

Fur shrug; BB Dakota (find here)

Faux leather mini skater skirt; ASOS (find similar here) (plus size option)

Diamond tights: Santee Alley, Los Angeles (find similar here)

Black platform booties; BCBG Maxazria (find similar here)

DIY: Crystallized Boudoir Bralet

DIY couture bralet

Original Post: January 28th, 2014

I have been looking this past year for a cute bralet that I can wear under sheer shirts. I have been having some difficulty because all the ones I seem to find are made for women with a smaller bust. I felt that this was fashion unfairness and I decided to do something about it. My girls (my boobs) and I decided to make our own bralet using and old bra that no longer fit. (Bra band was too big. Cheers to weight loss without boobage loss!! I wanted a bralet that would standout no matter if it was under a shirt or not. Here is how I did it.

Materials

Old bra of your choice

Fabric glue (I used e6000)

Clear plastic gems (in shapes of your choice)

Black Elastic in 1/2 inch and 1 inch diameters

Fabric scissors

Needle and thread

2 Swimsuit hooks (clear)

Tape Measure

Sewing pen

* I chose to have my bralet close in the front. If you would like to keep your bralet with the traditional closure you will not need the elastic or the swimsuit hook

Instructions

Take tape measure and measure your chest diameter (approximately where your bra will fit.) Take your measuring tape and measure bra band  diameter where it is 1 or 2 inches in width (2 inches will give you more back support) . Mark place with sewing pen.

Take old bra and cut off back band on marked lines. Measure your old bra width with the back band portion removed. Take your chest diameter and subtract the bra diameter. This will be the length of your elastic.

Cut two pieces of the 1 inch elastic the length you measured.

Sew elastic onto sides of bra cups on the remaining portion of your bra band.

Now here comes the tedious part. Take your glue and working in small sections, glue gems onto bra cups.

Once you are finished gluing on all of your gems, cut piece of fabric between bracups. Sew swimsuit hook onto one side of bra cup. Take 1/2 inch elastic and sew onto the other bra cup. Make a small loop with your elastic and sew into place. Cut off remaining elastic.

Using measuring tape measure from armpit to armpit going around your neck. (Like a halter top). Take your other swimsuit hook and sew into one top of bra cup. Take remaining 1/2 inch fabric and cut it the length that was measured for your halter strap. Sew one side of the elastic onto the opposite bra cup top. (The bra cup without the swimsuit hook). Sew a small loop into the other side of your elastic.

Tada!! you know have a gorgeous, one of a kind custom made bralet that will fit your girls!!

OOTDs: Continuing Me Elsewhere

This past week I had the fabulous opportunity to return to my treasured favorite city in the world, Paris. After a two year hiatus due to the never-ending story called COVID, I was able to book myself a flight and make my way overseas. As previously told in my other posts, since my 30th birthday a trip to Paris has been an annual excursion. There is just something about that city of love that lifts my spirits and recharges my batteries. Besides the culture, the history, the food and the overall atmosphere, the Parisian fashion has served as motivation to return yearly to cherished city. For this trip I definitely had more time to plan and prepare my own fabulous fashion choices. I became even further inspired after my most recent bag purchase to add to my collection. I love a good animal, more specifically leopard print ensemble. Check out all my fabulous fashion choices during my excursion and details below.

Also don’t forget to checkout and subscribe to my travel blog, TMCLLC Life, for details about my whereabouts and more travel information.

Parisian animal print realness

Outfit Details Below

Welcome!!!

Hey there my classy comrades!!

Welcome to Confections, Crafts and Couture!!

I am so excited to finally get this blog off and running. It has been a long time coming. This blog serves to provide you with inspiration and entertainment. It features various items of baked goodies, creative crafts, ideas and fabulous fashion. I provide occasional recipes featured from my bakery http://www.sweetserendipitybakery.com as well. I try to provide also as much information as I can about each post. I hope you enjoy all the posts and use this blog as a muse to be as creative as your heart desires.

I have so many wonderful blogs in store in the near future. The holidays are among us, which gives me even more motivation to come up with different ideas for sweet treats, gifts and everything else. I hope you enjoy this blog as much as I. Thank you for your interest.

Love,

Tamika