National Sugar Cookie Day

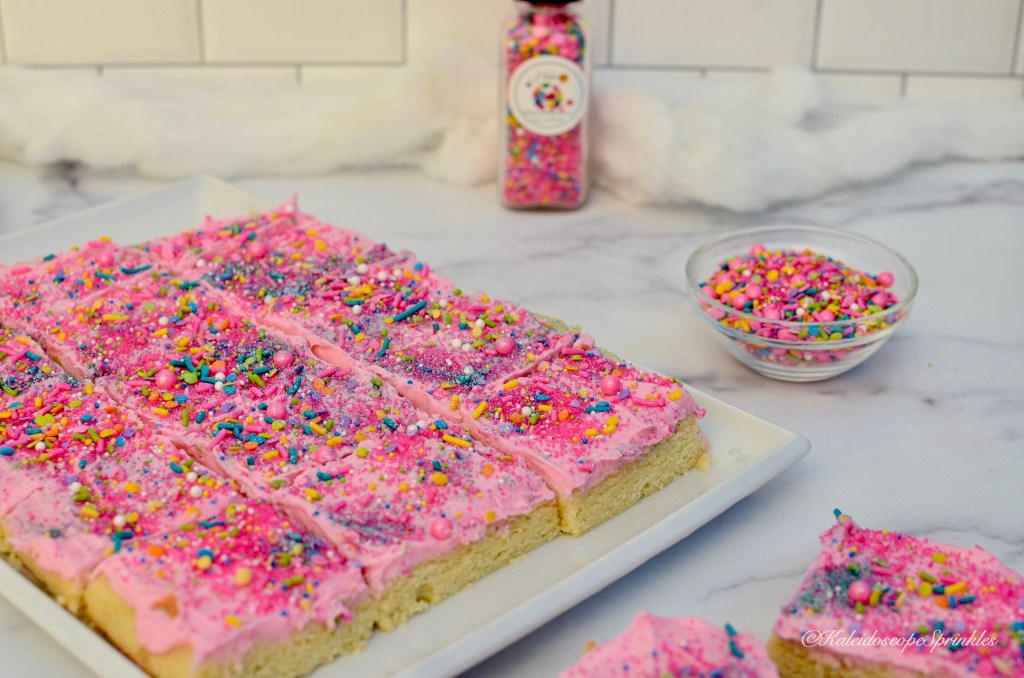
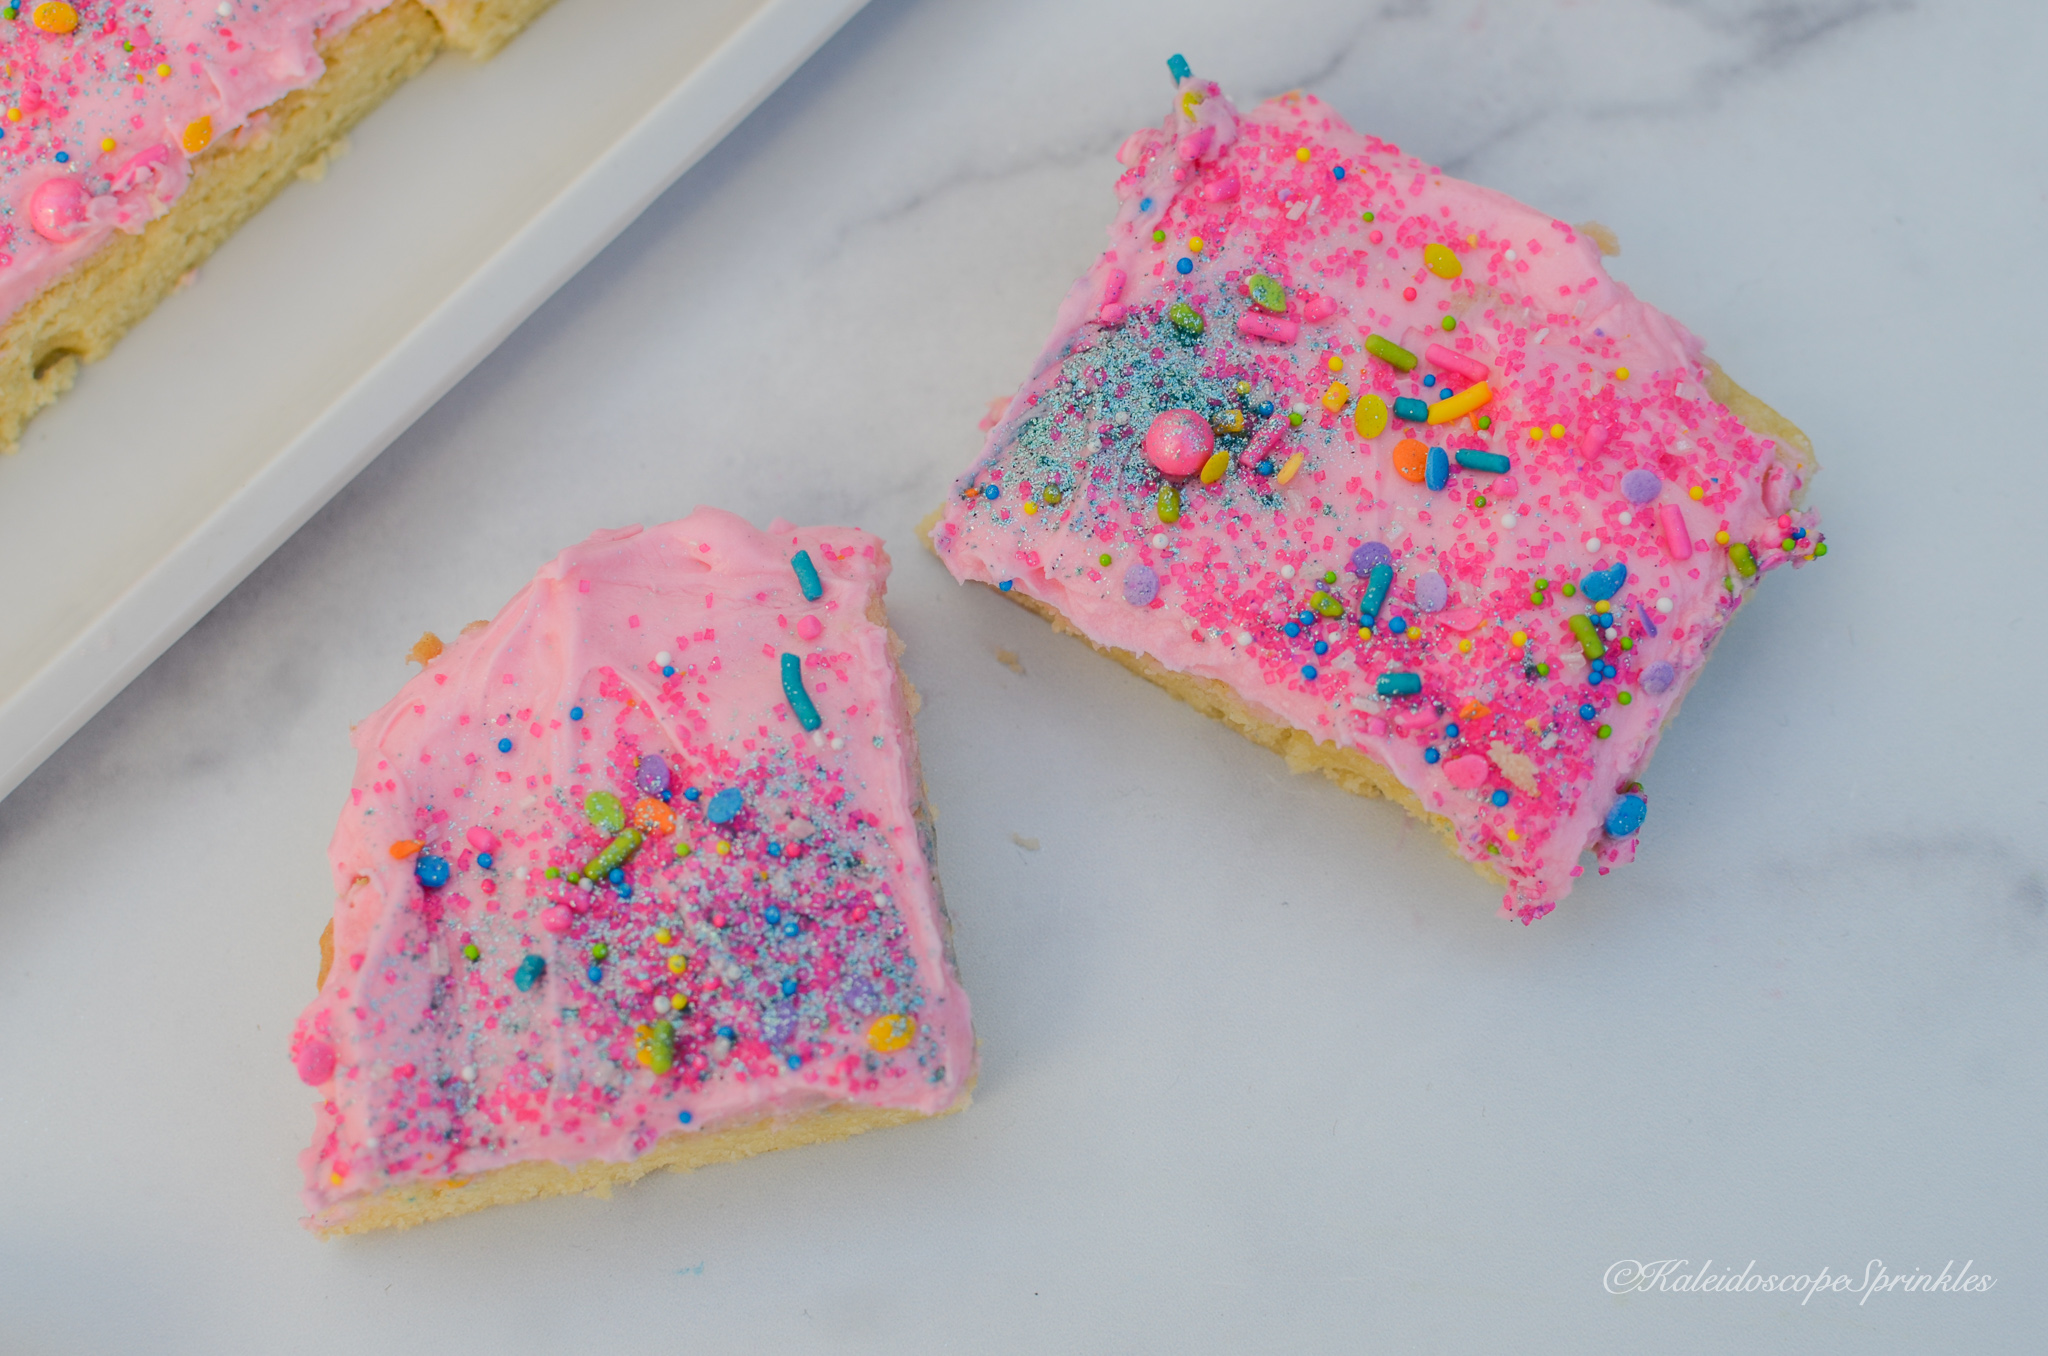
I adore a good sugar cookie. Some may call or consider this cookie rather basic, but if made right this cookie can be more delectable than the rest. I love a sugar cookie that is flavorful, soft but does not fall apart when you pick it up. The right sugar cookie also must have the perfect amount of delicious frosting but not be overly sweet.


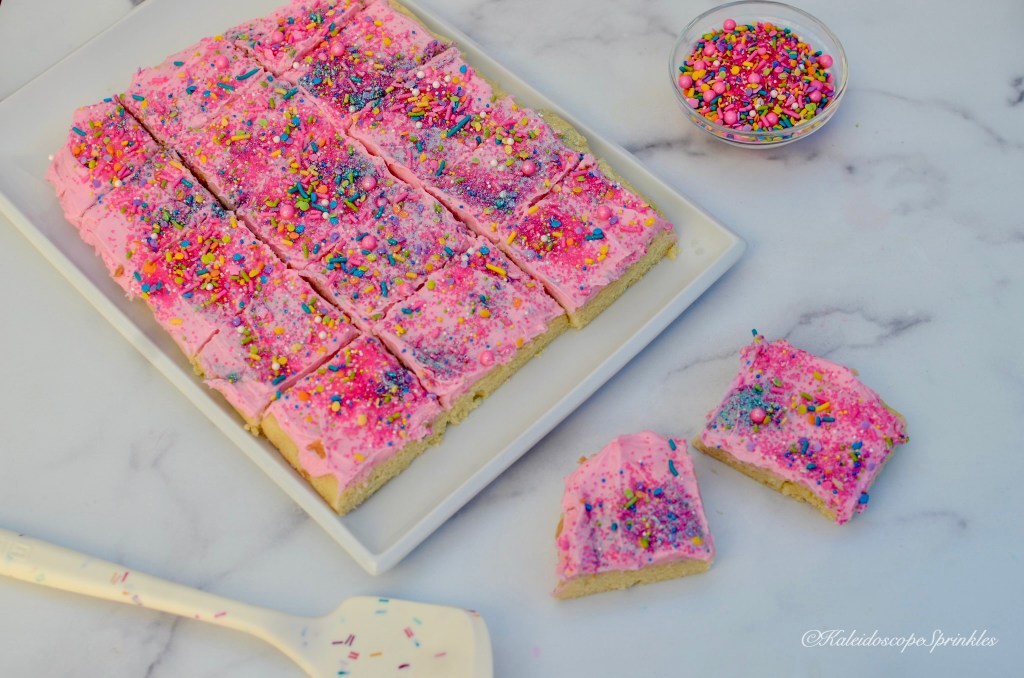
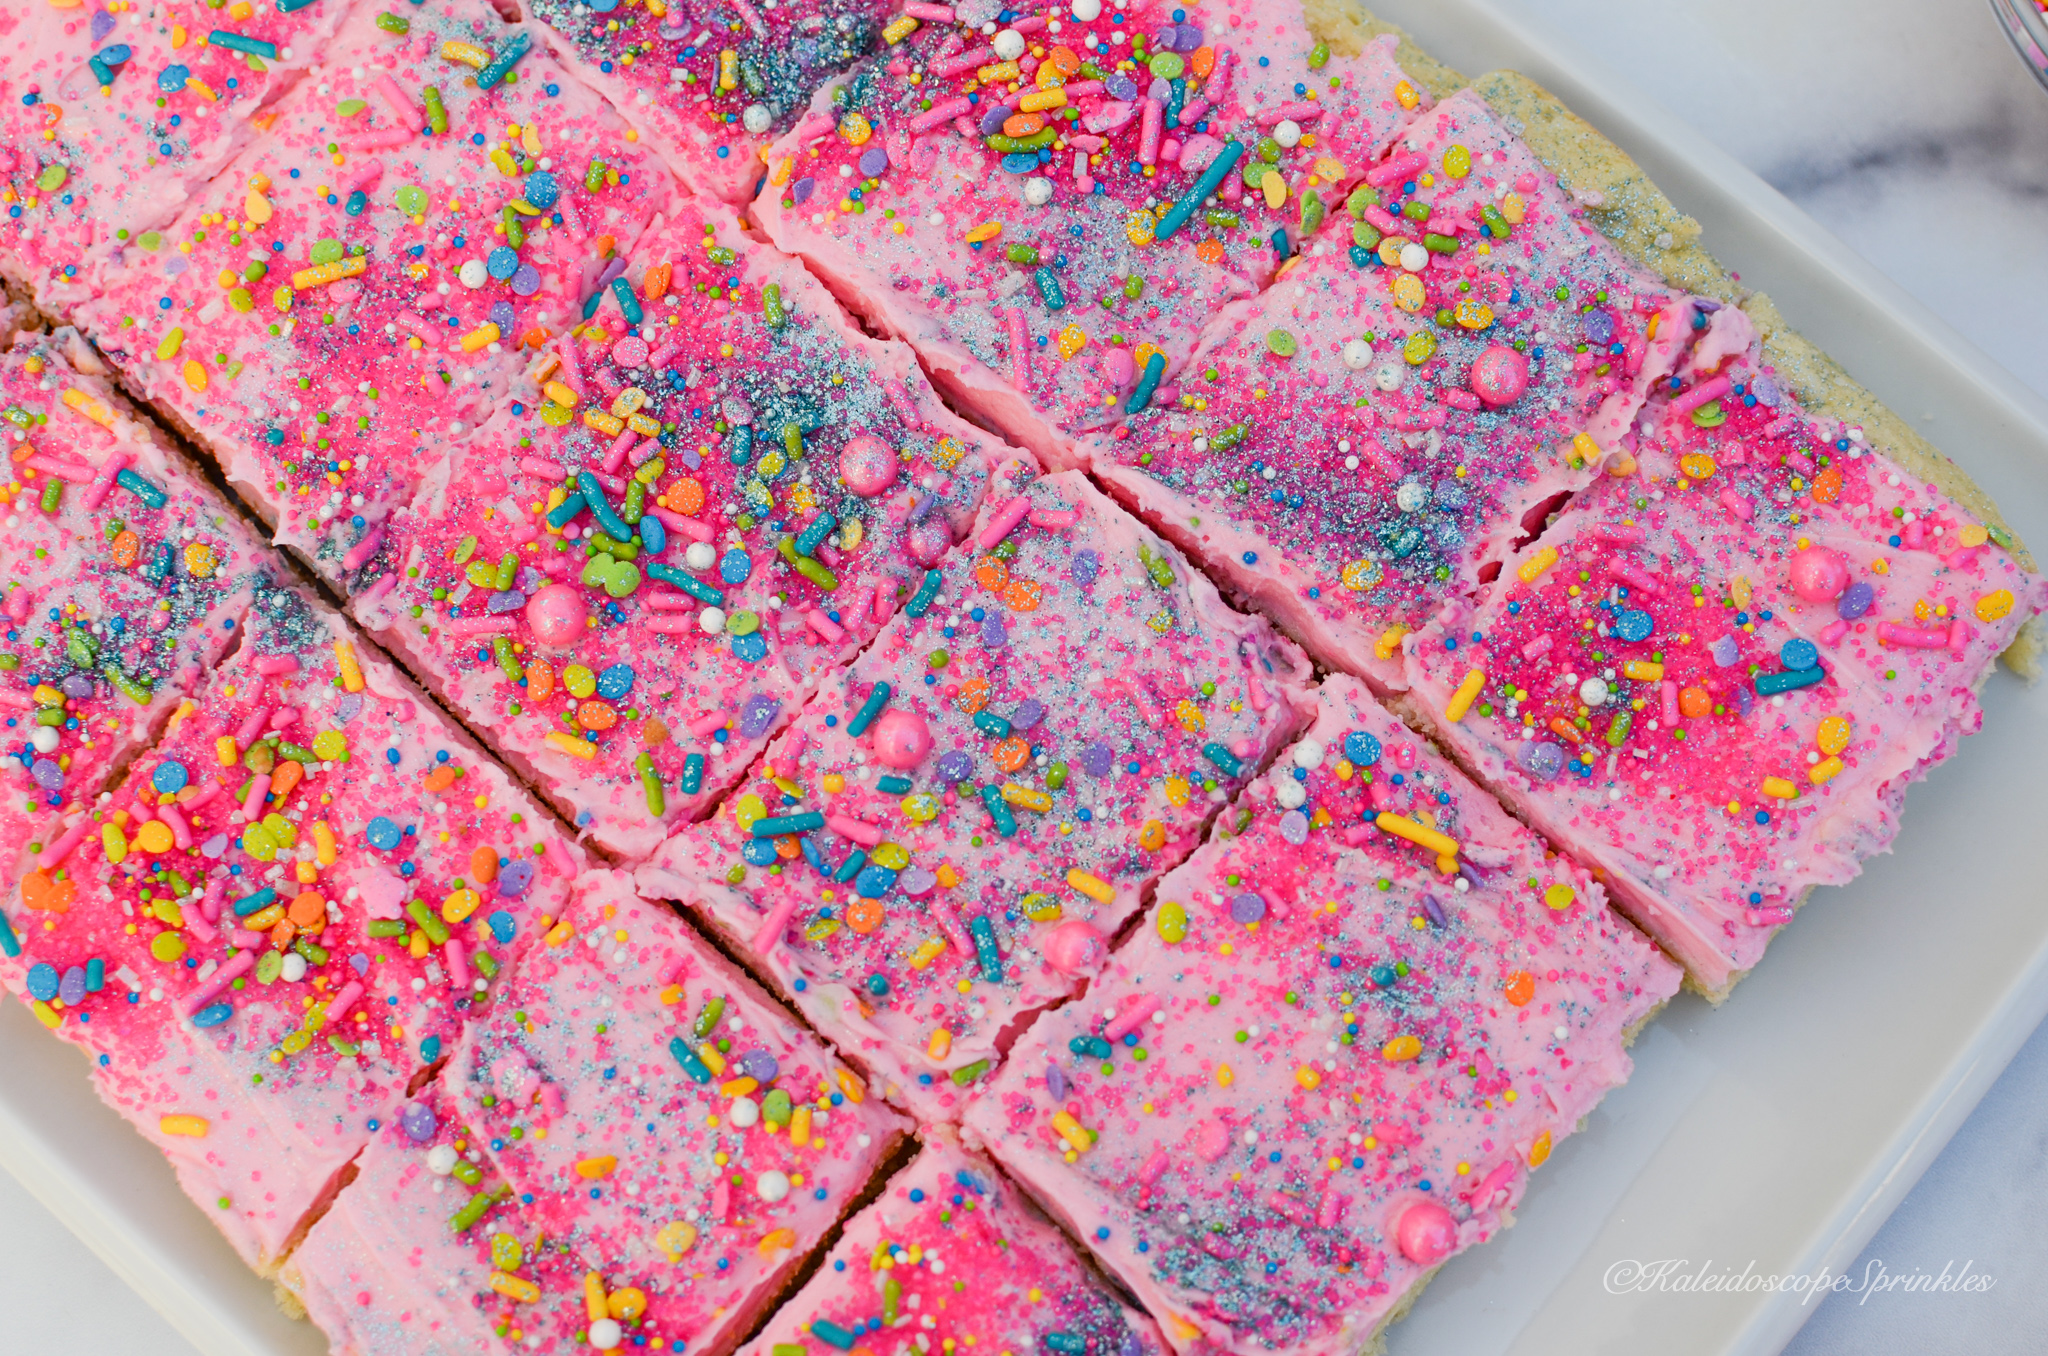
Now you’re probably thinking, “geez it sounds like she has spent a lot of time thinking about sugar cookies!” Guess what? You’re right! I have spent many of nights mastering the perfect sugar cookie recipe. What I have come to find out is in order to get the right textured cookie, it’s better to make bars. I figure now is the right time to share this recipe with you being National Sugar Cookie Day and all. This recipe is amazingly tender with the correct amount of one-of-a-kind flavored frosting. What makes these cookies so incredibly soft and tender are my secret ingredients, almond and tapioca flour. What makes these cookies even more special is they are decorated using Kaleidoscope Sprinkles Neon Gumbo Sprinkle Mix and Cosmic Shimmers. You’ll definitely want to save this recipe and give it a try. Once you do you’ll be an even bigger fan of sugar cookies, promise!


Recipe and video below

Decorating sugar cookie bars

Ingredients
Cookies:

2 cups all-purpose flour

¼ cup almond flour

1 tbsp. tapioca flour ( you can substitute cornstarch)

1 tsp. baking powder

½ tsp. salt

1 cup unsalted butter, at room temperature

1 cup granulated sugar

2 large eggs, room temperature

1 ½ tsp. vanilla extract

½ tsp. almond extract

1 tsp. lemon zest


Frosting:

2 ¼ cups powdered sugar

½ cup unsalted butter, room temperature

2 – 3 tbsp.

Baileys Strawberry & Cream liqueur (You can substitute heavy cream)

1 tsp vanilla extract


Wilton Rose Icing Color for coloring (optional)

Neon Gumbo Cosmic Shimmers for decoration (optional)

Teal Cosmic Simmers for decoration (optional)


Directions
Preheat oven to 350 degrees. Butter and parchment paper bottom of 9 by 13″ baking pan.


In a medium mixing bowl whisk together flours, baking powder and salt. Set aside.


In the bowl of an electric stand mixer cream together butter with granulated sugar until blended. Scrape down mixing bowl. Add eggs one at a time. Scrape down mixing bowl again. Add vanilla, almond extract and lemon zest. Add flour mixture to bowl. Mix cookie dough until just combined. Be careful not to over mix or dough will be tough.


Spread mixture into prepared baking dish. To help even it out I also like to press even with greased hands (sprayed with non-stick cooking spray).


Bake in preheated oven for approximately 14 – 16 minutes until dough has puffed up and is golden brown on the edges.


Let cool completely on a wire rack until room temperature.


While the cookies are cooling, in a large mixing bowl using an electric hand mixer blend together powdered sugar, butter, liqueur, and vanilla extract. Add small amount of icing color. Mix until frosting is light and fluffy.


Spread frosting evenly over cooled cookie bars. Cover cookies with Sprinkle Mix and Cosmic Shimmers.


Devour and enjoy!

DIY and OOTD: INDEPENDENT Day

I’m still celebrating this wonderful 4th of July weekend. These past two days have been full of favor and fabulousness. My cousin came to visit me and we both definitely had a blast celebrating our independence in the streets of Los Angeles. We ate tacos and drank margaritas, went to brunch, went shopping and viewed eye candy. We also had a chance to catch up and enjoy each other’s company. My cousin is unfortunately already headed back to Sacramento. After all the activities and fireworks from last night, I am using today for relaxation and blog posting.

This past weekend was the most I had been outside in LA since the beginning of COVID. I was ready to step on the scene with some fashion ensembles. This weekend’s theme was centered around bandanas and always self-love. I had purchased this cute off-the-shoulder bandana print top online a few years back and I strategically waited for the perfect time and outfit to make its debut. After securing the matching bandana print bag, by a Black owned designer. I came up with the idea to make bandana print shoes as well to complete the outfit. The project was super easy to complete, so I decided to share my DIY with you.

DIY instructions and details on my outfit below

Materials

  • Scissors

INDEPENDENT DAY D.I.Y.

Outfit Details

DIY Shoes

Shirts: 1. Black/ White- The Hanger (purchase similar here)

2. Popsicle- Akira (purchase similar here)

Jeans: KUT from the Kloth

Bag: Brandon Blackwood (purchase here)

Nails: Custom nails by Wunder Nails (contact here)

Bandana-ed down

Antiguan Coconut Rum Cake

Original Blog post from: Travel, Medicine and Culinary Arts

Summer, summer, summertime! It’s that wonderful time of the year where the beach and a tropical drink are calling my name. I’m not going to lie, living in L.A. leaves me with this feeling the majority time of the year. The land of eternal sunshine is more synonymous with smoothies now but summertime is different. People want to be outside and enjoying the best parts of life even more, including me. 

Last month before it was officially summer I was able to enjoy an incredible vacation in the Caribbean. I had the opportunity to delve into Antigua, land of 365 beaches. This beautiful country is not only known for its array of beaches, it’s also known for its rum. (See my Antiguan Travel Guide.) Rum, of course derived from all the cropped sugarcane, is a staple in Antiguan cuisine. I was able to sample some great rum while I was there and of course bring some home. 

I actually created this tropical cake recipe 10 years ago after visiting another Caribbean paradise. I decided to slightly remix my original recipe to make it even more flavorful and satisfactory for summer. Check out my upgraded recipe for coconut rum cake below. It’s the perfect cake to bake ahead of time and take to the beach. 

Delicious coconut rum cake

Antiguan Coconut Cake

Ingredients

Cake:

½ cup unsalted butter, room temperature 

½ cup vegetable oil 

1 cup granulated sugar

1 cup light brown sugar, lightly packed

4 large eggs, room temperature 

1 tsp. vanilla extract 

½ tsp. rum extract (optional)

2 ¾ cup AP flour

1 ¼ tsp. baking powder

½ tsp. salt

¼ cup of rum ( I used my Antiguan rum of course) 

1 cup coconut milk

¾ cup shredded coconut

Filling:

4 tbsp. unsalted butter, melted

½ cup coconut milk 

¼ cup rum

Glaze:

½ cup light brown sugar, packed

¼ cup (½ stick) unsalted butter

¼ cup half and half

½ tsp. vanilla extract

¼ tsp. salt

2 cups confectioners sugar 

Shredded coconut for topping

Directions

Butter and flour bundt pan. 

In a large sized bowl combine flour, baking powder and salt. Set aside.

Using a stand mixer with paddle attachment cream together butter, oil, sugars until light, fluffy and double in size (approximately 10 minutes. ) Add eggs one at a time to the creamed mixture. Add vanilla and rum extract. Add half of the flour mixture to the creamed mixture. Add rum. Combine last of the flour mixture. Add coconut milk. Mix well until all ingredients are incorporated. Fold in shredded coconut. 

Pour batter into prepared bundt pan. Transfer to unheated oven. Bake at 325F for approximately 1 hour and 15 minutes. (Bake until tester comes out clean). Let cake cool on wire rack until slightly above room temperature. 

While cake is baking make the filling. In a small saucepan melt 4 tbsp. of butter and coconut milk. Remove from heat and stir in rum. Allow mixture to cool to room temperature. 

Poke cooled cake with fork or skewer, pour butter/ coconut milk mixture over cake. Allow mixture to soak into the cake at least one hour (overnight preferably). Invert cake onto wired rack. 

For Glaze: Stir all ingredients together, except confectioners sugar, in a small saucepan over medium-heat heat until brown sugar dissolves and mixture comes to a boil. Reduce heat to low and add confectioners sugar. Whisk until glaze is smooth, about one minute. Remove from heat. Allow glaze to cool to room temperature. Pour glaze onto cooled cake. Top with shredded coconut.

Devour and enjoy!

Pride Mocha Donuts

I can’t believe we are half way into this year already. It’s the month of June, which is full of celebrations! To name a few of my favorites there’s National Hug Your Cat day, National Donut Day, Juneteenth, Black Music month and of course Pride month. I recently returned from vacation at the end of May and totally overlooked National Donut Day this year.


Every year I try to celebrate and recognize Pride Month in my own unique way. In the past I have created rainbow cakes, attended drag shows, made a jacket, attended marches, etc. The colorful and creative LGBTQIA community has always served as inspiration for me. As an ally I understand the importance of representation.


Since I missed out on the opportunity to make something for National Donut Day, I thought this would be the perfect opportunity to make a new original recipe. I decided baked donuts would be best to keep those summer bodies popping. I found a way to combine two of my favorite things: donuts and decorating delight. These delicious donuts are filled with mocha flavor and covered with perfected Pride decor. I used the chromatic Kaleidoscope Dreams Sprinkle Mix from Kaleidoscope Sprinkles to take the decorating up another level as well.


Give these sensational Pride donuts a try and you’ll be filled with delight! Recipe below:

Delicious Pride donuts


(Makes 8-10 donuts)
Ingredients
Donuts:

1 ¾ cup all purpose flour

⅓ cup unsweetened natural cocoa powder

1 ½ tsp. baking powder

½ tsp. baking soda

½ tsp. salt

½ cup granulated sugar

2 tbsp. butter, cubed and cooled

1 large egg, room temperature

¼ cup milk, scalded (I used almond)

¼ cup fresh brewed coffee

1 tsp. vanilla extract


Glaze:

1 ½ cup confectioners sugar

3-4 tbsp. Baileys Almande almond milk liqueur


Kaleidoscope Dream Sprinkles Mix (optional)

Wilton fondant for decorating (optional)

Wilton gel color for decoration (optional)

Directions
Preheat the oven to 350F. Lightly grease donut pans.


In a large bowl whisk together flour, cocoa powder, baking powder, baking soda, salt, and sugar. Add cubed butter using a fork or fingers to press butter into flour mixture, until combined and it resembles course sand.


In a small separate bowl mix together egg, milk, coffee and vanilla to bowl and stir until just combined.


Add wet mixture to dry mixture. Mix slowly until dough is combined, smooth and thick. Be careful not to over-mix.


Allow dough to rest for 15 to 20 minutes.


Use a piping bag or ice cream scoop to fill each donut cup about three-quarters full, making sure the center area is clear of dough. Bake donuts 10-12 minutes until they are a chocolatey brown and spring back when touched.


Let donuts completely cool to room temperature.


While donuts are baking, make the glaze. In a medium sized bowl whisk together confectioners sugar and almond liqueur until smooth and completely combined. (Glaze should be thick and coat the back of a spoon.)


Use spoon to drizzle donuts with or dip donuts into the glaze. Cover with sprinkles and fondant to decorate.


Devour and enjoy!

Emerald Birthday Gemstones

It’s my favorite month of the year! May is my birthday month and this year I’m definitely celebrating all month long. I’m making up for last year’s secluded celebration. I definitely enjoyed myself last year but I wanted to go over the top this year because that’s my business (in my Tabitha Brown voice).


This year not only did I want to celebrate with an excursion, but I wanted to celebrate with as many treats as I could fit into this month as possible. I started off with some amazing Hummingbird Cupcakes (see post) and wanted to keep the party going.


For those of you who don’t know emerald is the birthstone for this month. A few months ago I bought a new silicone mold having no clue what I planned to do with it. As usual, the idea came to me during my sleep one night. I woke up, wrote down my idea on my bedside notepad and went back to sleep. I thought I would create my own emeralds for my birthday celebration since I never received one before and could make them delicious. I gathered my ideas and materials and got to work. My emeralds birthday gemstones would be a celebration of May on the inside and out. The insides of these treats are filled with birthday cake flavor and covered in shimmery Kaleidoscope Sprinkles Cosmic Shimmers to make these gems truly shine!

See how I created these tasty gems below with the step by step video and recipe below.

Step by step video on how I created my birthday gemstones

Ingredients
12 oz. Birthday Cake Oreos (purchase here)

8 oz. cream cheese, room temperature

6- 12 Hershey Birthday Cake Kisses (purchase here)


Candy melts

Cosmic Shimmers, for decorating (optional)


Directions
Using a food processor or rolling pin crush Oreos to a fine consistency. Place crushed cookies into a medium size bowl and mix with room temperature cream cheese. Mix cookies and cream cheese until completely combined. Place mixture in the refrigerator and allow to cool for at least 30 minutes.


While cookie mixture is setting in the refrigerator, melt candy melts according to package directions.


Place melted candy melts into the silicone mold and make sure molds are completely covered. Place silicone mold in the refrigerator to allow candy melts to set.


Take silicone mold and cookie mixture out of the refrigerator. Using small ice cream scoop or spoon spread cookie mixture filling up half of each mold. Place Hershey Kiss into the center of each mold. Fill the rest of each mold with the remainder of the cookie mixture. Place silicone mold back into the refrigerator to allow cookie mixture to cool for another 15 minutes.


Remove silicone mold from the refrigerator. Cover the remaining cookie mixture with candy melts to seal each mold. Place silicone mold back into the refrigerator for an additional 15 minutes for remaining candy melt to set.


Once mold has completely set, remove it from the refrigerator. Carefully remove each gemstone from the silicone mold. Using a small paint brush, cover each mold with Cosmic Shimmers.


Devour and Enjoy!

Birthday gemstones

White Chocolate Chip Birthday Cake Blossoms

It’s National Chocolate Chip Day!


I honestly had no idea this holiday landed in during my birthday month. I can’t believe all these years I missed out on celebrating my special day with some of my favorite cookies. This year there was no chance that I was not celebrating this food holiday. Not only am I celebrating this day, but I’m cherishing it with an original recipe.


As you already know I find inspiration for all my recipes in many different ways. Last month I was perusing through my neighborhood Target when I spotted something new in the candy isle. Birthday cake flavored Hershey’s Kisses with sprinkles! I, of course, purchased these new yummy treats and became sparked with dessert ideas. I knew exactly what I wanted to do with these candies to make the perfect birthday chocolate chip cookie.


Check out my recipe for these White Chocolate Chip Birthday Cake Blossom cookies.These cookies are filled with birthday cake flavor and sprinkles of course. I added Kaleidoscope Sprinkles Royalty Sprinkle Mix which created the perfect color variety and texture for these cookies. I promise you’ll forget all about celebrating with traditional cake after eating these.

Ingredients
2 ¼ cup All-purpose flour

1 tsp. baking soda

½ tsp. salt

1 cup unsalted butter, room temperature

1 cup light brown sugar, packed

¼ cup granulated sugar

2 eggs, room temperature

1 tsp. vanilla extract

1 tsp. Butter & nut extract (optional)

1 tbsp. milk (I used almond milk)

2 cups of white chocolate chips


1 cup of Kaleidoscope Sprinkles Royalty Sprinkle Mix (purchase here)


Birthday Cake Hershey’s Kisses (purchase here)


Directions
Preheat oven to 350F.


In a medium sized bowl mix together the flour, baking soda and salt. Set aside.
In a large separate bowl, using either hand or stand mixer, cream together butter, brown and granulated sugar. Add eggs one at a time. Mix until smooth. Add vanilla and Butter & nut extract. Add half of flour mixture to cream mixture and stir until incorporated. Add second half of flour mixture. Stir until incorporated. Add milk. Add white chocolate chips and sprinkles to batter. Slowly fold in until combined.


Place cookie dough in the refrigerator to rest for at least 30 minutes.


Line cookie sheets with parchment paper. Using cookie scoop or ice cream scoop, place cookie dough onto sheets about 1.5-2 inches apart. Bake for 12-15 minutes until cookies are slightly golden and firm to touch on the surface. Remove from oven and allow cookies to cool to slightly above room temperature.


Add Birthday Cake Hershey’s Kisses to top of each cookie.


Devour and Enjoy!!

Hummingbird Cupcakes

It’s May and Mother’s Day is steadily approaching. I am super excited because May is also my birthday month. Not only do I plan to celebrate my birthday all month long, but I’m also taking my first international trip since COVID. I, of course, am taking all the necessary safety precautions and am fully vaccinated. There are not enough words to describe how much I need this trip. I am headed to the Caribbean for a solo relaxing break from the rest of the world.


A few years ago I had the opportunity to celebrate a previous birthday in Jamaica. It was a wonderful adventure of enjoyment and leisure. I had the opportunity to learn the history and dive into some of the Jamaican culture. Reminiscing on my past Caribbean birthday trip, I came up with the absolute perfect recipe for said occasion.


Hummingbird cake is a delicious tropical flavor filled delight that I first experienced living in the South. After tasting this amazing gem I had to discover its origin and of course how it got its name. Hummingbird cake actually originated in Jamaica and is named after the island’s national bird. In 1968, Jamaica sent the recipe for this cake, along with other recipes in a media press kit to the USA to increase tourism. The recipe soon took off in the South and the rest is history, pun intended.


This delightful cake filled with pineapple, bananas, pecans and cream cheese is only fit for a queen, which is why I decided to make it for Mother’s Day and my birthday celebration. I went a step further and added coconut to my recipe and decorated with Kaleidoscope Sprinkles My Mama’s Biscuits Sprinkle Mix as well, taking it to an even further level of sophistication.


You can find the complete recipe and step by step video below. Believe me you’ll definitely want to make this one for your mother or yourself.

Step by step recipe and decorating video


Hummingbird Cupcakes

(Makes 24-30 cupcakes or three 9″ cakes)


Ingredients
Cupcakes:
3 cups all purpose flour

1 tsp. baking soda

1 tsp. salt

1 tsp. ground cinnamon

1 ½ cups of vegetable oil

2 cups of sugar

3 eggs, room temperature

1 ½ tsp. vanilla extract

1 cup (8 oz.) can crush pineapple, undrained

1 cup chopped pecans

½ cup unsweetened shredded coconut

2 cups chopped bananas


Cream Cheese Frosting:
12 oz. of reduced fat cream cheese

½ cup of butter

3 1/2- 4 cups of confectioners sugar

2 tsp of vanilla extract


Kaleidoscope Sprinkles My Mama’s Biscuits Sprinkle Mix, optional


(Pastel frosting colors from Decopac)


Directions

Preheat oven to 350 degrees.

Place cupcake liners in cupcake tins and set aside. In a medium size bowl, whisk together flour, baking soda, salt and cinnamon. Set aside.

In a large mixing bowl, cream together oil and sugar. Add eggs one at a time to the creamed mixture. Add vanilla extract. Fold in flour mixture. Fold in crushed pineapples, pecans, coconut and bananas. Mix until completely combined.

Using an ice cream scoop place batter into muffin tins. Bake cupcakes for 25-30 minutes or until tester comes out clean. Allow cupcakes to completely cool.

While cake is baking in a large bowl, whisk together cream cheese and butter. Slowly add confectioner’s sugar using hand mixer on low speed until frosting is smooth. Add vanilla extract. Whisk frosting on medium-high speed until vanilla extract combined and frosting is light and fluffy.

Add food color gel (optional).

Frost cupcakes with cream cheese frosting.

Top with My Mama’s Biscuits Sprinkle Mix.


Devour and Enjoy!

White Chocolate Lemon Madeleines

One of my favorite things to do while visiting Paris is a trip to the grocery store. My Parisian tradition is once I settle into my hotel room I usually escape to the streets to find my nearest food market. I absolutely love to peruse the aisles and rack up on my favorite treats only available in France. I love to load up on local Comté cheese (my favorite cheese), wine, chips and of course sweets. My carbohydrate overload is not complete without a bag of madeleines. There are so many varieties available to buy in Paris, but the best will always be the classic flavor.


Madeleines are one of my favorite cookies because these sweet treats somehow manage to cram being a cookie and cake into one. The soft, sponge, cake texture filled with the flavors of the best European butter make it irresistible. I honestly have been putting off trying to conquer this treat in fear that I would mess up this delicate balance of deliciousness. This year I finally built up the courage to take on the madeleine because life is too short to not overcome a simple fear.


I had a Williams and Sonoma gift card burning a hole in my purse that I had been dying to use for something worth the cost. I bought myself a top of the line madeleine pan and some other fabulous items as well. I was ready to make some Parisian delicacies but I then decided that I wanted these Madeleines to be unforgettable. I became inspired by another purchase I just made from Costco, Lemoncello Chocolate Almonds. I thought, ” Why not incorporate these in my recipe?” Lets just say I made the right decision! These madeleines honestly tasted like they were flown in straight from Paris or somewhere in the South of France.


These madeleines are soft, delicate and lemony with a delicious white chocolate almond surprise in the center. I then went even further to dip these cookies in white chocolate for even more sin and sugar. I decided to decorate them with Kaleidoscope Sprinkle’s Cosmic Shimmers, Lemonade and Pineapple Skies Sprinkle Mixes for more color and pizazz.
Check out the complete step by step recipe, video and decorating video below.

Step by step video
Madeleine decorating video

Recipe (Adapted from Martha Stewart’s Lemon Madeleines Recipe)

Makes 2 Dozen


White Chocolate Lemon Madeleines
Madelines:

1 ⅓ cup all purpose flour

½ tsp. baking powder

¼ tsp. kosher salt

3 large eggs plus

2 egg yolks, room temperature

¾ cup granulated sugar

1 tsp. vanilla extract

2 tbsp. lemon zest

2 tbsp. fresh lemon juice

¾ cup (1 ½ sticks) unsalted butter, melted


Sconza Lemoncello Chocolate Almonds (purchase here)

White Chocolate for dipping ( I used Baker’s and Ghiradelli’s), optional


Lemon Cosmic Shimmers (purchase here), optional

Lemonade Sprinkle Mix (purchase here), optional

Pineapple Skies Sprinkle Mix (purchase here), optional


Directions
In a large bowl, whisk together flour, baking powder and salt. Set aside.


In another large bowl, using a hand or stand mixer, mix together eggs, egg yolks, granulated sugar, vanilla, lemon zest and lemon juice on medium-high speed. Mix for approximately 5 minutes until mixture is pale and thickened. Turn speed down to low and slowly mix in the butter. Turn off the mixer and fold in the flour mixture using a spatula. Let batter rest for 30 minutes.


Preheat oven to 350F. Grease Madeleine pans well.


Using small ice cream scoop place batter into the center of each Madeleine shell. Place almond into the center of each scoop of batter and press down until almond is covered.
Bake cookies, rotating pans halfway through, until edges are crisp and golden brown, approximately 10 to 11 minutes. Let cookies cool slightly in pans on wire racks. Invert pans and remove madeleines. Allow madeleines to complete cool to room temperature.


Once the cookies have completely cooled dip ⅓ of the Madelines into melted white chocolate. While chocolate is still warm dust each cookie with Cosmic Shimmers and Sprinkle Mixes.


Devour and Enjoy!

Decorated White Chocolate Lemon Madeleines

Sock-it-to-Me Cake

I don’t know about you, but this has been a rough week for me. The continual display of senseless harassment and killings of my brothers and sisters has placed another gray cloud over this Spring. The saying goes, “April showers bring May flowers.” Well I think our people have definitely waited long enough to receive the flowers we deserve and then some.

As you know baking has always served as an outlet for my stress and emotional demands. After this week kicked my butt I most certainly needed something to channel all my anger and frustration into. I wanted to make something that not only helped me but also served a purpose as a political statement. I pondered what recipe could serve duel function as a proclamation and a piquant dessert.

After some cooling off and thinking, the perfect recipe came to mind. In the 1960s the US was again filled with civil unrest and social unjust. Aretha Franklin with her powerful pipes took a stance and demanded, ” R-E-S-P-E-C-T…Oh( sock it to me, sock it to me)..” Here it is 60 years later and the requisition remains the same, RESPECT!

Check out my recipe and complete step-by-step video for Sock-it-to-Me Cake below.

Step by Step video Sock-it-to-Me Cake

Ingredients

Sock it to Me Cake

Cake:

1 cup of butter, room temperature

1 ¾ cups of sugar

3 cups all-purpose flour

1 ½ tsp. baking powder

½ tsp. of salt

5 large eggs, room temperature

1 cup of greek yogurt or sour cream

1 cup of unsweetened almond creamer or milk

1 ½ tsp .of vanilla extract

½  tsp. of almond extract

Filling:

1 cup of pecans or raw almonds

½ cup of brown sugar

2 tbsp. ground cinnamon

Glaze:

2 cups of confectioner’s sugar

3 tbsp. milk or almond creamer

1 tsp. of vanilla extract

Directions

Butter and flour bundt pan.

Using a food processor, pulse pecans until pecans are finely chopped. In a small bowl add brown sugar and cinnamon to pecans. Mix until combined. Set small bowl aside.

In another medium sized bowl, combine together flour, baking powder and salt. Set aside.

Using a stand mixture, cream butter and sugar in a large bowl for approximately 10 minutes. (Combine until butter and sugar is light and fluffy and doubled in size.) Add eggs one at a time to the creamed mixture. Add yogurt or sour cream. Add half of flour mixture to the creamed mixture. Add creamer/milk. Combine last of flour mixture. Mix well until all ingredients incorporated. Stir in vanilla and almond extract. 

Pour 1/3 batter into prepared bundt pan. Sprinkle 4 tbsp. of pecan mixture over batter. Add another 1/3 of cake batter to the pan, making sure to cover up pecan mixture. Sprinkle the rest of the pecan mixture, except about 3 tbsp., over cake batter. Pour the rest of cake batter into the bundt pan. Spread cake batter evenly to cover almond mixture.

Transfer to unheated oven; bake at 325 degrees for approximately 1 hour 15 minutes. Let cool on wire rack in pan for approximately 15 minutes. Remove from pan, place cake on wire rack, and let cool completely.

While cake is baking, in a small bowl whisk together milk/creamer, confectioner’s sugar, and vanilla until well combined. (Glaze should coat the back of a spoon). Pour glaze over completely cooled cake. Sprinkle remainder of the almond filling onto top of cake.

Devour and Enjoy!!

Sock it to Me Cake

Happy Resurrection Sunday!

Here we are in another month of the year still battling pandemia, a term I made up for this continued pandemic nonsense. As a healthcare professional, I’m in no means down playing the importance of safety and health during this quarantine. I’m just over continuing sacrifice and follow guidelines while others act as though they never heard of a mask or the CDC. After spending over a year in self-isolation and celebrating many holidays in the comfort of my own home, I decided that I would enjoy this particular holiday differently this year. Yes I might still be at home but my spirit has flown and soared to a new place.


Resurrection Sunday aka Easter Sunday reminds me that, I despite last year and the continuance of this year, remain grateful. This is the time to appreciate revival and the good things that remain on the horizon. I took this positive outlook and filtered it into a new carrot cake recipe and decoration. I got so inspired I even made a Custom Sprinkle Mix from my sprinkle company for this occasion and this cake.


Check out my updated Carrot Cake recipe and cake below.

I hope you have a fabulous Resurrection Sunday.

Step by step Carrot Cake decorating video

(Makes two 9 inch cakes, four 6 inch cakes or 24 cupcakes)

Ingredients
Cake:

2 cups plus 1 tbsp. all purpose flour, separated

1 ½ tsp. baking power

½ tsp. baking soda

½ tsp. salt

2 tsp. ground cinnamon

1 tsp. ground ginger

¼ tsp. fresh nutmeg

1/8 tsp. ground cloves

¾ cup canola oil

1 ½ cup granulated sugar

½ cup brown sugar, firmly packed

4 eggs, room temperature

½ cup buttermilk, room temperature

1 tsp. vanilla extract

1 pound of peeled carrots, coarsely grated (approximately 3 cups. I use baby carrots and my food processor. )

½ cup chopped pecans ( You can use traditional walnuts if you like)

½ cup raisins


Cream Cheese Frosting:
12 oz. of cream cheese

½ cup (1 stick) of butter

3 1/2- 4 cups of confectioners sugar

2 tsp of vanilla extract


Custom Sprinkle Mix


Directions

Preheat oven to 350F

Grease and flour cake pans.

In a medium sized mixing bowl mix together flour, baking powder, baking soda, salt, cinnamon, ginger, nutmeg and cloves . Set aside.

In a large bowl or using a stand mixer cream oil and sugars together. Beat on medium speed until the mixture resembles wet sand. Add eggs one at a time to the mixture. Slowly add the flour mixture one third at a time, alternating with buttermilk. After each addition, be sure to scrape the sides of the bowl. Mix batter until fully combined but be careful not to over mix. Add vanilla extract. Add grated carrots and slowly mix.

Fold in pecans and raisins to the cake mixture. Be careful not to over mix.

Transfer batter to the cake pans and smooth batter evenly in the pans. Bake cakes for approximately 25-30 minutes until toothpick or cake tester comes out clean. Place cakes onto cake rack and allow to cool completely to room temperature.

While cake is baking make the cream cheese frosting. In a large bowl, or stand mixer, whisk together cream cheese and butter. Slowly add confectioner’s sugar using mixer on low speed until frosting is smooth. Add vanilla extract. Whisk frosting on medium-high speed until vanilla extract combined and frosting is light and fluffy.

Frost cakes with cream frosting. Decorate with Sprinkles.

Devour and Enjoy!