Butterscotch Apple Cider Cake

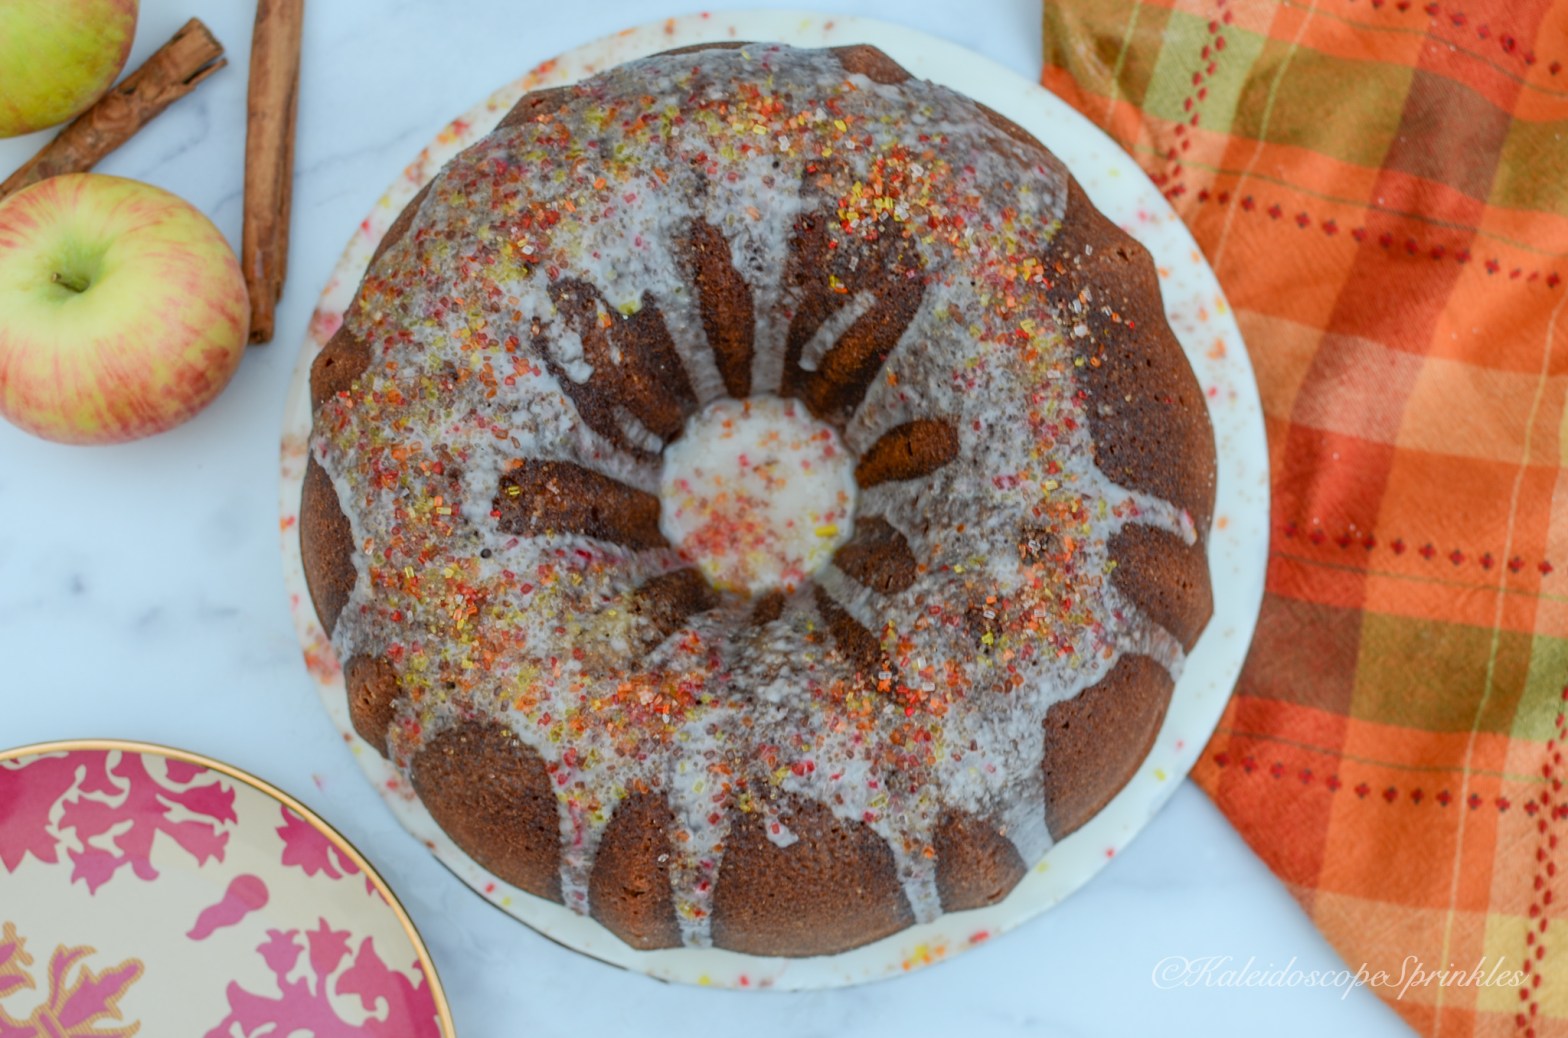
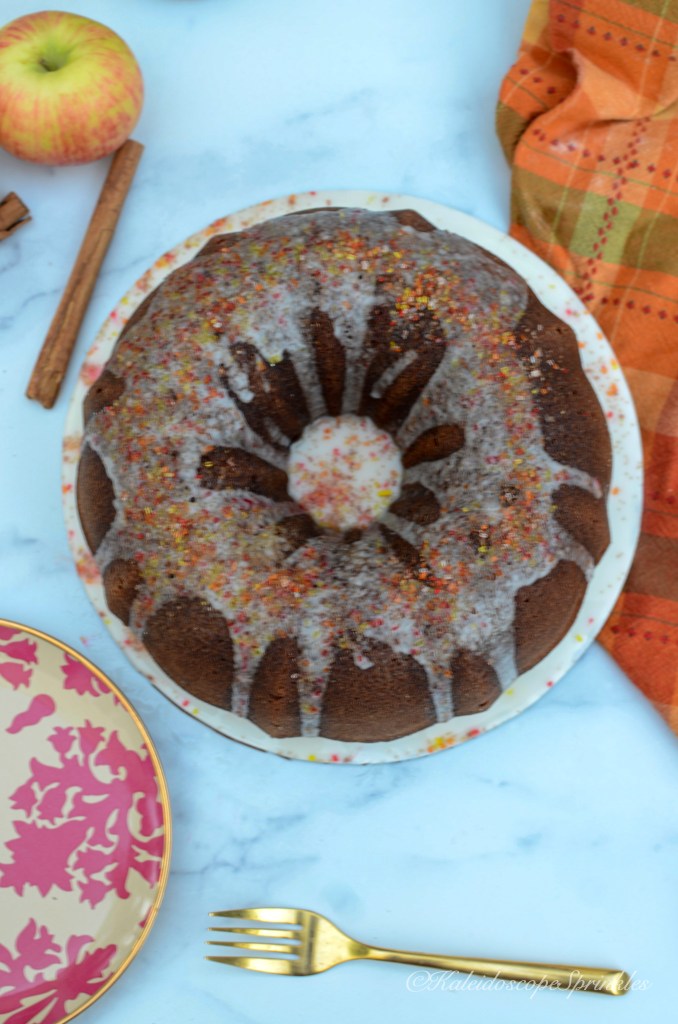
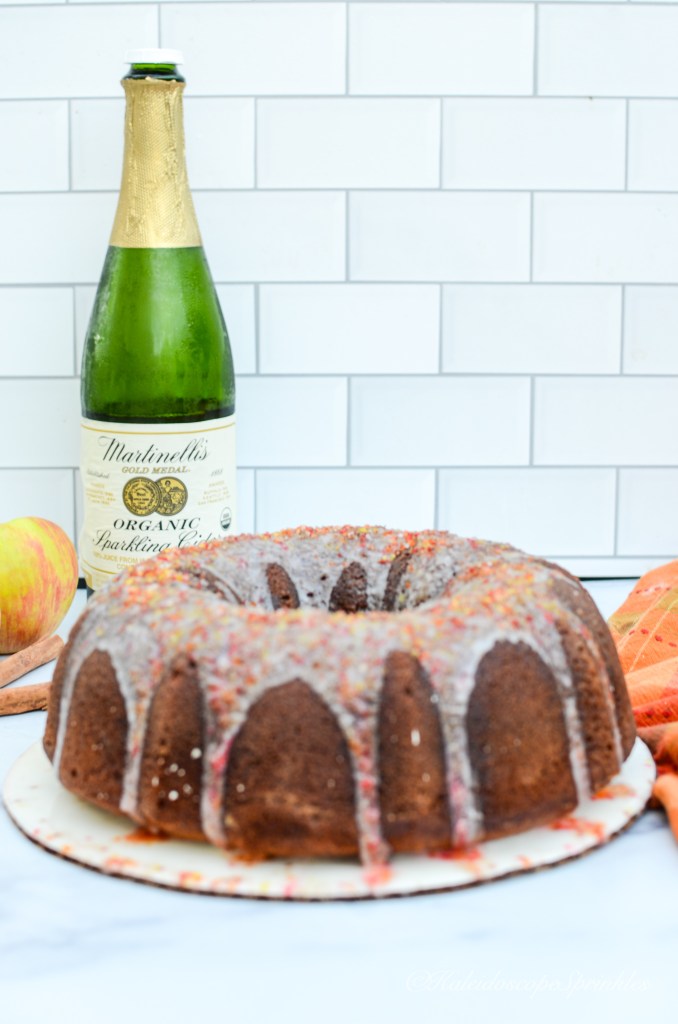
If you’re up to date with my blog, than you’ll know I posted what I thought was my first apple cider cake recipe I ever made. To my surprise, some years ago I already concocted a scrumptious cider cake for fall. I was browsing through my some old photos and recipes on my prehistoric laptop and stumbled across this recipe. As soon as I saw the photo I remembered how tasty this apple cider recipe was. How could it not be with fresh apples slices in it and smothered in fresh, homemade butterscotch? This recipe is a delectable a decade in the making.

Complete recipe below.

Butterscotch Apple Cider Cake

Ingredients

Butterscotch

4 tablespoons unsalted butter
1 cup of tightly packed dark brown sugar
¾ cup heavy whipping cream (not ultra-pasteurized)
1 tablespoon vanilla extract
1 teaspoon kosher salt

Cake 

2 1/2 cups all-purpose flour
1 tablespoon ground cinnamon
2 teaspoons baking powder
1 teaspoon salt
1/2 teaspoon baking soda
1 cup (2 sticks) unsalted butter, melted plus 2 tbsp room temp.
1 1/2 cups packed light-brown sugar plus 3 tbsp
4 large eggs
1/4 cup heavy cream
1 cup of apple cider
2 large apples, peeled, cored and cut into rings about 1/4 inch thick  


Directions
In a heavy bottomed stainless steel 2 quart saucepan, melt butter over low to medium heat. Just before butter is melted, add all dark brown sugar at once and stir with wooden spoon until sugar is uniformly wet.


Stir infrequently until mixture goes from looking grainy to molten lava. It will take about 3 to 5 minutes.


Once mixture changes from lava consistency to almost liquid form, add all the cream at once and replace your spoon with a whisk. Lower heat a little and whisk cream into mixture. Whisk until all the lumps have dissolved. When liquid is uniform, turn heat back to medium and whisk every few minutes until butterscotch becomes almost too thick to stir (approx. 10 minutes)


After liquid has been boiling on the stove for about 10 minutes, turn heat off and let rest for a minute or two before transferring into a stainless steel or glass bowl.
Add vanilla extract and salt. Stir until smooth. Set aside

Preheat oven to 350 degrees. Take bunt pan and using the 2 tbsp. of butter grease pan very well. Sprinkle 3 tbsp of brown sugar over the entire inside of the pan. Place apple rings onto bottom of the pan. Set pan aside


In a medium sized bowl, combine flour, cinnamon, baking powder, salt and baking soda. Sift or whisk the ingredients together. Set aside


Using a stand mixer, cream butter and brown sugar together for about 10 minutes (until light and fluffy). Add eggs one at a time to the creamed mixture. Combine cream and cider together in a measuring cup. Add flour and cider mixture to the stand mixer, alternating, beginning and ending with the flour mixture. Be careful to scrape the sides down and not to over mix.


Pour cake batter over apples in the bundt pan. Bake for approximately one hour and fifteen minutes.

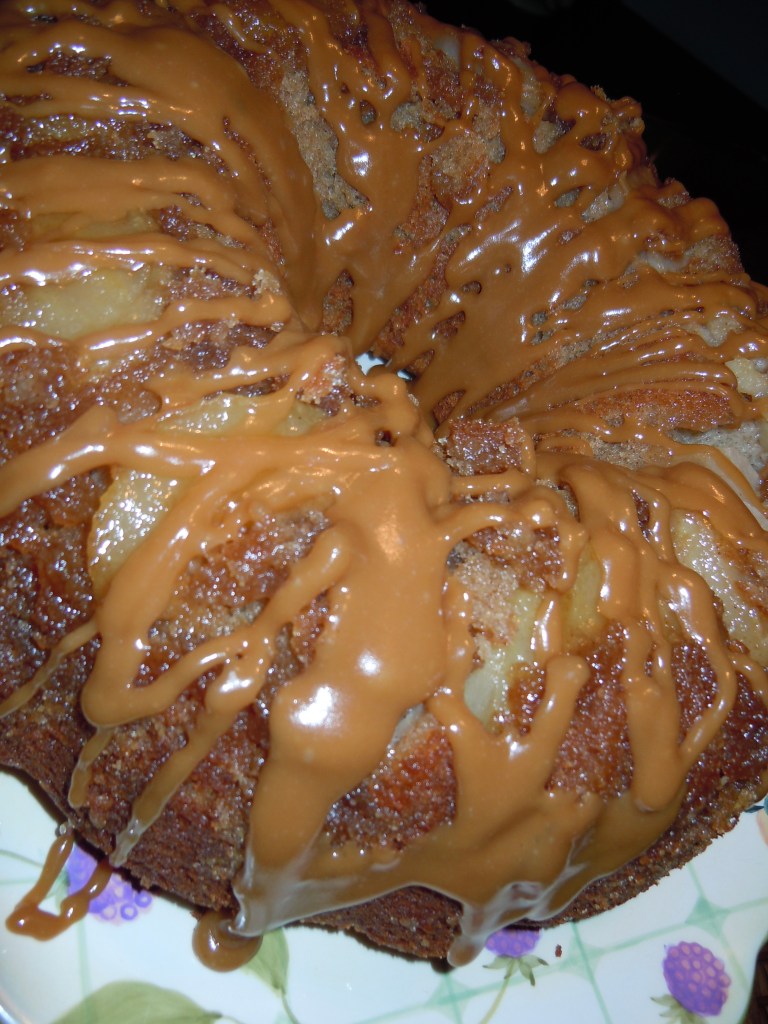
Allow cake to rest to slightly above room temperature. Use a pairing or small knife to release cake from the sides of the pan. Place cake plate on top of pan. Flip cake pan over onto cake plate. Drizzle butterscotch over the cake.

Devour and Enjoy!!

OOTD: Minnie Mouse Rocks the House!!


Tis the season of costumes and characters. Since I will be working on Holy-ween this year, I decided to play dress up in another way. I took inspiration from my Minnie Mouse shirt and updated her look. Check it out


Outfit details

Minnie Mouse Crop top: Asos (purchase here) 

Black leather pencil skirt: thrifted at Goodwill (purchase similar here)

White Mesh Caged booties: B Brian Atwood (purchase here)

Earrings: Thrifted from Salvation army (purchase similar here)

DIY: Fall Pumpkin Sign

If you have been following me on social media you’ll know that a few months ago I got the great idea to hang some fabulous decorations over my stove. I became inspired after seeing a post of a super chic wreath hanging over someone’s stove during the holidays. I went to my local Michaels store during the summer and found this basic ice cream shaped wooden sign. As soon as I saw it I brainstormed the idea of covering the sign with paint and sprinkles. After finishing my project I was quite impressed with the results. The decor over my stove just added an extra element of pizzazz to my kitchen/ home decor.

Here we are in my favorite season and I am even more inspired to decorate for fall. I love all the colors, fabrics, flavors and smells that are associated with autumn. I went back to my neighborhood Michaels store to peruse the aisles for more craft inspiration. I found another simple wooden sign, this time pumpkin shaped and took it home. I knew that I wanted to experiment with a new color palette rather than my usual fall colors: red, orange and gold. I went back to Michaels yet again and found some fantastic fall ribbon. This ribbon was the perfect inspiring color palette. I gathered up the rest of my craft goodies and got to work. I finally finished my pumpkin sign and I absolutely love the results, so much I decided to share this DIY with you.

All items can be purchased from Michaels Stores. See my results, step by step video and instructions below.

Step by step DIY fall plaque

Materials

  • Wood stain. I used some old walnut stain I already had on deck (pun intended). (purchase here)

Instructions

  1. Stain wood pumpkin plaque with two coats of wood stain. (I used walnut finish)
  2. Paint wooden “hello” sign with white acrylic paint. Let dry.
  3. Sand and paint letters with rose gold acrylic paint. Let dry.
  4. Make bow out of ribbon by cutting 3 pieces (your choice of size) from each ribbon. Fold ribbon ends together and secure in place with craft wire.
  5. Glue flower bouquet onto bow using glue gun.
  6. Measure and cut gingham fabric to fit half of wooden pumpkin plaque.
  7. Dye gingham fabric according to package instructions. Allow fabric to completely dry.
  8. Once fabric has completely dried glue fabric onto pumpkin plaque using Mod Podge. Allow to dry.
  9. Add and secure twine to end to gingham fabric with Tacky Glue to create a border.
  10. Glue “FALL” letters onto gingham fabric using Tacky Glue or Mod Podge.
  11. Glue bow and flower bouquet to plaque using glue gun.
  12. Glue “hello” sign to wooden plaque using Tacky Glue.
  13. Allow sign to complete dry.
  14. Hang your new fabulous Hello Fall plaque up and show off!

Sparking Cider Cake


Here we are finally in the month of October. Fall is moving full steam ahead and I couldn’t be more ecstatic. There are so many joys that come with autumn it’s hard to keep track. One of the wonderful things I love about this season is the array of yummy drinks that accompany it. There are of course pumpkin spice lattes, mulled wine, hot cocoa and most definitely apple cider. Honestly it’s a tough call between PSL and fresh apple cider, on who takes the cake for fall (pun intended). I can never get enough of both drinks during the season.


A few years ago I used pumpkin spice lattes as inspiration for a delicious cake recipe. This cake was as scrumptious as it sounds covered in butterscotch frosting. (Once I find the recipe in my archives I will post it to my blog.) I have also previously made plenty of apple cakes and concoctions, but never an apple cider based cake. I thought that this year would be the perfect opportunity to let cider shine in cake form. I busted out my favorite sparkling cider and brainstormed a winning cake recipe. Check out my recipe below for Sparkling Cider Cake. This cake is light and airy from the cider effervescence but full of flavor from all the spices of cider and apple butter. The cake is then covered in Kaleidoscope Sprinkles Sparkling Cider Sugar Crystals for the best autumn decorations for this cake. It is definitely the complete essence of fall in a baked good. You’ll surely want to save this recipe for now and later.


Ingredients

Cake:

3 cups all purpose flour

1 ½ tsp. baking soda

½ tsp. salt

2 tsp. cinnamon

½ cup unsalted butter, room temperature

½ cup vegetable oil

½ cup granulated sugar

½ cup brown sugar

4 large eggs

1 tsp. vanilla extract

½ tsp. lemon juice

½ cup apple butter/ unsweetened apple sauce

1 cup sparkling apple cider


Glaze:

¼ cup sparkling apple cider

2- 2 ½ cups confectioners sugar


Sparkling Cider Sugar Crystals, for decoration (optional)

Directions
Preheat oven to 350F.


Butter and flour bundt pan.


In a large sized bowl combine flour, baking soda, salt and cinnamon. Set aside.
Using a stand mixer with paddle attachment cream together butter, oil, sugars until light, fluffy and double in size (approximately 10 minutes. ) Add eggs one at a time to the creamed mixture. Add vanilla and lemon juice. Add apple butter Add half of the flour mixture to the creamed mixture. Add apple cider. Combine last of the flour mixture. Mix well until all ingredients are incorporated.


Pour batter into prepared bundt pan. Bake at 350F for approximately 55-60 minutes (Bake until tester comes out clean). Let cake cool on wire rack until at room temperature.
While cake is baking make the glaze.


For Glaze: Whisk together apple cider and confectioners sugar. Whisk until glaze is smooth, about one minute. Pour glaze onto cooled cake.


Cover cake with Kaleidoscope Sprinkles Sparkling Cider Sugar Crystals (optional).


Devour and enjoy!

The Perfect Fall Cupcakes

Fall is here and its absolutely the best time of year! Now I’m not saying that I didn’t enjoy the long summer days and nights, but nothing compares to an autumn day. There is something about this season and time of year that just makes my smile a little wider. I’m not sure if its the cool nights leading into crisp, comforting days. It might be the color change of leaves, pumpkin spice everything, all the fabulous apple and squash recipes, sweater weather, fall fashion or the culmination of everything, but I can never get enough.


As a child my autumn wasn’t complete without a visit to Apple Hill. A day spent at the apple orchards was heavenly accompanied with fresh cider and doughnuts. I loved picking all the fresh apples and then as a family coming home to make pies or other original recipes. With all the apples that were brought home from Apple Hill high levels of creativity and consumption also became a fall tradition.


Between all the warm spices and bountiful harvest, fall evenings just make me want to rush home to turn my oven on. Not only are the evenings the perfect weather to warm up the house, but I also love filling up my home with all the smells of the season.


This year after reminiscing over my previous autumn memories in the kitchen, I decided this year needed a special memory of its own. I haven’t had the opportunity to make my way to apple picking yet, but I wanted to create the ultimate fall recipe ahead of time.


Check out my recipe for these Perfect Fall Cupcakes. They are made with the ideal blend of warm spices. Each cupcake is then filled with a fresh, crisp apple compote. The spice cupcake with tart apple compote is then covered in a smooth, sightly sweet and tangy cream cheese frosting. The cupcakes are then decorated in of course our favorite Fall Sprinkle Mixes: The Shade, Sparkling Cider and Fall Through, to make them even more spectacular. These cupcakes provide the perfect bit of autumn provisions. I promise you once you taste these cupcakes they will become a part of your yearly fall traditions.


You can find the complete recipe and step by step video below.

(Makes approximately 2 dozen/ 24 cupcakes)

Ingredients


Apple Compote:

2 pounds of apples (Approximately 4 large or 5-6 medium sized apples, Granny Smith or Honeycrisp)

2 tbsp. fresh lemon juice

2 tbsp. unsalted butter

½ cup brown sugar

¼ tsp. salt


Spice Cupcakes:

2 ½ cups all purpose flour

1 ½ tsp. baking powder

¼ tsp. salt

1 tbsp. Pumpkin Pie spice

½ tbsp. cinnamon

¼ tsp. cloves

¼ tsp. All spice

¼ tsp. ground ginger

1 cup unsalted butter

2 cups granulated sugar

3 eggs, large

1 cup buttermilk


Cream Cheese Frosting:

12 oz. of cream cheese

½ cup (1 stick) of butter

3 ½ – 4 cups of confectioners sugar

2 tsp of vanilla extract


The Shade Sprinkle Mix, for decorating (optional)

Sparkling Cider Sugar Crystals, for decorating (optional)

Fall Through Sprinkle Mix, for decorating (optional)


Directions:
Peel and chop apples into small bites sized pieces.


Using a large pan/ skillet, heat to medium heat. Add apples and cover with lemon juice to prevent browning. Add butter, brown sugar and salt to apples in pan. Stir ingredients together and cook until apples have cooked down and juices have reduced and thickened. Allow compote to completely cool.


(You can make compote ahead of time and refrigerate overnight. Also leftover compote is great on top of oatmeal or yogurt for breakfast.)


Preheat oven to 350F. Line cupcake tin with liners.


In a medium sized bowl whisk together flour, baking powder, salt, pumpkin pie spice, cinnamon, cloves, All spice and ground ginger. Whisk until all ingredients are combined and set bowl aside.


In a separate large bowl using either a stand or hand mixer cream together butter and granulated sugar until light and fluffy and doubled in sized. (Approximately 3-5 minutes). Add eggs to mixture one at a time. Add flour mixture and buttermilk to creamed mixture, alternating, beginning and ending with flour mixture. Carefully mix until just combined. Be careful not to over-mix.


Using an ice cream scoop place cupcake batter into cupcake tins. Bake cupcakes at 350F for approximately 22-25 minutes until tester comes out clean.


Allow cupcakes to completely cool.


While cupcakes are baking make frosting. In a large bowl, or stand mixer, whisk together cream cheese and butter. Slowly add confectioner’s sugar using mixer on low speed until frosting is smooth. Add vanilla extract. Whisk frosting on medium-high speed until vanilla extract combined and frosting is light and fluffy.


Once cupcakes have completely cooled, using rounded part of pipping tip cut center out of cupcakes. Spoon or pipe apple compote into the center of each cupcake. Pipe cream cheese frosting on top of each cupcake.


Decorate cupcakes with Fall Sprinkle Mixes.


Devour and enjoy!

Cosmic Kaleidoscope Brownies

I love recreating and updating classics. Whether it’s refurbished furniture, recycled clothes or an old recipe sometimes adding a modern twist can upgrade something to the next level. It’s not necessarily about losing out on the tradition but allowing something to flourish in new times. It’s back to school time so I thought that this would be the perfect opportunity to visit some old dessert recipes made for lunches but improve on the flare and flavor.


As a child and now as an adult, dessert has always been the best part of the meal. Starting as an adolescent I came to appreciate the preparation and taste that came from homemade goodies versus those from a package. Fresh cookies or brownies in my lunch made the night before always meant more to me than something out of a box. What a wonderful opportunity to share a classic recipe that is sentimental and also great for school time or anytime.


Check out the recipe below for Cosmic Kaleidoscope Brownies. They take those packaged colored delicacies from your childhood to the next step. They are of course made with Kaleidoscope Dreams Sprinkle Mix, tons of rich, delicious chocolate and love.


You can find the complete recipe and step by step video below.

Step by step video for Cosmic Kaleidoscope Brownies

Ingredients

Brownies:

½ cup unsalted butter melted, warm

8oz. 100% cocoa baking chocolate (unsweetened), roughy chopped

1 cup granulated sugar

2 large eggs room temperature

2 tsp. pure vanilla extract

¾ cup all purpose flour

½ tsp. baking soda

½ tsp. salt


½ cup semi-sweet chocolate chips (optional)


Frosting:

4 oz. cream cheese, room temperature

¼ cup unsalted butter, room temperature

1 ½ cup unsweetened cocoa powder

1 tsp. vanilla extract

dash of salt


Kaleidoscope Dreams Sprinkle Mix (for decorating), optional


Directions
Preheat oven to 350 degrees. Grease 9 x9 inch baking dish.


In a medium sized bowl add flour, baking soda and salt. Whisk together and set aside.
In a large sized bowl, add melted butter, granulated sugar and chocolate. Mix with your hand mixer on medium speed until chocolate is completely melted. (If chocolate does not melt completely, stick bowl in the microwave for 20-30 seconds to melt remaining chocolate). Add eggs one at a time, mixing after each addition to incorporate. Add vanilla extract.


Fold flour mixture to wet chocolate mixture until all ingredients are incorporated. Be careful not to over mix. Fold in chocolate chips. Spread brownie batter into 9 x9 buttered baking dish.


Bake for 22-25 minutes or until a toothpick inserted into the center comes out just barely clean. Don’t overbake.


While brownies are baking make the frosting. In another medium bowl add cream cheese, butter, powdered sugar and cocoa powder. Using hand mixer, mix at low speed and then increase to medium-high once sugar has incorporated. Add vanilla extract and salt. Continue to mix on high speed until frosting is light and fluffy.


Once brownies have finished baking allow them to cool on cooling rack until room temperature. Spread frosting on top of brownies. Sprinkle Kaleidoscope Dreams mix on top. Cut into 16 servings.


Devour and enjoy!

Happy Kobe Day!

The eight month of this year is coming close to an end. This month has always been celebratory to me with my godson’s birthday, the last full month of summer, Kobe’s birthday and of course Kobe Day. I have always celebrated Kobe’s birthday as he was my own family member, since I practically grew up with him. It wasn’t until I moved to Los Angeles in 2014 that I came to truly appreciate Kobe Day. Last year of course was even more sentimental and also somber.


Last year I tried my best to celebrate the life and legend of Black Mamba in my own unique way. I unfortunately still held onto the heavy cloud of January 20th and grief over my shoulders. I made a fabulous letter cake and watched old VHS tapes and then soaked my pillow in tears of memories. It was definitely a day of mixed emotions.


This year I am in a much better headspace. I still think about the loss of such a great legend daily, but I have come to a place of peace. I know that one of Kobe’s greatest legacies was his work ethic and his determination to succeed. I now use my grief from Kobe to fuel the fire of my own passions. I am thankful that Kaleidoscope Sprinkles has allowed me to channel sorrow into smiles.


For Kobe Day this year, I decided to celebrate low key with continued success and cakesicles. I didn’t feel the need to do much this year because I have in my own way been celebrating daily with Mamba Mentality. The goal in life is to strive for your best every day and then hit reset. Kobe taught us that life is too short. In the 41 years he was on this earth he accomplished so much by his continued work effort. I pray I am able to do that in the life God allows me to see.


Check out my Kobe Day cakesicles and step and step videos below.


Check out Kaleidoscope Sprinkles Black Mamba Sprinkle Mix here. It’s the perfect way to celebrate Kobe Day!

Happy Kobe Day!
Step by Step Kobe Day Cakesicles

Mamba Forever!

National S’mores Day!

The culmination of summer is upon us. The evenings and mornings are starting to cool off and the days are starting to get shorter. This means more opportunity to take advantage of those magical summer nights. I love spending my evenings in my backyard with my feet kicked up surrounded by the warmth of my fire pit. A nice glass of great wine and something sweet is the perfect pairing for the night.


S’mores are the unofficial sweet treat of the summer and I have yet to have one this season. Being that today is the official holiday, I thought that this would be the perfect opportunity to master the s’more with some homemade marshmallows. I have made homemade marshmallows before and the recipe is fairly simple to master. Homemade marshmallows taste so fresh and so much better than the store-bought ones. This time I decided to upgrade my marshmallows by adding Kaleidoscope Sprinkles to the mix. I actually added the Kaleidoscope Sprinkles Purple Reign Sprinkle Mix to the last step and was quite satisfied with the results.


See the complete recipe and step by step video below.

Homemade marshmallows step by step video


Homemade Marshmallows


Ingredients

3 packets unflavored gelatin

1 cup cold water, divided

1 ½ cup granulated sugar

1 cup light corn syrup

1/8 tsp. kosher salt

1 tbsp. vanilla extract

confectioners sugar for dusting (approximately ½ cup)


Kaleidoscope Sprinkles Purple Reign Sprinkle Mix (for decorating), optional


Directions
Using your stand mixer with whisk attachment, add gelatin and ½ cup cold water. Allow gelatin to sit and bloom.


While gelatin is resting, to a medium saucepan add sugar, corn syrup, remaining ½ cup of water and salt on medium heat. Continue stirring mixture until sugar dissolves and temperature reaches 240F on a candy thermometer.


Take sugar mixture off the heat. Turn stand mixture on low speed and slowly pour in sugar syrup.


Raise the speed of the mixer to high speed and continue mixing for another 10-12 minutes. Add vanilla extract.


Butter and dust half of the confectioners sugar into a 9×9 baking dish. Coat bottom of dish with sprinkle mix. Pour marshmallows on top of sprinkles in the dish. Using a spatula, smooth the top of marshmallows. Dust top of marshmallows with confectioners sugar.
Allow marshmallows to sit overnight.


Once marshmallows have dried out, flip dish over onto parchment paper or baking pan. Using knife coated in confectioners sugar cut marshmallows into 1″ squares. Roll marshmallows into remaining confectioners sugar.


Devour and Enjoy!


*To make s’mores: Use one marshmallow (toasted or not), two squares of graham crackers, one piece of Dove chocolate or Nutella.

OOTD: Happy Anniversary

This past weekend I had the wonderful opportunity to celebrate my anniversary. No it’s not the anniversary you are thinking about. I celebrated one year of my fabulous small business, Kaleidoscope Sprinkles. I started my business last year not only to celebrate my passion of baking and decorating but also to celebrate the Black community. Being a small business owner is not a cake walk (pun intended), but I wouldn’t change my decision at all. I decided to celebrate my business anniversary by making a delicious red velvet number cake decorated in my favorite colors and sprinkles. I also decided to get jazzy in some bright colors, a balloon and have my own photo shoot. Check out my pictures and details of my anniversary weekend below.

Happy Anniversary to me!

Outfit Details

Shirt and skirt: Akira Chicago

Shoes: Calvin Klein (purchase similar here)

Earrings and bracelet: Kaleidoscope Sprinkles (purchase here)

Hair: Heat Free Hair

National Ice Cream Day/ Raspberry Cake Day!

Summer has already kicked off and is definitely in action. There have been several heat waves all over the continental US, including Los Angeles. Climate change is real and unfortunately getting worse. When its sweltering outside I’m not a fan of turning my oven on unless absolutely necessary. As you should already know, I have a huge sweet tooth. Surprisingly though I’m not a huge fan of ice cream. I rarely eat it, as I feel I would rather save my calories for something else. Now gelato is an entire different story. (Yes I’m bougie).


Although I’m not a big ice cream fan, with the heat outside, I decided I was definitely celebrating National Ice Cream Day this year. I usually go for the classic cookies n cream but this year I wanted to try something new. I discovered that the day following National Ice Cream day is National Raspberry Cake Day, who knew. I found this amazing white chocolate raspberry flavored ice cream and purchased too much. After having a few scoops I was definitely satisfied. Since my freezer is already at maximum capacity and I didn’t want to waste all that ice cream, I got to brainstorming what I could do.


A few years back I remember scrolling across a recipe for ice cream bread. Ah ha! The perfect recipe and idea to use up my ice cream and still be able to celebrate National Raspberry Cake Day. I waited until the evening when my house finally cooled down enough to turn my oven on and got to work. I was quite surprised how simple and well my ice cream bread and raspberry ice cream cake turned out. What really made the cake appealing was the Kaleidoscope Sprinkles Cake, Cake, Cake Sprinkle Mix I used to decorate the top. I will definitely be keeping this recipe around for the next time I buy too much ice cream or want to try something different. I suggest you hold on to this recipe as well.


You can find the recipe for my ice cream bread, raspberry ice cream cake and step by step video below.

Step Ice Cream Bread and Raspberry Ice Cream Cake

Ice Cream Bread
Ingredients
2 cups ice cream of you choice, melted ( I used Tillamook White Chocolate Raspberry)

¾ cup all-purpose flour

1 tsp. baking soda


Cake, Cake, Cake Sprinkle Mix, for decorating (optional)

Directions


Preheat oven to 350F.


Grease and parchment paper loaf pan.


In a large bowl, place melted ice cream. Stir melted ice cream until smooth and creamy consistency. Fold in flour and baking soda. Pour ice cream batter into loaf pan. Sprinkle top with Sprinkle Mix.


Bake ice cream cake at 350F for approximately 30 minutes until cake tester comes out clean.


Allow cake to cool completely to room temperature. Cut bread into slices.


Devour and enjoy!

Raspberry Ice Cream Cake


Ingredients

1 ice cream bread loaf

2 pints of raspberries

1 cup raspberry fruit spread (I used Simple Truth Organic brand)

2 cups of semi-soft ice cream


Sprinkle Mix, for decoration (optional)


Directions


Line Loaf pan with plastic wrap thoroughly. Leave some overlay plastic to cover top of cake.


Slice ice cream bread loaf into 14 thin slices width wise.


Line bottom loaf pan with cake slice, enough to completely cover the bottom of pan. Try not to leave any gaps.


Melt fruit spread in saucepan on low heat to just above room temperature. (This helps fruit spread onto cake with tearing it.) Use spatula to place thin layer of half of the fruit spread on bread slices.


Line fruit spread with fresh raspberries.


Gently add half of semi-soft ice cream on top of ice cream. Add bread slices on top of ice cream.


Repeat steps with fruit spread, raspberries, ice cream and bread slices.


Cover cake with plastic overlay. Place cake in the freezer overnight to set.


Unwrap and invert cake when ready to serve. Cover cake with more sprinkles and slice.


Devour and enjoy!