Earth Day Scones!

Happy Earth Day 2024! I have been celebrating and honoring this earth since I was a child. Growing up in California meant learning about conservation and planet protection early on. I remember planting baby trees one year when I was six or seven. Another year I recall attending a beach clean up. Recycling was understood as an important initiative when I still barely tying my shoes.

I admittingly, have been an advocate for Mother Earth, since the old years of the 1980s. When I was child I remember growing up with Captain Planet and the campaign, “Recycle, Reduce, Reuse.” I recall watching the news and hearing about a hole burning in the ozone. In my adolescence, I didn’t fully understand the extent of the importance of saving this planet. I did at that time understand that making a small difference could lead to a great impact. 

Every Earth Day I try to not only continue the fight for our planet, but I try and encourage others to do the same. Earth Day is about being conscious about the awareness of climate change and doing your part to improve that. I try and make small changes daily to reduce my overall carbon footprint. This year is one step closer to a cleaner and more delicious future.

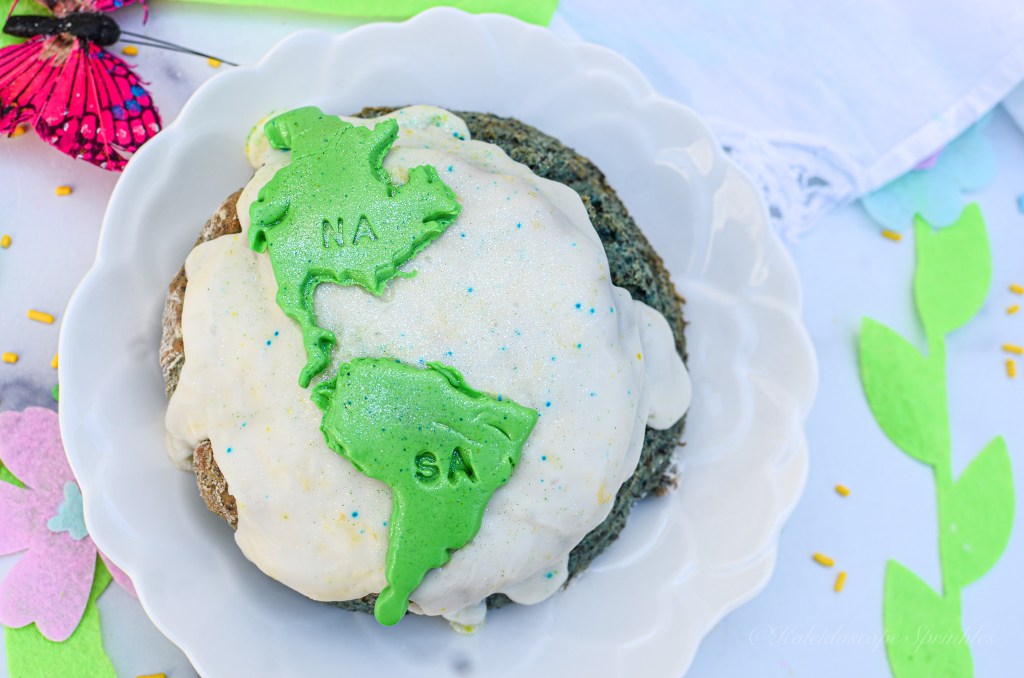
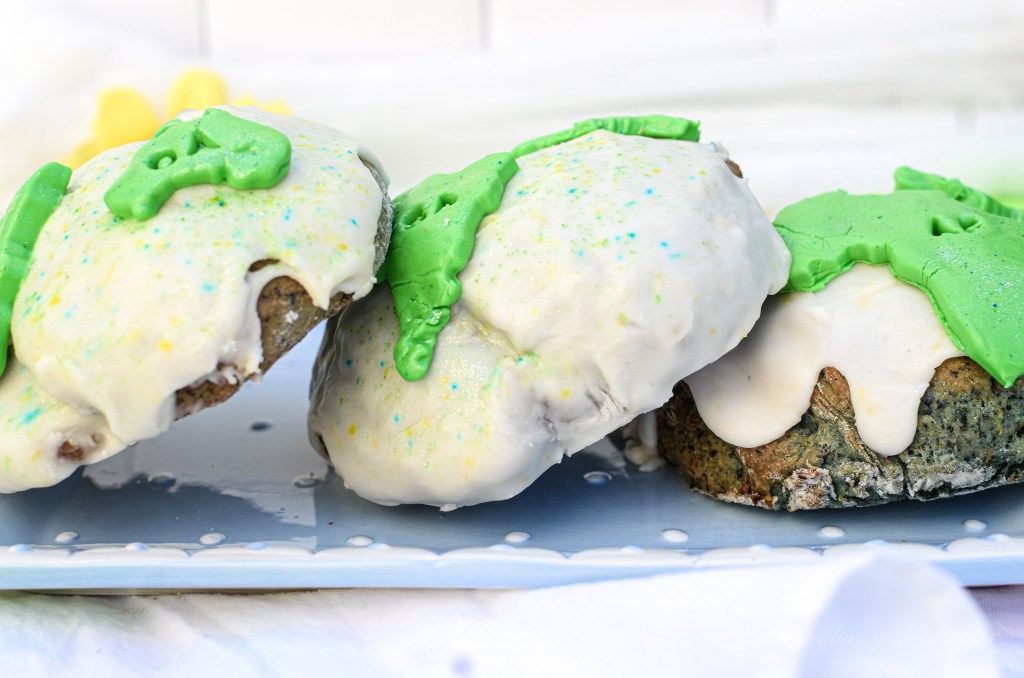
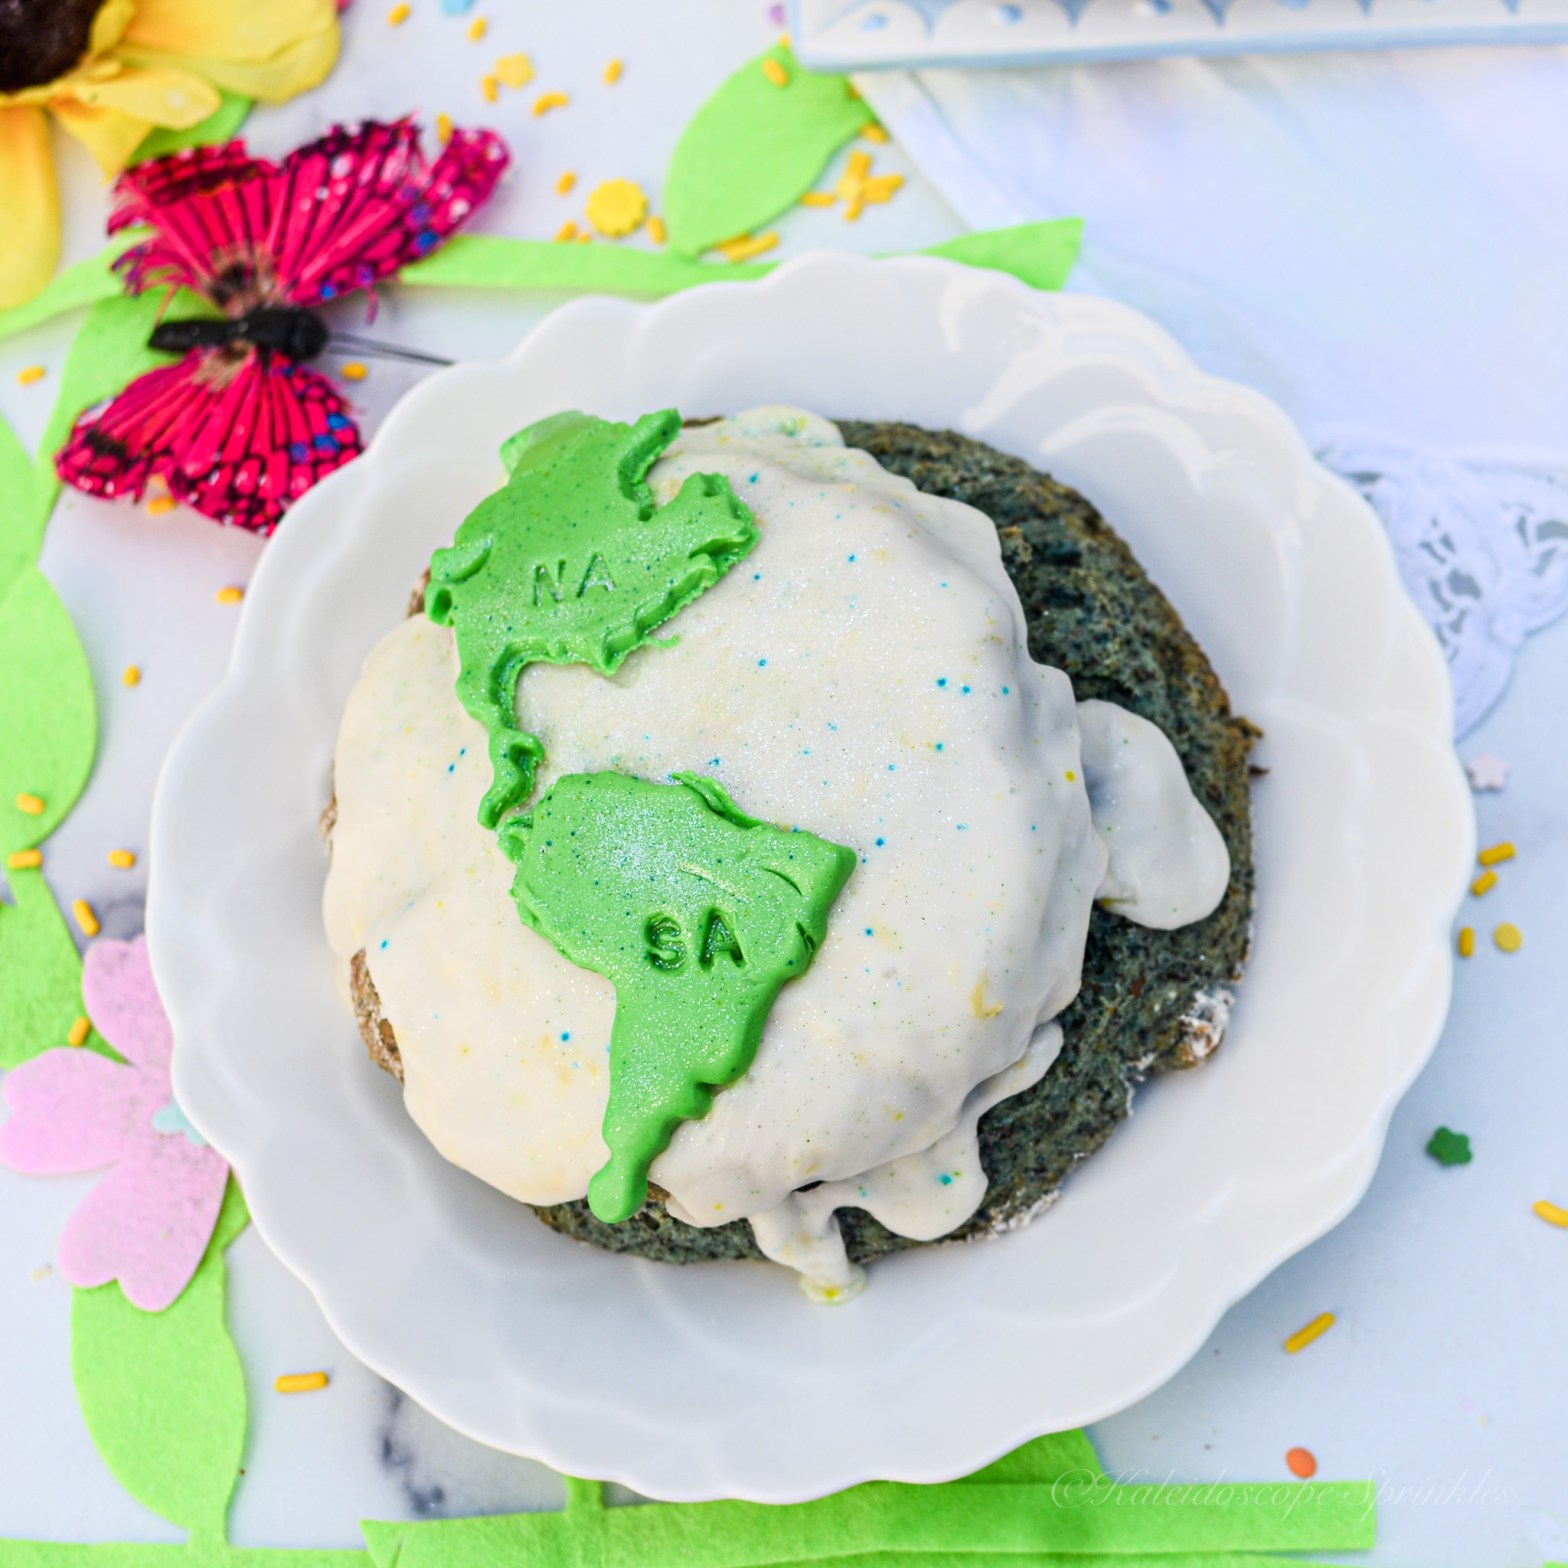
These warm and earth friendly Blue Thai Tea & buttermilk flavored scones will have you celebrating your taste buds and Mother Earth! They are covered with a sweet delicious lemon glaze to highlight the essential needs for conservation. They are then decorated in fondant and even more earthy decoration. Take a bite and pledge this year to do your part to protect this planet. 

See the recipe and video for these eco-friendly Earth Day Scones below.

Happy Earth Day 2024! 

Earth Day Scones

( Makes 4-8 scones, based on sizes)

Recipe

Ingredients 

2 cups all purpose flour

1 tsp. baking powder

½ tsp. baking soda

¼ tsp. salt 

½ tsp. lemon zest

½ cup (1 stick) cold butter, semi frozen and grated

½ cup buttermilk

⅓ cup brown sugar, lightly packed

1 large egg 

½ cup Blue Thai Tea, (whole or crushed leaves)

Glaze

2 cups confectioner’s sugar 

½ tsp. of lemon zest

2 tbsp. lemon juice

1 tsp. vanila extract

1-2 tbsp. of water (depends on preference of thickness of glaze)

Green fondant, for decoration (optional)

Green Cosmic Shimmers (edible glitter), optional

Kaleidoscope Sprinkles Eternal Sunshine Sprinkle Mix, for decoration (optional)

Directions

Preheat oven to 400F. Line cookie sheet with parchment paper.

In a large mixing bowl mix together flour, baking powder, baking soda, lemon zest and salt. Add grated butter using hands or a fork to press butter into flour mixture, until combined and it resembles course sand. Set aside.

In a medium sized bowl or measuring cup mix together buttermilk, brown sugar, egg and Blue Thai Tea. Stir until combined together. Add the wet mixture to the dry ingredients. Mix together using a spatula or your hands until it forms a dough. 

Press the dough out onto a floured surface and form it into a disk about one inch thick. Cut disk into 4-8 pieces. Bake at 400F for 12-17 minutes. 

While scones are baking, in a small bowl whisk together confectioner’s sugar, lemon zest, lemon juice, vanilla extract and water. Whisk until the glaze is nice and smooth and slightly runny.

Once the scones have cooled to room temperature. Dip the scones or layer glaze onto the scones to cover them completely. Decorate with fondant, Cosmic Shimmers (edible glitter) and sprinkles.

Devour and Enjoy!

OOTD: Miss Dior Pop Up Barbie

𝙀𝙡𝙚𝙜𝙖𝙣𝙘𝙚 𝙢𝙪𝙨𝙩 𝙗𝙚 𝙩𝙝𝙚 𝙧𝙞𝙜𝙝𝙩 𝙘𝙤𝙢𝙗𝙞𝙣𝙖𝙩𝙞𝙤𝙣 𝙤𝙛 𝙙𝙞𝙨𝙩𝙞𝙣𝙘𝙩𝙞𝙤𝙣, 𝙣𝙖𝙩𝙪𝙧𝙖𝙡𝙣𝙚𝙨𝙨, 𝙘𝙖𝙧𝙚 𝙖𝙣𝙙 𝙨𝙞𝙢𝙥𝙡𝙞𝙘𝙞𝙩𝙮.

Christian Dior

This past weekend I had the opportunity to attend enjoy and celebrate the Miss Dior Avenue pop up located in West Hollywood in celebration of Dior’s new scent, Miss Dior Parfume . The pop-up was full of pleasant aromas, treats and surprises. The beauty and the gelato was incredible. Thank you Dior for always elevating the elegance. 

I dressed perfectly for said occasion in my fabulous Parisian Barbie Chic ensemble. Bright pink was the perfect color choice for this event and I’m glad my fashion choice was right on target.

🎀 Dress by Anne Klein (purchase similar here)

🎀 Heels by Steve Madden (Purchase similar here)

🎀 Pink Slides (seen in movie) by Dior (Purchase similar here)

🎀 Tote bag by Dior (purchase similar here)

🎀 Sunglasses purchased at Nordstrom (purchase similar here)

Black Queen Cookies

Black History Month (BHM) is steadily coming to a close. Despite having an extra day this year with it being a leap year, this month still doesn’t seem long enough. There is just too much Black history to try and pack into one month. This is why I am a firm believer in celebrating Black history every day.

In the past, I have celebrated in February by taking a trip to Egypt in 2022. I have created Black history recipes and delicious treats. I have attended special Black history discussions. This year, I attended a special Hip Hop exhibit to kick off BHM. I have also highlighted and continue to feature and support Black owned businesses with my purchasing power.

Before the official end of BHM, I wanted to honor the culture with another fabulous business and baked good. I was fortunate enough to receive some African artisan salts from a company called, N/UM. These chef curated salts that are sourced from the Motherland are a perfect way to elevate my confections for this month and anything else I plan to make in the future.

I previously purchased this cute cultural cookie cutter and became inspired with my new flavorful salts to formulate a new cookie recipe.

Check out my Black Queen Cookies filled with the robust yet delicate flavors of Africa.

If you’re interested in purchasing these flavorful artisan salts for yourself, CLICK HERE!

You can get the complete recipe and step by step video for my Black Queen Cookies below.

Some more Black history of you . In 1841 a Black man by the name of Edmond Albius made the widespread use and production of the vanilla bean possible. At the time, Edmond was a 12 year old enslaved boy from the Bourbon Islands was owned by French. He figured out what other botanists had tried to do for centuries. Albius discovered that the vanilla plant could be pollinated by hand using a blade of grass or a swipe of a thumb.

Makes 18-24 cookies

Ingredients
Cookies:

2 cups all-purpose flour

¼ cup almond flour

1 tbsp. tapioca flour ( you can substitute cornstarch)

1 tsp. baking powder

1 tsp. N/UM Kgalagadi Ancient Salt

1 cup unsalted butter, at room temperature

1 cup granulated sugar

2 large eggs, room temperature

¼ tsp. (1 pod) fresh vanilla ‘caviar’ seeds or 1 ½ tsp. of vanilla extract

½ tsp. almond extract

Royal Icing

4 cups confections sugar

3 tbsp. meringue powder

¼ tsp. N/UM Benguela Lily Fleur de Sel salt

1 tsp. vanilla extract

7-8 tbsp. water

food coloring gel, for royal icing (optional)

Kaleidoscope Sprinkle Cognac Queen Sprinkle Mix, for decorating (optional)

Directions
Preheat oven to 350F degrees.


In a medium mixing bowl whisk together flours, baking powder and N/UM salt. Set aside.


In the bowl of an electric stand mixer cream together butter with granulated sugar until blended. Scrape down mixing bowl. Add eggs one at a time. Scrape down mixing bowl again. Add fresh vanilla and almond extract. Add flour mixture to bowl. Mix cookie dough until just combined. Be careful not to over mix or dough will be tough.


Roll out dough onto a floured surface until about ¼ inch (0.63 cm.) thick. Cut out cookies using your cookie cutter. To prevent sticking, dip cookie cutter in flour first before cutting out cookie dough.

Place cut out cookies on cookie sheet with 1 inch separation between each cookie.

Bake in preheated oven for approximately 14 – 16 minutes until dough is slightly golden brown on the edges.

Let cool completely on a wire rack until room temperature.


While the cookies are cooling, in a large mixing bowl using an electric or hand mixer blend together powdered sugar, meringue powder, water and vanilla extract. Add small amount of icing color. Mix until icing is smooth and right consistency.

Place icing into small individual piping bags with each color. Decorate each cookie using royal icing. Allow icing to set.

Devour and enjoy!

*cookie cutter purchased from Amazon, SHOP HERE!

Mexican Chocolate Dulce de Leche Brownies

I love a great getaway. A refreshing trip mostly brings me peace and inspiration. If you have been following my travel blog, TMC LLC, you know that I recently enjoyed and returned from a trip to Puerto Vallarta. Puerto Vallarta was such an incredible adventure. There were many outdoors activities to do, plenty of leisure time and most importantly great food to savor. I had delicious fresh fish tacos, which are my favorite. I also had plenty of snacks and sweets, including authentic Mexican chocolate.

Before my trip to the Mexican peninsula, I had sampled lots of chocolate from all over the globe. This would be my first time having authentic chocolate from Puerto Vallarta and I was looking forward to it. During one of my days causally exploring the city. I was looking for something to eat for dinner and stumbled upon a restaurant that also served as a chocolate shop. My meal for dinner was absolutely delicious, but it left me too full to eat any dessert. I knew I had to come back for the variety of chocolate and sweets being served.

Upon my last day in Puerto Vallarta, I made it back to Vallarta Chocolate Factory. My hotel, Hacienda San Angel, had already provided me plenty of chocolates during my daily turn down service. I was interested in purchasing something I could bring back home with me. I found some authentic Puerto Vallarta cocoa powder in the chocolate shop and quickly scooped some up. I already had an idea of what I wanted to do with this baking ingredient.

I returned home to my LA estate and quickly got to work in my kitchen. I had some extra dulce de leche* in my refrigerator because I always keep some ready for recipe inspiration. I took out a can of my homemade dulce de leche* and turned my oven on. I whipped up a batch of some amazing Dulce de Leche Brownies and decided to share the recipe with you to enjoy.

These are easy and quick to make if you’re able make your dulce de leche* ahead of time. The brownies are even more decadent a la mode with vanilla ice cream and Kaleidoscope Sprinkles on top.

See my recipe for these Dulce de Leche Brownies below. I hope you enjoy making them and eating them as much as I did.

Dulce de Leche Brownies

(Makes 24 brownies)

Ingredients

2oz. of Mexican cocoa powder, (or any cocoa powder of preference)

16oz (1 cup/ 2 sticks) unsalted butter

2 cups of granulated sugar

3 large eggs, room temperature

1 tsp. vanilla extract

1 cup of flour

8 oz. can homemade dulce de leche*, room temperature.

Directions

Preheat oven to 350F. Grease and add parchment paper to 9 x13″ pan.

Using a double boiler on low heat, in a large bowl melt and combine together cocoa powder and butter. Once ingredients are combined and smooth, remove from heat and allow to cool down.

Once chocolate mixture has cooled down slightly, add sugar and mix together until ingredients resemble wet sand.

Whisk eggs in one at a time until mixture is fully combined. Add in vanilla extract.

Add flour to mixture and use spatula to fold in flour until fully combined.

Add brownie mixture to 9 x 13″ pan.

Drop dulce de leche in spoonfuls on top of brownie mixture. Use a knife to spread and swirl dulce de leche into the brownie mixture.

Bake brownies for 30-35 minutes or until tester comes out fudgy.

Allow brownies to cool completely to room temperature. Cut brownies into 24 squares.

Serve brownies solo or a la mode with vanilla ice cream and Kaleidoscope Sprinkles on top.

Devour and enjoy!

*Want to know how to make your own Dulce de leche? CLICK HERE

Eggnog Créme Brûlée w/ Gingerbread Cookies

I love a good, classic French dessert. I am a fan of almost most anything sweet, but there is just something special about simplicity. A classic flavor served properly can make my taste buds tingle. I believe that is why créme brûlèe has always been a favorite of mine.

During my many adventures to Paris and all my culinary courses, I have come to understand this basic confection. Créme Brûlèe is essentially a baked custard consisting of four ingredients. Although, it all sounds so simple, it is with precision of ingredients, measurements and bake that a masterpiece can be created. I have made and enjoyed a plethora of this classic caramel recipe, but decided to try something different.

After coming back from another splendid trip to the city of lights, I became inspired to get into the holiday spirit. I decorated both the exterior and interior of my home after unpacking, of course. My Christmas interior designs this year including a brand new pink tree with confectionary ornaments, which was inspired by the Galleries-Lafayette. What better way to celebrate than a holiday inspired Parisian recipe.

See my recipe for my delicious Eggnog Créme Brûlée with homemade Gingerbread Cookies. I made the cookies even more special by topping them with Kaleidoscope Sprinkle My Goodies Gumdrop Sprinkle Mix. This recipe is full of holiday spices and flavor. I will honestly tell you, this is one of my top 5 recipes!

I hope you truly enjoy this recipe and have a very MERRY CHRISTMAS, HAPPY HOLIDAYS and Happy KWANZAA!

Eggnog Creme Brûlée (Makes 4 large or 8 mini servings)

Ingredients

For Créme Brûlée:

Créme Brûlée *adapted from La Cuisine Paris

300ml Heavy Cream

30g granulated sugar, plus more for tops

3 egg yolks

1 whole vanilla bean

1-2 cinnamon sticks

1 whole star anise

1 tbsp. whole cloves

1 whole nutmeg

½ tsp. ground cinnamon

½ tsp. ground nutmeg, fresh is best

For Gingerbread Cookies:

Gingerbread Cookies *adapted from Martha Stewart’s Cookies

2 ¾ cups all-purpose flour

½ tsp. baking soda

½ tsp. salt

2 tsp. ground ginger

2 tsp. ground cinnamon

¾ tsp. ground cloves

½ tsp. ground nutmeg, fresh is best

½ cup unsalted butter, room temperature

½ cup packed dark brown sugar

1 large egg

½ tsp. vanilla extract

¾ cup molasses

Royal Icing, for decorating (optional)

My Goodies Gumdrop Sprinkle Mix, for decorating (optional)

Directions

For Eggnog Créme Brûlée:

Preheat the oven to 100c or 212F.

In medium size bowl, measure out granulated sugar and set aside.

In a large measuring glass, measure out heavy cream. Cut vanilla bean in half length-wise and cut out seeds. Using the back of the knife, scoop up seeds and place them in heavy cream. Set aside.

Using your cheesecloth, make a spice satchel with remaining vanilla pod, cinnamon sticks, star anise, cloves and nutmeg. Tie up satchel with kitchen twine.

Place saucepan over medium heat and add heavy cream. Place satchel into saucepan along with heavy cream. Bring to a simmer. Once cream is simmering, remove satchel from the cream. Turn off heat.

In mixing bowl with granulated sugar, whisk in egg yolks until combined. Slowly pour simmering cream into the egg mixture, a little at a time. Continue to whisk together, add ground cinnamon and nutmeg.

Transfer cream mixture into ramekins. Place ramekins into shallow baking dish. Bake crémes using a Bain-marie (water bath) at 35-45 minutes. Crémes should be slightly set when ready.

Remove from oven and allow crémes to cool to room temperature, then place in the refrigerator.

Once ready to serve, remove from the refrigerator. Cover the surface of each créme with a thin layer of granulated sugar. Use small torch, to brûlée the top and caramelize the sugar.

For Gingerbread Cookies:

In a large bowl, whisk together flour, baking soda, salt and spices until combined. Set aside.

In a large separate bowl, using either a hand or stand mixer, cream together butter and brown sugar on medium speed until combined and mixture is fluffier in texture. Add egg to the mixture. Mix batter until fully combined, but be careful not to over mix. Add vanilla extract. Add molasses. Add the flour mixture.

Once dough is combined, wrap it in plastic and chill in refrigerator for 1 hour (up to 2 days).

Preheat oven to 350F. Line cookie sheet with parchment paper or nonstick liner.

On a generously floured surface, roll out dough about ¼ inch thick. Cut out gingerbread people with cookie cutters. Brush off excess flour. Transfer cut out cookies onto prepared baking sheets.

Bake cookies for about 10-12 mins, until desired softness of cookies has been achieved.

Allow cookies to cool completely to room temperature. Once cookies have cooled. Frost and decorate them with royal icing and sprinkles!

Devour and enjoy your créme brûlée with your gingerbread cookies!

RAspberry SPECuloos Tiramisu

During my latest visit to Paris, on my last day there I had several hours before my departure. I had already checked out of my hotel in the Opéra district and stored my luggage. I was free to continue to enjoy the city before I headed to the airport.

After breakfast and checking out, I decided to trek to Monmartre to burn off some calories and enjoy one of the best neighborhoods in the city. Monmartre has always been a favorite part of Paris for me because of its favorable views and cute stores. I walked around for hours, visited some vintage shops and even enjoyed getting caught in the rain.

On my way back to my hotel from my Monmartre visit I wanted to grab my last meal in Paris before my departure. I was craving something satisfying, but not necessarily French nor fancy. I hopped on Google Maps for ‘restaurants near by my location’ with great ratings. I just so happened to scroll upon Pére & Fish, which was within walking distance and highly rated. I browsed the menu and was sold after I saw a tasty looking fish sandwich. I quickly pulled up the directions for the restaurant and headed there with some pep in my step.

Once I arrived to Pére & Fish I was pleasantly surprised to find out that the restaurant was automated. I walked in and placed my order after browsing through an assortment of fish combos. I happily added dessert to my meal, a raspberry Speculoos tiramisu.

I can honestly say. I was even more pleasantly surprise by my meal. The food was superb for what would be considered “fast food”. What really took my meal over the top was the tiramisu. The combination of raspberries with Biscoff was inventive and delightful. I loved the luscious dessert so much that I decided to recreate my own version once I arrived back home.

Definitely give this recipe a try this season or anytime you’re in the mood to experience a tempting treat!

See complete video and recipe below.

Tiramisu recipe

Serves (8-12)

Ingredients

4.4oz (½ pack) Biscoff cookies, finely chopped

¼ cup (4oz.) Biscoff cookie butter (Speculoos), plus more for topping

8oz. mascarpone cheese, room temperature

10 oz. raspberry preserves, heated

16 oz. fresh raspberries

8oz heavy cream, chilled

8oz. confectioners sugar

1 tsp. (.20 oz) vanilla extract.

1 package (7oz). Italian ladyfingers

1 ½ cup (12oz/ 375ml.) old strong brewed coffee or espresso

½ cup (4 oz/ 125ml) raspberry liqueur, I used Chambord

Cognac Queen Sprinkle Mix for decoration, optional

Directions

Using a food processor or manually, chop Biscoff cookies until finely chopped, wet sand-like texture. Set aside.

Using a hand or stand mixer, in a medium sized bowl whip together mascarpone cheese and Speculoos until fully combined. Whip for about 3-5 minutes until mixture is fluffy. Set aside.

Using a hand or stand mixer, in a large chilled bowl add heavy cream. Whip heavy cream on high for about 3-5 minutes until soft peaks have formed. Add confectioners sugar and vanilla extract to heavy cream. Continue to whip cream for another 3-5 minutes until stiff peaks have formed.

Using a spatula, add ¾ of whipped cream (save ¼ for top of tiramisu) to cheese/ Speculoos bowl. Carefully fold whipped cream into cheese mixture, trying not to knock out air from whipping cream. Once fully combined, keep chilled until ready to assemble the tiramisu.

Ready to assemble using triffle dish or individual serving cups. Place chopped Biscoff cookies on bottom of dish/es, save some chopped cookies for the topping. (The next layers are up to your preference). Spoon or pipe Speculoos cream evenly into the trifle dish. In a bowl, add coffee and raspberry liqueur. Dip ladyfingers into coffee mixture. Add to soaked ladyfingers to trifle dish. Safely heat up raspberry preserves slightly using stovetop or microwave. Add and spread half of raspberry preserves to trifle dish. Add half of raspberries on top. Repeat the steps until trifle dish is ¾ full or to serving size of your choice for individual servings.

Top tiramisu with remaining whipped cream, chopped Biscoff cookies, melted Speculoos, fresh raspberries and Sprinkle Mix.

Devour and Enjoy!

*For a kid friendly version of this recipe, you may substitute the raspberry liqueur with raspberry syrup or omit it all together.

French Fall Fashion

Fall fashion is one of the reasons this season is absolutely my favorite. Fall fashion means adorning extra layers of clothing, wearing heavier fabrics and pieces with colorful accessories to keep you warm. As the temperatures drop, the warmth not only from the clothing but the upcoming season fills my heart.

This year’s fall season was even more special since I was able to return to my favorite city. For the past couple of years I have been able to visit Paris in Autumn, but a little earlier into the season. September in Paris is a lovely affair, it can be seasonably warm though. The crowds may be less in September, but so are the garments since the average temperature is still a mild 22 C/ 71 F. That means not being able to wear fabulous coats, scarves, gloves and other warm accessories I love to put on.

October in Paris is an entirely different scenario. The average temperatures have dropped to a chilly 15 C/ 63 F. There is definitely a crisp air with gusts of wind and rain on many days. This means October is the best season to truly enjoy all that encompasses fall fashion.

Being fully immersed in the fashion capital of the world during my favorite season is truly a privilege. French fashion heavily influences my daily fashion choices, but during an autumn in Paris I have a higher standard to uphold.

When it comes to fashion, Parisians understand that elegance comes from simplicity. This year, I tried to keep my fashion ensembles clean, comfortable and chic as the locals do. The secret this year to my fashion choices was using my colorful coat and handbag as the focal point to my ensembles.

Please see my French Fall Fashion Look book below. Let me know your thoughts on my outfits in the comments.

GRWM For a night in Paris

Fall French Fashion Look Book

👀 🅛🅞🅞🅚 1 

💓Cropped sweater- @gabifresh x @fashiontofigure

💐Printed Coat @sikadesigns x @nordstrom

👟Sneakers @asics

😎Sunglasses @gucci

👩🏾‍🎨Beret- purchased in Paris

👀 🅛🅞🅞🅚 2 

🌈 Plaid blazer- Thrifted 

💛Yellow sweater- @asos (purchase here)

👖Jeans @kutforthecloth. Great for curvy girls! (purchase here)

🥾Boots Caslon Miller x @nordstrom (purchase here)

🧣Scarf- purchased during one of my international trips 

👀 🅛🅞🅞🅚 3 

🧡Cropped blouse- @amazon (purchase here)

🍑Satin cargo pants- @amazonthedrop x @vi_bogodist (purchase here)

🖤Maxi cardigan- @asos (purchase here)

👀 🅛🅞🅞🅚 4

💛Stripped sweater- @asos (purchase here)

🎀Bow ballet flats- @asos

👩🏾‍🎨Beret- @amazon (purchase here)

👀 🅛🅞🅞🅚 5

👚Pin stripped blouse- @amazon (purchase here)

💕Criss cross sweater- @asos (purchase here)

🧤Leather gloves- @portolanoproducts 

👀 🅛🅞🅞🅚 6

🍊Sweater dress- @asos (purchase here)

👀 🅛🅞🅞🅚 7

🌸Cropped blouse- Thrifted 

💘Plaid Scarf- purchased in 🇰🇪 at Masai village

👀 🅛🅞🅞🅚 8

🖤Sweater dress- @asos (purchase here)

👀 🅛🅞🅞🅚 9 

 💗Cowl neck bodysuit @asos- (Purchase here)

Happy Cat Day

It’s National Cat Day! Today is a day that I celebrate every year because of my adoration and affinity for cats. As long as I can remember, cats have always been my spirit animal. There is just something about the way cats carry themselves and respect true love and affection. It’s as though cats secretly know they are royalty. When I was about 5-6 years old, I recall adopting my first pet cat named ‘Beautiful.’ She wasn’t officially adopted, but she was a stray cat that our family took in and cherished.

As a child growing up in California I quickly adapted and admired everything Sanrio. The Japanese created, colorful cartoon characters became my childhood obsession, especially Hello Kitty. As an adolescent, this magical kitty was so bright and cheery I was automatically drawn to her. She just seemed to be so happy and pleasant to be around. I continued to cherish cats and Hello Kitty throughout my childhood and into adulthood.

Hello Kitty has always been “that girl.” Now as a grown woman I feel like I can relate to Hello Kitty even more. Hello Kitty represents finding simple happiness in our current chaotic world.

This year I decided to celebrate National Cat Day by not only enjoying time with my adorable cat, Butterscotch, but also celebrating the world treasure that is Hello Kitty. I thought the perfect recipe would be some pretty purple ube/potato cookies decorated fabulously. I decided to add even more pizzazz by using some Kaleidoscope Sprinkles to decorate the cookies as well.

The cookies turned out super cute, delicious and perfect for enjoying all that is today.

You can find the complete recipe and step by step video below.

Hello Kitty Cookies

Hello Kitty Cookies:

1 ½ cup flour

½ tsp. salt

1 tsp. baking soda

¼ tsp. lemon zest

12 tbsp. (¾ cup) unsalted butter, room temperature

1 cup brown sugar

½ cup pureed ube potato

2 eggs, room temperature

1 tsp. vanilla extract

1 cup white chocolate chips

Royal Icing

4 cups confections sugar

3 tbsp. meringue powder

2 tbsp. lemon juice

7-8 tbsp. water

Food coloring gel for royal icing, for decorating (optional)

Kaleidoscope Sprinkles or sprinkles of your choice, for decorating (optional)

To make cookies:

In a medium sized bowl, combine flour, salt, baking soda, cinnamon, nutmeg and orange zest. Set flour mixture aside.

In a large separate bowl, using either hand or stand mixer, cream together butter and brown sugar. Cream butter and sugar together until butter is pale yellow and doubled in size. Add sweet potato. Add eggs one at a time. Mix until smooth. Add vanilla extract. Add half of flour mixture to cream mixture and stir until incorporated. Add second half of flour mixture. (Add purple food gel for more color, optional). Stir until incorporated. Add white chocolate chips to batter. Slowly fold in until combined.

Cover dough with plastic wrap and place cookie dough in refrigerator for 30 minutes to overnight.

Once ready to bake cookies, remove dough from refrigerator to rest for at least 15-20 minutes before baking.

Preheat oven to 350F.

Line cookie sheets with parchment paper or non-stick mat. Using rolling pin, roll out cookie dough onto a heavily floured surface (dough is very wet dough) until ½” thick. Use floured cookie cutter to cut out cookies. Place cut out cookie dough onto sheet 1.5-2″ apart. Bake cookies for 12-15 minutes until cookies are slightly golden and firm to touch. Remove from oven and allow cookies to cool completely to room temperature.

*If not, using cookie cutter then no need to roll out cookie dough. Use cookie scoop or ice cream scoop, place cookie dough onto sheets about 1.5-2 inches apart. Bake for same amount of time.

While cookies are baking, make royal icing for decorating cookies later.

To make icing:

In a large bowl, add confectioners’ sugar, meringue powder, lemon juice and 6 tablespoons of water. Using a hand mixer or a stand mixer with fitted with a whisk or paddle attachment, beat icing ingredients together on high speed for approximately 2 minutes. When lifting the whisk/paddle up off the icing, the icing should drizzle down and smooth out within 5-10 seconds for proper consistency. Set aside until ready to decorate.

Once cookies are completely cooled. Decorate cookies by frosting them with royal icing and Kaleidoscope Sprinkles.

Devour and enjoy!!

*Hello Kitty cookie cutters were purchased at Michaels craft store.

OOTD and DIY: Denim and Dodgers

Happy September! It’s a brand new month of the year and one step closer to my favorite season, fall. It’s still technically summer and Los Angeles makes it known with the triple digit days experienced earlier this week. I’m excited about today not only because it’s September, but also because I’m attending my first official Dodgers game today.

Being a Northern California girl I can tell you that I’m not a big Dodgers fan. I appreciate that the Dodgers were Kobe’s team and I also appreciate the team colors blue and white. Outside of that, it’s just baseball. Speaking of Kobe, he is the whole reason behind my attendance for tonight’s game. Tonight is Laker’s night at Dodger’s stadium and they are giving away special baseball jerseys in honor of Kobe. Natalia Bryant, Kobe’s oldest daughter, is also throwing the first pitch of the game so this should be exciting. Since this is my first time attending a southern California baseball game and I can’t pick up my jersey ahead of time, I had to think of something snazzy yet cool to wear tonight. I wanted to represent the blue colors of the Dodgers team, but I also wanted to be stylish and comfortable. I remembered I already had the perfect stylish solution.

Last year during August, also known as Black Business Month, I purchased this lovely navy blue Black owned casual chic top from Nordstrom. This hand made dual toned blue top was handmade is Ghana and perfect for the game. The only problem is I purchased the top in what I thought was my size, but it was clearly too small. I decided to let the top stay in my closet for a year as I continued to work on my fitness. A whole year later and the top remains too small for me to put on this curvaceous body. I refuse to give up and decided to create a solution and up-cycle my ensemble.

I went to the fabric store and purchased some similar stretch denim fabric to add to my top. The idea is to expand the width but still keep it stylish enough not to know the top had been maneuvered. The entire process of reforming and recreating my top was super easy thanks to my sewing machine and a simple hand stitch. I was able add the fabric and form this top to my body.

I loved how this top came out. I must say I look like a strike out and a knock out. I decided to share the process and pictures below.

See my step by step video and instructions below.

Denim DIY

Here’s what I did:

Materials

Cotton stripe puff sleeve crop top by Sika (purchase similar here)

¼ yard of stretch denim fabric in shade of your choice

seam ripper

fabric shears

matching blue thread

sewing needle

sewing machine (optional if you opt to hand sew everything)

fabric pen/ pencil

dressmaker (straight) pins

fabric measuring tape

iron-on hem tape

iron

Instructions

  1. Use measuring tape to measure width of blouse and width of your bust. The difference in measurements is essentially the amount of fabric needed to make your top fit.
  2. Fold fabric in half so top of denim fabric is facing outwards on both sides.
  3. Take number from your width measurement difference and divide that in half.
  4. Measure the length of the top where you’ll be cutting to determine the length of denim fabric you need.
  5. Use fabric pen and draw your measurements onto your fabric.
  6. Cut folded denim fabric into two identical panels for each side of your top.
  7. Remove hem from crop top where you’ll be adding addition denim fabric.
  8. Take iron-on hem tape and iron two folded sides of denim together for each panel.
  9. Use straight pins to add and secure denim panels to your crop top.
  10. Carefully try on your top with the new fabric in place to make sure it fits properly.
  11. Once you’re satisfied with the fit and made the proper adjustments with your denim panels, sew them in place on your top where the previous seams were opened.
  12. Once denim panels have been secured in place using sewing machine or hand sewn, hand sew any additional details to make sure your top is top notch and chic.

13. Wear your new upgraded, up-cycled and on trend crop top proudly.

From Costco to Kobe

Happy 8/24 or otherwise known as Kobe Day. Kobe Day, which was once considered a local Los Angeles holiday, has now blossomed into an international celebration. Well deserved as it is, Kobe Day is a day to recognize and remember my forever favorite, Kobe “Bean” Bryant. Kobe’s birthday is actually on August 23rd, but today is recognized for Kobe’s numbers and contribution to the world. I celebrate annually in my own way, whether with confections or anything of my choosing.

I knew that this month was going to be a busy one with my extended vacation to Barbados being the pinnacle of August. Before my Caribbean Crop Over carousel, I came to the conclusion that I wanted to create a Kobe cake before I left. In the previous years, I have celebrated with a humongous letter cake, cupcakes, cake pops and other things. I wanted to celebrate Mamba’s birthday and Kobe Day again this year, but I didn’t want something big that would waste away while I was away. Also, I didn’t want to spend too much time with an ornate confection, since my time was so limited. I got an amazing idea to repurpose some store bought treats, but upgrade them to another level.

While putting together my monthly Costco delivery I came across some summer baked goods on sale. I quickly added these scrumptious Mini Lemon Cakes to my Instacart and got to brainstorming. This was the perfect time to recreate a quick cake for Kobe Day. I thought adding some fresh fruit to the mini cakes would elevate them, so I came across some purple blackberries to contrast the yellow lemon filling. Definitely on theme for Kobe Day. I got even more inspired from Kaleidoscope Sprinkles summer sprinkle mix, Black Butterfly mix. I made my own pretzel butterflies and added some pastels in honor of Gigi.

The mini Mamba cakes came out amazing and I am quite proud of the final product. I stuffed the cakes in the freezer while I was out of town. The cakes are now freshly defrosted and ready for consumption today.

I celebrate Kobe and Gigi every day with keeping Mamba Mentality alive, but today is extra special and even better with cake!

HAPPY MAMBA DAY!! See the complete details below.

Mini Lemon Cakes purchased from Costco

Homemade buttercream, get recipe here

Creative Snacks Co. Strawberry Yogurt pretzels

Candy Melts from Michaels store

Jordan Almonds from Sconza

Black Butterfly Sprinkle Mix from Kaleidoscope Sprinkles.