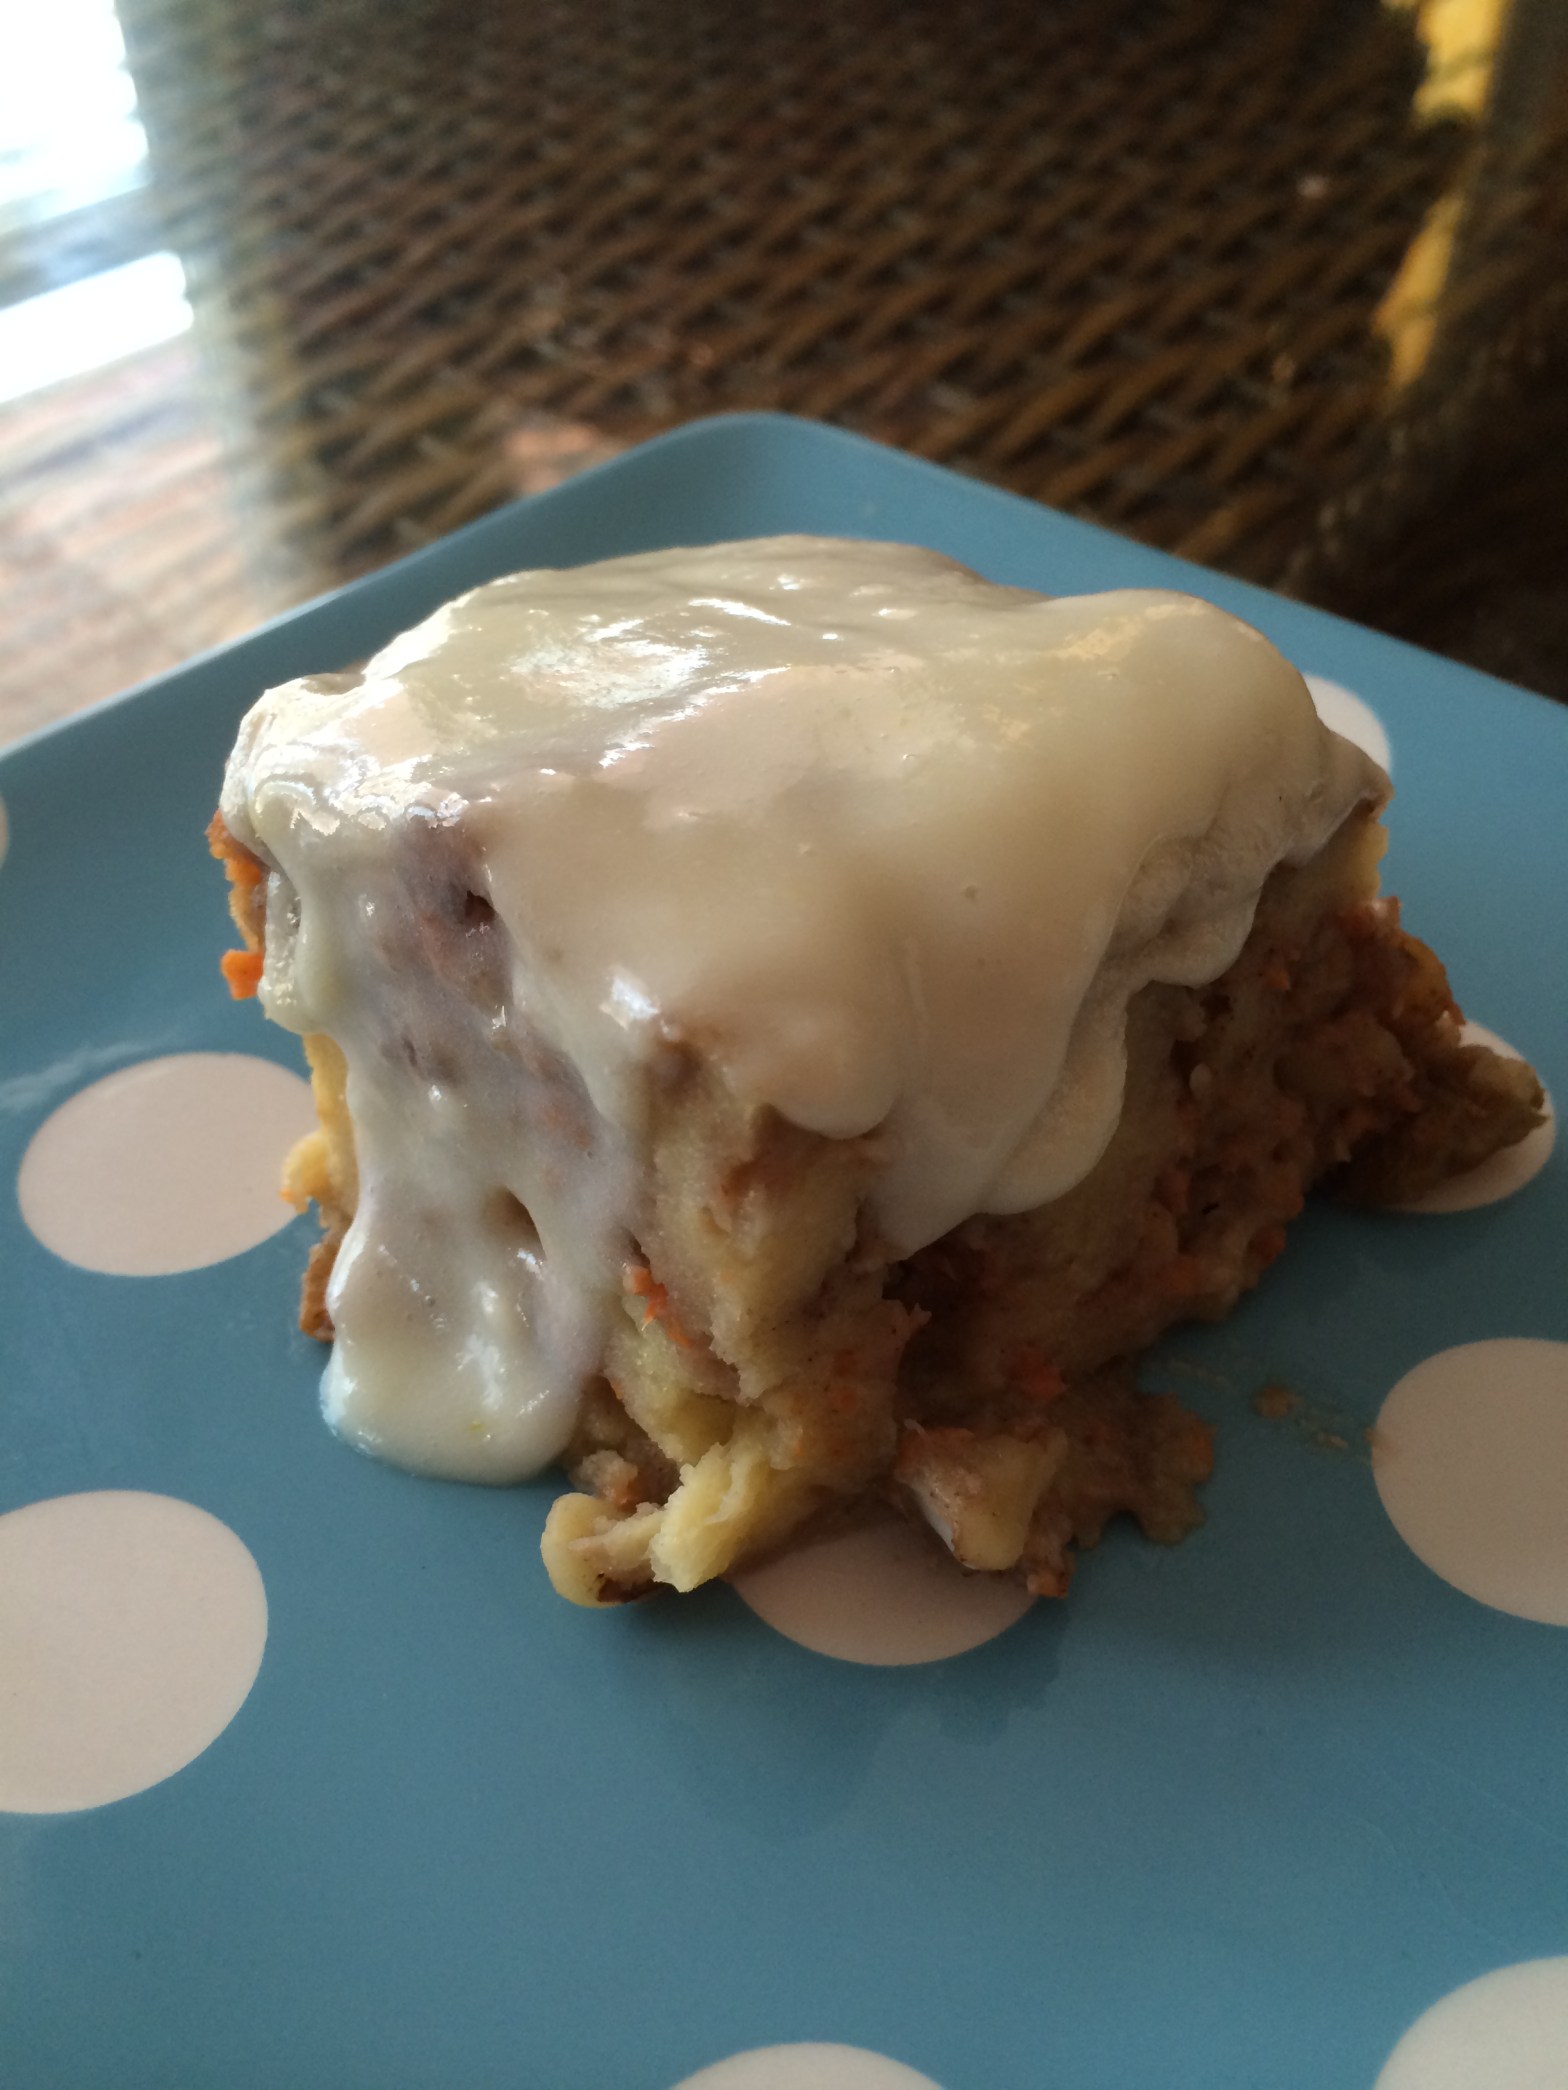
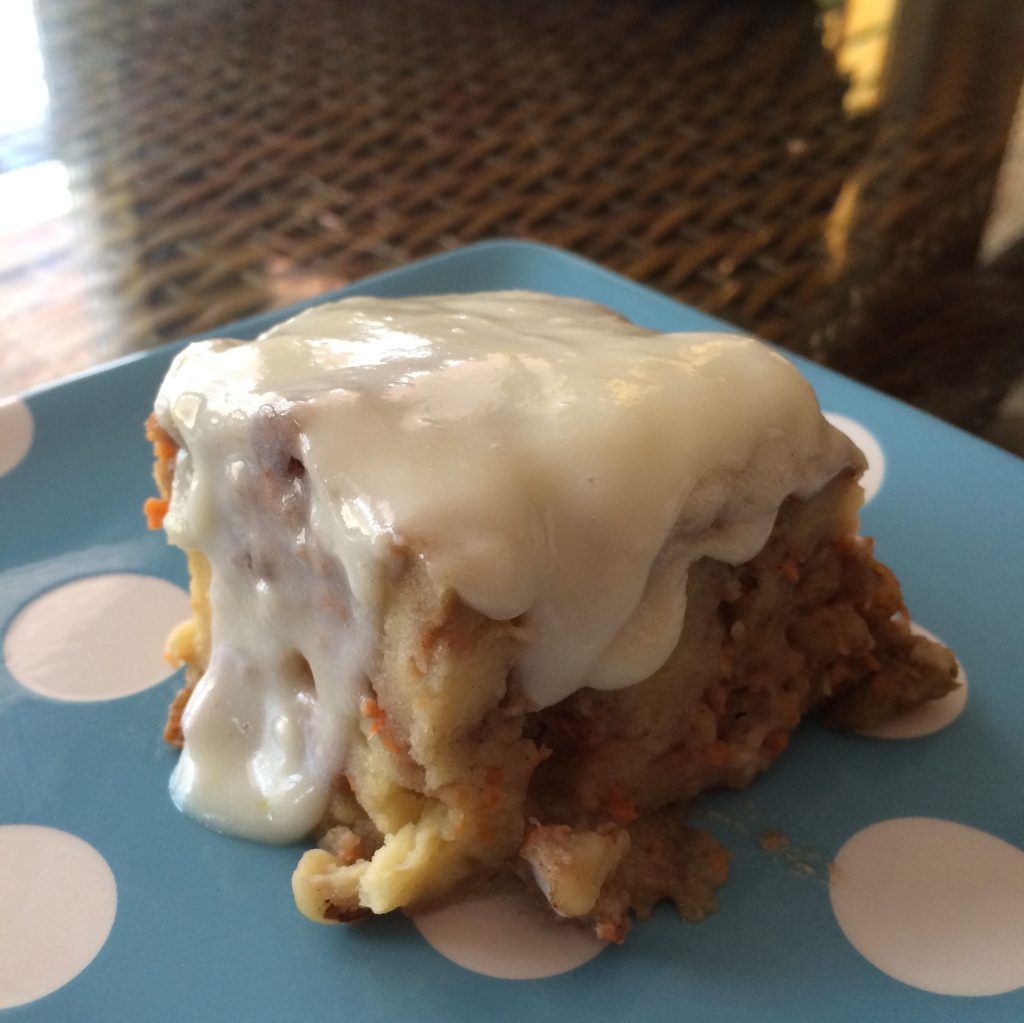
I’m not sure why but most of my dessert ideas come to me at night. Maybe its the fact that my wildest fantasies are food focused. (Greedy girl at heart). One eventful evening I had an idea about combining carrot cake and bread pudding. I woke up thinking “why have I never thought of this before?” Bread pudding is my ULTIMATE favorite dessert and I love carrot cake, any cake for that matter. I pondered what would be the best way to keep that nostalgic flavor of carrot cake but have that wonderful consistency that makes bread pudding so wonderful. I came up with the following and it was a hit to my family.
Definitely give this recipe a try now or save it for later. I promise you won’t regret it.
Recipe Below:
Pudding
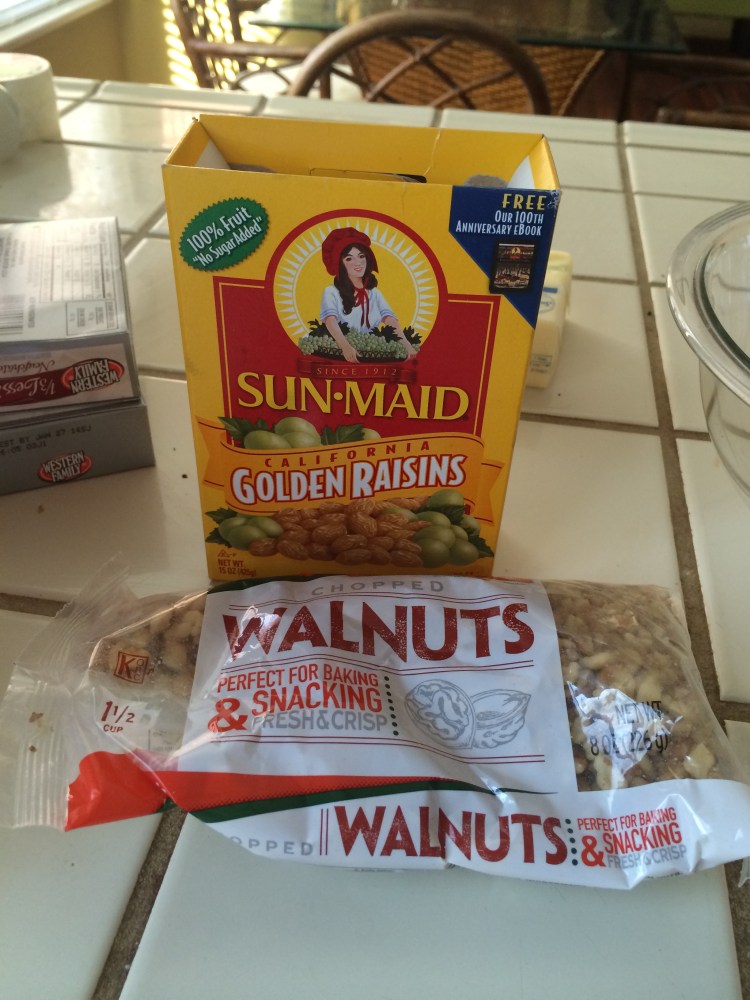
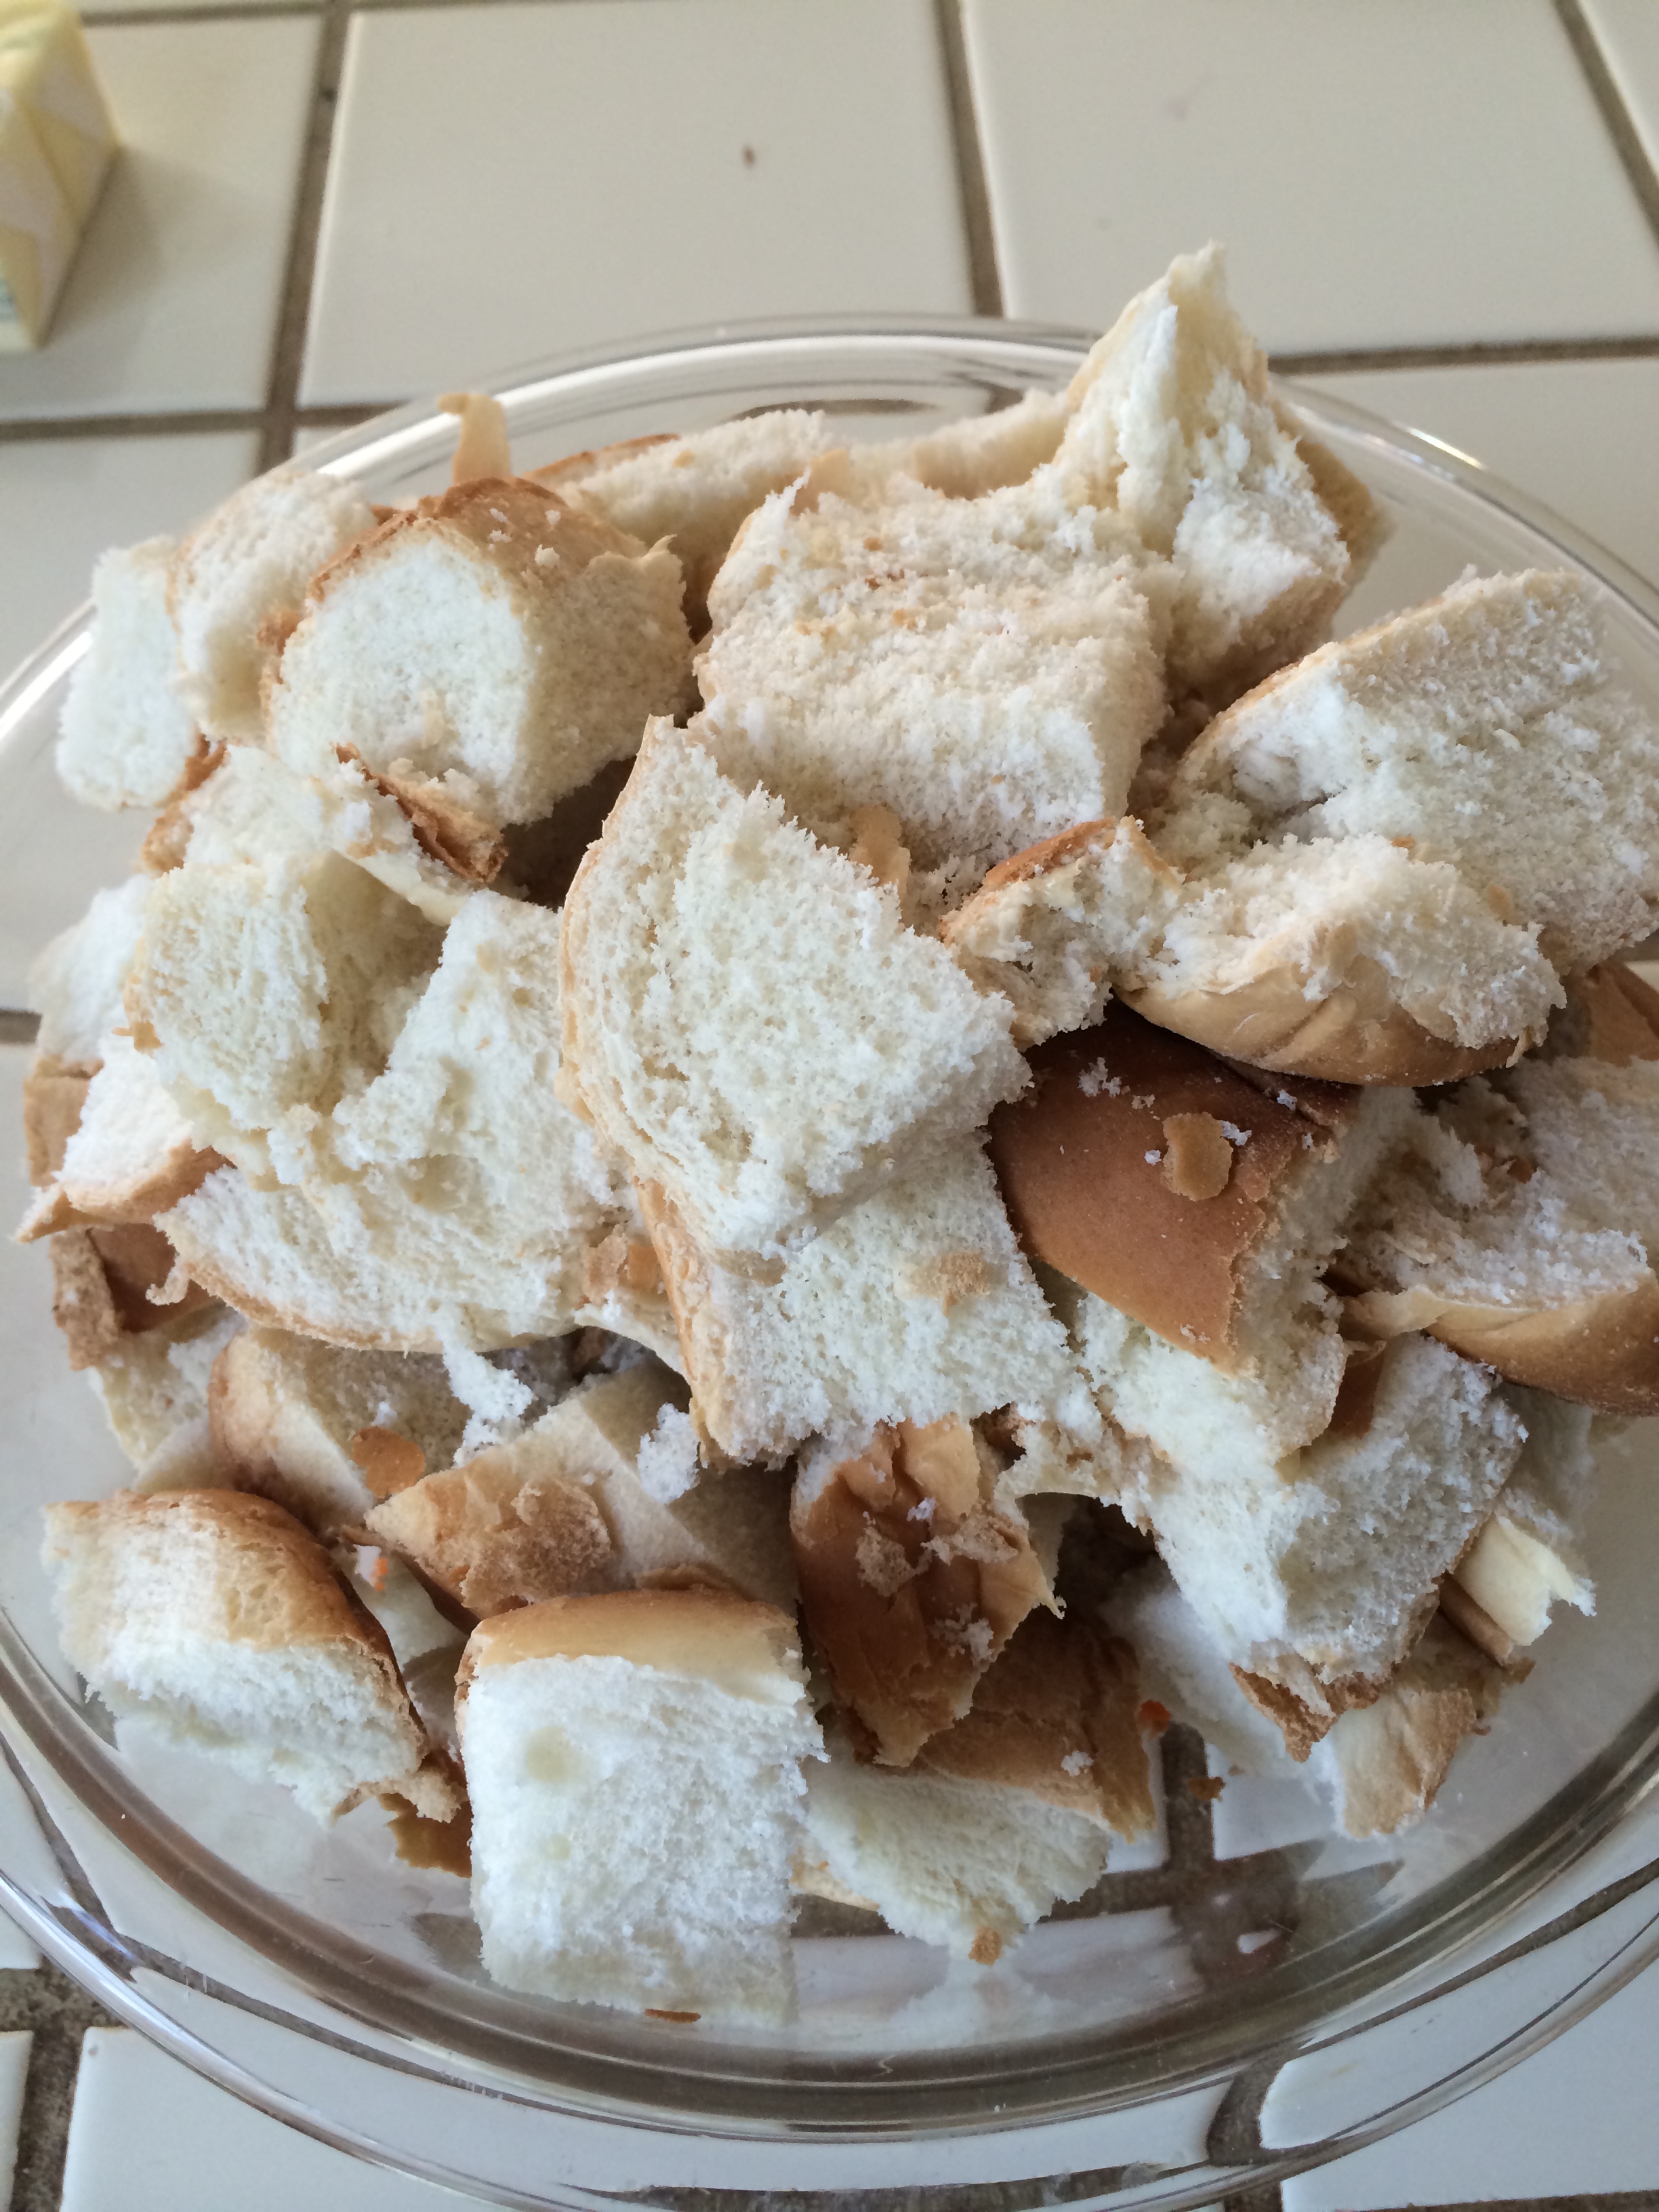
6 cups of chopped up day old bread ( I used sweet rolls)
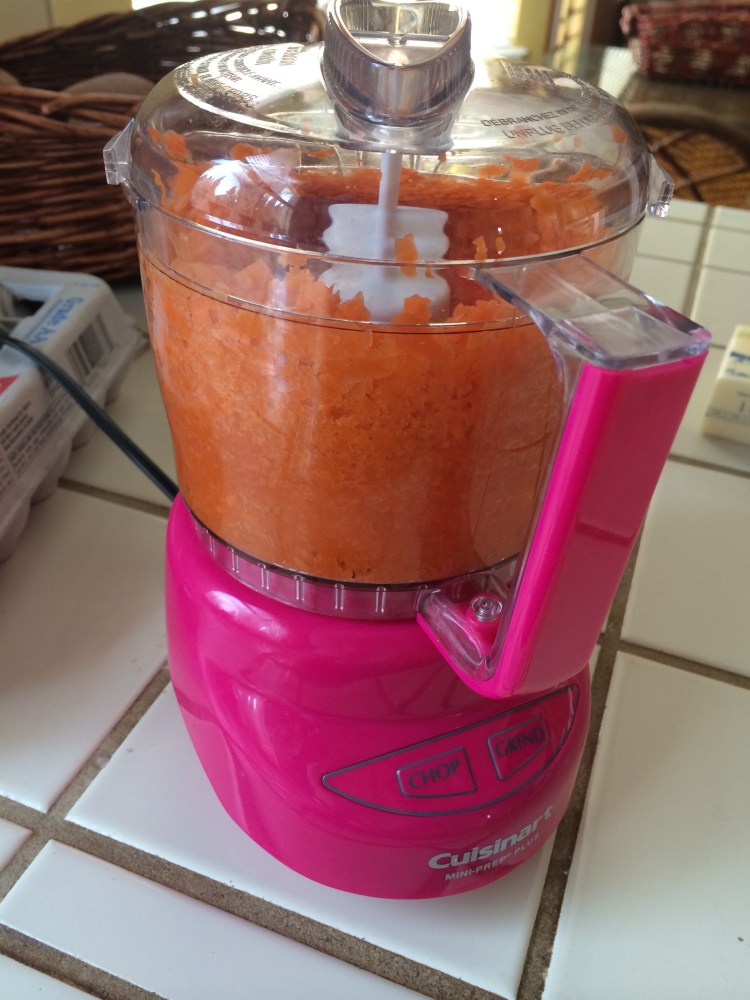
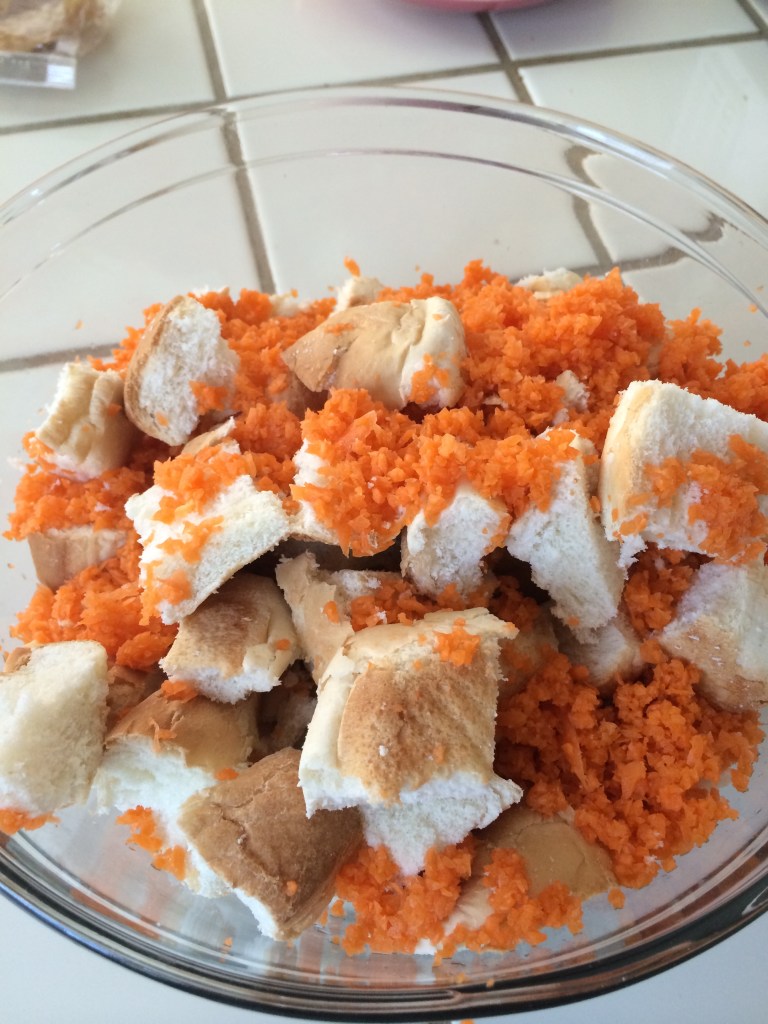
1 cup of finely shredded carrots
3/4 cup of granulated sugar
1 cup of brown sugar
4 cups of milk (your choice)
6 large eggs, room temperature
2 tsp of cinnamon
½ tsp ground ginger
½ cup of golden raisins
½ cup of chopped walnuts
Glaze
8 oz of cream cheese , room temperature
4 oz of butter, room temperature
2 cups of confectioners sugar
1 tsp of vanilla extract
2 tbsp of whiskey
1/2 cup of milk
1/4 tsp of lemon zest
Directions
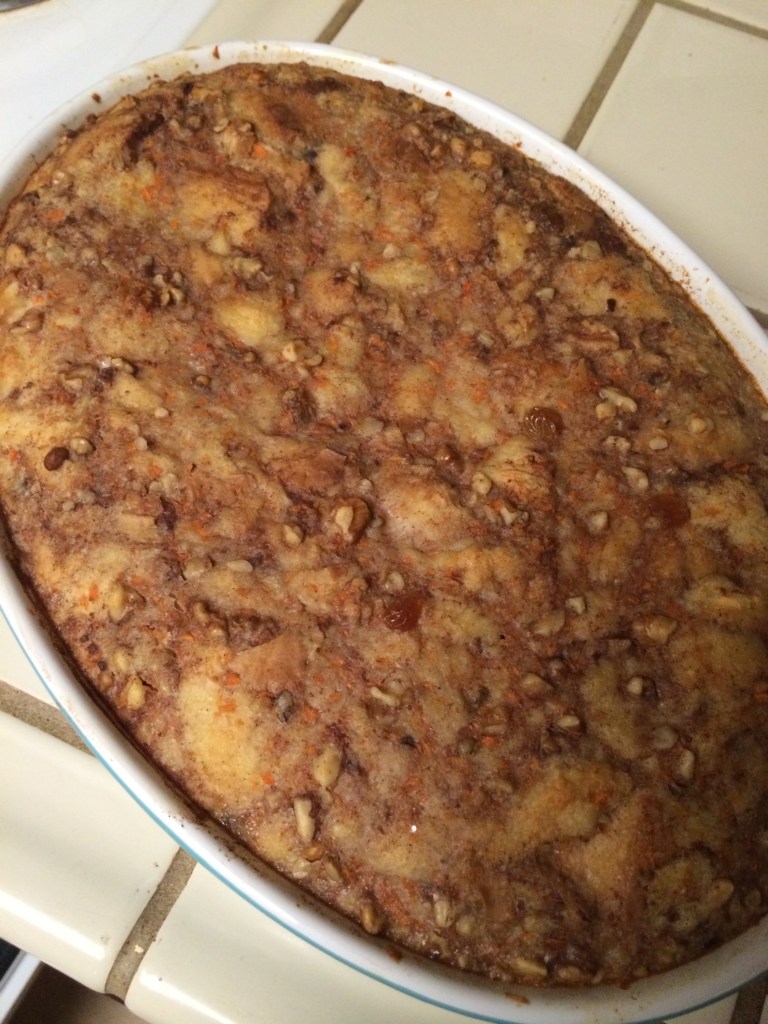
Preheat oven to 325 degrees. In a large bowl, whisk together granulated sugar, brown sugar and milk until sugars has dissolved. Add eggs one at a time. Stir until combined. Stir in cinnamon. Add bread and carrots to the custard mixture, making sure that all the bread is covered by the custard. Allows bread to soak for at least 30 minutes until softened. Fold in raisins and walnuts. Place pudding in a 9 x 13 x 2 pan or large casserole dish. Place casserole dish in water bath. Bake for approximately one hour until firm.
While pudding is baking make the glaze. Using hand mixer, cream together cream cheese and butter. Slowly add confections sugar until incorporated. Mix in vanilla extract, whiskey, milk and lemon until smooth. (Glaze should coat the back of the spoon). If glaze is too thick add more milk for your liking
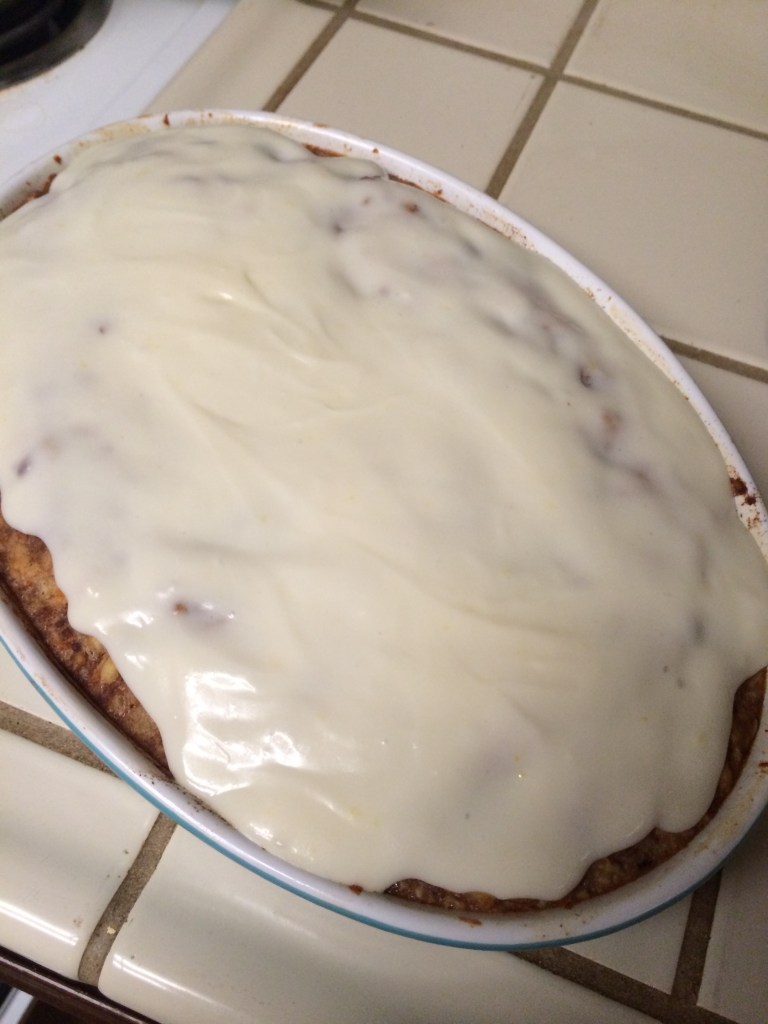
Once pudding is done, allow is to cool to room temperature. Poor glaze on top.
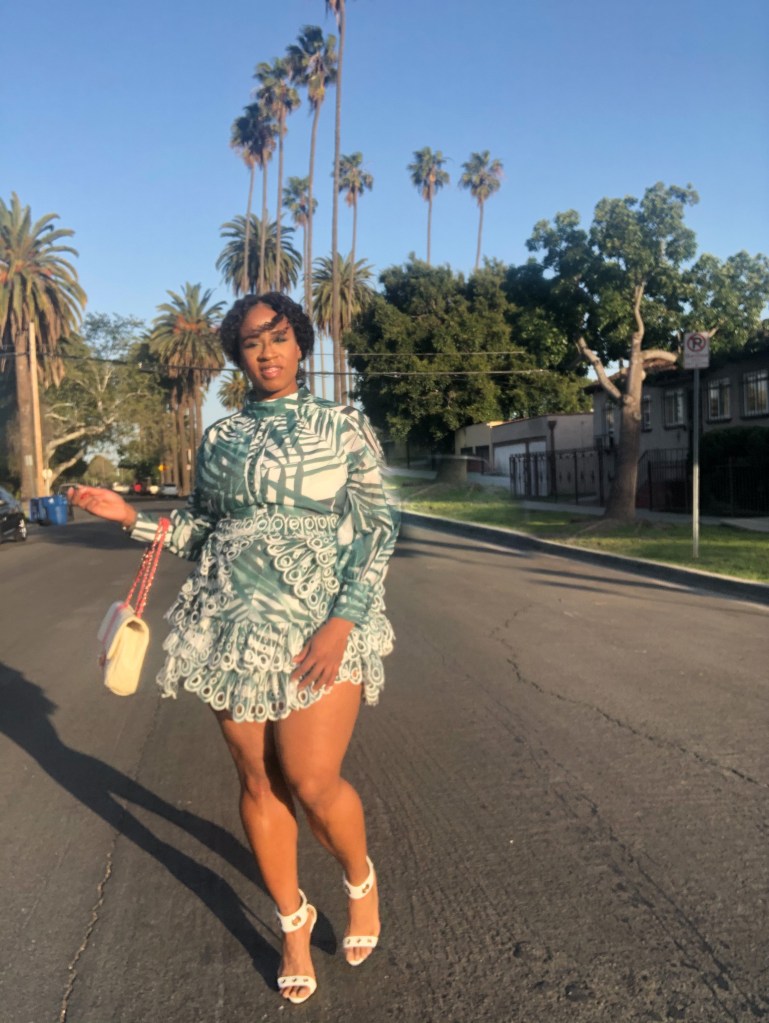
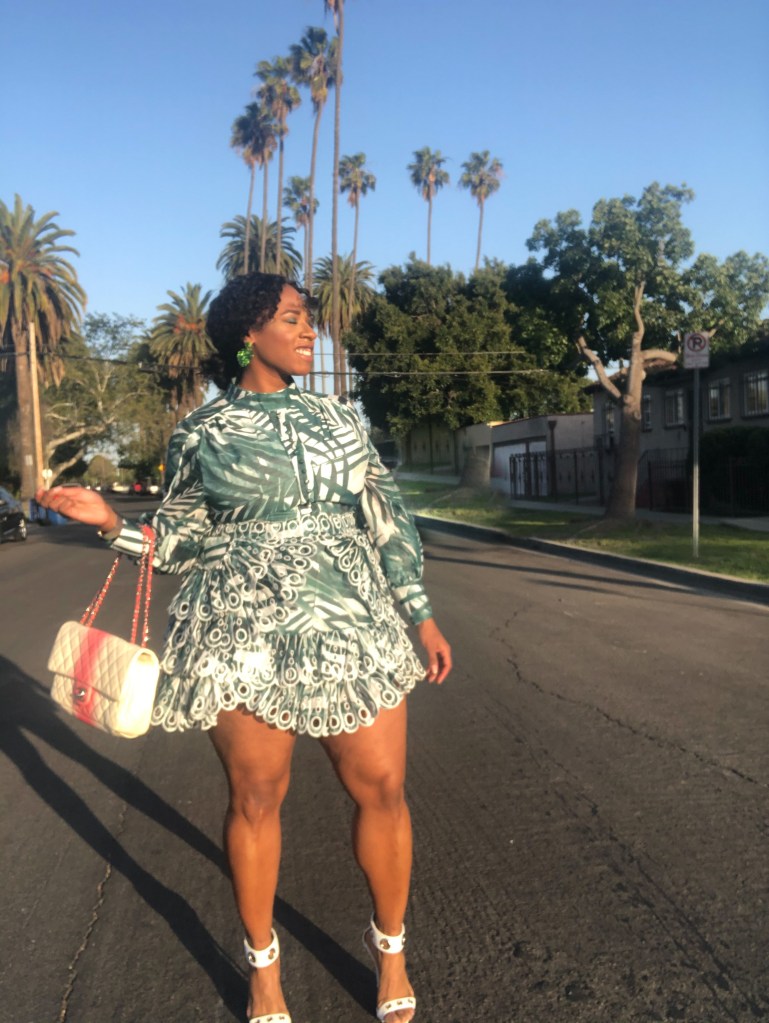
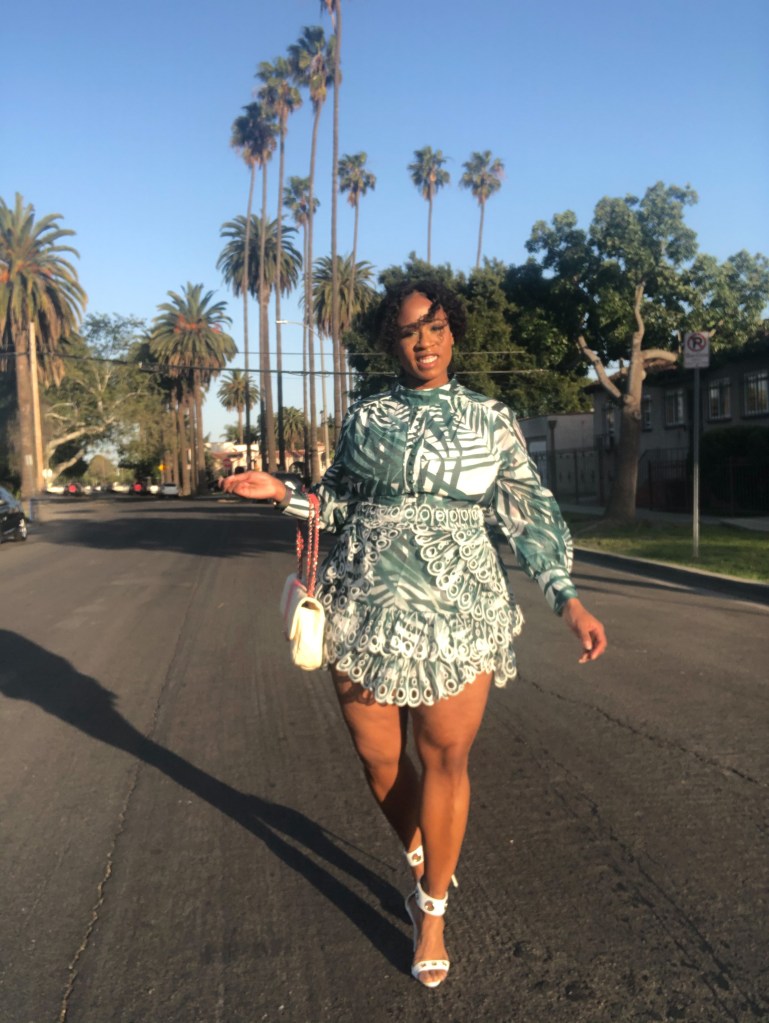
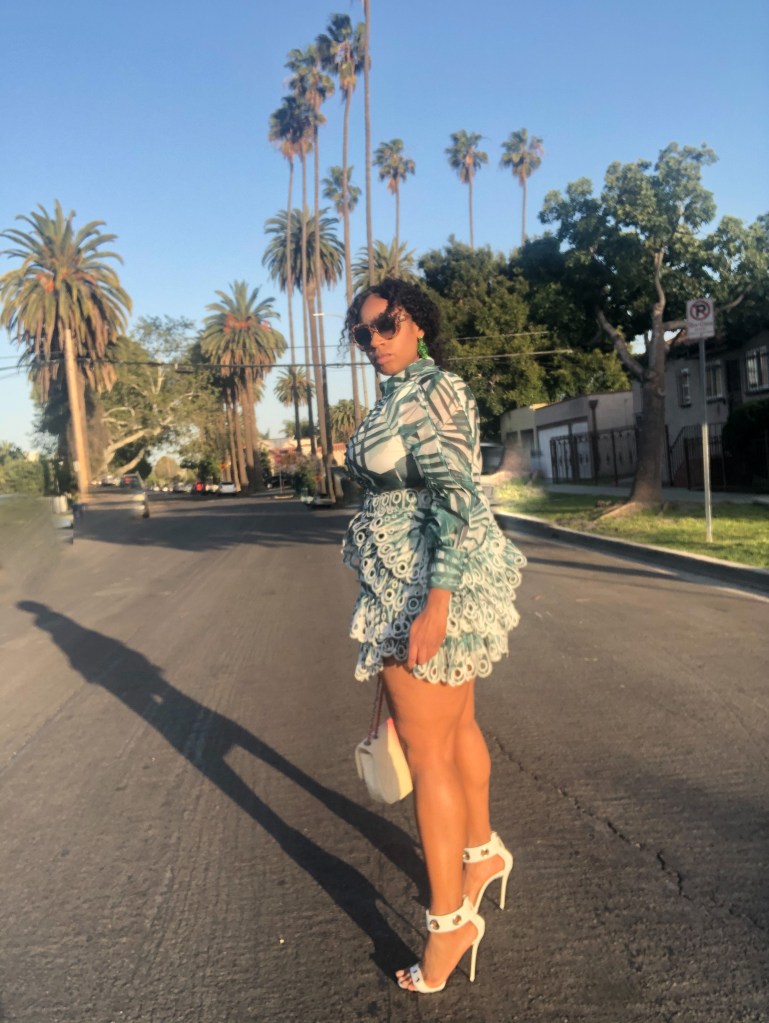
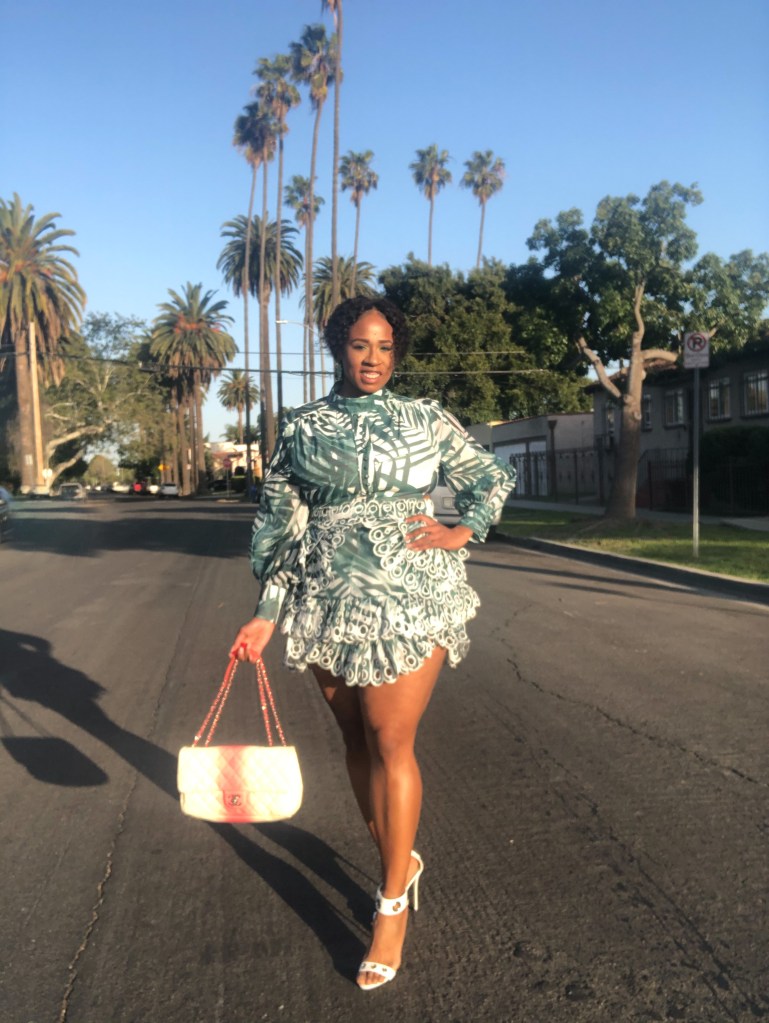
I absolutely love Spring and the fashion that comes along with it. The temperatures are the perfect blend of crisp cool mornings and warm evenings. Here in California that usually means the classic sweatshirt and slides. I myself prefer to be a little more jazzy when casual or dressed up for this time of year. This especially applies to Palm Sunday and Easter Sunday. This year I decided to go all the way off for Palm Sunday. I’m serving green, legs and ham for breakfast. Check out the details of my outfit below.
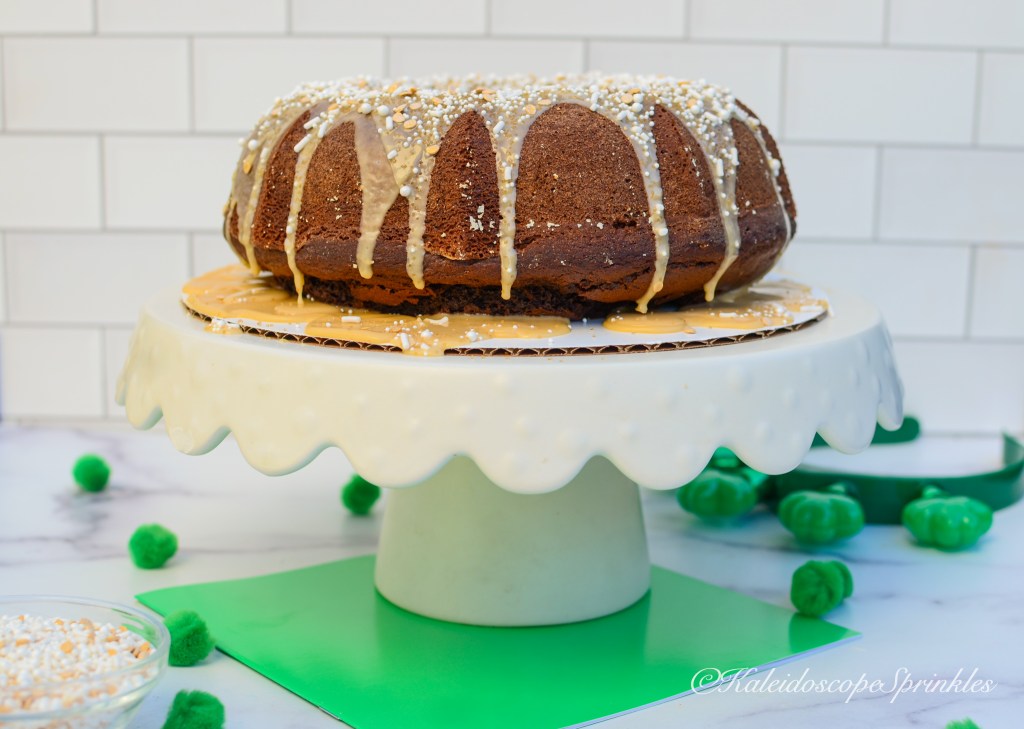
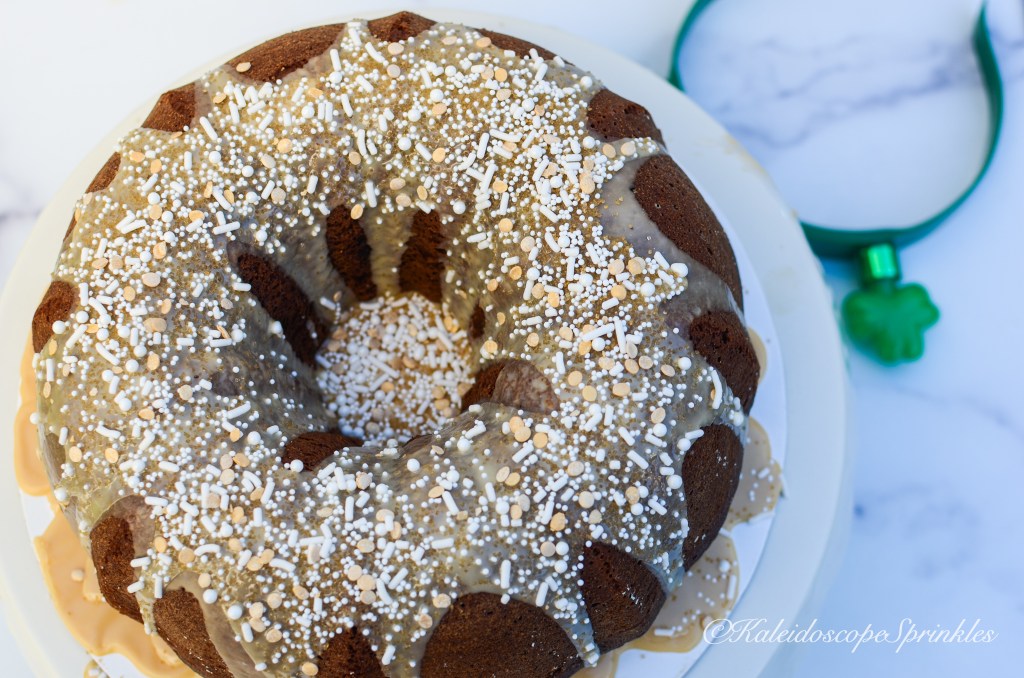
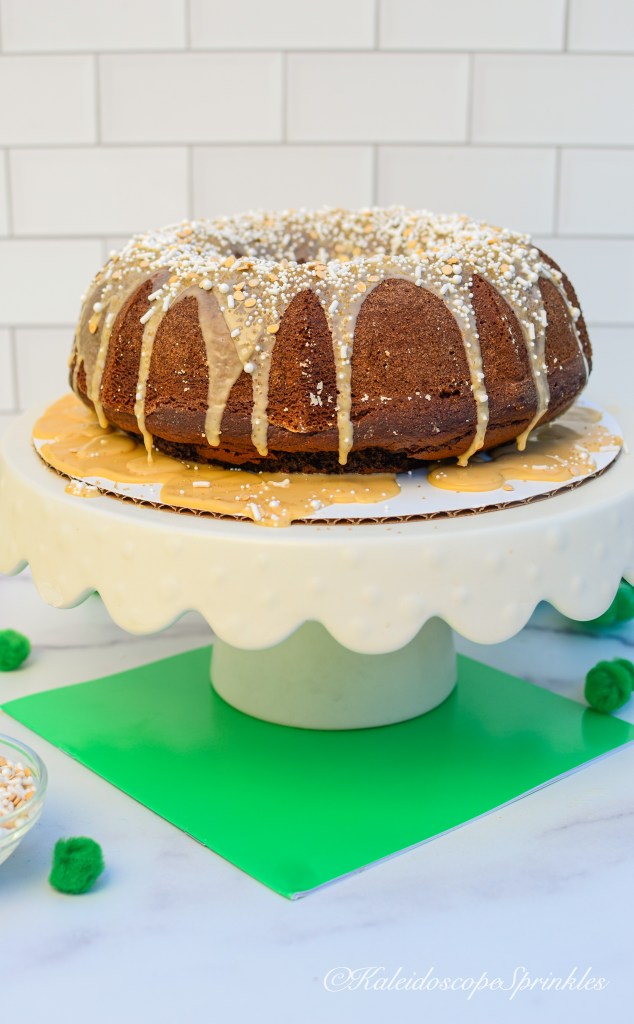
I know, I know I’m late. I’m two days late to be matter of fact. I was planning on dropping this original recipe in time for St. Patrick’s Day but I got busy and overwhelmed. I wanted to make sure that this cake came out as good as it looked, so it took a little more time than planned.
When I think of March 17th of course the color green comes to mind for most. As a previous resident, St. Patrick’s Day always reminds me of Chicago. The river being turned an electric green in the wee hours of the morning. All of the Irish pubs filled with drunken patrons on beer crawls. I definitely miss St. Patrick’s Day in Chicago as much as I miss all the amazing Windy City food.
This cake was made with my Chicago memories in mind. This rich chocolate cake reminds me of those delicious chocolate cake shakes from Portillos. This cake is made with rich Irish cream inside the cake and the luscious glaze on top. This cake is then covered in Kaleidoscope Sprinkle’s White Party Sprinkle Mix to bring back all those memories of late Chicago nights. I truly hope you enjoy this cake as much as I enjoyed my midwest trip down memory lane.
In a medium sized mixing bowl mix together sugar, flour, cocoa powder, baking soda, baking powder and salt. Set aside.
In a large bowl or using a stand mixer beat oil and eggs together. Beat on medium speed until the mixture is fully combined. Add buttermilk, Irish cream and vanilla extract. Slowly add the flour mixture one half at a time. Mix until fully combined but be careful not to over mix. Slowly pour brewed coffee into cake batter until throughly combined.
Transfer batter to the cake pan and smooth batter until even in the pan. Hit cake pan onto the counter a few times to knock out air bubbles. Bake cake for approximately 40-45 minutes until toothpick or cake tester comes out clean.
While cake is baking make the glaze. In a medium sized bowl whisk together confectioner’s sugar and Irish cream until smooth. (Glaze should be thick enough to coat back of a spoon.)
Place cake onto cake rack and allow to cool completely. Invert cake onto cake plate or board. Pour glaze onto cake.
Here we are in another month to celebrate. March is the perfect time to uplift and appreciate the wonderment that is women. I am very thankful to walk in the footsteps of many women giants. There are so many asterisks throughout history full of feminine energy and triumphs.
Not only is it March a celebration of women it is also the beginning of Spring. I absolutely love this time of the year when you can feel the seasons transition into something newfangled. You can see all the flowers blooming and the animals twitter-patting. All the new budding colors full of pristine pastels and of course Illuminating yellow.
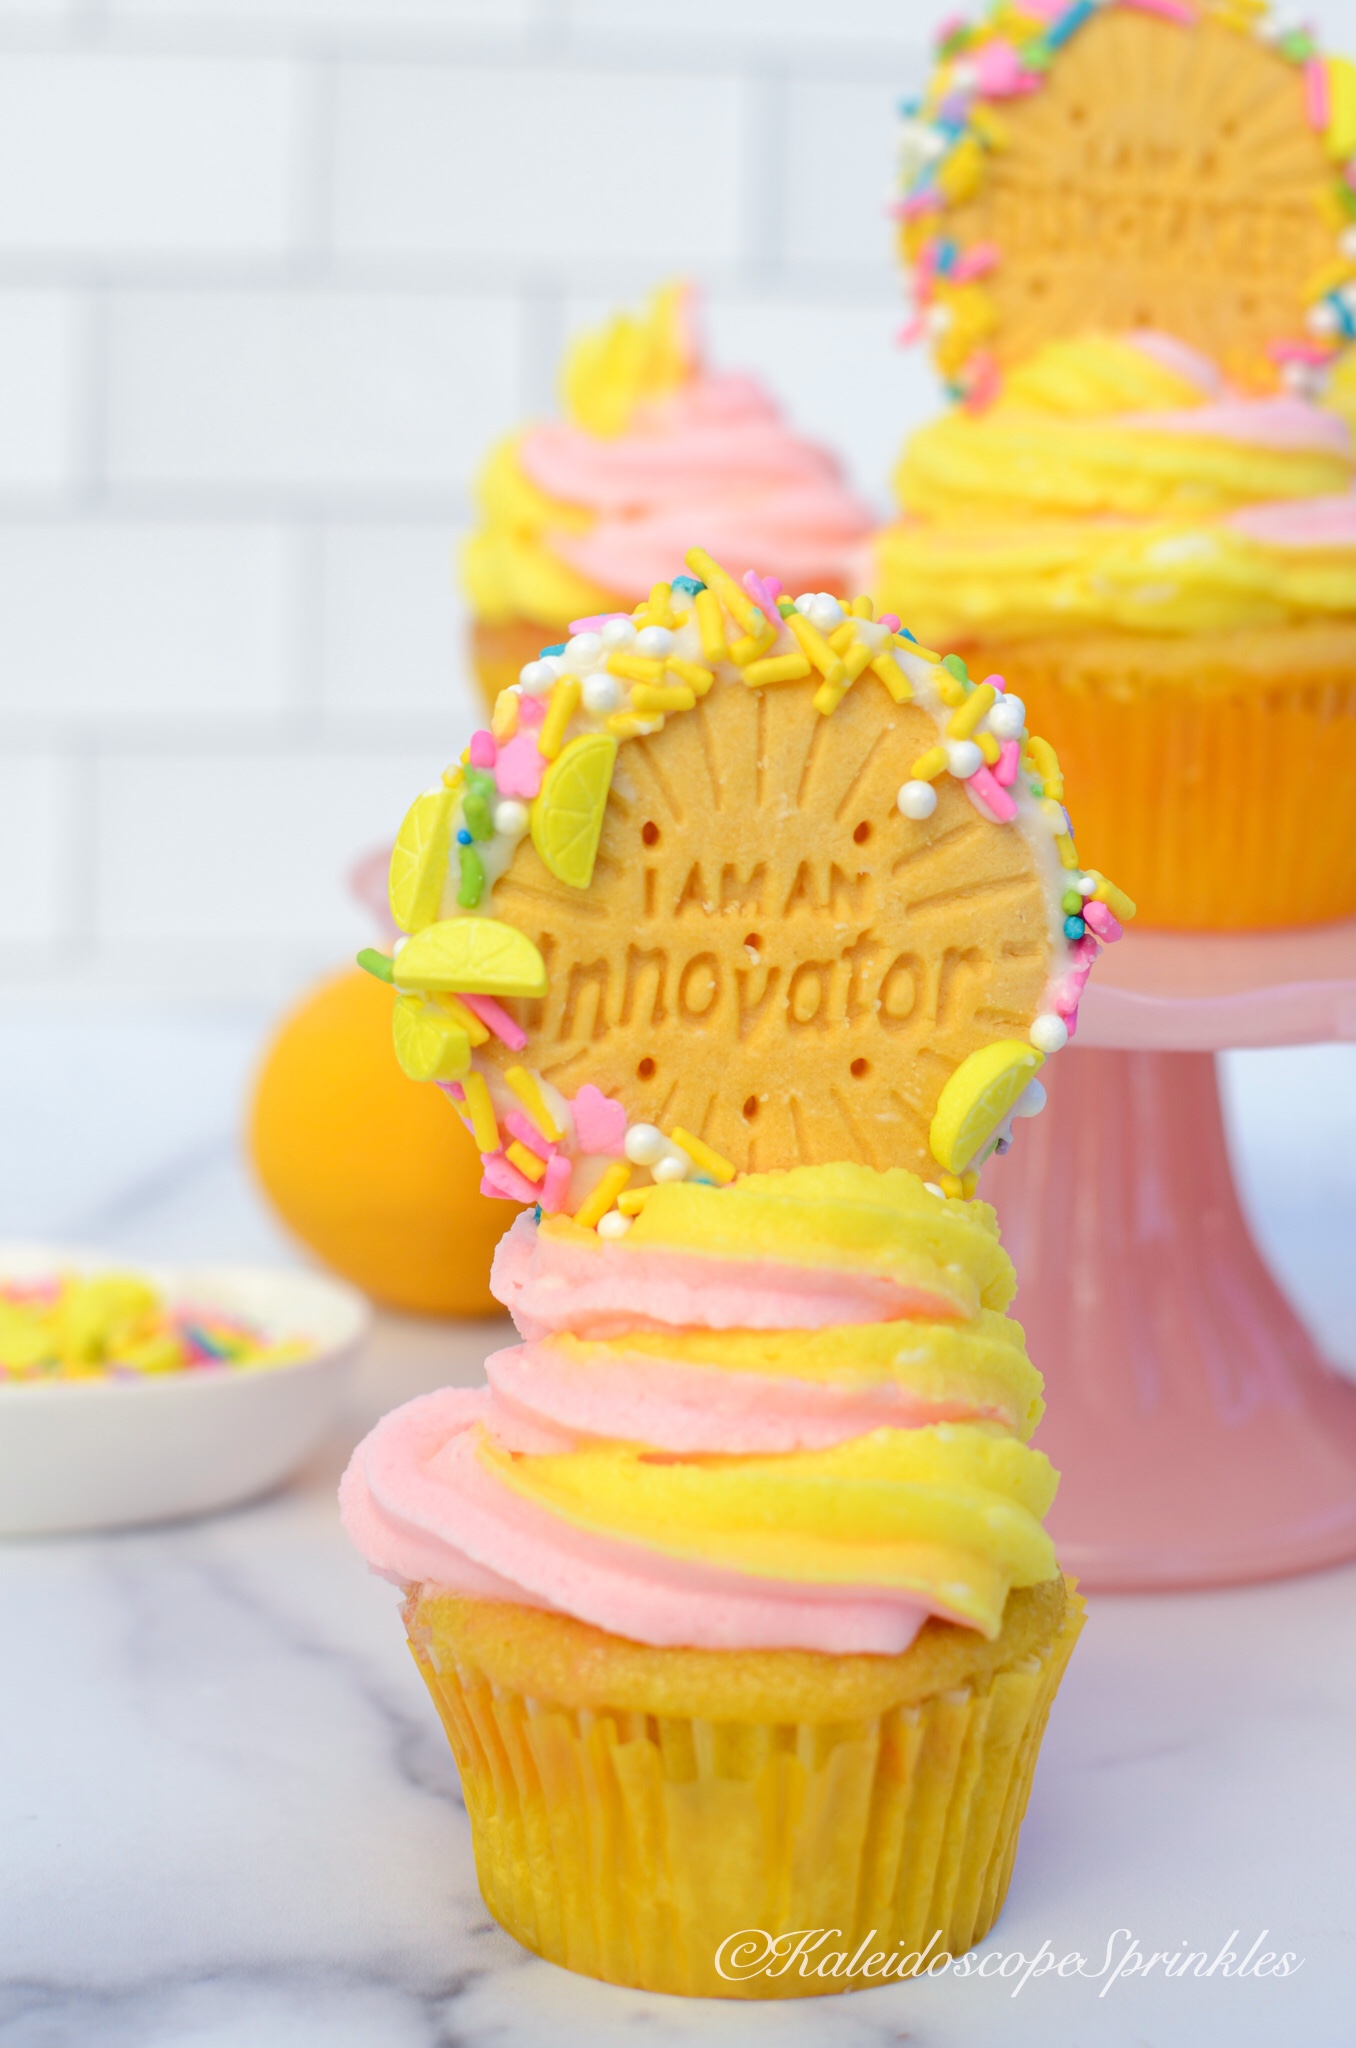
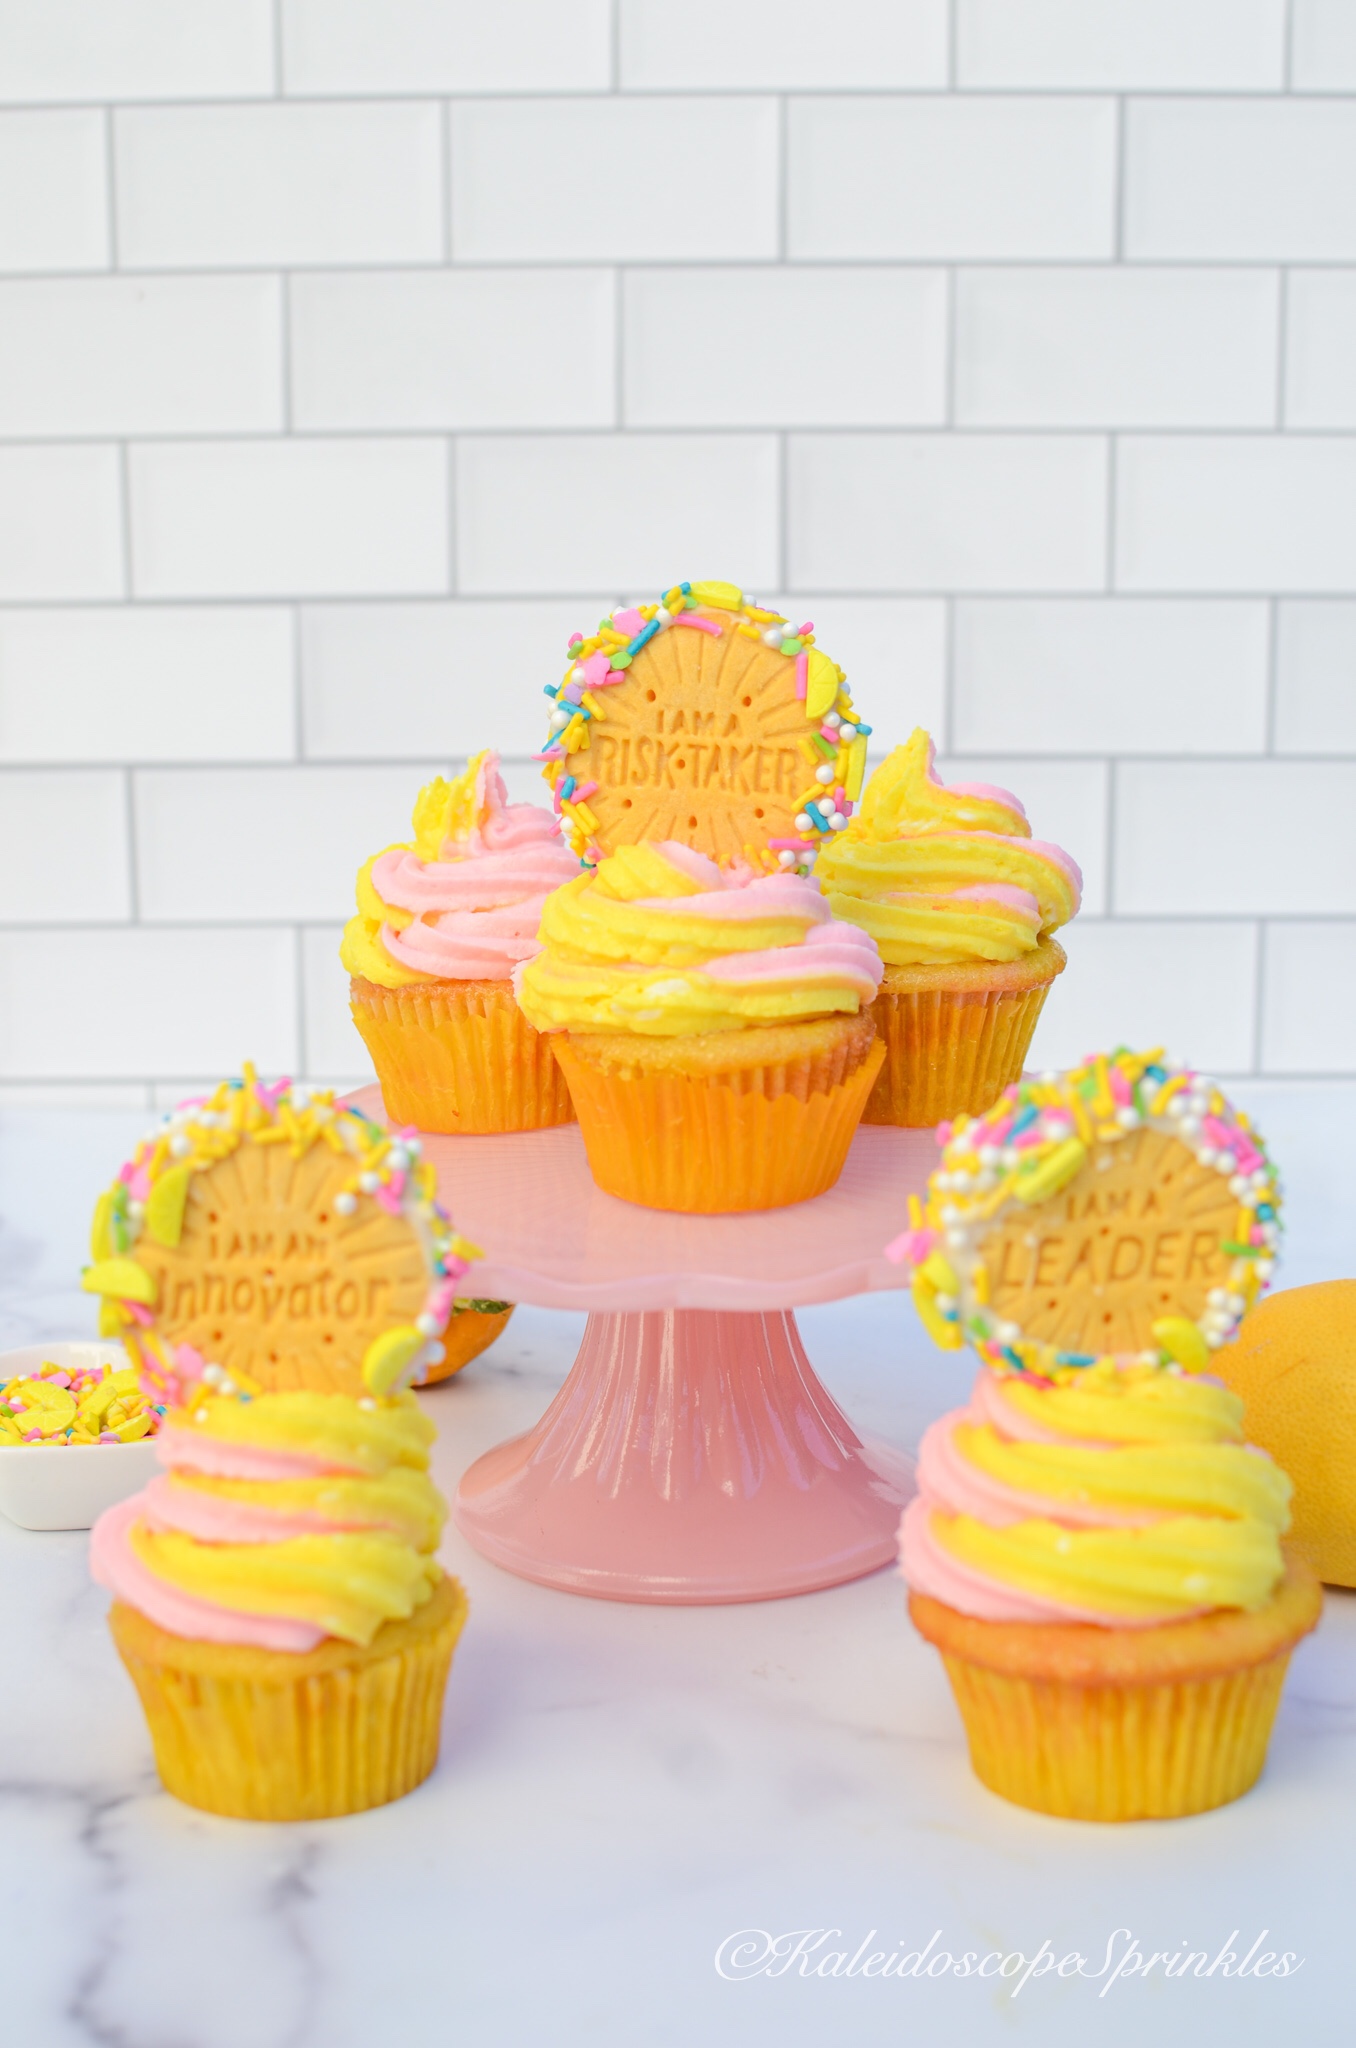
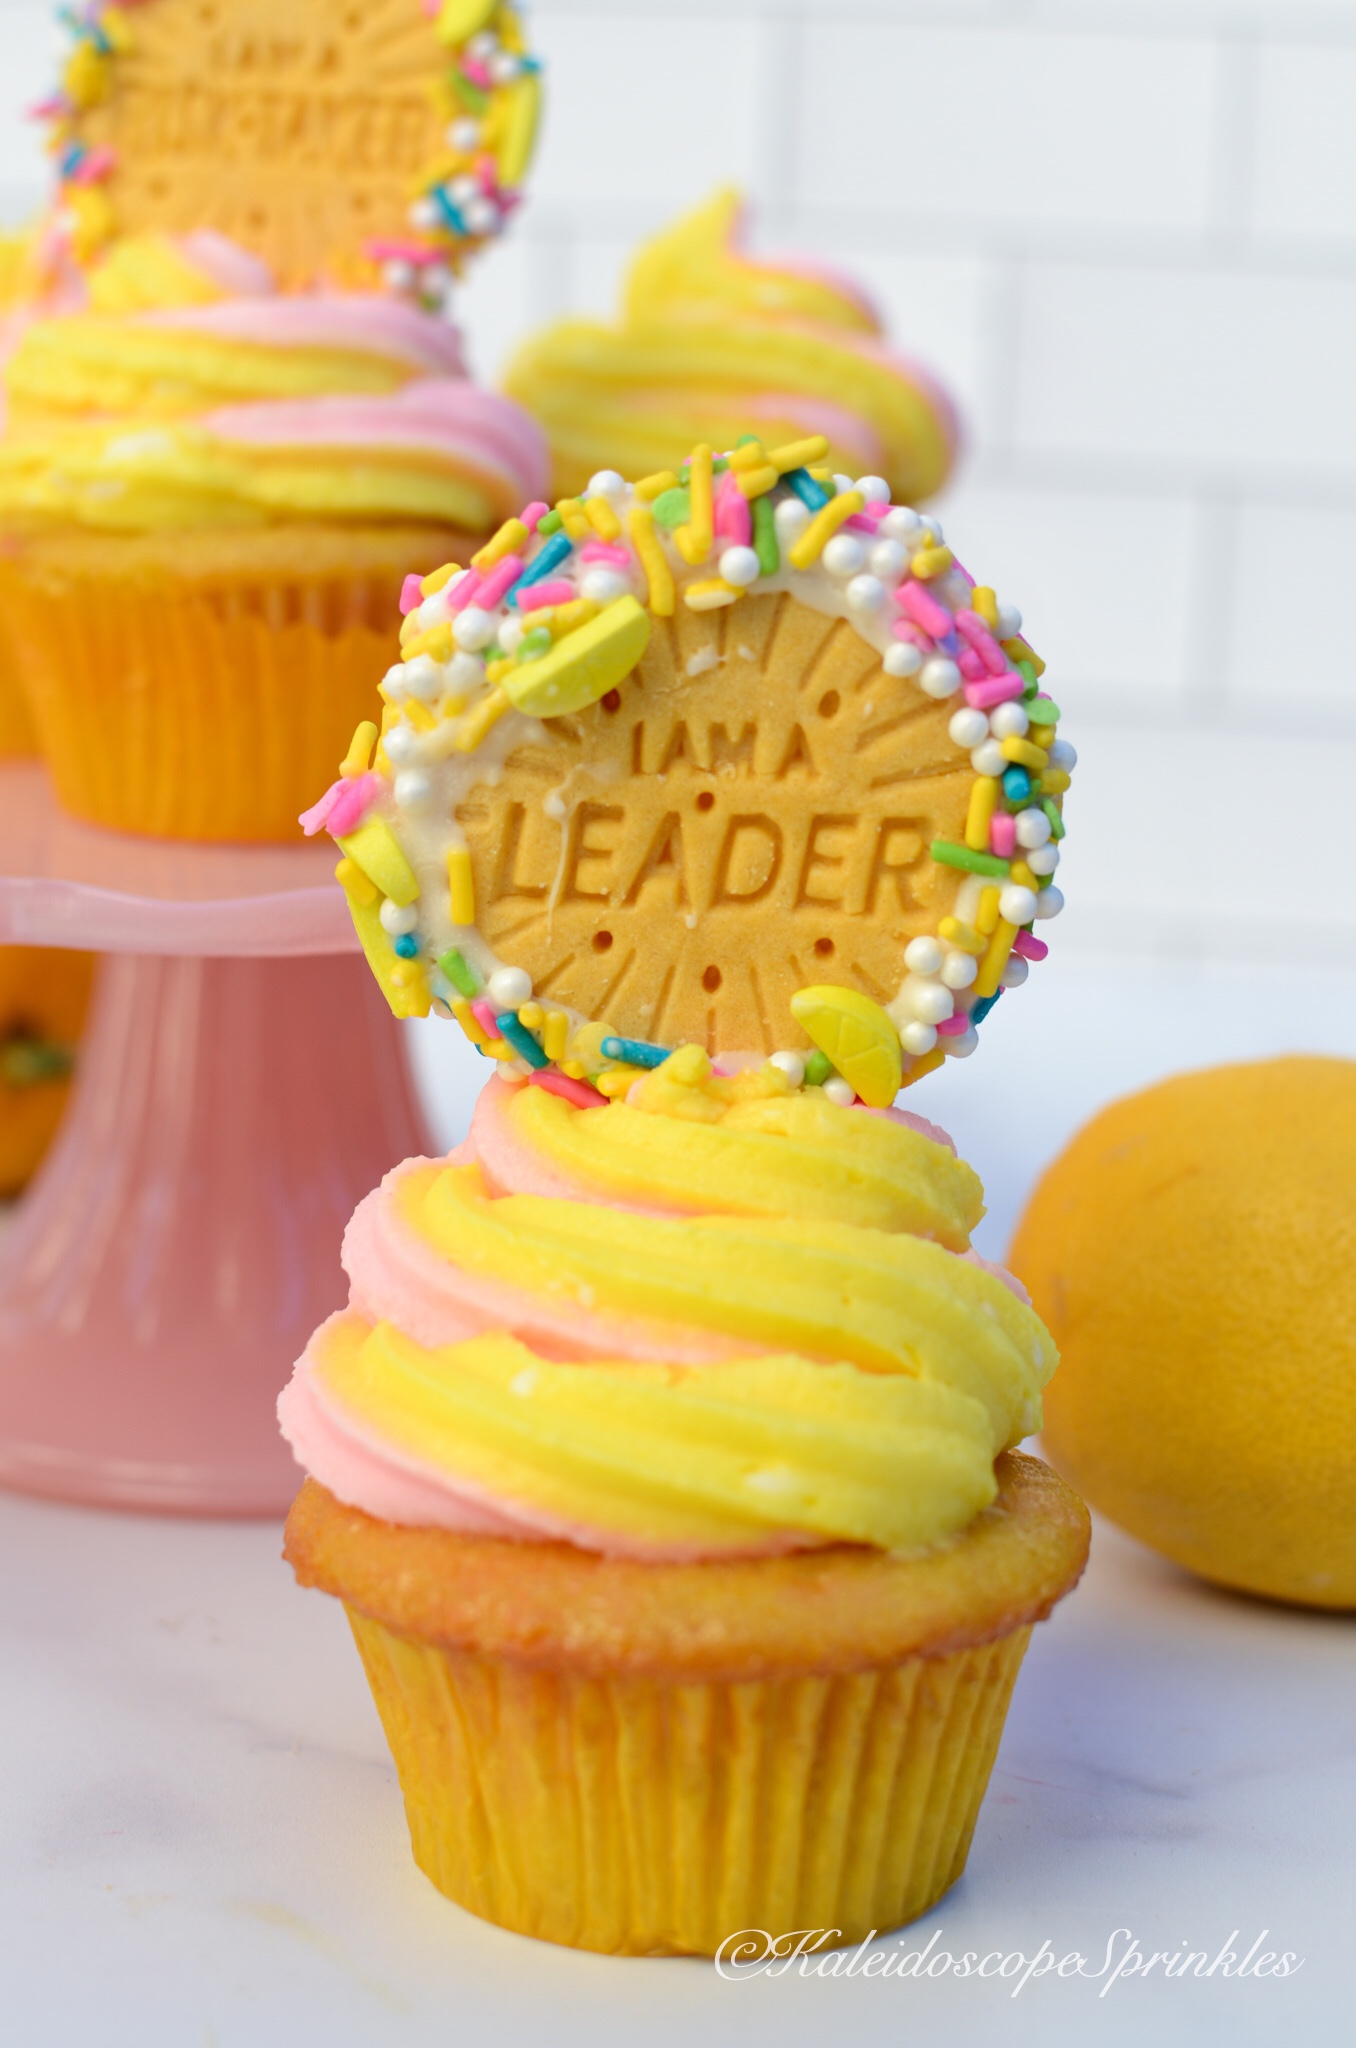
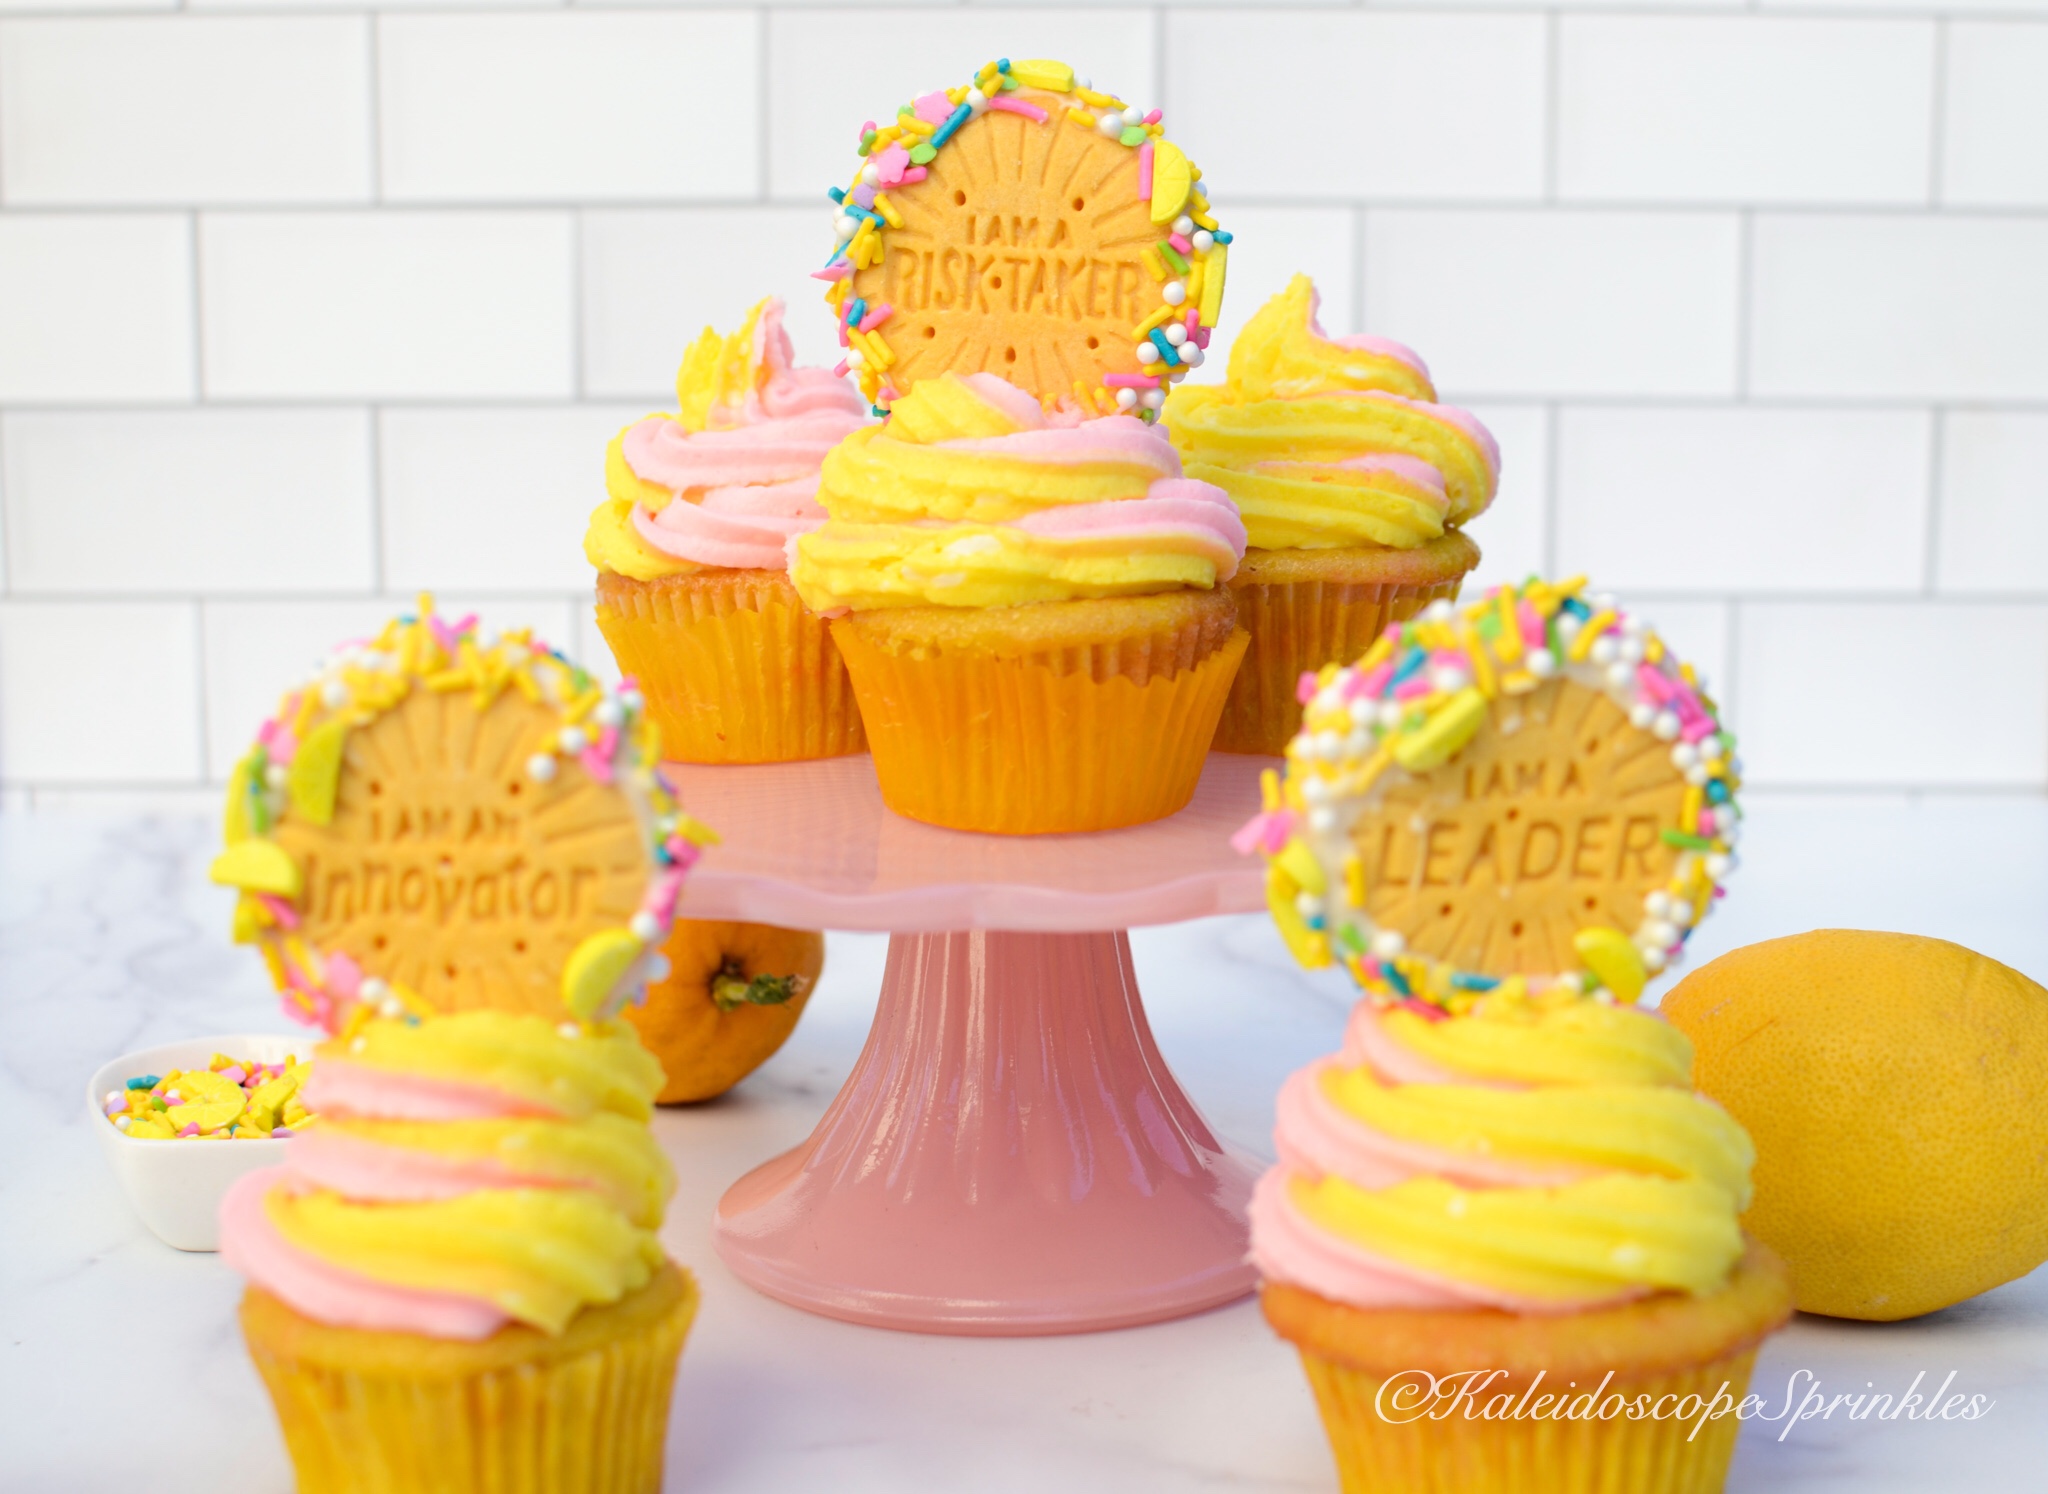
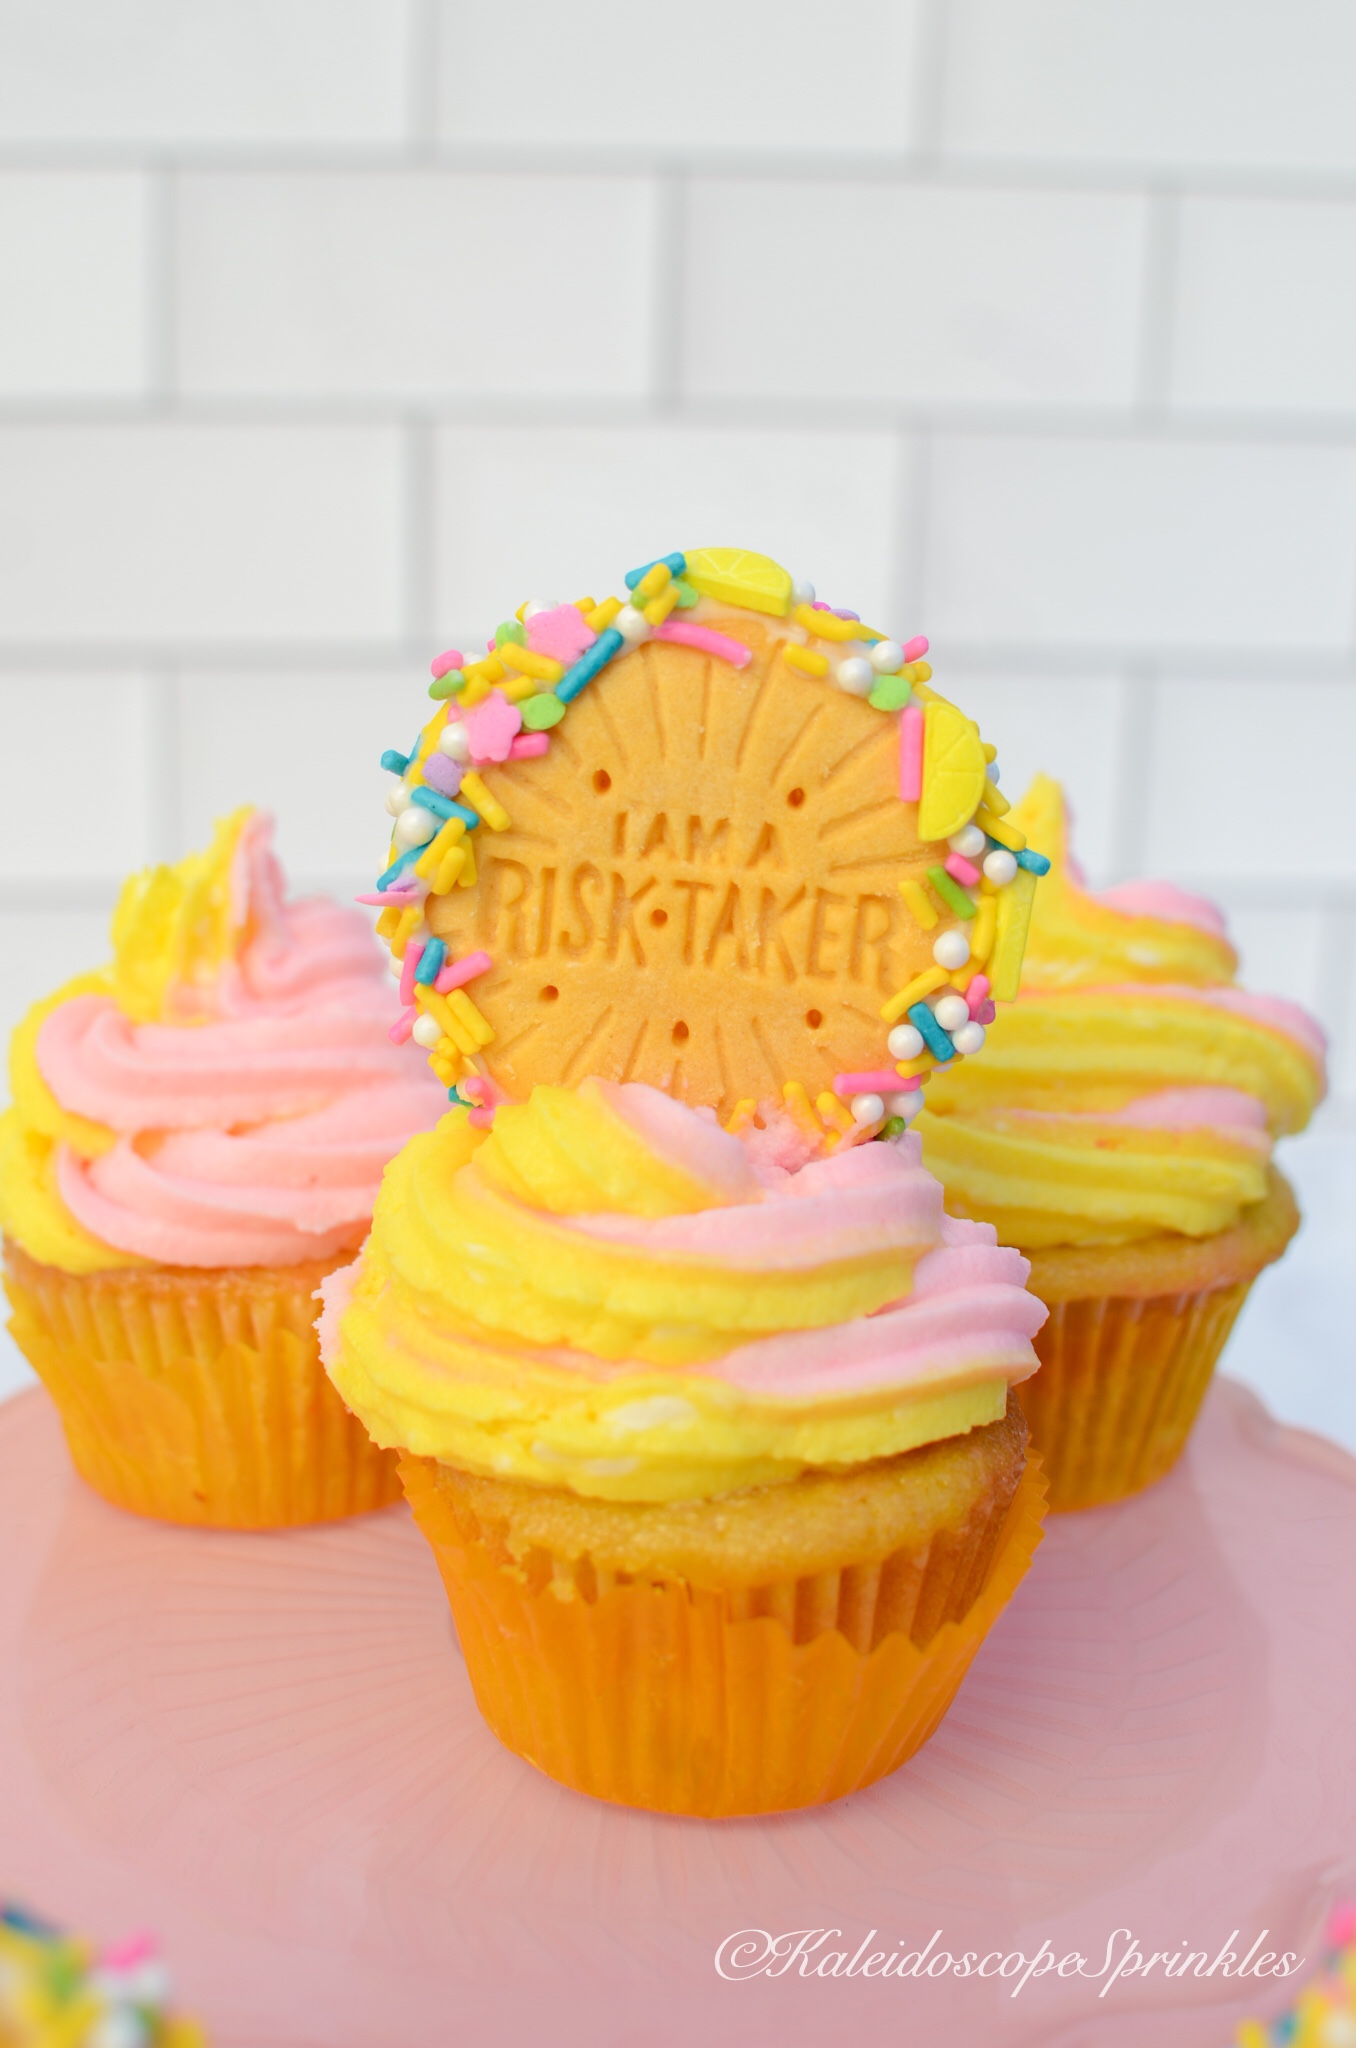
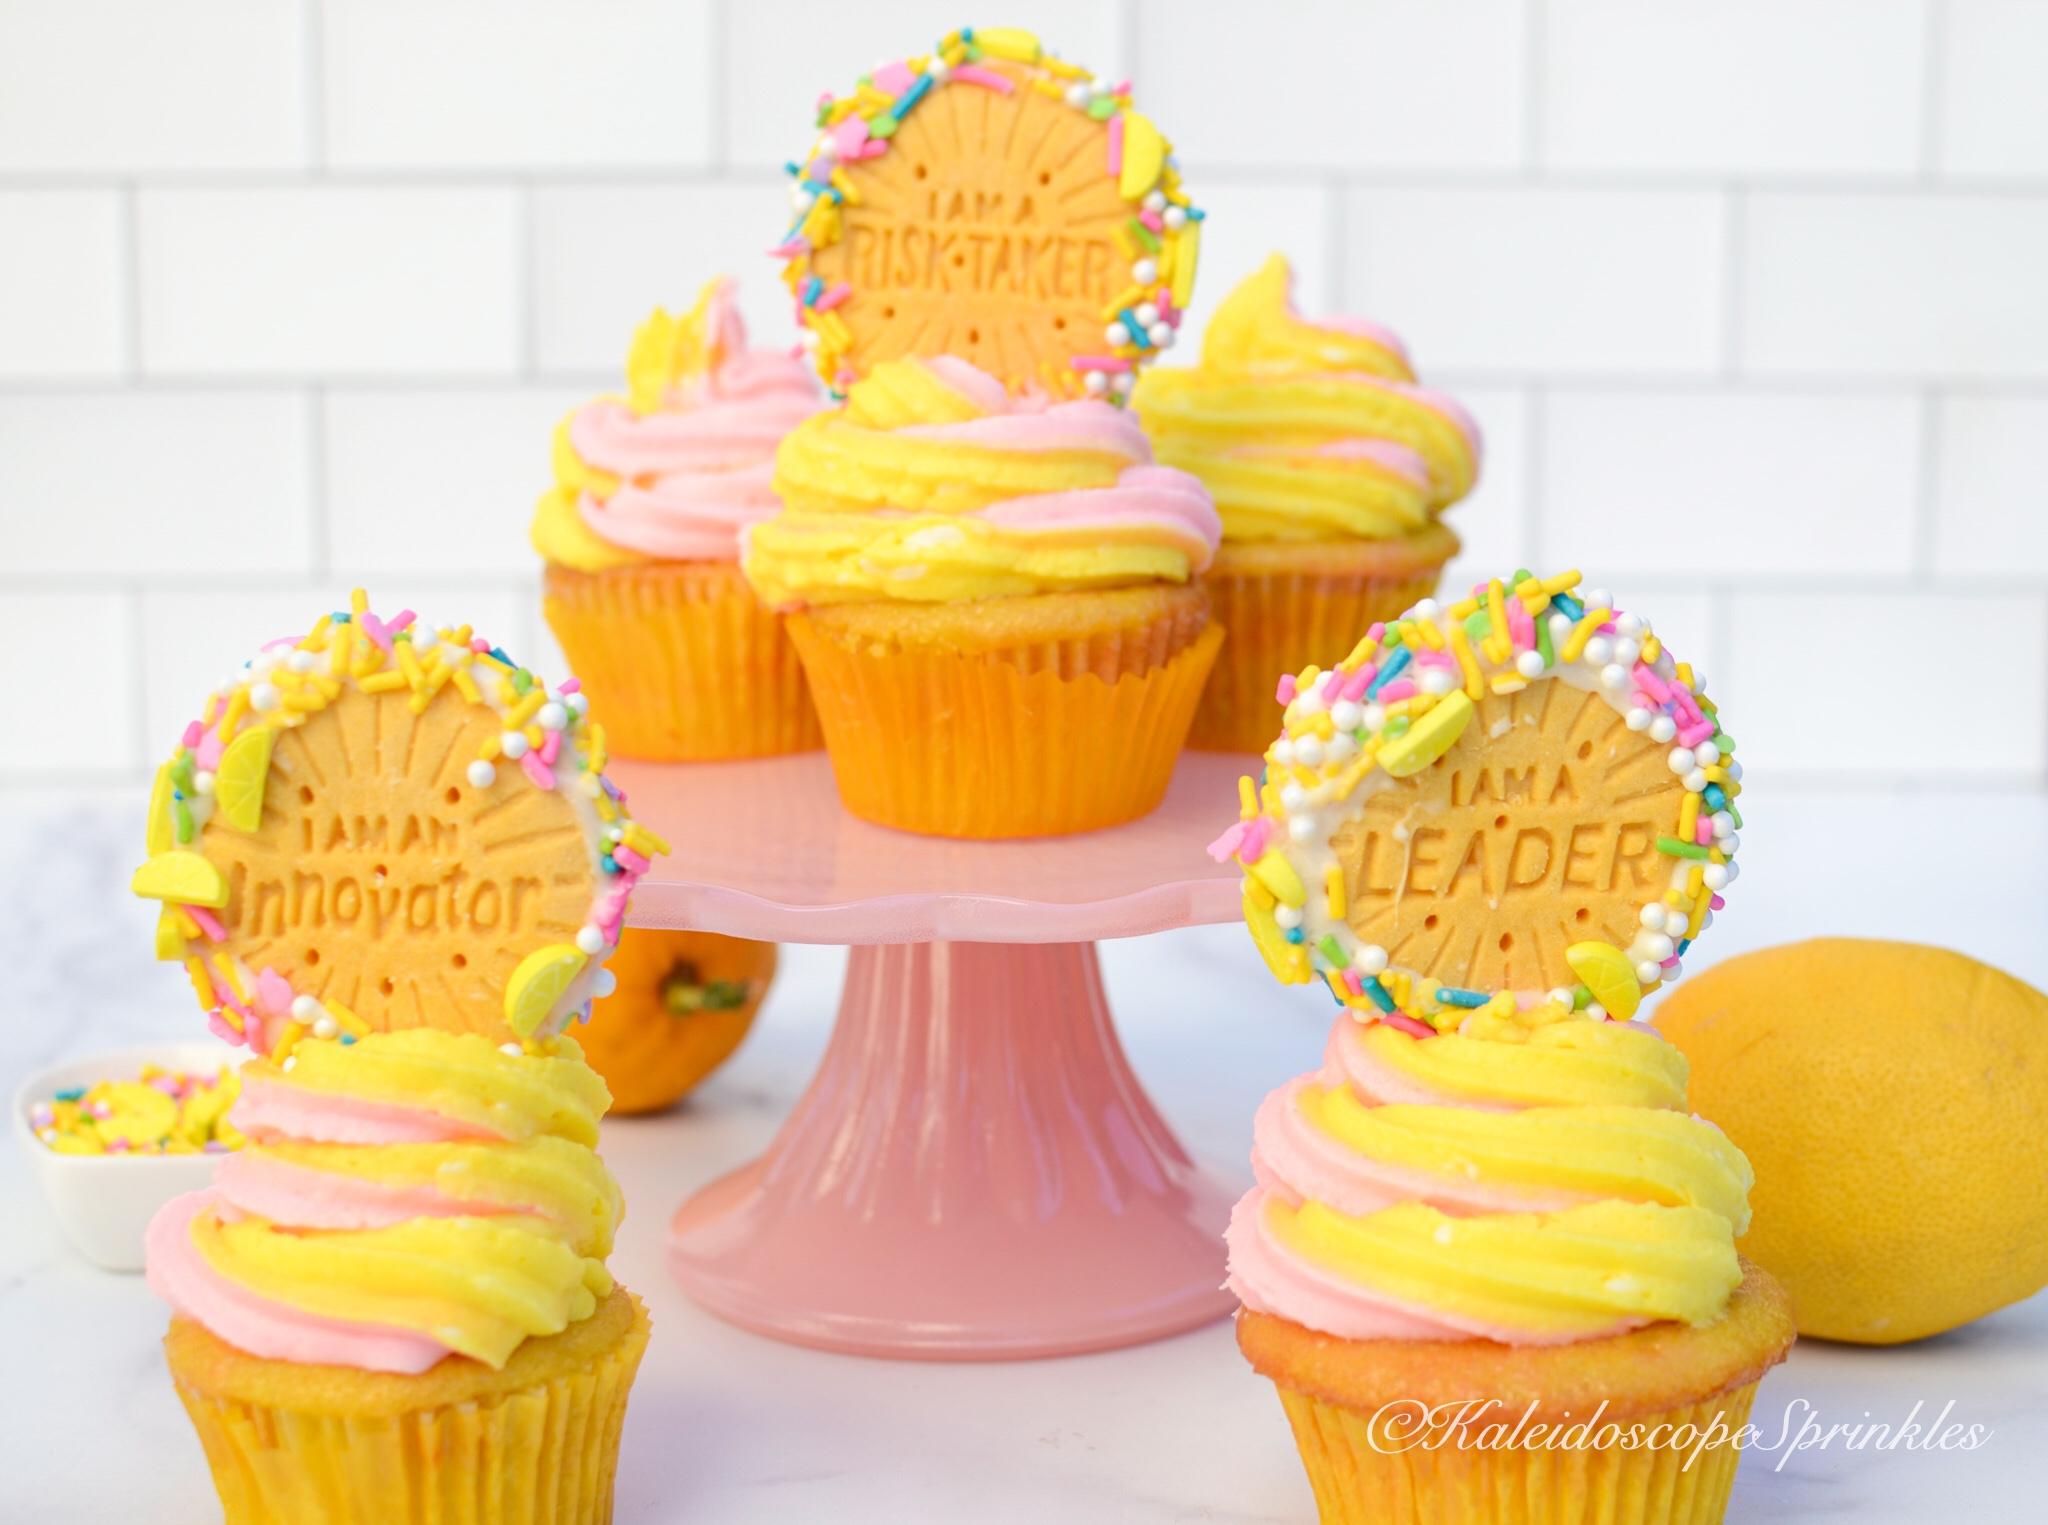
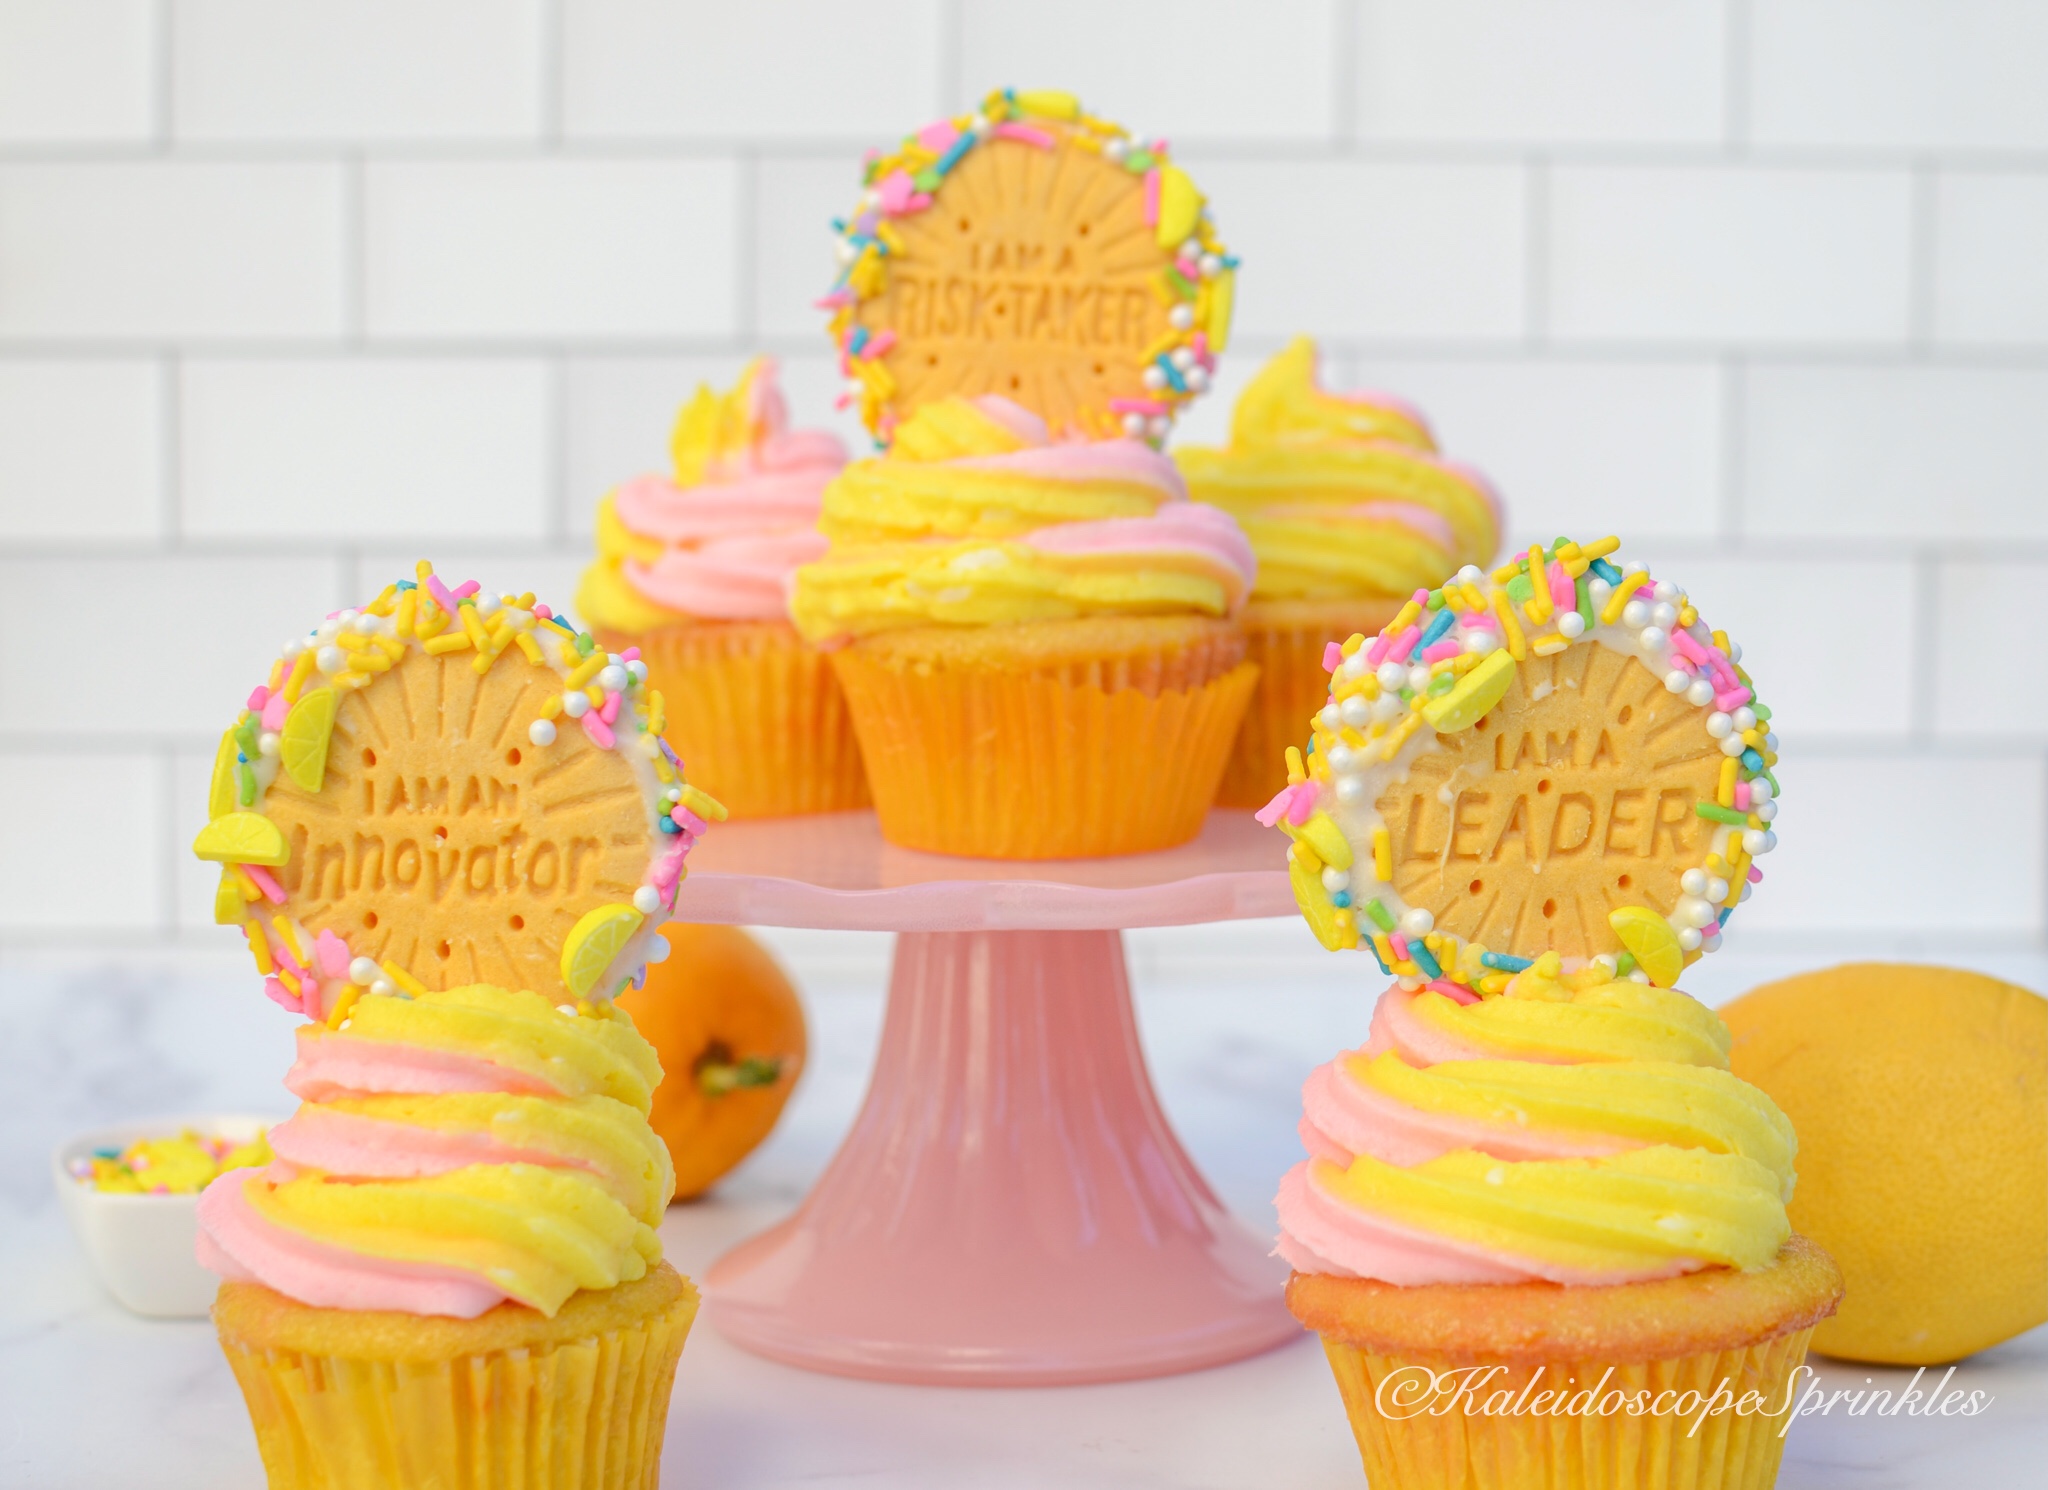
I decided to take the jubilation of this month and create a fabulous dessert. These cupcakes are the complete combined package of women and Spring appreciation. This recipe is based on my Red Velvet Cupcake recipe and create a tender but lemony texture. The cupcakes are then decorated with amazing pastel cream cream frosting. Each cupcake is then decorated with GSC lemon flavored cookies topped with Lemonade Sprinkle Mix. This mix is the absolutely perfect mix for Spring and these cupcakes.
Definitely check out the recipe and the finished product below. I had a wonderful time making these and hope they represent the spectacular that is of women.
Step by step decorating video
Pink Lemonade Velvet Cupcakes Ingredients
Cupcakes (Makes approximately 24 servings):
2 ½ cups of all purpose flour
1 ½ tsp of baking soda
2 tbsp. lemon zest
½ tsp. of salt
1 cup of vegetable oil
1 ½ cups of granulated sugar
2 eggs, room temperature
2 tbsp of fresh lemon juice
1 tsp of vanilla extract
1 ½ cups of buttermilk, room temperature
pink food coloring
yellow food coloring
Cream Cheese Frosting: 12 oz. of reduced fat cream cheese
Preheat oven to 350 degrees. Place cupcake liners in cupcake tins and set aside.
In a medium size bowl, whisk together flour, baking soda, lemon zest and salt. Set aside. In a mixing bowl, cream together oil and sugar. Add eggs one at a time to the creamed mixture. Add lemon juice and vanilla extract. Add flour mixture and buttermilk, alternating, beginning and ending with flour mixture.
Divide batter into two bowls. Add pink food coloring to one bowl and yellow food coloring to the other bowl. Fold food coloring into the batter. Be careful not to over mix. Using a spoon, place batter into muffin tins. Bake cupcakes for 20-25 minutes or until tester comes out clean. Allow cupcakes to completely cool.
While cake is baking in a large bowl, whisk together cream cheese and butter. Slowly add confectioner’s sugar using hand mixer on low speed until frosting is smooth. Add vanilla extract. Whisk frosting on medium-high speed until vanilla extract combined and frosting is light and fluffy. Add food color gel (optional).
Frost cupcakes with cream cheese frosting. Top with Lemonade Sprinkle Mix and lemon flavored cookies.
Happy 2021! I am so very excited to start fresh into a brand new year. Last year was the longest and most stressful year of my life, like I am sure it was for so many. That says a lot for someone who went to medical school and completed a residency program as well. It felt like there were more valleys than peaks but overall I survived. 2021 is already off to a great start for me.
I have a small but mighty potted Meyer lemon tree in my backyard. I decided the best way to start this brand new year was to literally turn lemons into lemonade. Well something even better than lemonade actually, Limoncello. My tree had a bountiful season so I had plenty of lemons to pick and peel for my spirits. After making my limoncello (See recipe here), I had an abundance of lemon juice left over and I was definitely not going to let it go to waste.
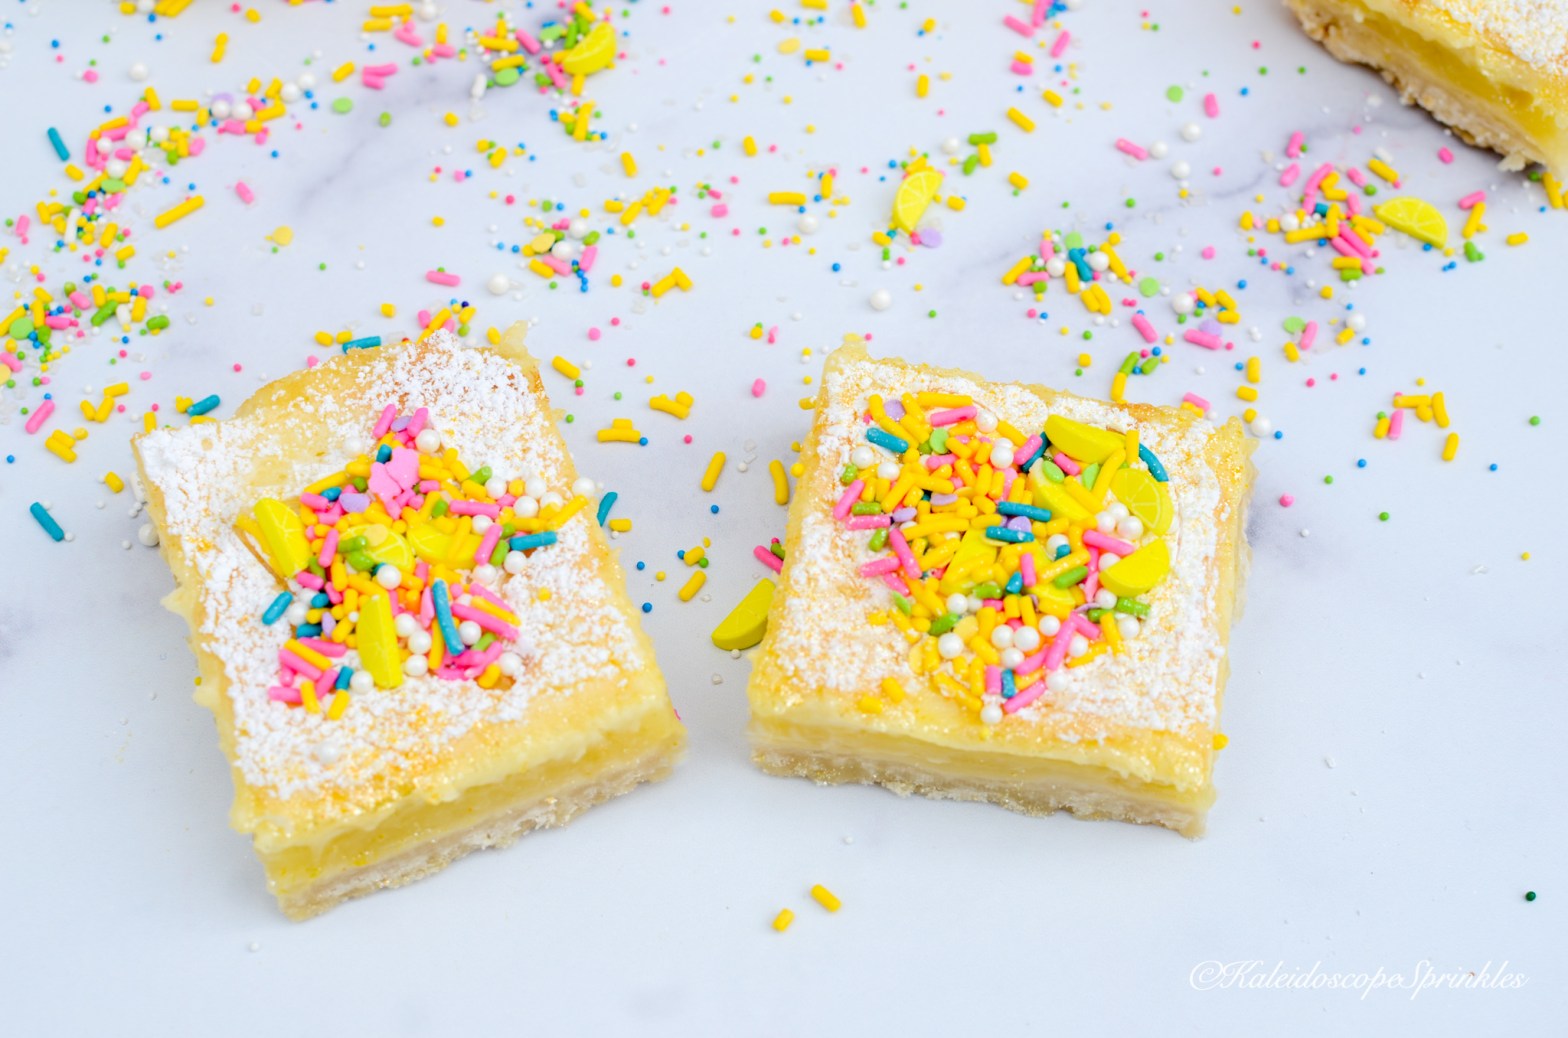
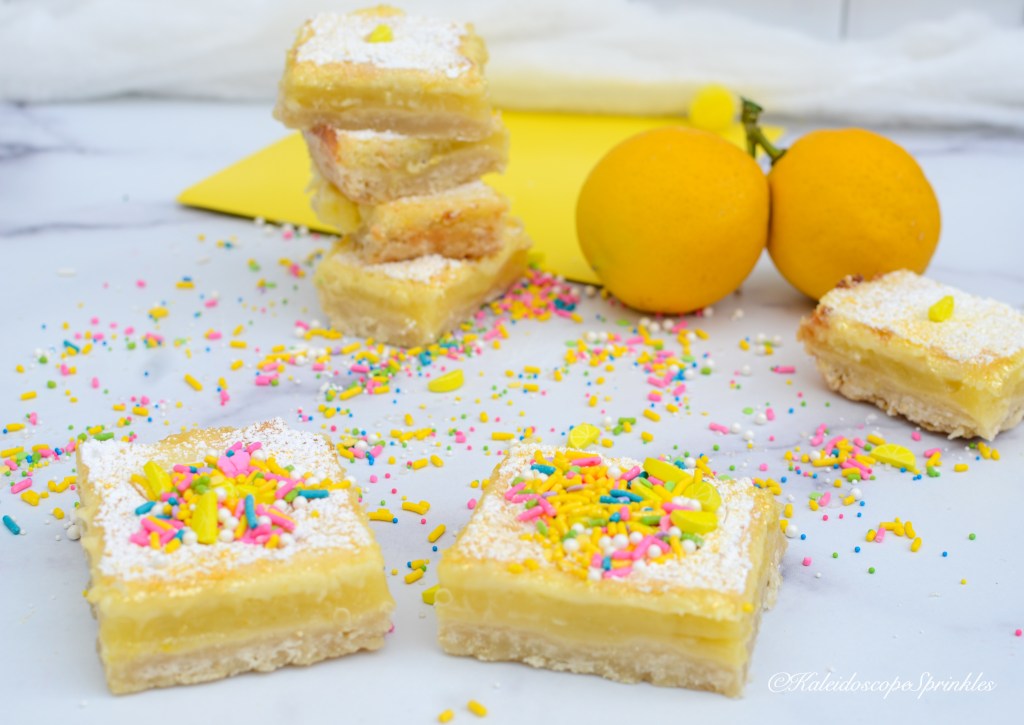
Not only do I love baking but I also live for fashion! I love watching the trends and colors for the season and creating my own spin on things. This year Pantone chose this gorgeous yellow color called ‘Illuminating’ as the Color of the Year and I became so inspired. Not only was I ready to incorporate this positively amazing color into my wardrobe but I also was eager to incorporate it into my kitchen. I got to work and created two new Sprinkle Mixes inspired by this radiant color. I also knew exactly what to do with my left over lemon juice, make lemon bars!
These are not your average lemon bars either. These illuminating lemon bars go the next step with cream cheese to make them even creamier and add more pucker. Everyone who has tried these lemon bars so far have raved about them.
Check out the recipe and step by step video below.
Step by step Video
Lemon Bars (adaptive from Martha Stewart’s Lemon Squares recipe)
Ingredients
For the crust: ¾ cup (1 ½ sticks), unsalted butter, frozen. (plus more for dish)
1 ¾ cups all purpose flour
¾ cup confectioner’s sugar
¾ tsp. kosher salt
For the cheesecake filling: 8oz. cream cheese, softened
Directions Preheat oven to 350F. Butter a 9 x 13″ glass baking dish and line it with parchment paper. (Be sure to leave enough paper overhang for handles).
Make the crust by grating butter on a cheese grater with large holes into a medium sized bowl; set aside.
In a separate large bowl, whisk together flour, confectioners’ sugar and salt. Add butter; stir with a wooden spoon or large spatula until combined and mixture looks crumbly. Transfer mixture to prepared dish; press evenly onto bottom with your hands. Freeze crust for 15 minutes. Transfer the crust from freezer to oven and bake crust for 16-18 minutes. Bake until crust is slightly golden.
While crust is freezing and baking, make your fillings. In a separate medium sized bowl whisk together cream cheese, granulated sugar, egg and vanilla. Whisk until filling is creamy and fully combined. Set aside.
In another medium sized bowl whisk together eggs, granulated sugar, flour and salt until smooth. Slowly pour in lemon juice while mixer is on low speed.
Smooth cream cheese mixture evenly over the hot crust. Slowly pour lemon mixture over cream cheese mixture.
Reduced oven temperature to 325F and bake bars for 25-30 minutes until the filling is set and the edges are slightly golden brown. Let bars cool slightly on a wire rack. Lift out bars from the glass dish and let them cool completely before cutting into 2 inch squares. Dust with confectioners’ sugar. Cover with Lemonade Sprinkle Mix, optional.
Here we are in February and I am eagerly awaiting Spring to approach. After this past week’s brutal weather in the South I’m definitely sure I am not the only person feeling this way. Spring represents growth, rebirth, rebuilding and better weather. I love not only all the bounty that is Spring, I of course love the colors as well! I can’t wait to break out all my pastel ensembles and frolic amongst the flowers.
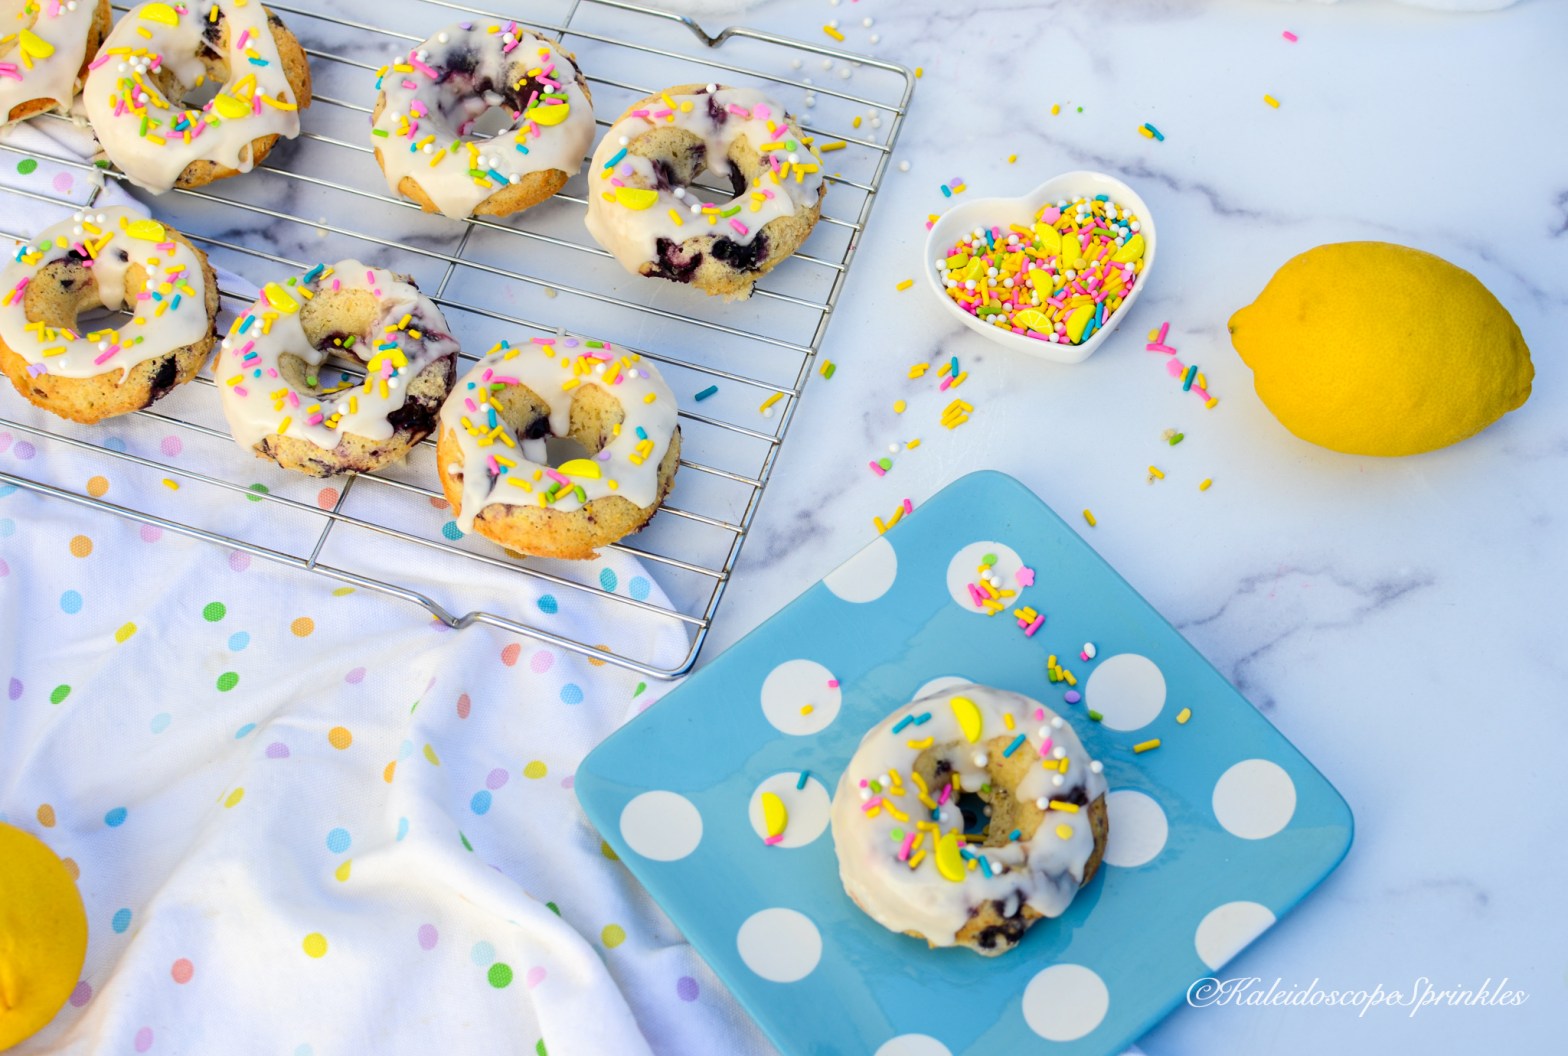
Here in Los Angeles the average temperatures year round fluctuate between sweatshirt to t-shirt dress weather. Not only is L.A. known for its immaculate weather its also known for its donuts. I absolutely love donuts but my hips and thighs do not. I’m not one to deprive myself of anything so I decided to come up with my own resolution.
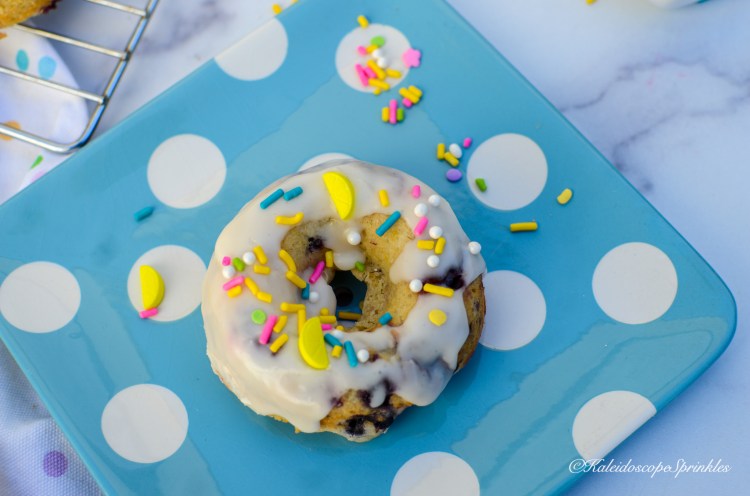
Check out my recipe for fresh Lemon Blueberry Baked Donuts. These cake donuts are satisfyingly filled with zesty lemon and less guilt inducing. They are covered in a delicious tart lemon glaze. They are then covered with the perfect sprinkles for Spring. These original bakes will curb any donut craving and keep that waist snatched.
Check out the complete recipe and step by step video below.
Step by step Lemon Blueberry Baked Donuts video
Makes 6-8 donuts
Ingredients Donuts:
1 cup plus 1 tbsp. AP flour, divided
1 tsp. baking powder
⅓ cup granulated sugar
½ tsp. fresh grated nutmeg
½ tsp. salt
2 tbsp. unsalted butter, cold and cubed
½ cup buttermilk
1 tsp. vanilla extract
1 egg, beaten
zest of lemon (approximately 1 tbsp.)
1 cup of fresh or frozen blueberries (thawed, drained)
Preheat the oven to 350F. Lightly grease donut pans.
In a large bowl whisk together one cup flour, baking powder, sugar, nutmeg, lemon zest and salt. Add cubed butter using a fork or fingers to press butter into flour mixture, until combined and it resembles course sand.
Add buttermilk, egg and vanilla to bowl and stir until just combined.
In a small separate bowl, combine blueberries and remaining tbsp. of flour. Carefully stir blueberries until completely coated by flour.
Fold blueberries into the donut mixture. Be careful not to overmix or blueberries will break and donuts may be rubbery.
Use a piping bag or ice cream scoop to fill each donut cup about three-quarters full, making sure the center area is clear of dough. Bake donuts 10-12 minutes until they are a light golden brown and spring back when touched.
Let donuts completely cool to room temperature.
While donuts are baking, make the glaze. In a medium sized bowl whisk together confectioner’s sugar, lemon juice, vanilla extract and salt until smooth and completely combined. (Glaze should be thick and coat the back of a spoon.)
Use spoon to coat donuts or dip donuts into the glaze. Cover with sprinkles.
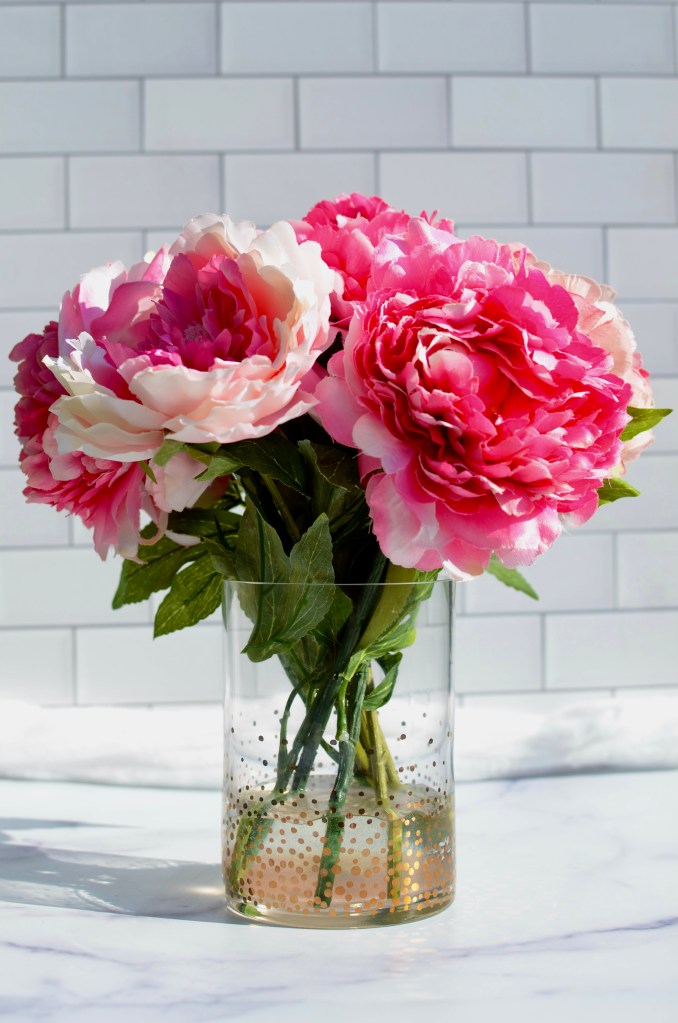
I love being surrounded by flowers. Whether I’m inside or outside, the array of colors and depth that flowers display always brings me a smile. A few years ago I was looking for a cute little floral arrangement for my Paris room. I wanted a variety of different pinks to contrast my almost completely black and white room. I did a little shopping for some floral arrangements and soon came to realize that these things are expensive. The more natural and delicate looking the arrangement the bigger the price tag. I refused to pay for something that looked fairly easy and simple to make myself. I went shopping at my local craft store and then I got to work.
I was able to create my own floral arrangement that looked like a came directly from an interior decorator display. I was quite impressed with how my arrangement came out and how simple the entire process was.
Being that Valentines Day is right around corner and also to observe my local Michael’s store grand opening, I thought this would be the perfect time share this DIY project. You can make this project as a gift for your someone special or yourself.
Check out the complete DIY video and instructions below.
I can’t believe we are already in month two of this year. Although February is technically Black History Month, I celebrate our history every day. 28 days is just not enough time to reflect and appreciate all that Black people have and continue to do for this country.
There are many ways to enjoy and uplift Black history. Whether it be a small or large effort it makes a difference in continuing to commemorate all things Black. I decided that one way I was going to cherish this fabulous February is by creating of course a culturally conscious baked good and spreading some knowledge.
Red velvet cake is a traditional soul food recipe that is believed to have originated in the South and is of African American origin. This ruby colored confection is believed to have been baked starting in the 1800s and was known as ‘velvet cake.’ This special cake after gaining its color has served as an important part of Juneteeth parties, where red food is served to symbolize the blood shed during slavery and in the Civil War.
I decided to take this traditional cake recipe and make some delicious cupcakes with representation. Check out my recipe for these Black History Month cupcakes below.
Place cupcake liners in cupcake tins and set aside.
In a medium size bowl, whisk together flour, baking soda, cocoa powder and salt. Set aside. In a mixing bowl, cream together oil and sugar. Add eggs one at a time to the creamed mixture. Add vinegar, vanilla extract, and food coloring gel. Mix until gel is completely combined. Add flour mixture and buttermilk, alternating, beginning and ending with flour mixture.
Using ice cream scoop, place batter into muffin tins.
Bake cupcakes for 20-25 minutes or until tester comes out clean. Allow cupcakes to completely cool.
While cake is baking in a large bowl, whisk together cream cheese and butter. Slowly add confectioner’s sugar using hand mixer on low speed until frosting is smooth. Add vanilla extract. Whisk frosting on medium-high speed until vanilla extract combined and frosting is light and fluffy. Add food color gel (optional).
Frost cupcakes with cream cheese frosting. Top with Black Power Sprinkle Mix and fondant pieces, (optional).
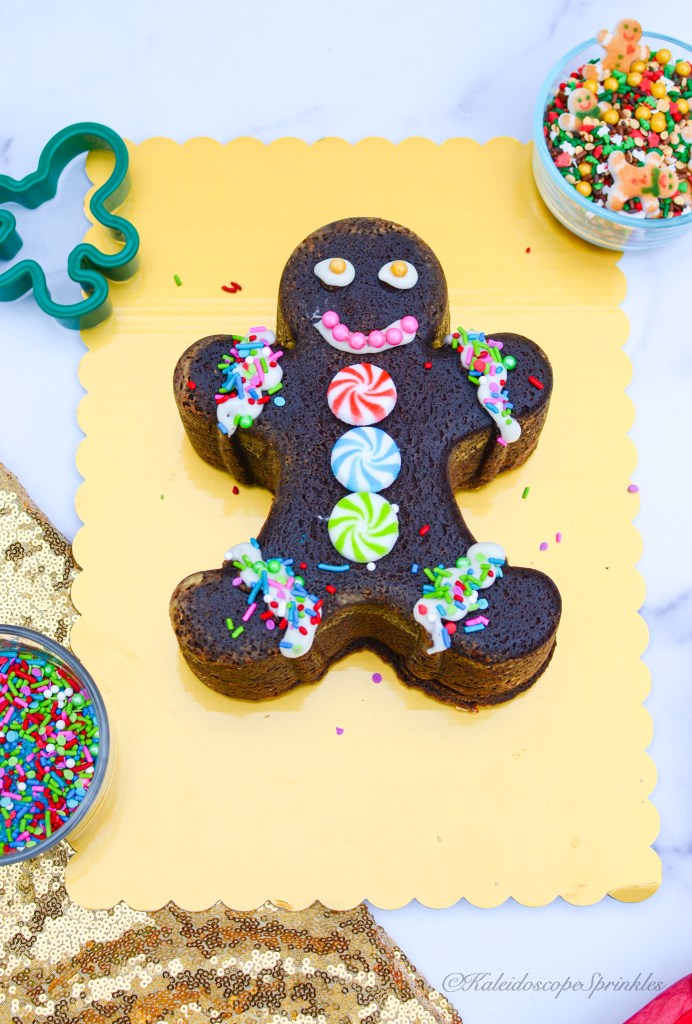
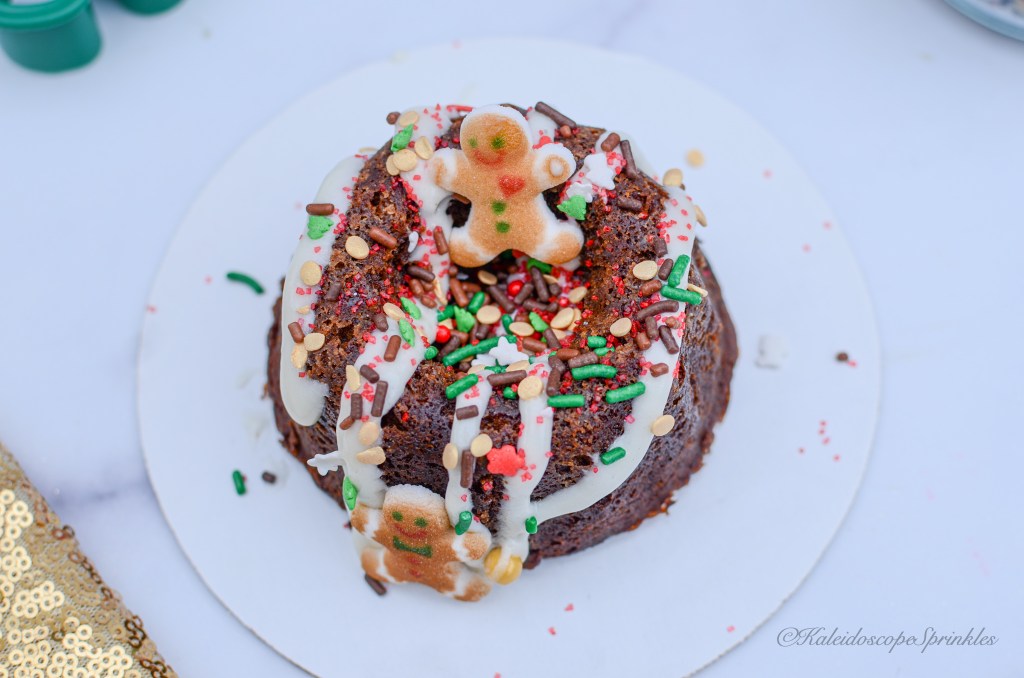
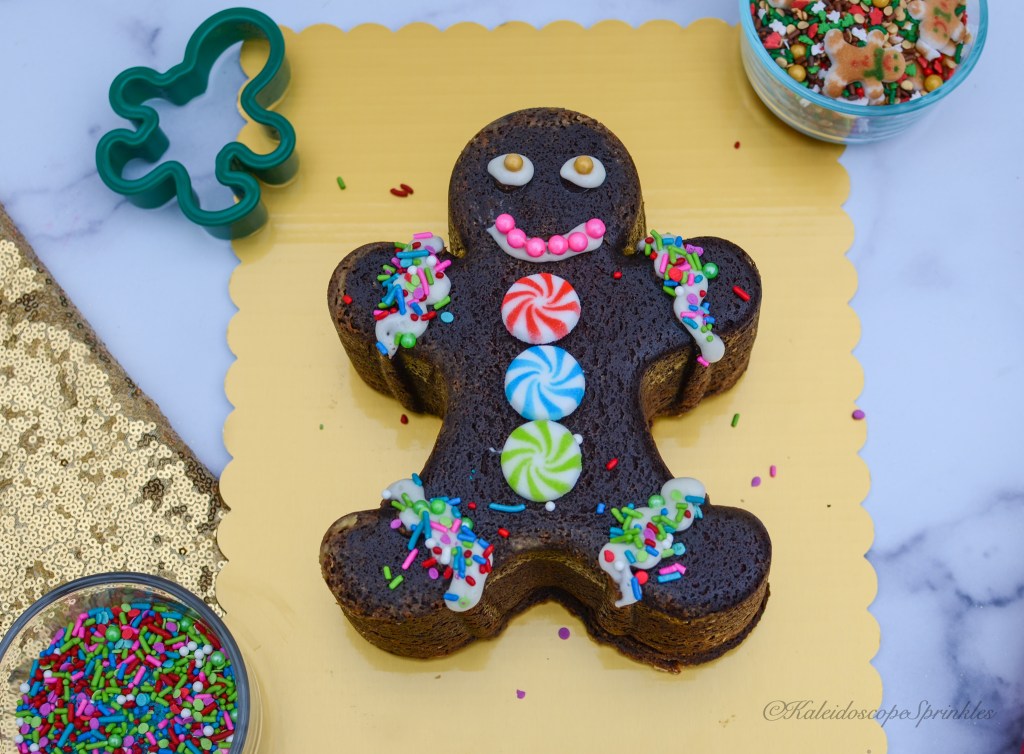
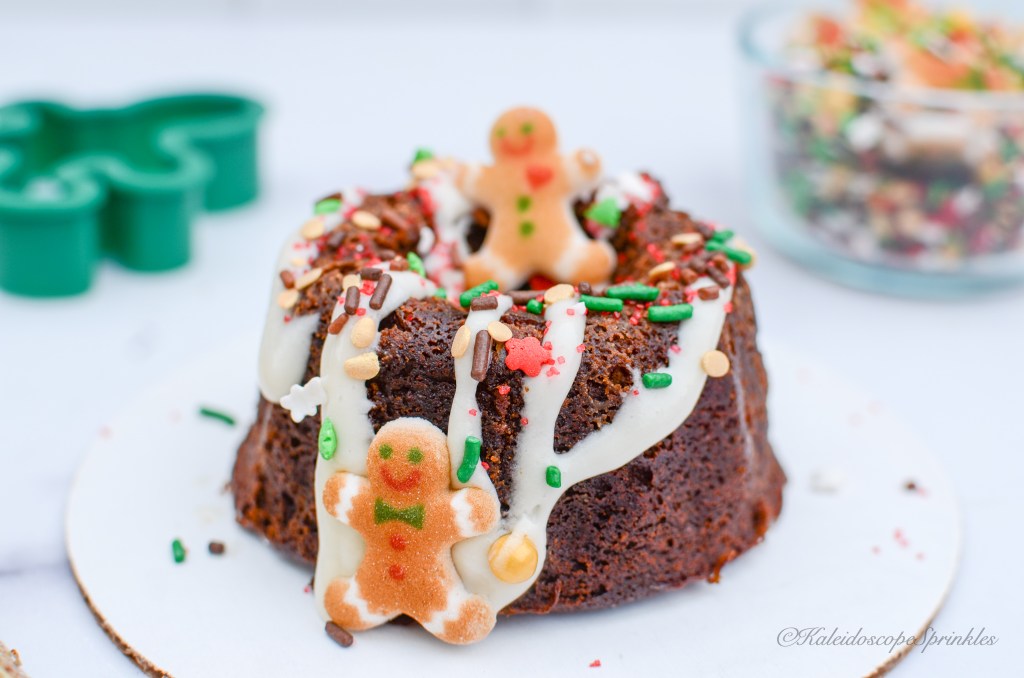
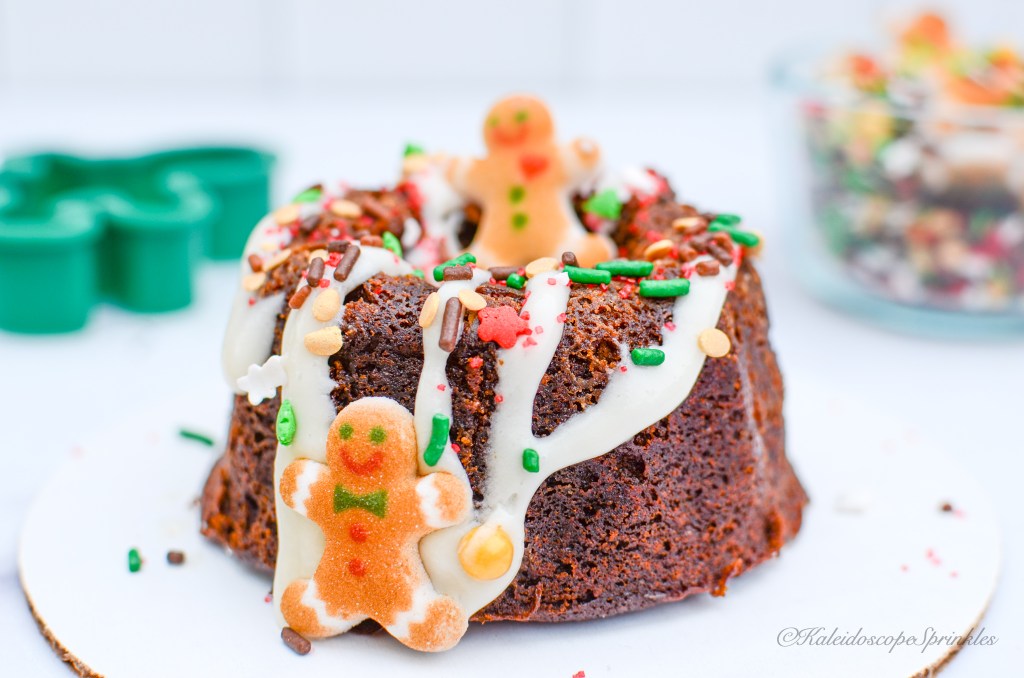
I have a confession, I have always wanted to live in a gingerbread house. I realize that is not practical or realistic but I dare to dream. Just the smells and warmth that is associated with gingerbread has always put me in a comforting place. During the holidays I am drawn to gingerbread memorabilia more than I should be. A few years ago I saw and bought this fantastic gingerbread man shaped bundt pan. That pan sat in my cabinet silently crying for attention and use. This year I told myself, especially after starting my sprinkle mix business, that I would definitely be utilizing that cake pan.
After a few weeks and a few baking projects later I was ready to make my gingerbread man pan proud. I wanted to make sure that not only my gingerbread looked good but it also tasted just as good. I went to one of favorite baking cookbooks and found an amazing gingerbread recipe. I, of course, decided to add my own spin to the recipe and give my gingerbread man the upgrade he deserved. The recipe turned out really well. It also made more than my gingerbread man could handle, so I was able to make a mini bundt cake and gingerbread loaf using the same recipe. See my how my amazing gingerbread man turned out and my recipe below.
Preheat oven to 350F. Grease and flour your bundt pan.
In a medium sized bowl, combine cocoa powder, baking soda, molasses and coffee and careful whisk ingredients together. Set aside.
In a medium sized mixing bowl mix together flour, baking powder, cinnamon, ginger, cloves and salt . Set aside.
In a large bowl or using a stand mixer cream butter and sugars together. Beat on medium speed until the mixture is light and fluffy, approximately five minutes. Turn speed down to low on the mixture and slowly add oil until well combined. Add eggs one at a time to the mixture. Slowly add the flour mixture one third at a time, alternating with the coffee/ molasses mixture. After each addition, be sure to scrape the sides of the bowl. Mix batter until fully combined but be careful not to over mix.
Transfer batter to the cake pan and smooth batter until even in the pan. Hit cake pan onto the counter a few times to knock out air bubbles. Bake cake for approximately 50-55 minutes until toothpick or cake tester comes out clean. Place cake onto cake rack and allow to cool completely to room temperature.
While cake is baking make glaze. In a medium sized bowl whisk together cream cheese, confectioner’s sugar, milk and extracts until smooth. Invert cake onto cake plate or board. Pour glaze onto cake. Decorate with Sprinkle Mixes (optional).
This year I have positively been on a baking spree. From dealing with the stress that is 2020 to also opening up my own sprinkle mix company, Kaleidoscope Sprinkles, my oven has stayed on. Believe me I’m not complaining one bit, especially how chilly it has been in L.A.. I love baking and hope to one day open my own store front bakery. I am in no way a professional baker but the passion is completely there. I have been trying to challenge myself with different bakes this year that I would not normally do myself.
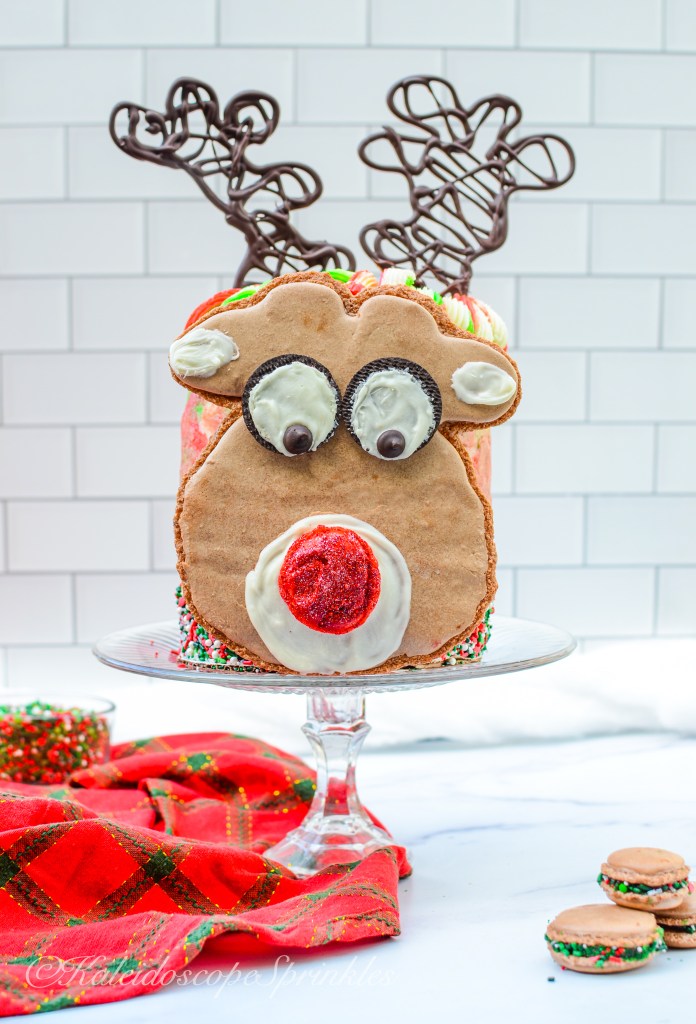
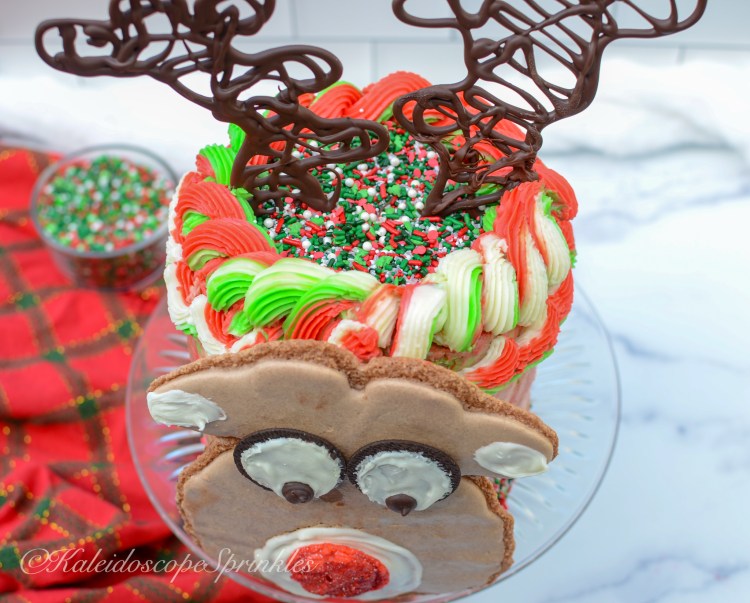
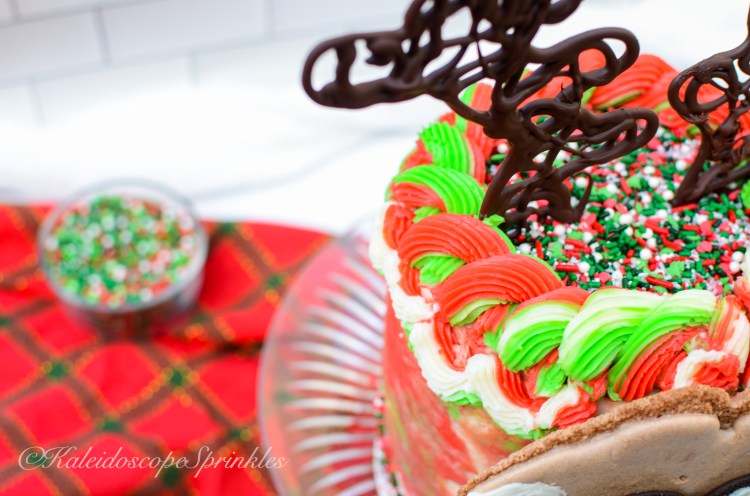
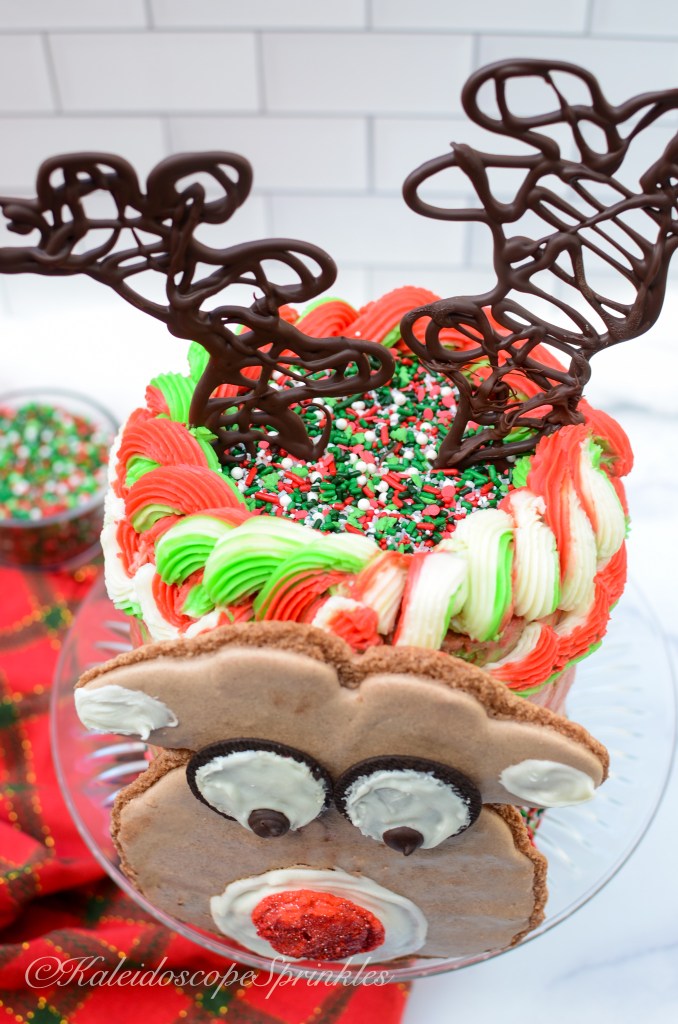
This year through one of my baking social media connections, I signed up to join my first baking collaboration. This baking collaboration is themed around Rudolph. I mean how fun is that?! As soon as I read the theme of this baking test the wheels inside my head starting turning full speed. I knew I was of course going to be using my sprinkle mixes and edible glitters but I wanted to make sure Rudolph was the true star. After a few weeks of pondering the idea finally came to me. I knew exactly how I was going to execute this friendly Rudolph baking competition. I went to work and here is what I came up.
The recipe for my Rudolph inspired chocolate mint cake and step by step decorating video is below.
Ingredients
Rudolph macarons (adapted from La Cuisine Paris French Macaron recipe)
90g ground almonds
75g egg whites
50g granulated sugar
135g confectioner’s sugar
1 ½ tbsp. Dutch cocoa powder
red food color gel
Chocolate Cake (adapted from Vintage Cakes “The Pink Cake” recipe)
Sift the ground almonds into a medium sized bowl. Measure the egg whites into a clean (non greasy) mixer bowl. Using the whisk attachment of a stand mixer, start whipping the egg whites on medium speed. Start slowly adding the granulated sugar one teaspoon at a time.
Gradually increase the speed, slowly add the confectioner’s sugar and continue to whisk the egg whites until they form a glossy stiff meringue and all the sugar is dissolved. Carefully fold the ground almonds into the meringue half at a time until combined. Be careful not to overmix.
Place a small portion of meringue into a small bowl and fold in red food coloring. With the remainder of the meringue fold in your cocoa powder. Put the mixture into a pastry bag. Put parchment paper on a baking sheet and form your Rudolph face and nose. Rack cookie sheets against the counter to remove air bubbles. Allow meringues to rest on the counter for approximately 15 minutes prior to placing them in the oven.
Bake meringues at 320F for approximately 12-15 minutes. Let cool on cooling rack completely.
While meringues are cooling increase oven temperature to 350F and make cakes. Grease, parchment paper and flour five, 6″ cake pans.
In a small sized bowl, place unsweetened chocolate and cocoa. Pour the boiling water over the chocolate and allow it to steep for one minute. Whisk the mixture together. Whisk in the Greek yogurt and vanilla. Set aside.
Whisk together flour, baking powder and salt in a separate medium sized bowl. Set aside.
Using a stand or hand mixer, cream butter and sugars together at medium-high speed until light and fluffy. Make sure to scrape the sides of the bowl down as you cream the ingredients together. Add oil into the mixture until combined and the batter is more fluffy.
Add eggs and egg yolks to the batter one at a time, adding the next one as soon as the previous one has disappeared into the batter. With the mixer on low speed, add the flour mixture in three parts, alternating with the chocolate mixture in two parts, beginning and ending with flour. Make sure to continue to scrap down the sides of the mixing bowl. Be careful not to overmix the batter.
Divide the batter equally into the five cake pans. Smooth the tops and tap the pans on the counter to remove air bubbles. Bake cakes in the oven for approximately 20-25 minutes.
Cool cakes completely in their pans on a cooling rack prior. Flip cakes out of the pans and leave on parchment paper.
Prepare buttercream according to directions. Add mint extract. Divide buttercream into 3 bowls and add the red and green food coloring to two of the bowls. Place frosting into piping bags. Melt semi sweet chocolate using double boiler. Place melted chocolate into piping bag and shape antlers onto parchment paper. Allow antlers to set in the refrigerator.
Frost cooled cakes with the mint buttercream. Decorate Rudolph with candy melts and Cosmic Shimmers. Add Rudolph face and sprinkle mix to cake. Top cake with sprinkles and chocolate antlers.